Clutch problems can cause serious trouble for owners of cars with a manual transmission. The VAZ 2107 is no exception. However, most faults can be quite easily fixed with your own hands.
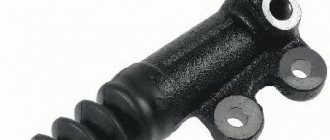
- Clutch slave cylinder VAZ 2107
RCS device - Location of the RCS
- Symptoms of a malfunction of the control center
- Main malfunctions of the RCS
- Repair kit for RCS
- Dismantling of the RCS
Video: repair of the VAZ 2107 clutch slave cylinder
How to inspect the clutch basket?
How can you tell if the basket is worn out? It’s very simple: the first sign of wear on this part is slippage, which occurs if the disk is not pressed tightly against the flywheel.
Here are step-by-step instructions for checking the basket for wear:
Put the car on the handbrake. Start the engine and engage gear 3 or higher. Lower the right pedal and press the gas. Pay attention to the car's reaction to such actions.
What do these or other options indicate?
It is considered normal if the car stalls as a result of such impacts. This means that the clutch and gearbox are fine.
Important If the engine continues to run, this should be a cause for concern. The basket is faulty because it does not allow the entire clutch to disengage completely.
It is necessary to replace not only the basket, but also the disk.
The following steps should be performed to determine a particular problem:
- Idle the engine.
- Press the right pedal all the way.
- Switch to first gear and move backwards.
If it is difficult to shift gears and strange sounds occur, it is concluded that the disk and flywheel are faulty.
The best time to repair and replace the clutch is the moment when the car is undergoing major repairs. If the power unit has already been removed, then repairing and changing the clutch will be much easier. If you follow the following plan of action, everyone will successfully cope with this job. Note that the described actions can be performed even in the garage.
So, the sequence is as follows:
- Remove the gearbox (gearbox). If there is no need to repair or replace it, you can safely disconnect the drive, battery and mass air flow sensor (mass air flow sensor). There is no need to drain the oil first.
- Unscrew the cable providing the transmission.
- Disconnect the starter.
- Loosen the fasteners on top of the box.
- Unscrew the elements of the speed sensor, as well as the electrical wiring harnesses.
- Slightly loosen the drive nut on the right, but unscrew it completely on the left.
- Unscrew the ball joint.
- Disconnect the engine protection.
- The torque rod must be unscrewed, and then the lower crankcase cover must be removed.
- Remove the linkage, first loosening the nut of the clamp, which helps control the gearbox.
- Unscrew the fasteners and bolts of the gearbox.
- Using a jack, lift the engine.
- Unscrew the box from the pillow and then remove it.
After the box is removed, the motorist can see the problem area and is able to perform some actions with it.
To replace the basket, you must first remove the retaining fasteners.
You need to pay attention to the petals: the basket should be replaced completely if it is significantly worn out
Before installing the new basket, you need to adjust the position of the gearbox input shaft so that the box can be easily put on in the future. Then a disc is installed in the flywheel.
After the position of the basket is corrected, it is necessary to tighten the bolts. This is done gradually: first 3-4 turns, and only then should it be fixed.
At the very end of the procedure, all that remains is to install the release bearing and shaft, which must be generously lubricated before installation.
All previously removed parts are installed back in the reverse order.
Preparing for repairs
Before putting the car in a pit and removing the box to replace the clutch, you need to visit the store and buy all the necessary spare parts:
- Clutch disc.
- Basket (drive disk).
- Release bearing.
- If necessary, clutch fork.
- If there is significant wear, the crown on the flywheel will also need to be replaced.
- Bolts securing the basket to the flywheel.
It is also important to have a good set of tools on hand, WD-40 penetrating lubricant, sometimes even a gas torch is necessary (if the bolts and nuts are very rusty).
It is advisable to carry out all the work in an inspection pit or overpass (it is unlikely that the average driver of a six will have a lift in the garage, so we do not mention it). If everything goes smoothly and the nuts unscrew well, you will complete all the work very quickly.
Place the car on the pit, fix it in one position by placing stops under the wheels. All work is divided into two stages: under the car and above it. Please note that there is no need to drain the oil, since if you dismantle it carefully, you will not spill a drop.
And don't forget about the alignment of the clutch disc. The price of a special device is quite high - about 500 rubles. but you can use a small piece of pipe without any problems, as long as the diameter is suitable.
How to adjust the clutch?
The clutch is adjusted by a special bolt with a lock nut, which is located at the end of the cable.
The pedal stroke is adjusted by turning the nut and should ultimately be 12-13cm. The increase or decrease in stroke is adjusted by screwing and unscrewing the nut from the tip.
To check whether the required distance at which the pedal is from the floor has been reached, it is recommended to press it several times and take a measurement. The adjustment continues until the desired distance is reached.
Clutch adjustment:
Tips and tricks
As the main advice when choosing this unit, you should mention the quality of materials when purchasing. The purchased parts must have the manufacturer's markings and series and batch numbers. Many enterprises have their own information resources where you can check the originality of a part by simply checking the batch numbers and the specific part.
Warning! Otherwise, the counterfeit unit has unstable quality and may fail at any time.
Also, in the process of replacing the VAZ 2104 clutch slave cylinder, it is necessary to strictly follow the sequence of actions and accurately calculate the tightening torque of the hoses and pipes from the fluid tank to the main part in order to avoid cracking of the rubber and plastic parts of the body.
Also, once every few thousand kilometers, it is necessary to carry out an inspection of the entire assembly, since the vast majority of cars of these models have significant mileage, the likelihood of unexpected breakdowns is quite high.
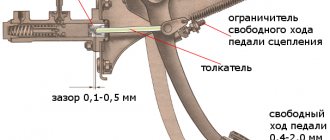
Adjusting the clutch pedal travel
Hydraulic adjustment occurs differently. The distance between the pusher rod and the release fork should not exceed 5mm.
To adjust the distance, follow these steps:
- Remove the spring from the bracket and fork.
- Adjust the distance between the rod and the release fork so that it is 0.5 cm. This distance can be adjusted by screwing and unscrewing.
Note! Before adjusting the clutch, you must read the official instructions, since the methods described may not be suitable for certain car models
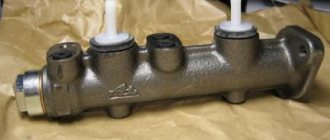
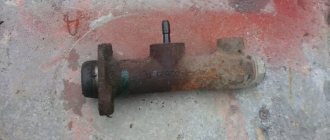
Repair and replacement of the clutch slave cylinder
When choosing a spare part to replace the clutch cylinder, you should pay attention to the material from which the part body is made. As noted earlier, such material can be cast iron, steel, aluminum or polymers
Today, many manufacturers offer aluminum and even polymer cylinders, but such parts are less reliable.
There are several types of clutch cylinder malfunctions that will require rod repair:
- leakage of working fluid through worn seals or connecting tubes with defects;
- presence of cracks in the cylinder body;
- broken working cylinder springs.
The rod consists of several components, each of which is subject to wear. Its parts - pusher, piston, cuffs, spring - experience high loads during operation, so there is a possibility that they may fail.
Symptoms of a faulty clutch cylinder:
- a decrease in the level of brake fluid in the cylinder reservoir and the appearance of spots under the car while parked;
- the pedal fails and the clutch works intermittently;
- There are problems with shifting gears.
Experts advise, first of all, to pay attention to the travel of the clutch pedal. If it runs too softly, this is not yet a reason for urgent repairs, but the operation of the cylinder should be diagnosed.
To check it, you need to bleed the clutch hydraulic drive. If there are air bubbles in the working fluid, you should understand the reasons for their appearance. As a rule, air gets inside the rods of the clutch slave and master cylinders due to depressurization of the sealing collars.
As noted earlier, repairing and replacing the clutch slave cylinder is not a very difficult task. This part is most often located on the gearbox housing.
First you need to unscrew the fastening bolts, disconnect the pusher from the fork and begin dismantling the hose that comes from the main circulation center.
Since there is working fluid in the master cylinder, the hose should be plugged (for this you can use a plug of the appropriate diameter). There is also another opinion - you need to disconnect the hose to completely drain the brake fluid (it is believed that this will help flush the clutch hydraulic system from dirt).
After dismantling, the clutch master cylinder must be disassembled and, if possible, repaired. If this part has a metal body, then it can be fixed in a vice, but if the part is plastic, then you need to be careful not to damage it.
After disconnecting the air valve, it is necessary to remove the outer cuff. After this, taking into account the design features of the cylinder, it is necessary to provide access to the rod and remove the retaining ring. After disassembling the part, you must ensure that there is no damage to the spring, rod or defects of the cylinder mirror.
All components must be washed with brake fluid. We noted earlier that kerosene, gasoline, motor oil or water cannot be used for this purpose (these liquids contribute to the swelling of rubber elements).
When assembling the cylinder, all seals and seals should be replaced with new ones.
Repair of the clutch master cylinder will not be possible if:
- body cracks;
- noticeable wear on the inner surface of the body, which appears as a result of defects in the rod.
In this case, you need to completely replace the faulty clutch cylinder with a new part.
After replacing the clutch master cylinder, do not forget to bleed the system.
The method for bleeding the hydraulic drive system after replacing the clutch slave cylinder does not differ from that described previously for the hydraulic clutch. At the same time, in some car arches (for example, on Fiats), the clutch system is back-pumped. To do this procedure yourself you need to prepare:
- a hose that fits tightly onto the exhaust valve;
- a large syringe, the diameter of the nozzle of which corresponds to the size of the hose;
- a wrench to remove the air release valve.
First, unscrew the cap of the reservoir with the working fluid and draw it into the syringe. You need to expel all the air balls from the syringe, and then connect its spout with a hose, the second end of which is connected to the release valve. After this, you need to unscrew the valve 2-3 turns, press the syringe and pump the brake fluid into the clutch cylinder. To prevent air from entering the system, you must first tighten the valve and only then remove the hose.
This sequence of actions must be performed several times until all the air is forced out of the hydraulic drive system into the tank. After this, you need to depress the clutch pedal about 10 times and, if necessary, adjust its travel height.
Clutches VAZ 2101
Gear shifting in a car transmission occurs through the operation of the clutch. The clutch mechanism consists of several elements that wear out during operation. For timely diagnosis of breakdowns, it will be useful for you to know their structure.
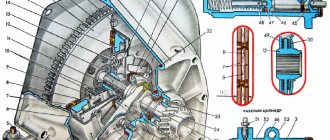
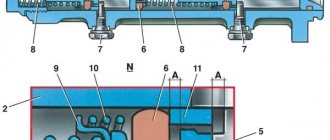
Rice. VAZ car clutch diagram
| 1 – locknut of the clutch release fork pusher;2 – clutch housing;3 – working cylinder of the hydraulic clutch release drive;4 – release spring of the clutch release fork;5 – valve cap for bleeding the hydraulic clutch release drive;6 – clutch diaphragm pressure spring;7 – friction linings of the driven disc;9 – driven clutch disc;10 – rivet-damper stop;11 – damper disc plates;12 – front sealed ball bearing of the gearbox input shaft;13 – driven disc hub;14 – damper spring;15 – pressure ( drive) clutch disc;16 – front cover of the clutch housing;17 – engine crankshaft flywheel;18 – flywheel ring gear;19 – bolt securing the casing to the flywheel;20 – primary (drive) shaft of the gearbox;21 – clutch release clutch thrust bearing ;22 – spring plate for fastening the thrust flange;23 – thrust flange of the pressure spring;24 – rear ball bearing of the gearbox input shaft;25 – drive gear of the gearbox input shaft;25 – clutch release clutch;26 – clutch release fork;27 – friction thrust flange ring; | 28 – fork ball joint;29 – fork retaining plate;30 – fork cover;31 – stepped rivet (9 pcs.) fastening the pressure spring support rings and thrust flange plates;32 – clutch cover;33 – clutch release fork pusher;34 – adjusting thrust nut; 35 – master cylinder plug; 36 – tube fitting socket for supplying fluid to the working cylinder; 37 – piston return spring; 38 – clutch release master cylinder; 39 – bypass hole; 40 – flexible hose fitting for supplying fluid from tank;41 – inlet (compensation) hole for filling the cylinder;42 – master cylinder piston;43 – piston o-ring;44 – clutch pedal pusher;45 – master cylinder pusher piston;46 – cuff seal channel;47 – piston cuff;48 – hole (0.2 mm) for air outlet; 49 – damper friction rings; 50 – damper friction disk spring; 51 – valve for bleeding the hydraulic clutch release; 52 – piston support plate; 53 – working cylinder piston; 54 – plug working cylinder with a socket for the fluid supply fitting to the working cylinder |
Why do you need to change the clutch?
Clutch disc VAZ 2101
To replace the clutch you will need to stock up on: A 13mm wrench, and in addition to all this you will also need to take two different types of screwdrivers (Flat and Phillips in this case), and you also need to stock up on a mandrel for centering the clutch disc which in a car store it costs literally 100 rubles! (You can see what this mandrel looks like, which is discussed in the article, just below in the section: “For beginners!”)
When should you change the clutch?
During operation, the clutch of any car wears out over time, and the first signs of a worn clutch that a car will show are:
- Increased noise that begins to appear very clearly when changing gears in the car.
- Jerks can also occur when starting a car, and they can also occur while driving when you depress the clutch pedal, then engage a gear, and then when you release the pedal, the car jerks forward slightly.
This mainly happens due to the damper springs that are installed on the driven disk, and in the photo below they are shown by arrows. These springs are needed so that the clutch disengages smoothly and thus does not cause discomfort when driving, and when these springs become unusable, when the clutch is disengaged, as mentioned earlier, a jerk occurs, which often has a very negative effect on the comfort of driving a car!
- In addition to all this, if the clutch malfunctions, the effect that the clutch “slips” may occur. This is when you are driving a car and at the same time you press the gas pedal, let’s say to the floor, and your car does not accelerate, but the engine speed increases sharply and even reaches the red zone, this effect is popularly called the clutch “Slipping”.
- And in conclusion, we note one more effect, called the “Leads” clutch. The first signs of this effect are as follows: let’s say you engage first gear and at this time the clutch pedal is still fully depressed, but even despite this the car starts to roll. This effect is called the “Leads” clutch.
Preparatory work
In order to replace the clutch on a VAZ 2107, you will need access to the gearbox and engine from below, so you need to use a special lift or a so-called inspection hole. Before starting work, be sure to remove the negative terminal from the battery and you can proceed.
First remove the air filter and unscrew the starter.
Now we can work on the gearbox on the VAZ 2107. We will need to dismantle its lever. We will not remove the box itself. Press it with a screwdriver and pull out the locking sleeve located in the groove of the lever rod. You can take it out, unscrew the bolts and dismantle the front floor.
Device location
To find the clutch slave cylinder on a VAZ classic, you need to look for it directly in the area where the gearbox is located. The device is attached with two bolts to the gearbox housing.
The mechanism can only be seen from below or in the very depths of the engine compartment on the driver’s side. Repair work related to dismantling and replacing the clutch slave cylinder can be carried out “from under the hood,” but it is much more convenient from an inspection hole or on an overpass. The video below shows the location of this unit. What function does this product perform and is it possible to do without it? We'll find out more about this later.
Features of operation
The operating principle is very simple. Below is a diagram where the slave cylinder is indicated by a green arrow.
According to this diagram, we can say that the RCS performs an important function, or rather, it activates the fork, which is connected to the clutch drum. The main element of the RCS, or rather the piston, is activated by the resulting fluid pressure coming from the main cylinder through the hose when the clutch pedal is pressed. The brake fluid pushes the piston, which in turn drives the fork, which acts on the drum, pushing the disc away from the flywheel. Many people wonder why brake fluid is used in the system? The reason is that brake fluid is incompressible, which is why it is used in such important systems as brakes and clutches.
When to replace the RCS
During the use of the unit, which happens very often, the product tends to fail. The main causes of breakdowns are chafing and wear of the cuffs, the appearance of cracks in them, which entails the leakage of liquid. Significant loss of fluid will cause the clutch system to malfunction. It is possible to repair a DCS that has become unusable, but it is easier and more efficient to replace it with a new one.
In order not to wait until the pressure in the clutch pedal disappears, you need to periodically inspect the unit. If there is a leak in the fuel fluid, it is necessary to immediately carry out the appropriate repairs on the VAZ 2107. Before carrying out repairs, you need to make sure that this particular element is faulty, since the main circulation system may also fail. The main signs of failure of the RCS are:
- decrease in the level of fuel fluid in the tank;
- visible brake fluid leaks from the device body or from under the rubber boot;
- “failures” of the clutch pedal, which can be periodic or constant;
- difficulty changing gears.
But most often the malfunction is determined by detecting a brake fluid leak.
Features of replacing the RCS
Replacing the VAZ 2107 clutch slave cylinder begins with the need to remove all fluid from the reservoir. Further actions are carried out in order:
First you need to loosen the fastening nut that connects the hose to the cylinder. There is no need to unscrew the nut completely, just loosen it at this stage. Using pliers, you need to remove the tension spring. After this, you should unclench the cotter pin and remove it from the tip of the pusher. Using a key set to “12”, you need to unscrew the two bolts that secure the product to the gearbox housing. After unscrewing the bolts, you can disconnect the bracket from the cylinder, which is intended to secure the spring. Hold the working cylinder body and remove it
During dismantling, pay attention to the pusher, which is located in the fork. After disconnecting the product from the crankcase, you can continue unscrewing the nut connecting the hose to the device. After unscrewing the nut, brake fluid will begin to flow out of the hose, so you should prepare a special container in advance.
After the device is dismantled, it should be replaced with a new one, since repairing it is irrational. The cost of the product is insignificant, so it is easier to replace it with a new one than to try to carry out repairs. Installation of the product is carried out in the reverse order of removal. After installation, it is necessary to carry out the system bleeding procedure. In conclusion, it should be recalled that regular car maintenance helps prevent various unforeseen consequences along the way, such as the “disappearance” of the clutch.
Technical parameters of the “seven” clutch: classification and parameters
VAZ models are equipped with a single-disc clutch with a central spring. Motorists interested in which clutch is best to install on a VAZ 2107 should take into account that its type depends on the power of the power unit. The units differ in the parameters of the pressure spring, casing and dimensions of the driven disk, and the entire set consists of three elements:
- Pressure disk.
- Slave disk.
- Release bearing.
Pressure plate
On VAZ classics, two types of such mechanisms are used:
- 2103 – for cars with engines up to 1.5 liters.
- 2121 – for cars with engines up to 1.7 liters.
Externally, they are almost identical, they can easily be confused - the diameter of the disk in both cases is 200 mm. However, there are still distinctive signs:
- On product 2121 there is a mark in the form of a six-millimeter hole in one of the slots in the diaphragm spring blade.
- The width of friction linings 2103 is 29 mm, and 2121 – 35 mm.
Driven disk
To decide which clutch is best to install on a VAZ 2107, it doesn’t hurt to know that a “classic” disc is quite easy to distinguish from a “front-wheel drive” one by the bends that partially cover the damper springs. Driven disks are available in two sizes:
- 200x140 – for engines up to 1.5 liters; There are two brands: 2103 and 2107, the latter has asbestos-free linings.
- 200x130 - according to the documentation, the disk is brand 2121 and is designed for the Niva, but installation on the “seven” is also possible. In addition to its size, it features a reinforced damper with reinforced diaphragm springs.
Another noticeable factor is that the 2121 driven disc has a larger number of rivets on the linings than its 2103 counterpart.
Release bearing
The part is supplied complete and has an additional name - release clutch. For “classics”, its marking also begins with a set of numbers 2101. The bearing is visually distinguished by the presence of wire brackets, which is familiar to car enthusiasts who have replaced the working cylinder on a Lada.
A set of clutch parts for Niva can be installed on any classic car. Such parts are designed to withstand heavy loads, and therefore will last longer. The only inconvenience is that the “Nivov” basket will require a lot of effort on the clutch pedal.
This is interesting: Injector for VAZ 21099 - all the features of the device
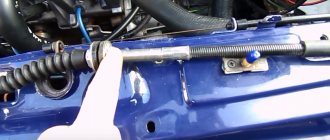
How to remove the clutch slave cylinder
Before you begin repairing the clutch cylinder, it will have to be removed from the vehicle. Here's what you need for this:
- pliers;
- set of spanners;
- set of socket heads;
- empty container for brake fluid;
- rags.
It is most convenient to remove the clutch cylinder in the inspection hole. As an option, an overpass is also suitable. If the driver has neither one nor the other, it will not be possible to remove the cylinder. The work is performed in the following order:
- The cylinder return spring is removed manually.
No tools required to remove the cylinder return spring - There is a small cotter pin at the end of the pusher.
It is carefully grabbed with pliers and pulled out. It is convenient to remove the cylinder cotter pin with small pliers - Now you should loosen the locknut on the slave cylinder hose.
This is done using a 17 mm open-end wrench. The locknut on the cylinder hose is loosened with a regular 17 mm open-end wrench. - The cylinder itself is attached to the crankcase with two 14 mm bolts.
They are unscrewed with a socket head. The cylinder fasteners are unscrewed using a 14 mm socket with a long knob - To remove the cylinder, you need to hold the hose end by the nut using a 17 mm wrench. With the second hand, the cylinder rotates and is disconnected from the hose.
Popular models and manufacturers
When choosing a non-original clutch slave cylinder, products from the following manufacturers are most often used:
- Sachs. The German company is a leading manufacturer of clutch cylinders for most automobile brands of foreign and domestic manufacturers. The popularity is due to the high quality of products and the use of innovative developments.
- Lukas. The largest manufacturer of auto parts, whose products meet all international quality standards. It produces brake cylinders for most automobile brands and repair kits for them.
- Fenox. Specializing in the production of clutch and brake cylinders for more than 25 years. Supplies products to most automakers.
- TRW. The company owns the Lukas brand and supplies brake system components, in particular brake cylinders, for all the world's largest automakers. The products are distinguished by their quality and extreme reliability.
- LUK. Official partner of major automakers in terms of designing new developments and systems. Supplies clutch cylinders to assembly lines of most of the world's major automakers.
This is interesting: Intake manifold gasket - how to replace it?
The main symptoms of a malfunction of the control center
The following symptoms indicate problems with the cylinder:
- the fluid level in the tank decreases, spots form under the car;
- the pedal begins to fail when pressed, the clutch does not work normally;
- There are difficulties with switching or turning off speeds; adjusting the drive does not help at all.
Masters recommend first of all paying attention to the operation of the pedal. Its soft movement or failure should immediately alert you, although this is not a reason for immediate repair of the hydraulic drive
But the reason for diagnostics is that you need to bleed the clutch. If there are air bubbles in the brake fluid, it is necessary to determine their “nature”. In 99 cases out of 100, air gets inside the RCS or GCS rods due to a violation of the tightness of the cuffs.
Lada 2105 engine crackles and does not start
adjust the terminal on the battery... both terminals... clean and tighten... check the ground on the body and on the engine...
The solenoid relay on the starter does not work. Here either the contacts in the ignition switch are worn out and there is a large voltage drop on them (the solenoid relay does not have enough voltage to operate normally), or the relay itself is not working properly. In the first case, you can directly apply +12 from the battery to the retractor with the ignition switch on.
As a last resort, you can start with a tow, but this is not recommended... You need to install an additional relay to relieve the contacts in the ignition switch
The designers incorporated several innovative technical solutions into the VAZ 2105 engine. Firstly, the valve does not bend when the transmission breaks, and secondly, rotation is transmitted to the timing camshaft by a toothed belt.
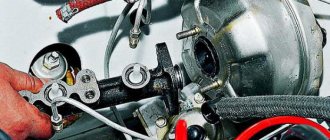
Hydraulic drive installation
Replacing a mechanism involves purchasing it in a retail network or via the Internet. Installation work is performed in the following sequence:
- The clutch master cylinder of the VAZ 2107 is put on the studs and pushed all the way to the base.
- The nuts are screwed onto the fasteners and tightened with a wrench to “13”.
- The union nut of the pipeline laid to the working hydraulic drive is screwed into the main cylinder.
- The rubber tube is connected to a plastic connecting element and secured with a clamp.
- The expansion tank is filled with brake fluid, which enters the main and slave cylinders of the clutch through tubes. Replacing the fluid in the system is mandatory due to wear products.
Upon completion of installation of parts, it is necessary to inspect and check the tightness of the nuts. Replacing the main or working clutch drive of a VAZ 2107 car ends with bleeding the system.
Choose the best
The last point in the question of which clutch is best to install on a VAZ 2107 car will be a short review of the most famous clutch kits for classic cars. Differences in brand products lie in reliability and behavior during operation.
Valeo
The well-known company from France is also known for its high-quality brake pads. Judging by the reviews of car owners, the clutch is characterized by soft operation with a clear engagement moment.
Many note the reliability of the new Valeo kits, which often operate without breakdowns for more than 150,000 km. The disadvantage is the high cost.
LuK
World famous German manufacturer of friction clutches. The products have always been distinguished by advanced design solutions. For example, the use of a torsional vibration damper on the pressure and driven discs significantly dampens vibrations, which contributes to comfort. LuK couplings are the best choice in terms of price-quality ratio, however, there are many fakes on sale, so you need to be careful when purchasing.
Kraft
The German brand has been known for 20 years, but recently products under this brand are increasingly being produced in Turkey, which, naturally, makes them cheaper. However, clutches have a lot of positive reviews, including:
- soft squeeze;
- no overheating during heavy duty operation;
- The flywheel has virtually no wear.
Sachs
The German manufacturer has extensive experience in the production of transmission parts. All coupling models are equipped with asbestos-free linings, and they provide:
- Optimal torque transmission.
- Resistant to increased loads.
- No maintenance required.
VIS
A domestic enterprise that supplies original products for Lada cars. The design of the coupling was developed by engineers from Tolyatti, but the components used in production are mainly imported. Most car owners, when deciding which clutch is best to install on the classic VAZ 2107, choose this manufacturer. The reason for this choice is the low price and acceptable quality.
Kraft tech
Turkish products licensed from the German company Kraft. The set is characterized by soft operation and is adapted to Russian working conditions. Some of the negative reviews relate to the fragility of the release bearing.
Trial
Another domestic manufacturer that guarantees up to two million load cycles for its disks without loss of performance properties. The average mileage of the kit parts is 80,000 km. Some motorists complain about cracks appearing on the driven disk in the area of the springs, causing them to fly out. However, it is worth noting that such problems arose after two or three years of operation.
The main symptoms of a malfunction of the control center
The following symptoms indicate problems with the cylinder:
- the fluid level in the tank decreases, spots form under the car;
- the pedal begins to fail when pressed, the clutch does not work normally;
- There are difficulties with switching or turning off speeds; adjusting the drive does not help at all.
Masters recommend first of all paying attention to the operation of the pedal. Its soft movement or failure should immediately alert you, although this is not a reason for immediate repair of the hydraulic drive. But the reason for diagnostics is that you need to bleed the clutch
If there are air bubbles in the brake fluid, it is necessary to determine their “nature”. In 99 cases out of 100, air gets inside the RCS or GCS rods due to a violation of the tightness of the cuffs.
But the reason for diagnostics is that you need to bleed the clutch. If there are air bubbles in the brake fluid, it is necessary to determine their “nature”. In 99 cases out of 100, air gets inside the RCS or GCS rods due to a violation of the tightness of the cuffs.
About the hydraulic drive device
To better understand what will be discussed, it is necessary to at least schematically imagine the design of such a drive. Let’s leave its purpose, structure, and role in the vehicle aside; in this case, the hydraulic drive itself is important.
Its implementation, as an example, as one of the possible options, can be seen in the figure below. This is enough to understand the structure and operation of the clutch drive, as well as to understand its role and significance in the vehicle.
- reservoir for filling brake fluid (1), which is used as a filler for the hydraulic drive;
- clutch master cylinder (2);
- hydraulic pipes (3,4,5) and hose (7);
- clutch slave cylinder (8);
- pedal (6) and return spring (9).
Clutch cylinder repair
To carry out the work, it is necessary to dismantle the entire assembly, first disconnecting all pipes and draining the liquid from the system. You should also prepare in advance a repair kit for the clutch master cylinder, which includes all parts subject to wear. Despite the fact that the design of the clutch master cylinder is not complicated, it is advisable to carry out the work by persons who have at least minimal experience in plumbing work. If the question of how to remove the clutch master cylinder is completely unclear, it is better to abandon repairs yourself and simply replace the cylinder with a new one.
After dismantling, the cylinder should be disassembled and its parts should be thoroughly washed with brake fluid (the use of solvents or gasoline is prohibited). It is also advisable to wash all parts from the repair kit that are planned to be used before installation.
After dismantling and completely disassembling the master cylinder into its component elements, you can begin to assess the technical condition of all parts. First of all, carefully inspect the piston, mirrors and sealing elements. Quite often, pockets of corrosion can be found on internal surfaces; they can be eliminated by careful treatment with fine-grained sandpaper. Multiple, extensive and accompanied by the presence of scuffing foci of corrosion indicate a violation of the gap between the piston and the cylinder walls.
It is recommended to replace all sealing elements with new ones, since when working under pressure, even minor defects inevitably lead to fluid leaks from the cylinder. It is not permissible to treat rubber seals with oils to facilitate assembly - this will lead to their swelling and the impossibility of normal functioning.
After all faults have been eliminated, the device can be reassembled in reverse disassembly sequence.
After replacing the clutch master cylinder or repairing it, the clutch system must be bled. This is a necessary measure to eliminate accumulated air bubbles, the presence of which is not allowed in the hydraulic drive system.
For bleeding, it is necessary to provide free access to the master cylinder, and for this it will be more convenient to drive some vehicle models into a pit or lift them on a hydraulic lift. New brake fluid is poured into the reservoir, a transparent tube is put on the fitting, the end of which is lowered into a container with the same working fluid. By rhythmically operating the clutch pedal, the hydraulic drive is pumped until the release of air through the fitting stops completely. After this, the fitting is tightened and the car is ready for use.
What you can do yourself
The simplest repair is possible without the help of specialists at a service station . The first thing to do is determine whether a belt is needed at all. First bleed the hydraulic drive. This is done simply: connect the hose to the bleeder screw, then lower its other end into a container filled with brake fluid. Afterwards, fill the small reservoir of the master cylinder with liquid. Once inside the cabin, press the pedal. Air bubbles will begin to appear. If the process of their formation does not end, repairs are necessary.
Remove and disassemble the cylinder. You will need a metalworking tool and a vice in which it will be convenient to disassemble the cylinder. The protective cap and pusher are removed, the piston is removed and with a little effort the lock ring located on the piston is removed. Next you need to remove the spring and seals. Now the following is done: the fitting is washed with brake fluid, as well as the holes in the cylinder. It is strictly forbidden to wash parts with gasoline, oil or anything else. The seals are replaced with new ones. If necessary, the spring can also be changed. If there is no damage to the cylinder mirror or the outer surface, the cylinder can be assembled and put in place.
In case of serious mechanical damage to the metal element, the working cylinder will have to be replaced. In theory, its repair is possible in this case, but the residual life can vary from several tens of thousands of kilometers to a couple of hundred. We do not recommend taking risks.
Procedure for bleeding the clutch
To bleed the clutch hydraulic drive you will need:
A rubber or plastic hose (tube) with a diameter suitable for tightly fitting the hose onto the drain fitting. Wrench (usually 8 by 10). A transparent vessel or reservoir for 200 ml of fresh liquid, for placing the second end of the hose into it. Fresh fluid to add to the clutch expansion tank. Important! Old contaminated fluid drained from the clutch hydraulic system cannot be poured back into the system. On some car brands, the drain fitting is located at the bottom, so you may need an inspection hole to get to it. To find out exactly where and how the clutch slave cylinder drain fitting is located in your car, study the “Operator's Manual”, in the “Clutch” section. It is advisable to wear rubber gloves, since brake fluid is considered toxic.. Important! In this case, it is necessary that the heavy object used not only prevents the pedal from returning back, but also exerts constant pressure on it, since when the fitting is unscrewed, the pedal will be pushed through and fall through.
Important! The pumping procedure is as follows:
Important! In this case, it is necessary that the heavy object used not only prevents the pedal from returning back, but also exerts constant pressure on it, since when the fitting is unscrewed, the pedal will be pushed through and fall through.
Important! The pumping procedure is as follows:
The first step is to check the fluid level in the clutch expansion tank. The tank must be filled completely, up to the neck. When inspecting the tank and adding fluid (if necessary), maintain cleanliness and prevent debris from entering the tank. Release the head of the working cylinder drain fitting from the protective cap and place a hose (tube) on it. The opposite end of the hose should be lowered into a container with fresh brake fluid
When air comes out of the hose into the liquid, air bubbles will be clearly visible. Important! During pumping, you cannot remove the second end of the hose from the liquid. Pump up pressure in the system using the clutch pedal. An assistant in the cabin must press the clutch pedal sharply and all the way 3-4 times
In this case, it is necessary that the pedal not only goes down to the stop, but also returns back to the stop. If the pedal “falls to the floor” and does not return to its original position on its own, you will have to return it with your hand or toe. The key here is to build up the pressure using maximum pedal travel. The interval between pressing the pedal should be approximately 2 seconds. Having pressed the pedal for the last time (the third or fourth), it must be left and held in the pressed position until it stops. While your partner holds the pedal all the way down, another person should unscrew the drain fitting of the working cylinder with the hose attached to it, about half a turn. After opening the drain fitting, old fluid from the working cylinder will begin to flow into the container with new brake fluid through the hose. With the old liquid leaving the cylinder, air will also come out, the presence of which can be judged by the air bubbles in the container with the new liquid. As the old contaminated fluid exits the clutch hydraulic system, the pedal pressed all the way by the second partner will begin to be pressed and lowered. You need to wait until the pedal is pressed all the way to the floor, and then immediately screw in (close) the drain fitting. The pedal cannot be released until the drain fitting is closed. Repeat the procedure of squeezing the pedal and opening/closing the fitting several more times until clean liquid without air begins to come out of the hose. If aired fluid continues to come out of the hose even after the system has been completely pumped and the fluid has been completely changed (approximately 1 liter), then you need to look for the reason why air is penetrating into the clutch hydraulic system. Important! During the pumping process, it is necessary to carefully monitor the liquid level in the expansion tank and not allow it to fall more than 35 mm from the edge of the neck. During the pumping process, the old fluid will drain into a container and leave the hydraulic system. Accordingly, the level in the tank will decrease, and if during the pumping process the liquid completely leaves the tank, then air will again enter the hydraulic system. Then you will not only have to start all over again, but also additionally waste new liquid, since the new liquid that has already been poured will merge into the container and mix there with the old one, and it will no longer be possible to pour it back. After pumping and obtaining the desired result, the fitting must be screwed in well, remove the hose and put a protective cap on the head of the fitting.
What part is used for pumping and where is this part installed?
Bleeding is carried out only through a fitting that is specifically needed for bleeding the clutch on a car, and this fitting is located on the clutch slave cylinder, which in turn can be very easily seen by looking under the bottom of the car, or by looking from above into the engine compartment.
When should you bleed your clutch?
Pumping is carried out only in cases where. When you press the clutch pedal all the way, the clutch is not completely disengaged, for example, you pressed the pedal, engaged first gear and before you even had time to take your foot off the pedal, the car is already moving, this is what is called not completely disengaging the clutch, as people say that the clutch is moving. And also if there was a repair, replacement of cylinders.
Why do you bleed the clutch? In order to remove air from the cylinders, or more correctly, to remove air from the brake fluid, otherwise if there is air in the brake fluid that is in the cylinders, then the clutch will not work as it should, as was noted earlier, it will not turn off completely, and also the pedal travel can be very light, therefore, after detecting these malfunctions, it is recommended to bleed the system as soon as possible, because it is dangerous to drive with a clutch that is not fully functional, since during emergency braking, the car itself will also roll into the before, as the clutch will not disengage completely!
How to bleed the clutch on a VAZ 2101-VAZ 2107?
Always remember that you need to bleed the clutch together in a car, because it’s difficult to do this without the help of an outsider, but there is still a way out, so if you are going to bleed the clutch alone, then first read the entire article to at least visually understand how it’s done , and then run the video clip located at the very end of the article, and this video shows a visual process of bleeding the clutch, performed by just one person!
And it’s best to do all the work in a pit, because it’s much simpler and more convenient, but if it’s not there, then you can do the work without it, it’ll just be a little problematic!
1) At the very beginning of the operation, pour new brake fluid into the clutch reservoir, and then close the reservoir with a plug.
2) Next, take a small hose in your hands and put one end of it on the fitting of the working cylinder.
3) Then ask an assistant to sit in the car and press the clutch pedal about 5 times, for the last time let him leave the pedal fully depressed.
Ask an assistant to press the clutch pedal sharply and at intervals of 3 seconds!
4) Meanwhile, while the assistant holds the pedal down, prepare an empty container into which you will drain the brake fluid with bubbles, and then lower the other end of the hose into this container.
5) Then loosen the fitting with a wrench and at this time brake fluid with bubbles will begin to drain into the container you are holding.
As you already understood and this was already mentioned earlier, bubbles are air that should never be present in the brake fluid, otherwise the system will begin to malfunction, in general, we continue!
6) Now wait until the clutch reservoir containing the brake fluid is almost completely empty and then immediately tighten the bleeder fitting tightly, and let the assistant take his foot off the pedal.
Be sure to pay attention to the words: “It will not empty almost completely,” so you don’t have to wait until all the fluid comes out of the reservoir; in no case should it fall less than 15 mm, otherwise you will be bleeding the clutch for a very long time and most likely the system it won’t even be pumped if you do this, because when the fluid is completely emptied from the tank, during this time air begins to enter the system, and therefore the clutch hydraulic drive will depressurize again, which will lead to constant pumping!
7) Now, as you already understand, when the level reaches almost to the very bottom, then stop the bleeding operation by screwing in the bleeder fitting and the assistant removing his foot from the pedal, and then again add liquid to the tank and repeat the entire bleeding operation again.
When is clutch bleeding required?
Bleeding the clutch hydraulic drive may be necessary in the following cases:
- Scheduled replacement of old fluid with new one.
Any liquid loses its properties over time and requires replacement. For brake fluid, which is also used in the clutch hydraulic system, the shelf life (from the date of manufacture), even when unopened, can be 1 year in plastic containers and 2 years in metal ones. That is, the working fluid can still lose its properties regardless of whether it was used or not. The recommendations should be followed when it comes to replacing the working fluid in the clutch. - Clutch system repair.
Like any mechanism, the clutch is subject to breakdowns and wear during operation, as a result of which it may require repairs (replacement of cuffs, seals, repair or replacement of the cylinder, elimination of leaks in the line, etc.). And as a result of repairs, the hydraulic system depressurizes with the leakage of working fluid or the entry of air into it. - Air entering the working fluid.
Air entering the line with the clutch fluid can occur both during clutch repair and fluid replacement, and due to air leaks through micro-holes in the hoses, through loose connections, worn rubber seals and cuffs in the master and working cylinders.
How quickly air gets back into the fluid will depend on the severity of the problem.
Selecting a replacement part
To replace the master cylinder, it is better to purchase the original. On most Ford Focus 2 cylinders the part number is 3M517A543AG. Also on cars there are parts with catalog numbers:
- 1476806;
- 1232971;
- 1539937;
- 1224067.
The original GCS from Mazda is also suitable for Focus 2. The part has article number BP4K41400E.
The original GVC for the Ford Focus is manufactured by FTE. The direct analogue comes with catalog number KG190089.4.39. Other worthy alternatives to the original are presented in the table below.
Table - Analogues of the native GCS for Focus
| Manufacturer | Article number |
| Febi | 34994 |
| Swag | 50934994 |
| Brembo | C24010 |
| Bosch | 0986486150 |
| Febest | 2181CB4 |
| BSG | 30425011 |
| Metelli | 550089 |
| ABS | 51226 |
| Sachs | 6284600627 |