- home
- Car electrics
- …
Well, not so long ago I wrote an article about checking the battery with a load fork , actually this happens for two reasons: when the battery is already dying and needs to be checked, and when the battery is new, it also needs to be tested before purchasing. But is it always the battery? Why might it suddenly fail? It’s one thing if it’s winter and it’s really difficult for him to work, but another thing if it’s summer and he’s not “purr-murr” at all. AND even on the instrument panel, the battery sensor begins to blink occasionally, or is constantly on! In such situations, you should not run headlong for a new battery; first you need to establish the reason why it failed, because in 50% of cases it can be the generator. Moreover, the check is quite easy to do without removing it from the car, let’s read more...
Indeed, guys, I have a lot of friends who first ran for a new battery, but later it was discharged to zero. The point is that before purchasing, you MUST check the generator! After all, think for yourself, if it does not recharge the battery (or there is no charge at all), then it will be discharged to zero after a day or two of use, I will say more, it is easy to bring it to a deep discharge , which is very bad even for a new battery, you will lose about 10 at once % capacity, DO YOU NEED IT? Therefore, I repeat once again - CHECKING THE GENERATOR IS MANDATORY
Why does the generator fail?
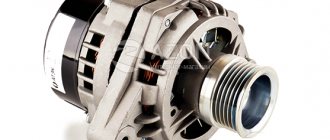
The generator itself has a simple structure; if you want, it’s a regular electric motor (only made to allow for large current generation), try to spin a regular electric motor and attach a light bulb or LED to it, it will start to light up - and there you have it, an elementary current generator.
Someday I will have an article in which I will tell you what the generator consists of. BUT today it is simple and exaggerated - this is the rotor (moving part), stator (fixed part), brush assembly, relay regulator , and of course the housing in which the whole thing is located.
And now the actual breakdowns.
- The bearings are jammed. This is a fairly common problem with already worn-out generators, the rotor in the housing spins on bearings, from time and moisture (dirt), they wear out and simply jam or wedge. If there is a wedge, then this is one thing - the rod stops rotating. But if wedging occurs, it is difficult to notice; the rod may or may not rotate. In any case, with such symptoms, the belt that turns the generator from the engine is more likely to break. THIS IS THE FIRST CALL.
- The winding on the stator or rotor has burned out. It is there in any case and most likely will be on the stator, so - also from moisture (salt on the roads), it can be corroded and it will simply short out or simply burn out, since copper wires are used there. Accordingly, current generation will stop.
- Failure of the brush assembly. This is also very common, brushes are graphite (often square) rods that run along the stator tracks. So, from time to time they simply wear out and need to be replaced.
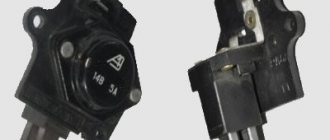
- Failure of the regulator relay. This relay prevents the generator from recharging the battery, bringing the voltage and current within the desired range. Often it also fails and the battery does not charge at all! Need to watch.
In general, for these 4 main reasons, the generator may not work, so it must be checked before purchasing a new battery. It's likely that this is what you're dealing with.
Multimeter - what is it
A multimeter is a measuring device used to measure resistance, current or voltage. Also, using such a device you can check the wiring for breaks. Each of these measurements involves the use of separate measuring instruments, such as a voltmeter, ammeter or ohmmeter. Therefore, a multimeter is considered a universal tool (mulmeter = voltmeter + ammeter + ohmmeter). In practice, analog and digital multimeters are used.
What is a multimeter
Analog
This multimeter is equipped with a special hand, like on a watch, by the movement of which the measurements are read. The analog multimeter is also equipped with a measuring scale with resistance, current and voltage values. The device is inexpensive, so it is very popular. The disadvantages of an analog multimeter include measurement errors (this mainly applies to products made in China).
Analog multimeter
Digital
Unlike an analog multimeter, a digital multimeter has an LCD or LED screen that displays data. These devices are easier to use and also have high accuracy, which cannot be said about cheaper analogues.
Digital multimeter
Car tips
Actually, I already told you about them from above; if the generator refuses to work, then it is easy to notice even inside the cabin.
- All modern cars will be signaled by a warning lamp - “red battery” on the instrument panel. If it lights up or even blinks, then there is nothing good about it, you need to react immediately, otherwise a discharge is just around the corner.
- Weak glow from all instruments. The “warning lamp” may burn out, but if you notice that the instruments begin to glow dimly, this means that the car is running on the battery, and not on the generator. Again you need to check.
- Belt break. If you crawl under the hood and there you see a break in the belt that spins the generator, then you MUST CHECK THE OPERATION! Otherwise, again, you can kill your battery.
These are all obvious malfunctions, but it happens that the battery is dead and everything seems to be fine, but something inside is “gnawing” - maybe it’s the generator? How to check easily and quickly on a car without removing it? Question? And everything is quite easy here
General recommendations and nuances
It often happens that the generator stops functioning only when the engine is warm. This phenomenon is due to the natural expansion of the metal with increasing temperature or a change in the properties of semiconductors (diodes) for the same reason. In this case, you should first check the functionality of the generator on a warm car, and if this does not bring results, then dismantle the device and check it after heating it with a hair dryer. In conclusion, it is worth noting that independent replacement of generator components such as stator or rotor windings and bearings in domestic conditions is advisable only if you have the appropriate equipment, tools, and experience. If it is not there, then if the battery is not charging, limit yourself to trying to replace the relay-regulator combined with the brush assembly. To do this, you don’t have to buy a new device: you can install a known good one and evaluate the result.
Check without removing from the car
There are two 100% ways that I personally recommend to you.
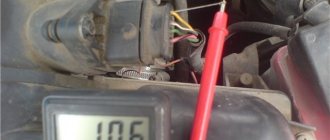
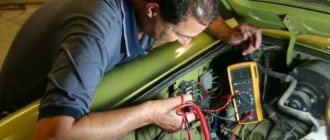
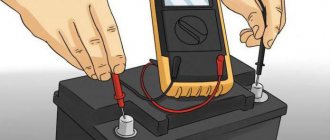
1) Check with a multimeter . Of course, not everyone has it, but in fairness it’s worth noting that this is a fairly common device and let’s say your father, neighbor, friend will have it “anyway.” To begin with, we measure with the engine not running, at the battery terminals, the normal voltage should be about 12.5 - 12.7 V, ideally.
We start the car, do not accelerate, and do not turn on any electrical appliances - with the engine running, we measure the voltage, it should be within 13.8 - 14.5 Volts.
However, on modern cars, where a lot of electronics are crammed, manufacturers assure that 14.8 Volts IS ALSO NORMAL. More on this below. Next, we connect the load - headlights, heater, heated rear window, foglights, radio, after that the voltage should drop a little - but not lower than 13.7 - 14.0V. If it is lower, say 12.8 - 13V, then the generator is not working, you need to check it.
Let's summarize a little:
Normal battery voltage is 12.5 - 12.7V
After starting the car - 13.8 - 14.5V, on some modern cars - 14.8V
After turning on the maximum load, it should be - 13.7 - 13.8 V
If the voltage is below 13V, urgently CHECK THE GENERATOR
2) The old grandfather's method . You can check this on almost all machines, and this method works 100%. But everything needs to be done very carefully. So - we start the engine, turn on a small load (for example, headlights or heated rear window). And on a working engine, we need to remove the negative terminal from the battery, everything is unscrewed with a key to “10”. We remove it and put it to the side, you can simply lift it above the terminal.
If the car continues to work confidently, the headlights have not dimmed, then your generator is 100% working. If the car stalls immediately, it means that the generator is 100% not working and it urgently needs to be looked at. So I tested it on a VAZ 2101 and now it works on my AVEO.
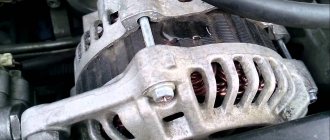
Belt tension
Make sure that the VAZ-2115 alternator belt is installed correctly. If a whistle appears when you turn on the light, this indicates that the tension is insufficient.
To get rid of this problem, you need to follow these steps:
- Using a 17mm wrench, unscrew the nut that secures the generator to the top bar.
- Place the mounting blade between the generator housing and the engine block.
- Pull the blade towards the radiator, increasing the tension.
- Tighten the nut after tensioning the belt.
If the belt tension is insufficient, the charge control lamp on the dashboard will dimly glow when the engine is running. It also happens that the lamp either lights up or goes out. Check the condition of the wiring, brushes and voltage regulator.
Battery overcharge
However, often it is not “undercharging” and “overcharging”. The electrolyte from the battery boils away and the battery also fails; there is nothing good about this either.
The first sign will be white streaks on the top of the battery, which means the electrolyte simply boils and evaporates. That is, the battery is charged, but the generator still “craps” charging it. The relay regulator has most likely failed here.
The check here is also elementary - you need to connect a multimeter or tester (whatever they call it) with the car running, and look at the charge. If it greatly exceeds 14.5 - 14.8 V, but is within the range of 15 - 15.2 V, it means that it is overcharging. We urgently change the relay-regulator, otherwise you will constantly boil your battery, ALSO NOTHING GOOD. It’s trivial that the plates may crumble.
Now let's watch the video version.
That’s all, he told me, exactly the methods without removing it from the car, and of course give it to a good auto electrician for repairs.
This is where I end, sincerely yours, AUTOBLOGGER.
Similar news
- Why does the alternator belt whistle? When cold or under load. ...
- Generator overrunning clutch. What is it and what is it for? Important...
- Engine chip tuning. Advantages and disadvantages. Is it worth doing at all? ...
Add a comment Cancel reply
REASONS FOR CHANGING BRUSHES
- Inexplicable chaotic shutdown of various electrical equipment in the car.
- A noticeable decrease in the brightness of headlights and other lamps both inside the car and on the body.
- Battery that discharges too quickly and problems with voltage levels.
These are the readings given by the on-board engine when the engine is running. We begin to treat the patient.
(To begin with, of course, disconnect the positive terminal from the battery, so as not to cause a short circuit and fire.) Next, unscrew the positive wire on the generator
What kind of lighting do you prefer?
Built-in Chandelier
We begin to dismantle the protective casing of the generator, under which the cause of our illness is located (brush assembly)
Unscrew the two bolts and disconnect the wiring going to the brushes.
This is, in fact, the reason for the lack of charging, or rather, the brushes have run out.
For comparison, old and new brushes. (how long should the brushes be)
Be sure to check the stem at anchor. (the place where the brushes come into contact with the generator shaft)
In my case, I need to grind the anchor... the offset is quite large. But to do this you need to remove the generator. Unfortunately, there is simply no time or opportunity for this, since it needs to be clamped into a lathe. so I’ll install the brushes like this (knowing in advance that they won’t last for a long time) ASSEMBLY IN THE REVERSE ORDER!
How to remove, disassemble the generator and troubleshoot problems yourself
Work order:
- We disconnect the negative terminal from the battery, thereby de-energizing the car.
- Unscrew the nut from the contact screw and disconnect the power wire.
- Unscrew the belt tensioner mounting screw.
- Unscrew the two mounting screws of the tension frame.
- We treat all connections with WD-40.
- Completely unscrew the lower and upper fasteners. Remove the pin from below.
- We remove the generator and begin disassembling it.
- Unscrew the bolts securing the generator cover.
- Next, carefully unscrew the bolts securing the capacitor and phase winding to the back cover of the generator. If necessary, disconnect the capacitor from the rectifier.
- Unscrew four more bolts and remove the back cover with the stator and rotor.
- Clamp the rotor in a vice and completely disassemble it by unscrewing the nuts and removing the pulley.
- Replace all failed elements - diode bridge, capacitor, bearings, voltage regulator and brushes.
- After replacing faulty elements, reassemble the unit in the reverse order.
What does extraneous noise indicate when the generator is operating, possible malfunctions and how to eliminate them
It is not uncommon that after starting the internal combustion engine, drivers notice noise uncharacteristic of the operation of the mechanism, which may be due to:
- Short circuit on valves. In this case, it is necessary to change the rectifier unit.
- Damage to bearing elements. They cannot be restored, so the bearings are replaced.
- Short to ground of the stator winding. To eliminate the problem, replace the stator.