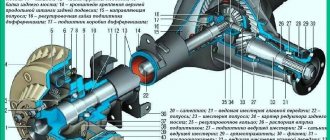
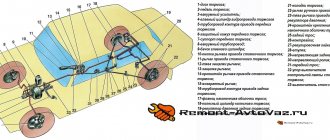
The rear axle of a VAZ passenger car (Figure 1) is made in the form of a solid beam 7 with a developed central part of a ring shape. The bridge beam is welded from two stamped steel halves. On one side, a cover 12 is welded to the middle part of the bridge beam, in which there is an oil filler hole with a threaded plug, and on the other side, the housing 16 of the main gear and differential is bolted.
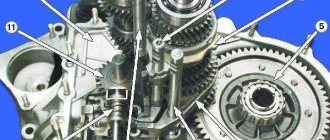
Figure 1 — Rear drive axle of VAZ passenger cars:
a - general view; b, c - diagrams of the main gear and differential; 1 — brake drum; 2, 17 — rings; 3, 11, 19 — bearings; 4, 21 - flanges; 5, 20 — cuffs; 6 - cup; 7 - beam; 8, 26 — brackets; 9 — axle shaft; 10, 31 - nuts; 12 - cover; 13 — satellite; 14, 15, 22 — gears; 16 - crankcase; 18 — bushing; 23 - axis; 24 — washer; 25 — body; 27— plate; 28 — shield; 29 - bolt; 30 - cap; 32 - window
Forged steel flanges 4 are welded at both ends of the beam for attaching brake shields 28 brake mechanisms. Support cups 6 of rear suspension springs and brackets 8 and 26 for fastening suspension parts are also welded to the rear axle beam.
The rear axle houses the main gear, differential and axle shafts. Transmission oil is poured into the rear axle . The internal cavity of the bridge communicates with the atmosphere through a breather, which eliminates the increase in pressure inside the bridge and prevents water from entering inside the bridge when overcoming water obstacles.
main gear
The car uses a gear main gear , single, hypoid. final drive ratio is 4.3 .
The final drive has one pair of bevel gears with a spiral tooth. The gear axes do not intersect, but intersect and lie at a certain distance (the axis of the drive gear is lower than the axis of the driven gear), i.e. have a hypoid shift. Thanks to the hypoid displacement , the height of the driveline and the body floor is reduced, as a result of which the vehicle's comfort increases, its center of gravity is slightly reduced and stability is increased. In addition, the hypoid final drive offers increased strength and durability, as well as smooth gear engagement and quiet operation.
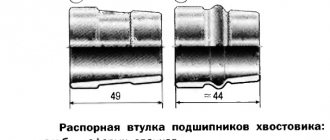
The axis of the drive gear 22 is shifted downward by 31.75 mm relative to the axis of the driven gear 14. The drive gear 22, manufactured together with the shaft on which the flange 21 is attached, is installed in the crankcase 16 on two tapered roller bearings 19, sealed by a cuff 20. Between the bearings there is spacer sleeve 18, ensuring correct tightening of the bearings. The driven gear 14 is bolted to the differential housing 25. The correct position of the drive gear relative to the driven gear is ensured by the adjusting ring 17.
Differential
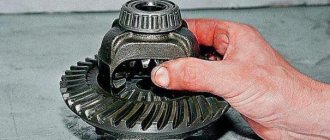
The car uses a bevel cross-axle differential , symmetrical, two-satellite, low friction. It distributes torque equally between the driving wheels of the car.
housing 25 is installed in bearings 11. The tightening of the bearings and the engagement of the teeth of the drive 22 and driven 14 gears of the main gear are adjusted by adjusting nuts 10. An axis 23 with two satellites 13 is fixed inside the differential housing. The satellites are in constant mesh with the gears 15 of the axle shafts, which are connected to splined ends of the axle shafts 9 and have support washers 24. All differential gears are made of straight teeth .
Half shafts
The vehicle uses semi-balanced axle shafts . They transmit torque and perceive bending moments in the vertical and horizontal planes.
The axle shaft 9 is made in the form of a solid shaft. The inner end of the axle shaft has splines, and the outer end has a flange. The axle shaft is connected with the inner end to gear 15 located in the differential housing 25. The outer end of the axle shaft is installed in bearing 3, which is placed in flange 4 of the bridge beam and sealed with a cuff. drum to the axle flange with bolts 29 and wheel and tire nuts 31, as well as a decorative cap 30. The axle shaft is held from displacement by a special plate 27 that secures the bearing 3. The plate, together with the brake shield 28, is attached to the flange 4 of the bridge beam.
Absolutely all representatives of the domestic “classics” have rear-wheel drive. No matter what anyone says, it has a number of advantages regarding handling, acceleration speed and even safety. However, these advantages will be useful to the driver only if the rear axle is fully operational, because even the most minor breakdown of one of its many parts can cause a malfunction of the entire mechanism.
Operating principle of the rear axle gearbox
Despite a significant number of car models in which the leading wheel is rear-wheel drive, the gearbox used in the rear axle design always, with rare exceptions, looks almost the same. Here it is worth remembering the definition, according to which a gearbox is a device that changes the rotation speed when transmitting force from one device to another . When the rotation speed changes, its magnitude and direction may change.
It is precisely this principle of operation that is implemented by the gearbox used in the design of the rear axle of almost any vehicle.
Rear axle gearbox design
The design of such a unit must be considered together with other elements included in its composition.
What the gearbox consists of and the principle of its operation is clear from the figure below. It includes:
- final drive (GP);
- cross-axle differential.
The power from the internal combustion engine, or, to be absolutely precise, from the gearbox, goes through drive gear 3 to driven gear 2. This pair of gears is called the main gear, and it changes the magnitude of the torque and the direction of its transmission.
The driven gear is connected to the axle shafts, through which power from the engine is supplied to the wheels. The cross-axle differential allows it to be distributed between different axle shafts, and gives them the opportunity to move at different speeds when changing direction.
A similar construction principle is implemented in many rear-wheel drive cars; VAZ cars, such models as 2106, 2107, Gazelle, are no exception. This device has shown its reliability and ability to work in the most difficult conditions.
What could the rear axle gearbox be like?
If you look closely at the above figure, you will notice that the drive and driven gears of the GP look somewhat unusual, their teeth are located at an angle, but not straight, relative to each other. This is due to the fact that the so-called hypoid transmission is used. Its peculiarity is the lower load per tooth, quietness and smooth operation. It allows you to increase the reliability of the gearbox used in the design of the rear axle, including those used on VAZ cars, such as models 2106, 2107, Gazelle and other similar cars manufactured using such a mechanism.
However, this is not the only option for implementing a GP, which successfully works as a gearbox in various rear axle designs. Such a device can be made using such gears as:
However, this possibility often remains theoretical or is applied to individual vehicle models. The gearbox, including for the VAZ family of models 2106,2107, as well as other passenger cars, is most often made using a hypoid gear.
Article: 21010-2401050-00, additional articles: 21010240105001, 2101-2401050-01
Order code: 003040
- You may need
- show more
- Passenger cars / VAZ / VAZ-21011 drawing
- » href=»/catalog/vaz-3/legkovye_avtomobili-30/vaz_2101-3/most_zadniiy_i_poluosi-133/#part3026″>Crankcase breatherRear axle / Rear axle and axle shafts
- Passenger cars / VAZ / VAZ-21031 drawing
- » href=»/catalog/vaz-3/legkovye_avtomobili-30/vaz_2103-106/most_zadniiy_i_poluosi-103/#part11161″>Crankcase breatherRear axle / Rear axle and axle shafts
- Passenger cars / VAZ / VAZ-21051 drawing
- » href=»/catalog/vaz-3/legkovye_avtomobili-30/vaz_2105-6/most_zadniiy_i_poluosi-108/#part17696″>Crankcase breatherRear axle / Rear axle and axle shafts
- Passenger cars / VAZ / VAZ-21071 drawing
- » href=»/catalog/vaz-3/legkovye_avtomobili-30/vaz_2107-8/most_zadniiy_i_poluosi-154/#part25092″>Crankcase breatherRear axle / Rear axle and axle shafts
- Passenger cars / VAZ / VAZ-21211 drawing
- » href=»/catalog/vaz-3/legkovye_avtomobili-30/vaz_2121-13/most_zadniiy_i_poluosi-108/#part59721″>Crankcase breatherRear axle / Rear axle and axle shafts
- Passenger cars / VAZ / VAZ-21231 drawing
- » href=»/catalog/vaz-3/legkovye_avtomobili-30/vaz_2123-315/most_zadniiy_i_poluosi-141/#part978114″>Crankcase breather Rear axle / Rear axle and axle shafts
- Passenger cars / VAZ / VAZ-21213-214i1 drawing
- » href=»/catalog/vaz-3/legkovye_avtomobili-30/vaz_21213_214i-1240/most_zadniiy_i_poluosi-202/#part2990099″>Crankcase breather Rear axle / Rear axle and axle shafts
- Passenger cars / Chevrolet / Chevrolet Niva 1.71 drawing
- » href=»/catalog/chevrolet-125/legkovye_avtomobili-30/chevrolet_niva_1_7-1233/most_zadniiy_i_poluosi-170/#part2974637″>BreatherAxles / Rear axle and axle shafts
- Passenger cars / VAZ / Lada 4×4 Urban1 drawing
- » href=»/catalog/vaz-3/legkovye_avtomobili-30/lada_4x4_urban-1885/b530__most_zadniiy_i_poluosi-134/#part4207496″>BreatherBridges / B530. Rear axle and axle shafts
- Passenger cars / VAZ / VAZ-21021 drawing
- » href=»/catalog/vaz-3/legkovye_avtomobili-30/vaz_2102-4/most_zadniiy_i_poluosi-133/#part7510″>Crankcase breatherRear axle / Rear axle and axle shafts
- Passenger cars / VAZ / VAZ-21041 drawing
- » href=»/catalog/vaz-3/legkovye_avtomobili-30/vaz_2104-5/most_zadniiy_i_poluosi-108/#part14590″>Crankcase breatherRear axle / Rear axle and axle shafts
- Passenger cars / VAZ / VAZ-21061 drawing
- » href=»/catalog/vaz-3/legkovye_avtomobili-30/vaz_2106-7/most_zadniiy_i_poluosi-113/#part20827″>Crankcase breatherRear axle / Rear axle and axle shafts
- Passenger cars / VAZ / VAZ-2120 “Nadezhda”1 drawing
- » href=»/catalog/vaz-3/legkovye_avtomobili-30/vaz_2120__nadejda_-245/most_zadniiy_i_poluosi-119/#part56662″>Crankcase breatherRear axle / Rear axle and axle shafts
- Passenger cars / VAZ / VAZ-21311 drawing
- » href=»/catalog/vaz-3/legkovye_avtomobili-30/vaz_2131-73/most_zadniiy_i_poluosi-195/#part64595″>Crankcase breatherRear axle / Rear axle and axle shafts
- Passenger cars / VAZ / VAZ-212131 drawing
- » href=»/catalog/vaz-3/legkovye_avtomobili-30/vaz_21213-731/most_zadniiy_i_poluosi-148/#part2010735″>Crankcase breather Rear axle / Rear axle and axle shafts
- Passenger cars / VAZ / LADA 4×4 M1 drawing
- » href=»/catalog/vaz-3/legkovye_avtomobili-30/lada_4x4_m-1456/most_zadniiy_i_poluosi-148/#part3241323″>Breather Rear bridge / Rear bridge and axle shafts
- Passenger cars / VAZ / LADA 4×41 drawing
- » href=»/catalog/vaz-3/legkovye_avtomobili-30/lada_4x4-1887/b530__most_zadniiy_i_poluosi-154/#part4214785″>BreatherBridges / B530. Rear axle and axle shafts
- Special equipment / Geomash / BBU-000 “Openok”1 drawing
- » href=»/catalog/geomash-114/spectehnika-42/bbu_000__openok_-1229/vrashatel-16/#part2966644″>Breather 2101-2401050-01Block drilling rig BBU / Rotator
There are no reviews for this product yet.
Today, the next article in the series “Crystal VAZs or typical breakdowns of domestic cars” is dedicated to the “classics”: VAZ-2101, 2103, 2104, 2104, 2105, 2106 and 2107. These cars have been driving along our roads for decades and, despite Despite all the shortcomings that we will talk about, their popularity is still high.
The series of articles 'Crystal VAZs or typical breakdowns of domestic cars' introduces car enthusiasts to typical faults that arise when operating AvtoVAZ cars. This article is dedicated to the favorite of hunters and fishermen - “Niva”.
The rear axle is a fairly reliable unit of the VAZ 2107, but despite its massive appearance, the mechanism requires regular maintenance, without which it can fail prematurely. This unit can serve for quite a long time if it is operated correctly and carefully, if possible avoiding extreme driving conditions of the vehicle. Calm and careful driving without sharp pressing of the gas and brake pedal, hard clutch engagement and similar overloads will contribute to the serviceability and durability of the rear axle.
Let's not forget about the differential
The structure and design of the gearbox cannot be fully understood without paying attention to such an element as the cross-axle differential. As already mentioned, its purpose is to distribute the resulting torque between the axle shafts. In fact, such a device is a planetary gearbox through which the torque is distributed between the wheels of the axle.
This design is typical for almost most cars, including VAZ models 2106, 2107. However, a reservation must be made - ordinary cars. All-terrain vehicles, SUVs, or crossovers may use other types of differentials. The fact is that a conventional differential, such as on VAZ models 2106, 2107, during operation is capable of directing all the incoming torque to where the load is less. The consequence of this will be the rotation of only one wheel, and the second will remain motionless.
To avoid this phenomenon, specially designed differentials are used:
- self-locking;
- with manual locking;
- viscose couplings, etc.
The gearbox used in the design of the rear axle, including for VAZ cars, for example models 2106, 2107, Gazelle and others, both domestic and imported, is a critical component, ensuring in many cases reliable and long-term operation. The reduction coefficient of the main pair significantly affects the dynamic parameters of the car and often determines its fuel and economic efficiency. » alt=»»>
Malfunctions and their elimination
The design of the gearbox, and the rear axle as a whole, is quite resistant to wear, and malfunctions with this unit occur quite rarely. But, nevertheless, there are cases when one of the mechanisms fails. What breakdowns happen most often, and what to do in such a situation, we will consider later in the article.
The first thing that tells the driver about a breakdown is noise in the area of the rear axle. It can come from two sources: the gearbox and the wheels. If the noise is heard from the rear wheels, then you need to check the axle mounts to the wheels themselves. Sometimes there are cases when the fasteners are not fully tightened, and during the ride, due to constant vibration, they unwind and play appears. It is this that contributes to the noise.
A more serious problem may be breakage or wear of the ball bearing located on the axle shaft. In this case, movement is strictly prohibited, since the wheel may fall off at any moment. To fix this problem, you need to lift the damaged part of the VAZ 2107 car using a jack and replace the bearing.
Wear of axle splines
If, when the car is moving, noise comes from the gearbox, then there may be a few more reasons. The first and most common reason is rear axle deformation. This often happens when the wheel hits an obstacle hard. Such damage must be repaired with the help of specialists, since the level of its noise depends on how smooth the rear axle is.
The second reason, which is quite rare, is wear of the splines of the axle shafts or gears of the gearbox. In this case, repairs will not help, but only replacement of parts with new ones is necessary. But before changing them, you need to understand why the gears or splines are worn out.
The gearbox design provides for heat removal from elements in contact with each other, as well as their lubrication. If the parts wear out, then the most likely reason is a low oil level, or its absence.
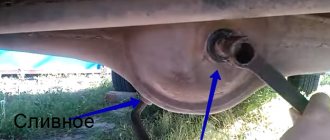
In order to check if there is a leak in the gearbox, pay attention to the “breather”. If there are oil leaks on it, or at its connections, the reason will be confirmed. Fixing it won't be very easy.
First, you should replace the breather with a new one. If after one or two trips, drips form again, and in the same places, then the “breather” has nothing to do with it. In this case, the breakdown is in the gearbox oil deflector, which is considered a more serious malfunction.
In general, it is not necessary to replace the breather with a new one, but it is enough to carry out several manipulations on it in order to restore its functionality. This, of course, will take a lot of time, but will help you save money.
The first thing you need to do in order for the “breather” to work is to clean it from dirt and dust, since when the oil heats up, these contaminants will interfere with the stabilization of atmospheric pressure, and, accordingly, prevent the cooling of the liquid.
The second manipulation is the purchase of a repair kit for the breather. It often happens that the valve inside the “breather” device gets stuck, and when heated, the oil does not go into the crankcase, but pushes through the seals and comes out. This is where the leaks appear.
So you and I have become familiar with the structure and operating principle of the rear axle of the VAZ 2107. Now, if it breaks down, you can determine the cause and quickly eliminate it.
Device
In order for the car to move, it is necessary to transfer the rotation of the engine to the wheels. But the engine speed is too high, and in order to correctly distribute the torque, a mechanism is needed that changes the gear ratio. Due to the gearbox and different engine speeds, the speed of movement changes, and the main pair of the rear axle takes over the rotation and transmits it to the wheels through gears.
- flange, it is fixed on the drive gear (shank) of the RZM, and is an intermediate link between the driveshaft and this gear;
- the shank of the main pair, at one end of which there are splines for pressing the flange, at the other end there is a bevel gear with a small number of teeth;
- driven gear (planet gear), it is in mesh with the drive gear, and it is with it that it forms the main gear;
- center differential, allowing the rear wheels to spin at different angular speeds.
The differential design is very simple - the mechanism consists of two axle gears, two satellites and a satellite pin. From the gearbox, the movement is transmitted to the axle shafts, on which the wheels are mounted.
Differences in VAZ rear axle gearboxes
RZMs differ in the gear ratio of the main pair; in total, there are four types of gearboxes on the VAZ classic:
The slowest one is the RZM 2102, its drive gear has 9 teeth, and the driven gear has 40 teeth. To calculate the gear ratio, you need to divide the number of planetary gear teeth by the number of teeth on the drive shaft; for the VAZ 2102 the drive gear is equal to 4.44.
The “penny” gearbox (2101) accordingly has the number of teeth on the gears 10/43, so its IF is 4.3. The next, faster one is RZM 2103 - it has a ratio of 1041, which means the gear ratio is 4.1. And finally, the “fastest” will be the 2106 gearbox, with the number of teeth 11/43 and an inverter frequency of 3.9, respectively.
Many VAZ 2101-07 owners strive to install the fastest gearbox, but this is not always necessary. If the car often carries cargo, that is, the car is a “workhorse”, high speed is of no use, but high-torque power will be very useful. It should be noted that RZM 2102 was not supplied as spare parts; it was installed only on station wagons.
Higher or lower?
Often, owners of classic Zhiguli cars use replacing the main pair as one of the types of tuning their cars. Which gearbox should I put on the VAZ-2107? It is worth choosing the gear ratio based on the engine power. If you install a pair with a low ratio (for Zhiguli the maximum parameter is 3.9), it will be easier for the car to accelerate to maximum speed. But in the range of 0-100 kilometers per hour, it will lose significant time for acceleration.
Replacing the rear axle gearbox of VAZ 2106, 2107
The main disease of REM is increased noise (hum), and the gearbox can hum for various reasons:
- there is insufficient oil in the bridge, or it is completely missing;
- the gap between the gears of the main pair is not adjusted;
- the gears are worn out, they have chips and other damage;
- the main pair has a manufacturing defect, the gears are not ground in from the factory;
- the shank nut has become unscrewed or loosened;
- bearings are worn out.
The main malfunction of the center differential is the wear of the gears of the axle shafts and satellites, when the surfaces of the parts are heavily worn, play forms between the differential gears, but the rear axle usually does not make noise due to wear of the differential gears.
ZM gearboxes on VAZ classics can be repaired, but only if there is no wear on the gears. If the mechanism can no longer be repaired, it needs to be replaced. We replace the rear axle gearbox of a VAZ 2106 on a “seven” as follows:
- we install the car on a pit or a car lift; changing the gearbox on the ground is extremely inconvenient;
- if the car is installed on a pit, it is necessary to jack up both sides; in any case, the rear wheels must be removed. If the work is not done on a lift, you should install stops under each side of the car (in the rear);
- unscrew the drain plug in the REM, drain the transmission oil, having previously prepared a container for it;
- remove the rear brake drums (two guide bolts on each side), after first removing the car from the handbrake. The drums can be difficult to remove; they are dismantled by tapping them from behind with a hammer through a wooden block. You cannot hit the drum with a metal hammer; the drum may break;
At this point, the removal of the gearbox can be considered complete; now all that remains is to either repair the mechanism or install a new one instead.
How much does a new gearbox and replacement labor cost?
The cost of the work, as always, depends on where you decide to have the repairs done. If it’s a garage-type service, then Uncle Vasya will ask you for about 1,000 rubles to replace the gearbox, but in a “sophisticated” car service center, be prepared to part with an amount of 2 to 3 thousand.
Prices for spare parts. The kit, which includes a new rear axle gearbox 2106 (Togliatti), gasket and even oil, costs about 5-6 thousand rubles (Moscow and Moscow region, AvtoPasker store).
The price for gearbox 2103 (AvtoVAZ) is not much different from 06 and is about 5,000 rubles.
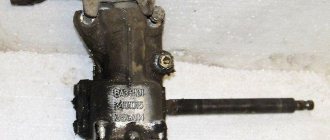
Using a gearbox, torque is transmitted from the engine to the wheels. The gearbox is a set of gears and includes two main blocks: a cross-axle differential and a main gear. When replacing or repairing this module, the question may arise as to how the VAZ 2103 gearbox differs from the 2106, which do not look identical in appearance.
Defects in the gearbox
Increased play in the RZM can be formed due to wear of the differential pinion pin - if you grab the driveshaft and rotate it clockwise and counterclockwise, this play can be felt. Also, increased clearance can be formed due to wear of the splines inside the differential housing itself.
If the gaps in the main pair of gearboxes are not adjusted, a characteristic noise occurs when the car moves:
- when the load increases (sharp acceleration), a characteristic howl is heard in the bridge;
- When I let off the gas the noise goes away.
The engine can hum in a different way, but the characteristic feature described above can most often be heard on VAZ classic cars. Worn teeth of the main pair are clearly visible on the planetary gear - they become rounded, and they often show traces of rust.
Adjusting the VAZ rear axle gearbox
If the main pair in the gearbox is worn out, it must be replaced. But you can’t just put the gears back in place; the gaps in them must be adjusted. In total, two types of basic adjustments are made:
- The thickness of the adjusting sleeve (washer) is selected for the shank (drive gear). The washer can have a thickness from 2.6 mm to 3.5 mm;
- The gap between the gears of the main pair is adjusted using two adjusting nuts of the differential housing.
The washer for the shank is selected in such a way that the shaft with the drive bevel gear rotates in the gearbox housing without backlash with a force by hand (0.3-0.4 kg). In this case, the shank nut should be tightened with a force of 12 to 26 kg, usually 18-19 kg are tightened.
After installing the shank, the differential housing with the planetary gear attached to it is put in place. The housing is secured with two covers (4 bolts, a knob with a 17mm head). The adjusting nuts are tightened from the sides of the bearings, the differential is installed so that there is play between the gears of the main pair, and the planetary gear should not be clamped. By moving the adjusting nuts to the right and left, the shank gear is brought to the planetary gear. By adjusting, you select the moment when the gap between the gears practically disappears.
The last stage is to adjust the preload of the differential bearings; the adjusting nuts are tightened from the sides. This work must be done with an indicator; the device should show from 0.14 to 0.18 mm, the gap between the gears should be within 0.08-0.13 mm. After the operation, the adjusting nuts are fixed with plates so that they do not turn.
Repair or replacement, which is better?
Car owners of VAZ classics often cannot decide what is best to do - buy a complete ready-made REM assembled or purchase individual parts and repair the gearbox. It’s really difficult to decide here - the price of a new gearbox, of course, is higher, but the owner of the car is freed from the headache of adjustment. The thing is that it’s not so easy to find a good specialist in VAZ gearboxes, and there is no guarantee that the new main pair will not hum.
If a car owner buys a new gearbox, but it hums, the part can be exchanged under warranty, but the car owner loses money on removing and installing the gearbox. If you purchase a defective main pair, the repair itself will be more expensive - you will have to pay a technician for a secondary overhaul of the gearbox.
VAZ rear axle gearbox locking
On VAZ 2101-07 vehicles, the factory does not provide locking of the center differential, but the industry already produces both differentials with locks and fully assembled 3M gearboxes. The most common today are REMs with screw locking; in them, the differential gears are locked depending on the load. In such rear axle gearboxes, a preload clutch is installed, it connects the wheel axle shafts with a certain force, and acts as a blocker.
Locking the VAZ rear axle gearbox provides the following advantages:
- increases cross-country ability, allows the vehicle to avoid slipping on difficult road sections;
- allows the car to accelerate faster at the start;
- The car corners more confidently.
But ZM gearboxes with screw locking also have their disadvantages:
- Fuel consumption increases slightly;
- when accelerating, the car handles worse;
- The differential and assembled gearbox with locking are much more expensive than standard parts (the price is approximately 2-2.5 times higher).
VAZ 2101-07 car owners should know that after installing the RZM with blocking, the car will not become an SUV, and it will not be able to move on severe off-road conditions.
Welcome! Rear axle gearbox - thanks to it, all the torque is transmitted from the driveshaft and goes to the rear wheels; without the gearbox, the rear wheels would not spin at all (Unless it is a front-wheel drive car, in which instead of a gearbox with an axle there is a regular beam at the rear) and a rear-wheel drive car wouldn't go anywhere, by the way, there is also a differential inside the gearbox that some people weld, and thus the likelihood that the car will skid when turning increases, so if you are looking for information on how to remove the gearbox and weld a differential in it, then we will help you We don’t recommend that you do this if the car is used in everyday life, if it’s purely for drifting on weekends, then why not, with the differential welded, the car really starts to spin much better, in addition, when accelerating, it picks up speed better, because on both the same torque is transmitted to the wheels and thus the car starts moving almost without slipping, but on classic cars this is hardly noticeable; on front-wheel drive cars this slippage is more pronounced (It becomes less, if there are good tires it disappears altogether).
Note! To carry out the work of replacing the rear axle gearbox, you will need the following tools: Wrenches, screwdrivers, you will also need a mounting wrench, and if you have a torque wrench, then be sure to stock up on that too, thanks to it you will correctly tighten the gearbox mounting bolts simply with weak tightening from vibrations Sometimes they get unscrewed, and too much tightening will also not lead to anything good (you can tear the bolts off if you suddenly decide to unscrew them again), so the bolts need to be tightened with a certain torque, which can be understood thanks to a torque wrench!
Where is the rear axle gearbox located? It is located in the lower rear part of the car, below for clarity it is circled in a white circle and this gearbox is also connected to the axle shafts by the way (indicated by blue arrows, or rather the blue arrows indicate the beams inside which these same axle shafts are located) which you will have to remove from the car , since their ends engage with the gears of the gearbox and therefore the gearbox can no longer be removed without disconnecting them (As you read the article, you will understand how to remove the axle shafts from the gearbox, we will explain in detail), so that the location of the gearbox is even clearer, we also for clarity The red arrow indicated where the jammer is located, as you can see, this gearbox is located next to it, so you definitely won’t get confused looking for it.
When do you need to change the rear axle gearbox? The gearbox is replaced when its gears are heavily worn or after severe deformation, which can occur as a result of the gearbox hitting a stone (This happens at speed, but basically the protection takes the entire blow), when the gears that are inside the gearbox wear out, there is a distance between them increases with each other and in connection with this a strong hum appears and the gearbox can also vibrate more than usual when the engine is running, unfortunately the gearbox is not so easy to repair, but it is possible, so if yours is already completely worn out and a new one is expensive, then try (If you want) repair the old one by replacing the main parts (Gears) in it, which basically become unusable, read more about how to repair the gearbox in the article: “Repairing the rear axle gearbox on VAZ cars.”
Lada (VAZ-2107). Gearbox
Home Cars - VAZ VAZ-2107 (Zhiguli) 1982+ - maintenance and repair manual
search site
content .. 100 101 102 103 104 105 106 107 108 109 ..
Lada (VAZ-2107). Gearbox
| Rice. 4–63. Rear axle gearbox assembly: 1 — drive gear; 2 — driven gear; 3 — satellite; 4 - axle gear; 5 — satellite axis; 6 — differential box; 7 — bolts securing the differential box bearing cover; 8 — differential box bearing cover; 9 — locking plate; 10—bearing adjusting nut; 11 — gear housing |
The rear axle gearbox assembly is shown in.
Determining
gearbox malfunctions by noise
Troubleshooting should be done in the following order:
Test No. 1
. To clearly determine the nature of the noise, drive the car on the highway at a speed of approximately 20 km/h.
Then gradually increase your speed to 90 km/h, listening at the same time to different types of noise and noticing the speed at which they appear and disappear.
Release the throttle pedal and reduce engine speed without braking.
As you slow down, watch for changes in noise and for when the noise gets louder. Typically the noise comes and goes at the same speeds during both acceleration and deceleration.
Test No. 2
. Accelerate the vehicle to approximately 100 km/h, place the gear shift in neutral, turn off the ignition and allow the vehicle to roll freely until it stops; Observe the noise pattern at various deceleration speeds.
| WARNING When turning off the ignition, be careful and careful. Do not turn the key more than necessary. This may trigger the anti-theft device. |
The noise noticed during the test and consistent with that noticed during the first test does not come from the final drive gears, since they cannot make noise without a load.
Conversely, noise noted on the first test and not repeated on the second test may be coming from the gearbox gears or the pinion or differential bearings.
Test No. 3.
With the vehicle stationary and braked, turn on the engine and, gradually increasing its speed, compare the resulting noises with those noted in previous tests. Noises that appear similar to Test No. 1 will indicate that they are not the gearbox noise of Test No. 1 and are caused by other components.
Test No. 4. Noises detected during the first test and not repeated during subsequent tests come from the gearbox; To confirm, raise the rear wheels, start the engine and engage fourth gear. In this case, you can make sure that the noise really comes from the gearbox and not from other components, for example, the suspension or body.
Removing the gearbox
If necessary, remove only one gearbox:
— drain the oil from the bridge beam;
— lift the rear of the car, place it on stands and remove the wheels;
— unscrew the nuts securing the brake shield to the beam and extend the axle shafts so that they come out of the differential box;
— disconnect the driveshaft from the gearbox, place a stand under the gearbox housing, unscrew the bolts securing it to the rear axle beam and remove the gearbox from the beam without damaging the gasket.
Gearbox installation
Before installing the gearbox, thoroughly clean the axle beam from oil.
Place a sealing gasket on the mating surface, insert the gearbox into the beam and secure with bolts. Pre-lubricate the bolt threads with sealant. Before applying sealant, thoroughly degrease the bolts and holes in the beam. Attach the driveshaft to the gearbox. Install the axle shafts and brake drums.
Install the wheel and tire and tighten the wheel bolts without tightening. With both wheels on, remove the stands and lower the car; then tighten the wheel bolts with a torque wrench.
Fill the bridge beam with oil through the oil filler hole, having first cleaned and screwed the magnetic drain plug into the beam.
Disassembling the gearbox
Attach the gearbox to the stand. Remove the locking plates 9 (see ), unscrew the bolts and remove the differential box bearing caps, adjusting nuts, and outer rings of the roller bearings. Mark the covers before removing them so that they can be reinstalled in their original places during reassembly.
Remove the differential box from the gearbox housing along with the driven gear and inner bearing rings.
To remove the drive gear and its parts:
| Rice. 4–64. Unscrewing the self-locking nut of the drive gear: 1 - stopper for fixing the flange of the drive gear; 2 - socket wrench; 3 — drive gear flange; 4—bracket for mounting the gearbox on the stand |
— turn the gearbox housing upside down () and, holding flange 3 of the drive gear with a stopper, unscrew the flange mounting nut with wrench 2;
— remove the flange and take out the drive gear with the adjusting ring, the inner ring of the rear bearing and the spacer;
— remove the oil seal, oil deflector and inner ring of the front bearing from the gearbox housing;
— press out the outer rings of the front and rear bearings using mandrel A.70198;
| Rice. 4–65. Removing the inner ring of the rear bearing of the drive gear using a universal puller A.40005/1/7: 1 - universal puller A.40005/1/7; 2 - drive gear; 3 — inner ring of the bearing; 4 - device A.45008 |
— remove the spacer sleeve from the drive gear and, using a universal puller A.40005/1/7 and a mandrel A.45008 (), remove the inner ring of the rear roller bearing;
- Remove the drive gear adjusting ring.
To disassemble the differential:
| Rice. 4–66. Removing the inner ring of the differential box bearing using a universal puller A.40005/1/6: 1 - universal puller A.40005/1/6; 2 — inner ring of the bearing; 3 — differential box; 4 - stop A.45028 |
— remove the inner rings 2 () of the roller bearings of the differential box 3, using the universal puller A.40005/1/6 and the stop A.45028;
— unscrew the nuts securing the driven gear and knock the satellite axis out of the box;
— turn the axle gears and satellites so that the latter roll out into the differential windows, after which they can be removed;
— remove the axle gears with support washers.
Checking
the technical condition of gearbox parts
Before inspecting gearbox parts, rinse thoroughly. This will make it easier to identify wear and damage to parts.
Check whether the final drive gear teeth are damaged and whether the contact spots on the working surfaces of the teeth are correctly located. In case of unacceptable wear, replace the parts with new ones; if the engagement is incorrect, find the reason.
| NOTE As spare parts, the drive and driven gears are supplied as a set, selected for noise and contact, so if one gear is damaged, both are replaced. |
Check the condition of the satellite holes and the surfaces of their axis; In case of minor damage to the surface, sand with fine-grained sandpaper, and in case of serious damage, replace the parts with new ones.
Check the surfaces of the journals of the axle shaft gears and their mounting holes in the differential box, eliminate the damage as in the previous operation.
Check the surfaces of the axle gear support washers and repair even minor damage. When replacing washers, select new ones based on thickness.
Inspect the drive gear and differential case roller bearings; they must be wear-free, with smooth working surfaces. Replace the bearings at the slightest doubt about their performance; poor condition of the bearings can cause noise and sticking of the teeth.
Check for any deformations or cracks on the crankcase and differential box, and replace them with new ones if necessary.
Gearbox assembly
Reliable operation of the gearbox is ensured by strict adherence to the following assembly and adjustment procedures.
| Rice. 4–67. Rear axle gearbox parts: 1 — drive gear flange; 2 — oil seal; 3 — oil deflector; 4 — front bearing; 5 — rear bearing; 6 — adjusting ring of the drive gear; 7 — axle gear support washer; 8 — axle gear; 9 — satellite; 10 — satellite axis; 11 — driven gear; 12 — differential box; 13 — differential box bearing; 14 — adjusting nut; 15 — bolt securing the locking plate; 16 — locking plate; 17 — locking plate; 18 — bolt securing the driven gear to the differential box; 19 — drive gear; 20 — cover fastening bolt; 21 — spring washer; 22 - gasket; 23 — bolt securing the gearbox to the rear axle beam; 24 — gear housing; 25 — spacer sleeve; 26 - flat washer; 27 — nut for fastening the drive gear flange |
The gearbox details are shown in.
Differential assembly
. Lubricate with transmission oil and install the axle gears with support washers and satellites through the windows in the differential box. Rotate the satellites and axle gears so as to align the axis of rotation of the satellites with the axis of the hole in the box, then insert the axis of the satellites.
Check the axial clearance of each axle gear: it should be 0–0.10 mm, and the moment of resistance to rotation of the differential gears should not exceed 14.7 N·m (1.5 kgf·m).
If the gap is increased, which is a sign of wear on the differential parts, replace the axle gear support washers with others of greater thickness. If the specified clearance cannot be obtained even when installing the thickest washers, replace the gears with new ones due to their excessive wear.
Install the driven gear on the differential box.
Using mandrel A.70152, press the inner rings of the roller bearings onto the differential box.
Installation and adjustment of the drive gear.
The correct position of the drive gear relative to the driven gear is ensured by selecting the thickness of the adjusting ring installed between the thrust end of the drive gear and the inner ring of the rear bearing.
Select the adjusting ring using mandrel A.70184 and fixture A.95690 with indicator. Perform the operations in the following order.
| Rice. 4–68. Installation using a mandrel of the outer ring of the rear bearing of the drive gear: 1 - mandrel A.70171 |
Having secured the gearbox housing on the stand, press the outer rings of the front and rear bearings of the drive gear into the crankcase sockets, using mandrels for this: for the front bearing - A.70185, and for the rear - A.70171 ().
| Rice. 4–69. Determining the thickness of the drive gear adjusting ring: 1 - indicator; 2 - device A.95690; 3 — rear bearing of the drive gear; 4 — mandrel A.70184 |
On mandrel A.70184, simulating the drive gear, install the inner ring of the rear bearing using mandrel A.70152 and insert the mandrel into the neck of the gearbox housing ().
Install the inner ring of the front bearing, the flange of the drive gear and, turning the mandrel to correctly install the bearing rollers, tighten the nut to a torque of 7.8–9.8 N·m (0.8–1 kgf·m).
Attach fixture A.95690 to the end of mandrel 4 and adjust the indicator, which has 0.01 mm divisions, to the zero position by placing its leg on the same end of mandrel A.70184. Then move indicator 1 so that its leg rests on the seating surface of the differential box bearing.
| Rice. 4–70. Scheme of taking measurements to determine the thickness of the drive gear adjusting ring: 1 - mandrel A.70184; 2 - device A.95690 with indicator; a1 and a2 – distance from the end of the mandrel to the journals of the differential bearings |
Turning mandrel 4 with the indicator left and right, set it to a position in which the indicator arrow marks the minimum value “a1” () and write it down. Repeat this operation on the seating surface of the second bearing and determine the value of “a2”.
Determine the thickness “S” of the drive gear adjusting ring, which is the algebraic difference between the values “a” and “b”:
S = a - b,
where a is the arithmetic mean distance from the ends of the mandrel 1 () to the differential bearing journals
a = ( a1 + a2 ) / 2,
| Rice. 4–71. Main gears: 1 - driven gear; 2 — serial number; 3 - correction in hundredths of a millimeter to the nominal position; 4 - drive gear |
b - deviation of the drive gear from the nominal position, converted to mm. The amount of deviation is marked on the drive gear () in hundredths of a millimeter with a plus or minus sign.
When determining the thickness of the adjusting ring, take into account the sign of the value “b” and its unit of measurement.
Example
. Let us assume that the value “a”, set using the indicator, is equal to 2.91 mm (the value “a” is always positive), and on the drive gear after the serial number the deviation “-14” is set. To obtain the “b” value in millimeters, you need to multiply the indicated value by 0.01 mm.
b = -14 0.01 mm = -0.14 mm.
Determine the thickness of the drive gear shim in millimeters.
S = a - b = 2.91 mm - (-0.14 mm) = 2.91 mm + 0.14 mm = 3.05 mm.
In this case, install an adjusting ring with a thickness of 3.05 mm.
| Rice. 4–72. Installing the inner ring of the rear bearing on the drive gear: 1 - inner ring of the rear roller bearing; 2 — mandrel A.70152; 3 — adjusting ring; 4 - drive gear |
Place an adjusting ring of the required thickness on the drive gear and press on the inner race of the rear bearing, removed from the mandrel A.70184, using mandrel A.70152 (). Install the spacer.
| WARNING When repairing the rear axle gearbox, a new spacer must be installed if the gearbox housing, final drive gears, or pinion bearings have been replaced. If the specified parts remain the same, then the spacer sleeve can still be used. |
Insert the drive gear into the gear housing and install the front bearing inner race, oil slinger, oil seal, drive gear flange and washer.
| WARNING To avoid damaging the oil seal when pressing, it must not be pressed all the way, but to a depth of 2-0.3 mm between the end of the gearbox housing and the outer surface of the oil seal. |
Screw a nut onto the end of the gear and, locking the drive gear flange, tighten it (see below for tightening torque).
Adjusting the drive gear
bearings
| Rice. 4–73. Dynamometer 02.7812.9501: 1 - movable pointer; 2 — torque limit indicator; 3 - body; 4 – handle; 5 - rod with a tip inserted into the adapter sleeve of the nut securing the drive gear flange |
To limit the axial displacement of the drive gear under operating loads, it is very important to create a preload in its bearings within specified limits. The tension is controlled with a dynamometer 02.7812.9501 (), which measures the moment of resistance to rotation of the drive gear.
The torque of resistance to rotation determines the degree of tightening of the bearings. It should be 157–198 N·cm (16–20 kgf·cm) for new bearings and 39.2–58.8 N·cm (4–6 kgf·cm) for bearings after a run of 30 km or more.
The flange nut must be tightened to a torque of 117–255 N m (12–26 kgf m), periodically checking with a dynamometer the moment of resistance of the bearings to turning the drive gear.
| Rice. 4–74. Checking the preload of the drive gear bearings: 1 - dynamometer 02.7812.9501; 2 - crankcase; 3 - adapter sleeve |
To check the resistance moment, put a dynamometer on the adapter sleeve 3 (), set the torque limit indicator 2 (see) to the scale division corresponding to 196 N cm (20 kgf cm), and use handle 4 to make several turns clockwise. When turning the drive gear, movable pointer 1 should not go beyond pointer 2 and should show at least 157 Ncm (16 kgfcm).
If the moment of resistance to turning is less than 157 N·cm (16 kgf·cm), and for bearings after a run of 30 km or more - 39.2 N·cm (4 kgf·cm), then tighten the drive gear flange nut (without exceeding the specified torque tightening) and check again the moment of resistance to rotation of the drive gear.
If the moment of resistance to turning turns out to be more than 198 N cm (20 kgf cm), and for run-in bearings 58.8 N cm (6 kgf cm), which indicates an excessive preload of the bearings, replace the spacer sleeve with a new one, since it is from excessive load has deformed to a size that does not allow for correct adjustment. After replacing the spacer, reassemble with appropriate adjustments and checks.
Installing the
Differential
Install the pre-assembled differential box into the crankcase along with the outer bearing races.
| Rice. 4–75. Checking the preload of the differential box bearings using device A.95688/R: 1 - fastening screw; 2 — key A.55085; 3 - driven gear; 4 — adjusting nut; 5 — intermediate lever; 6 — fastening screw; 7 — indicator bracket; 8 — bracket tightening screw; 9 - indicator for checking the preload of the differential box bearings |
Install two adjusting nuts 4 () so that they are in contact with the bearing rings.
Install the bearing caps and tighten the mounting bolts with a torque wrench.
Preloading
box bearings and adjusting the lateral clearance in the meshing of the main gears.
These operations are performed simultaneously using the tool A.95688/R and the key A.55085.
Secure the device () to the gearbox housing with screws 1 and 6, screwing them into the holes for the bolts securing the locking plates of the adjusting nuts.
| Rice. 4–76. Checking the lateral clearance in the meshing of the main gear gears using device A.95688/R: 1 - bracket tightening screw; 2 - indicator for checking the lateral clearance in the engagement of the drive and driven gears; 3 — screw for fastening the indicator rod; 4 — indicator bracket; 5 — fastening screw; 6 - driven gear |
Move bracket 7 along the guide of the device until lever 5 touches the outer side surface of the cover and tighten screw 8. Loosen screws 1 and 3 (), and install bracket 4 so that indicator leg 2 rests on the side surface of the driven gear tooth at the edge of the tooth, then tighten screws 1 and 3.
By turning the adjusting nuts, pre-adjust the lateral clearance between the teeth of the drive and driven gears within the range of 0.08–0.13 mm. The gap is checked using indicator 2 when rocking gear 6. In this case, the bearings should not have preload. The adjusting nuts must only be in contact with the bearings, otherwise the correct preload measurement will be affected.
| Rice. 4–77. Diagram for checking the preload of the differential box bearings: D - distance between the two differential bearing caps; 1, 2 — adjusting nuts |
Tighten the two bearing adjusting nuts sequentially and evenly, causing the differential bearing caps to move apart and therefore increasing the distance "D" (). This discrepancy is noted by indicator 9 (), on the leg of which lever 5 acts. The nuts for adjusting the bearings of the differential box are tightened until the distance “D” () increases by 0.14–0.18 mm.
Having set the exact preload of the differential box bearings, finally check the lateral clearance in the meshing of the final drive gears, which should not change.
If the gap in the gear mesh is more than 0.08–0.13 mm, then move the driven gear closer to the drive gear or move it away if the gap is smaller. To maintain the bearing preload set, move the driven gear by tightening one of the bearing adjusting nuts and loosening the other by the same angle.
To accurately perform this operation, keep an eye on the indicator 9 (), which shows the value of the previously installed preload of the bearings. After tightening one of the nuts, the indicator reading will change, as the divergence “D” () of the covers and the preload of the bearings will increase. Therefore, loosen the other nut until the indicator arrow returns to its original position.
After moving the driven gear, use indicator 2 () to check the amount of side clearance. If the gap is not correct, repeat the adjustment.
Remove fixture A.95688/R, install the locking plates of the adjusting nuts and secure them with bolts and spring washers. Spare parts are supplied with two types of locking plates: with one or two legs; the plates are installed depending on the position of the nut slot.
Adjustment and repair of gearbox components is carried out on a stand, where you can also test the gearbox for noise and check the location and shape of the contact patch on the working surfaces of the teeth, as indicated below.
Checking the contact of
the working surface of the teeth of the main gear gears
For the final check on the stand of the quality of engagement of the main gear gears:
— install the adjusted gearbox on the stand and lubricate the working surfaces of the driven gear teeth with a thin layer of lead oxide;
— launch the stand; use the levers of the stand to slow down the rotation of the installed axle shafts so that under load, traces of contact with the teeth of the drive gear remain on the surfaces of the teeth of the driven gear;
- change the direction of rotation of the stand and, while braking, get contact marks on the other side of the teeth of the driven gear, which corresponds to the car moving backwards.
| Rice. 3–78. Removing the air filter. The arrows indicate the nuts securing the filter housing to the carburetor |
The engagement is considered normal if, on both sides of the driven gear teeth, the contact patch is evenly located closer to the narrow end of the tooth, occupying two-thirds of its length and not extending to the top and base of the tooth, as shown in “e”.
| Rice. 4–78. Location of the contact patch in the meshing of the main gear gears: I - forward side; II - reverse side; a and b - incorrect contact in the meshing of the gears: move the drive gear away from the driven gear by reducing the thickness of the adjusting ring; c and d - incorrect contact: move the drive gear towards the driven gear, increasing the thickness of the adjusting ring; e – correct contact in gear meshing |
Cases of incorrect divergence of the contact patch on the working surface of the tooth are indicated in (a, b, c, d).
To adjust the correct position of the drive gear and replace the ring, disassembly of the unit is necessary.
When assembling, repeat all the operations for preloading the roller bearings of the drive gear, checking the moment of resistance to rotation, preloading the roller bearings of the differential box and adjusting the lateral engagement clearance
main gears.
Replacing the
drive gear oil
seal The need to replace the oil seal is determined by the decrease in the oil level in the rear axle housing (due to oil leakage through the oil seal) to a level that disrupts the normal operation of the gearbox.
Fogging of the crankcase neck and even the formation of individual drops in quantities not exceeding the norm indicated below are not a sign of leakage.
If there is excessive droplet discharge, determine the condition of the oil seal, for which:
— place the car on a lift or inspection ditch;
— clean the breather from dirt, check its condition;
— by unscrewing the control plug, check the oil level in the axle crankcase; if necessary, bring the oil level to normal;
— clean the neck of the gearbox housing from traces of oil and wipe dry;
— hang up the rear axle and place it on stands;
— start the engine, engage direct gear and at a speed of 90–100 km/h, warm up the oil to a temperature of 80–90°C (for approximately 15 minutes);
— with direct transmission engaged, at a speed of 100 km/h, determine the amount of oil leaking out in 15 minutes.
Oil leakage exceeding 5 drops in 15 minutes is a sign of a seal failure.
A damaged oil seal can be replaced without removing the gearbox from the car, if replacement of other gearbox parts is not required.
The procedure for replacing the oil seal is as follows:
— drain the oil from the rear axle housing;
— loosen the rear wheel bolts; put stops under the front wheels and hang up the rear axle ; release the parking brake and place the gear lever in neutral;
— remove the wheels and brake drums;
— unscrew the nuts securing the brake shield to the bridge beam and use the ejector to remove the axle shafts from the differential box;
— disconnect the driveshaft from the drive gear flange and move the shaft to the side;
— check the moment of resistance to rotation of the drive gear with a dynamometer and remember its value;
— holding the flange with a special wrench, unscrew the nut securing the drive gear flange and remove the flange with the washer;
— remove the drive gear oil seal;
— lubricate the working surface of the new oil seal with LITOL-24 grease and press it with a mandrel into the gearbox housing to a depth of 2–0.3 mm between the end of the gearbox housing and the outer surface of the oil seal.
— install the flange with a washer on the drive gear and, holding it with a special wrench, tighten the flange fastening nut, periodically checking the torque resistance to turning the drive gear with a dynamometer.
If the initial moment of resistance to rotation was 58.8 N·cm (6 kgf·cm) and higher, then the new moment of resistance to rotation should be 9.8–19.6 N·cm (1–2 kgf·cm) more than the original one. If the initial moment of resistance to rotation was less than 58.8 N·cm (6 kgf·cm), then tighten the flange mounting nut until a moment of resistance of 58.8–88.2 N·cm (6–9 kgf·cm) is obtained.
If, when tightening the nut, the torque resistance to turning is exceeded, then disassemble the gearbox, replace the spacer sleeve with a new one, after which the gearbox is assembled and adjusted as indicated in the chapter “Assembly and adjustment”.
Reassemble the rear axle in the reverse order of disassembly.
How to replace the rear axle gearbox on a VAZ 2101-VAZ 2107?
Note! When buying a new gearbox, take into account the fact that different gearboxes were used on the classics (there were four of them in total), they look the same and everything inside is almost the same, they just have different gears, the fastest spinning gearbox is from the VAZ 2102 car (It has a main pair 4.44) while the VAZ 2106 has a main pair of 3.9, the gearbox data is interchangeable (That is, you can install a gearbox from a six for a penny and vice versa) and the differences are only in the main pair, we will explain what kind of pair this is, in general detail I won’t explain, but we’ll just say that a car with a pair of 4.44 will accelerate faster but will have a lower maximum speed, while a car with a pair (with the same power of the car, we mean) 3.9 will accelerate longer, but its maximum speed will be much higher than a gearbox with a 4.44 pair, but on very powerful cars there is no point in installing a gearbox with a 4.44 pair, since fast acceleration means that you will also change gears much more often, and a very powerful car does not need a gearbox with a 4.44 pair ( A car literally in 3 gears at 80 will already work for wear and tear and will ask for the next gear, and at 5 to a certain speed it will accelerate to about 150 and will also make noise, but the engine allows it, but the gearbox will not allow it to accelerate any further, so when choosing it, be careful be careful and buy a new or used one based on the power of your car, and not on faster acceleration or maximum speed), all these gearboxes that were installed on classics are explained in more detail in the video below:
Posts 1 page 15 of 15
ShareNovember 126, 2009 22:23:06
- Author: Vasek7253
- Guest
Gearbox 2101: 3.753 2.303 1.493 1.00 2103: 3.75; 2.30; 1.49; 1.00; Z.X-3.87 G.p. 4.1 2105: 3.667 2.100 1.361 1.00 0.819 2106: 3.24; 1.98; 1.29; 1.00; Z.X-3.34 G.p. 4.1
ShareFebruary 218, 2010 12:13:44
- Author: Ivanovich
- Veteran
- Where: .
- Registered: November 1, 2009
- Posts: 589
- Respect: [+55/-0]
- Positive: [+238/-1]
- Invitations: 0
- Time spent on the forum: 20 days 15 hours
- Last visit: September 9, 2011 21:43:56
Gear ratios of VAZ gearboxes. Main gear pair 2106 (4.3) gear. number SPORT
Main gear pair 2106 (4.7) gear. number 43:9 SPORT
Main gearbox pair 2106 (5.1) gear. number 43:8 SPORT
Main gear pair 2106 (5.3) gear. number 43:8 SPORT
On early samples of 2121 with a 1.3 engine, 4.44 main pairs were installed. Until 1993, Nivas, model 2121 (1.6 engine), had main pairs with a 4.1 gear ratio. From 1993 on model 21213 (1.7 engine) to this day, main pairs with a gear ratio of 3.9 are installed.
A little information: the lower the number of the main pair, the greater the speed of the car at the same wheel radius and the same engine speed..
What are the main couples?
3.9 - VAZ-2106 has a mark on the crankcase in the form of the number 6. 4.1 4.3 4.44 - the front gearbox assembly is almost never found.
The following are only custom ones:
and further! Gearbox and rear axle of a classic VAZ. There are 3 options for gearboxes and 4 rear axle gearboxes. The gearboxes come in 2101, 2105, 2106. The gears (1st, 2nd, 3rd) in 2101 are shorter than in 2105, and longer in 2106. Gearboxes come with gear ratios of 3.9, 4.1, 4.3, 4.44. How to find out the gear ratio? Raise the rear wheel, put it in neutral, make 10 rotations of the wheel and count the revolutions of the cardan. Cardan speed 19.5 20.5 21.5 22.5 Gear ratio 3.9 4.1 4.3 4.44
ShareFebruary 318, 2010 12:26:26
- Author: Ivanovich
- Veteran
- Where: .
- Registered: November 1, 2009
- Posts: 589
- Respect: [+55/-0]
- Positive: [+238/-1]
- Invitations: 0
- Time spent on the forum: 20 days 15 hours
- Last visit: September 9, 2011 21:43:56
Rear axle VAZ 2101. Device
1 – axle shaft; 2 – wheel mounting bolt; 3 – guide pin; 4 – oil deflector; 5 – brake drum; 6 – axle bearing; 7 – locking ring; 8 – rear axle beam flange; 9 – axle shaft seal; 10 – rear axle beam; 11 – bearing mounting plate; 12 – rear brake shield; 13 – axle guide; 14 – adjusting nut; 15 – differential box bearing; 16 – bearing cover; 17 – breather; 18 – satellite; 19 – driven gear; 20 – axle gear; 21 – adjusting ring of the drive gear; 22 – spacer sleeve; 23 – drive gear bearings; 24 – drive gear oil seal; 25 – dirt deflector; 26 – flange; 27 – oil deflector; 28 – rear axle gear housing; 29 – drive gear; 30 – satellite axis; 31 – adjusting washer; 32 – differential box
Rear axle of VAZ 2101. Rear axles of VAZ-2101 cars; VAZ-2102 and their modifications have the same design and are completely unified, with the exception of gearboxes, the main gear of which has a different gear ratio. For the VAZ-2101 and its modifications it is 4.3, and for the VAZ-2102 it is 4.44. To distinguish gearboxes for station wagons, the letter “y” is applied to their neck.
As you know, cars differ in the type of drive. There is full, rear, and also front. The first models of classic VAZs came with rear-wheel drive. And the “seven” was no exception. In turn, the rear-wheel drive device includes a gearbox. The VAZ-2107 has a similar element design scheme as on the “six”. Well, let's look at what this element is for and how it works.