Consider the design of the differential
In general, the differential consists of:
1. housing (in which the axis of the satellites is rigidly fixed);
2. satellites (rotating on fixed axes);
3. gears (meshed with satellites).
In addition to bevel differentials
(the name corresponds to the shape of the satellite and gear), which are most often responsible for the distribution of torque between the wheels of one axle; there are also cylindrical differentials
, which are tightly registered in the role of interaxial ones.
As you can see, the design, despite the external differences, is very similar in essence. There are other kinematic differential schemes, but these are the most common.
Registration rules
Registration rules clause 5.9.
When the delegation established by the domain name administrator is terminated due to the expiration of the domain name registration, the registrar installs temporary DNS servers for the domain that redirect requests via the http protocol to the registrar's service website with information about the reason for the termination of delegation.
Registration rules clause 4.5.
The right to submit an application to renew a domain name registration remains with the previous administrator until the expiration of the preferential renewal period. The duration of the preferential renewal period is 30 days after the end of the registration period.
Registration rules clause 3.3.1.
The registrar has the right to accept applications for registration of domain names that are in the preferential renewal period (registration of vacated domain names). Domain name registration is carried out at the end of the preferential renewal period, unless the previous domain name administrator renews the domain name registration.
How to check the rear axle
Naturally, noises such as hum, vibration, crackling or knocking can also occur due to other malfunctions. For example, the same driveshaft, if the outboard bearing breaks or the crosspiece fails, can make a crunching sound and vibrate. Failure of the elastic coupling of the universal joint is also accompanied by similar symptoms. The rear struts or other suspension elements may be knocking
In any case, before starting bridge repair, it is important to make sure that it is the bridge that is faulty.
Checking the rear axle is performed as follows:
- We drive out onto a flat section of the road without holes or ledges.
- We accelerate the car to 20 km/h.
- We listen and note the accompanying noises.
- We gradually increase the speed of the car to 90 km/h and remember at what speed this or that uncharacteristic sound occurs.
- Without turning off the gear, release the accelerator pedal, reducing the engine speed. We continue to monitor changes in the nature of the noise.
- Again we accelerate to 90–100 km/h, turn off the gear and ignition, letting the car coast. If the extraneous noise does not disappear, the rear axle gearbox is in order. Without load, it cannot make noise (except for the bearings). If the sound disappears, the gearbox is probably faulty.
- We check the tightness of the wheel bolts by tightening them with a wheel wrench.
- We install the car on a horizontally flat surface. We hang its rear wheels with a jack so that we can rotate them freely.
- We alternately rotate the wheels of the car left and right, and also push them back and forth to determine the play. The wheel should turn easily without jamming. If the wheel plays or slows down when the bolts are securely tightened, the axle bearing is most likely worn out.
- When the gear is engaged, we rotate each of the wheels around its axis. Let's look at the behavior of the cardan shaft. It should also spin. If it doesn't turn, the axle shaft is most likely broken.
How does a differential work?
The main purpose of this unit is to give the wheels different rotation speeds at the right time, for example when turning a car. Let's look at a specific example:
When a vehicle moves on a straight road, each wheel has the same rotation speed. However, when the car makes a turn, the inner pair of wheels will travel slightly less distance than the outer pair. As a result, if the car did not have a differential, the inner pair of tires would begin to slip. This will lead to 2 problems:
— Rapid wear of the tires on each of the drive wheels,
— Poor road handling when turning the car (the absence of this unit will especially affect speeds greater than 70 km/h).
It is precisely due to the bevel differential on the VAZ 2110 and 2112 that it is possible to give a pair of drive wheels different rotation speeds. When they work together with the main gear, it is possible to reduce the speed, after which information from the gearbox is sent to the drive wheels.
Important! If you notice that a hum has appeared in the differential or the gearbox begins to knock when turning, be sure to check the condition of the differential yourself or with specialists at a car service center. Driving a car when a malfunction occurs in this unit can lead to a complete loss of control over the vehicle.
The main symptoms of faults in the differential.
You can find out about problems in the operation of this node by 2 symptoms in its operation:
- There is a hum in the gearbox when driving at high speeds,
- The appearance of a knocking or crackling sound in the bridge during a turn, even at low speed.
The cause of differential failure is most often damage and gradual wear of the bearing set. Also, damage to the oil seal and crosspiece can lead to problems in the operation of this element. The damage itself occurs either when the oil level in the system is insufficient, or during prolonged use of the vehicle.
What is differential
The VAZ 2107 is certainly not the most mysterious car in the world, however, not everyone and not always understand things and the principles of operation of elementary mechanisms. Today we will talk about the rear axle differential of the VAZ classic and the feasibility of blocking it.
When a car is moving, the drive wheels do unequal work, since the wheel that makes the turn at a larger radius has to travel a greater distance and, accordingly, at a greater angular speed. This problem arose before engineers quite a long time ago, but they began to think seriously about using a differential only before the Second World War. But this is not the point, but the fact that the use of a differential made it possible to solve very important problems at the same time:
- transmit torque to the drive wheels without loss;
- provide different angular speeds when cornering.
Do-it-yourself VAZ 2110 gearbox repair (video)
Repairing a gearbox on a VAZ 2110 with your own hands is not as difficult as it might seem at first glance. You will have to arm yourself with a set of tools, the necessary new parts to replace old ones, several photos and videos for clarity, as well as an operation and repair manual. Plus, we recommend that you familiarize yourself with our material, which will make complex manipulations much easier.
To begin with, it would be a good idea to study a video about repairing a gearbox on a VAZ 2110 with your own hands. This is for clarity, let's say so.
Replacement
It is recommended to drive the car onto an inspection hole or overpass, put the handbrake on, engage the gears and support the rear wheels with wheel chocks to ensure safety during repairs.
We arm ourselves with the following tools: wrenches 17.19, socket 30 and 13-17, mount, wheel wrench, wrench, lift (jack), lubricant and pliers.
Both hinges, internal and external, are located on the shaft drive, which means replacing them is identical and the point is to get to this very drive.
- At the rear on the crankcase protection we unscrew two nuts with a 19mm wrench, and at the front there are also two, but with a 17mm wrench.
- Drain a little oil (less than half) from the box.
- From the required side we tear off the wheel bolts with a balloon.
- Unscrew the nut of the outer grenade using a 30mm socket.
- We lift the vehicle using a jack.
- We remove the wheel by unscrewing it first.
- Find the bolts on the hub that secure the CV joint and unscrew them using a 13mm wrench (only two bolts).
- Use a pry bar to move the hub away from the reaction rods.
- We take the grenade pin out of the hub, to do this we pull the stand towards ourselves.
- We move the shaft drive aside.
- Now you need to remove the inner hinge from the box. To do this, open the hood and, using a pry bar inserted between the parts, jerk it towards the box. The CV joint must move, otherwise we repeat the action. As soon as it works, we go down to the wheel arch and remove the shaft drive with two CV joints.
- Remove the clamps (large and small) of the protective cover from the hinges. If damage to the anthers is detected, we replace them; if the condition is satisfactory, we move them to the side.
- Using a hammer, we hit the inner clip of the inner grenade with force, making sure that it flies off. We repeat similar actions on the other side.
- We remove the old rings from the shaft drive, put on new ones and a boot.
- We install the new hinge using a hammer and lubricate it and the boot with grease.
- Using clamps, we fix the protective cover on the grenade and the shaft. We do the same with the second part.
- We drive the shaft drive into the box, having first screwed the nut onto the CV joint.
- We collect spare parts in reverse order.
Answer-addition
You hang up both rear wheels, remove the wheel and brake drum, crawl under the car with a basin, a ratchet and a 13mm socket, and unscrew all the bolts on the rear cover of the gearbox in a circle. Next, you substitute the basin and use a screwdriver to pry off this very lid sitting on the sealant. You wait until all the old transmission drains. Then you remove the remaining oil with a rag from the gearbox housing so that it does not drip under the car. Next, turning the satellite axis, you look for which side the small bolt sticks out, 8 mm under the head. You unscrew it, jamming the gearbox gear with a pry bar, not forgetting that this pinion axis clamp is quite long and you need to unscrew it in a position in which it can all come out. Next, pull out the satellite axis by lightly pressing it from the top with your finger. After this, with a light blow of a hammer or fist, you drive the axle shaft inside to release the retaining ring. Next, you remove this very ring and calmly, with your hands, pull the axle shaft out of the stocking. Actually the next task is to remove the old oil seal. Because I forgot at home the power screwdriver with which I planned to remove it, I had to take pliers and simply tear out the old oil seal, having first torn it in half.-) Next, using a pre-selected pipe as a mandrel, the new oil seal is driven into place with light blows of a hammer. The main thing is to make sure that he sits down completely. I am guided by the change in the sound of the impact. After all these procedures, everything was washed with gasoline and wiped dry (including the axle shaft), after which, carefully, so as not to spoil the new oil seal, the axle shaft was inserted into place, secured with a retaining ring, etc., in the reverse order of disassembly. .-) The oil seal, before installing the axle shaft, it is recommended to lubricate it with the transmission. Next, the remnants of the old sealant were removed from the stocking and the cover, a new one was smeared, the cover was screwed into place and tightened crosswise. After which a new transmission is poured into the bridge - that’s basically all. It makes sense that after driving for a couple of days, remove the drum again and make sure that there are no leaks from the bridge. If they are found again, either the oil seal was damaged during installation, or the axle bearing was killed. Although the bearing can be diagnosed during the process of replacing the seal. In general, the most important thing here is to do everything carefully and buy a seal for the exact axle that is on your car.-) I almost forgot. After removing the axle shaft, be sure to make sure that there is no wear on it. Where to look for workings see here. If there is a hole, there are 2 options - change the axle shaft, which is not budgetary on the one hand and it is not a fact that you will be able to find it right away on the other. The second option is to scald the area and then turn it on a lathe. Thank God, no workings were discovered, although I had already made an agreement with the nearest turner, just in case.-)
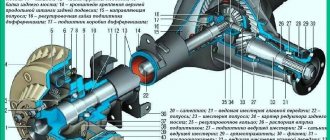
Rear axle device
The design of the rear axle of the VAZ 2101 consists of two main elements: a beam and a gearbox. These two nodes are combined into one mechanism, but they perform different functions.
The bridge consists of two main components: a beam and a gearbox
What is a beam
The beam is a structure of two stockings (casings) rigidly connected by welding. Flanges are welded into the ends of each of them, designed to accommodate semi-axial oil seals and bearings. The ends of the flanges have four holes for installing brake shields, oil deflectors and plates that press the bearings.
The middle part of the rear beam has an extension in which the gearbox is located. In front of this extension there is an opening closed by the crankcase.
The rear beam consists of two interconnected hollow stockings
Half shafts
The machine's axle shafts are installed in stockings. At the inner ends of each of them there are splines with which they are connected to the semi-axial gears of the gearbox. Their uniform rotation is ensured by ball bearings. The outer ends are equipped with flanges for mounting the brake drums and rear wheels.
Axle shafts transmit torque from the gearbox to the wheels
Gearbox
The gearbox design consists of a main gear and a differential. The role of the device is to evenly distribute and redirect the force from the driveshaft to the axle shafts.
The gearbox design includes the main gear and differential
main gear
The main transmission mechanism includes two bevel gears: drive and driven. They are equipped with spiral teeth that ensure they are connected at right angles. Such a connection is called hypoid. This design of the main gear can significantly improve the grinding and running-in process of gears. In addition, maximum noiselessness is achieved during gear operation.
The main transmission gears of the VAZ 2101 have a certain number of teeth. The drive has 10, and the driven has 43. The ratio of the number of their teeth determines the gear ratio (43:10 = 4.3).
The main gear consists of drive and driven gears
The driving and driven gears are selected in pairs on special machines in the factory. For this reason, they are also sold in pairs. In case of gearbox repair, replacement of gears is allowed only as a set.
Differential
The center differential is necessary to ensure that the wheels of the vehicle rotate at different speeds depending on the load on them. The rear wheels of a car do not travel the same distance when turning or overcoming obstacles in the form of holes, potholes, or ledges. And if they were rigidly connected to the gearbox, this would lead to constant slippage, causing rapid tire wear, additional stress on transmission parts, and loss of contact with the road surface. The listed problems are solved using a differential. It makes the wheels independent of each other, thereby allowing the car to freely turn or overcome various obstacles.
The differential allows the rear wheels to rotate at different speeds when the car overcomes obstacles
The differential consists of two side gears, two satellite gears, adjusting washers and a cast iron box that acts as a housing. The axle shafts fit into the axle gears with their splines. The latter rest on the internal surfaces of the box using adjusting washers of a certain thickness. They do not contact each other directly, but through satellites that do not have a rigid fixation inside the box. While the car is moving, they move freely around their axis, but are limited by the surface of the driven gear, which prevents the axis of the satellites from moving from the mounting sockets.
The differential housing with the mechanism is installed inside the gearbox on roller bearings pressed onto the housing support journals.
How to repair the rear axle gearbox on a VAZ 2101-VAZ 2107?
Note!
The gearboxes that went into classic cars were all practically the same, they only had a difference in the gears and therefore each gearbox is marked with the numbers 2106, 2103, 2102 and 2101, the repair of all gearboxes is also identical and does not require too high skills for this, the most important thing is to have a torque wrench and think with your head during the repair process and then you will succeed 100%!
Disassembly:
- Before you start disassembling the gearbox, you need to remove it from the car; if you do not know how to perform this operation, we recommend that you read it in the article that is posted on our website and it is called: “Replacing the rear axle gearbox on a VAZ.”
- Now, with a cloth, clean the entire gearbox from dirt and then put it where it will be most convenient for you to work (a workbench, for example, or you can lay it out on the ground, but just don’t lose anything in this case), then take a wrench in your hand and use it to turn it out the bolt that secures the locking plate (see photo 1), immediately after the bolt is unscrewed and the plate is released, remove it from the gearbox (see photo 2), perform exactly the same operation on the other side of the gearbox, respectively, with the other plate, when both locking plates will be removed, use a center punch, and use it to put marks on the bearing caps as shown in the figure number 3, the whole point is that the caps will need to be installed during assembly in exactly the same places where they stood previously and therefore (the cover of everything two, left and right) on each cover you need to make a mark relative to the body to which it is bolted, after the marks are made, select the cover that you will remove first (It doesn’t matter, but they need to be removed separately, it will be easier) and start unscrewing the bolts that secure it (Only two bolts secure one cover, see photo 4).
Removing the locking plate and marking the bearing caps to understand which cap goes where
Note!
Let us clarify once again about the marks that you need to make (This is for those who have not yet understood), we definitely recommend that in addition to the marks, you also put numbers or several marks on the lid, now we will explain everything! Since the covers must be installed strictly in the same way and strictly in their places, you can, for example, mark the first cover with one mark and this will mean that this is the right cover; on the second cover you can put two marks and this will indicate that it is left cover, for more details about where the marks need to be applied, see the photo below:
The arrows show marks made with a center punch and when reassembling the gearbox, you won’t get confused about which cover to put where.
- Then, when the bearing cover mounting bolts are unscrewed, take them out and remove the cover itself, as well as remove the adjusting nut as shown in photo 3 and then install the outer bearing ring after it and remove it too (see photo 4).
Removing the bearing cap bolts, removing the cap and removing the adjusting nut and bearing outer race
Note!
Perform exactly the same operation on the other side of the gearbox, but only when you remove the outer ring of the bearing on that side, mark it with something (a felt-tip pen, for example) and you will no longer confuse which outer ring is installed where, just their location also matters (If When the bearing is replaced, it will also have new rings, so if you have already bought a repair kit and there is a bearing and this ring, then there is no need to mark the removed one with anything)!
- Now that nothing is in the way, we move on to removing the driven gear assembly with the differential, to do this, just grab it with your hand and remove it (see photo 1), and also pull out all the other parts that are in the gearbox and are not attached to anything, these parts include the drive gear (see photo 2) which is assembled with such small but very important parts as a separator, with an adjusting ring, etc., the most important thing is that when you remove the drive gear it will be installed on it (it may fall when removal) spacer sleeve (Must be replaced) and remove it (see photo 3), after removal, take a drift and a hammer in your hands and use them to remove the inner ring with the cage and rollers; to do this, place the drift against the inner (namely, the inner) ring of the bearing and Hit it with a hammer until the inner ring with all the parts is removed along the shaft (see photo 4).
Removing the driven gear and removing the drive gear from the gearbox housing and removing the spacer sleeve and rear bearing ring from it
Note!
When you remove the inner ring by knocking it out along the shaft with all its parts (by the way, you need to knock it out not only in one place, otherwise you won’t succeed, hit it a little and in different places, so the ring will come off a little bit), there will be a there is an adjusting ring (Indicated by the arrow), remove it along the shaft too and do not damage it!
The arrow indicates the adjusting ring which must be removed after removing the rear bearing ring.
We would like to tell you a few words about the spacer sleeve and explain why it must be replaced. Firstly, the sleeve is deformed over time and since you have already disassembled the mechanism, it needs to be replaced, especially for those who have tightly tightened the gearbox flange nut and then it deformed, but choosing a new bushing is also not so easy; for more detailed information on why this bushing is needed and why it needs to be changed, see the video below:
- Let's go further, now you will need to remove the oil seal from the gearbox socket where it is installed, for more detailed information on how to do this, read the article: “Replacing the VAZ gearbox oil seal”, but only there the whole process is shown on the installed gearbox and you have it removed, so keep that in mind.
- After removing the oil seal, there is an oil deflector in the socket where it was located, carefully pry it with your hand and remove it, or simply tilt the gearbox a little and it will fall on its own, but just do not deform it (see photo 1), immediately behind this oil deflector there will be another ring bearing with the same cage and rollers, remove it from the seat too (see photo 2) and then, on the other side of the gearbox (from the inside), use a drift to knock out the outer ring of the bearing (see photo 3) and be prepared for the fact that it it will fly out on the other side, so you need to knock it out either with your hand or with something soft (see photo 4), otherwise it will be all scratched and therefore you will have to replace it.
Removing the oil deflector from the gearbox socket, removing the bearing ring and knocking out the outer ring of the bearing located inside the gearbox
Note!
According to the instructions above, you knocked out the outer ring of the front bearing with a drift; knock out the outer ring of the rear bearing in the same way, but only knock it out from the other side of the gearbox!
- Next, if you need to disassemble the differential previously removed from the gearbox, then take the special puller that we talked about at the beginning of the article and use it to press along the shaft (in simple words, remove along the shaft means) the inner ring of the bearing as shown in photo 1, if the puller is such no, then use a chisel as shown in photo 2 to move the inner ring of the bearing a little (also hit in different places, so the ring cannot move and will move) so that two thick screwdrivers fit there, as soon as space for two screwdrivers is free, insert them sides and using it as a lever (see photo 3) completely remove the inner race of the bearing from the shaft.
Pressing the bearing inner ring
Note!
After removing the bearing race from the shaft, the same way you remove the inner race of another bearing!
- To work further, you will need a vice or something else you need to clamp the differential so that it does not move when you unscrew the driven gear fastening bolts (A vice is needed from soft metal jaws, if you don’t have such, then place a thick rag between the jaws and between the part and firmly clamp the differential already in this case, it is not necessary, everything should be neat), as soon as you secure it, unscrew all 8 bolts that secure the driven gear (for clarity, a couple of bolts are indicated by an arrow in photo 1), after unscrewing, take a hammer with a rubber striker or with a plastic one and knock it down driven gear from the differential (It is indicated by a blue arrow in photo 2).
Unscrewing the bolts securing the driven gear to the differential and knocking it down with a soft-faced hammer
- Well, in conclusion, we move on to disassembling the differential, first remove from it the axle (see photo 1) on which the satellites are located, then, turning the satellites by hand, remove them from the differential (see photo 2), after them remove the side gears ( see photo 3) and their support washers (see photo 4) and with this the entire disassembly is completed, below it is explained how to assemble all these parts and their troubleshooting is explained (Fault detection is checking parts for defects, it explains what you need to look for and when in which cases it is necessary to replace certain parts with a new one).
Removing the satellite axle and removing the satellites themselves from the differential, as well as removing the semi-axial gears and their support washers
Assembly:
- All parts are assembled in the reverse order, but before assembly they need to be washed in kerosene and inspected, so after washing, pay special attention to the gears, each gear has teeth, so they should not be damaged, should not be scuffed, and should not change color either be painted (they must have the color of the metal and no black scale from the oil), since this is unacceptable; in addition, with fine-grained sandpaper, clean the satellite axle, the axle gears, namely their journals and the seats of these gears from scratches and minor damage if they will wear out; if the parts are severely deformed, replace them with new ones.
Note!
When you disassembled the gearbox from there, at the very last moment you had to remove the support washers and before that the semi-axial gears, so the semi-axial gears, as you already understood, go as one with these washers, and if you find that the support washers are deformed (Even insignificant), then in this case, be sure to replace these washers with new ones, but keep in mind that they need to be taken exactly the same thickness as the old ones, so don’t be mistaken!
- Now check the differential bearings; in no case should there be deformations or various kinds of scuffs on their working surfaces; if they are present and thus the working surface is not smooth, then replace these bearings with new ones and by the way, they are the cause of constant noise during operation of the gearbox (This is if they are worn out).
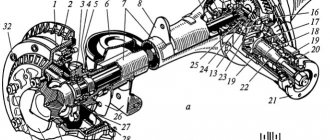
- When assembling the differential, the inner rings of the bearings, which you previously removed using a special puller, are installed with a piece of pipe of a suitable diameter until the rings rest, in addition, when assembling the differential, lubricate the side gears and their support washers with transmission oil, and also lubricate the satellites (One of the satellites indicated by number 9 in the diagram) and install all these parts back, during installation, rotate the satellites and side gears (One of them is indicated by a number so that the axis of the satellites can enter and install it after that.
The photo shows a diagram of the rear axle gearbox, but it is not complete, but with it you can understand everything perfectly
Note!
Also check the axial clearance of the axle gears, it should not be more than 0.1 mm, and if there is, then replace the support washers on all gears with washers of greater thickness, and if you can do anything else, determine the torque of the differential gears (By hand, these gears in case of determining the torque must be rotated as shown in the figure below), then this moment should not exceed more than 14.7 N.m (1.5 kgf.m)!
Rotate the differential gears and thus check the axial clearance of the gears
- Next, use a hammer and a suitable piece of pipe or a socket, with their help you will need to press (This means inserting) the outer ring of the front and rear bearings inside the housing (see photo 1), then if you decide to replace the main gear pair (The main pair includes the driven gear and the drive gear) or the bearings of the drive gear, then the adjusting ring will still have to be selected (Indicated by number 6 in the diagram above), to select it you need to make a device from the unnecessary (Old) drive gear, for this take a plate 80 long mm and weld it to the gear and after welding, grind it depending on the end of the gear to a size of 50-0.02 mm (see photo 2 in which the plate is already welded to the gear), then grind it or remove the layer of metal from that place with fine-grained sandpaper gears where the rear bearing is installed (indicated by number 5 in the diagram above), the metal layer must be removed until you achieve that the inner ring of the bearing is installed using a sliding fit; as soon as the required layer of metal is removed, install the inner ring with the cage and rollers on the gear, and insert it all into the gearbox housing (we install it in its place, it’s easier to say), after installing the same inner ring, but only the front bearing (The front bearing is indicated by number 4 in the diagrams above) with the separator and rollers, install the flange on its own put the seat on and rotate it so that all the bearing rollers are in the correct position, immediately after that tighten the flange nut with a torque of 7.9–9.8 N.m (0.8–1.0 kgf.m) and place the gearbox level and upright as shown in the third photo, then place the straight edge so that it touches the bearing beds along the same line and use a set of feeler gauges to determine the size of the gap between the straight edge and the same plate that you welded a little earlier (see. photo 3), write down this gap value somewhere or remember it and compare it with the deviation from the nominal position of the new gear (The deviation of the gear is written on it itself, it can be either with a plus or a minus sign, look for the location of this entry on conical part of the gear shank, see photo 4).
Pressing in the outer ring of the front bearing and installing a special drive gear, thanks to which you can find out how thick the adjusting ring will need to be installed
Note!
Now open the calculator or think everything in your mind, for example, you have a gap of 2.90 mm, and on the conical part of the gear tail there is -15 (This is the deviation of the gear from the nominal position), let’s first convert the gear deviation into millimeters for this: “-15 x 0.01 = -0.15 mm”, after translation we find out the exact thickness of the adjusting ring that we need, for this: “2.90 - (-0.15) = 3.05 mm”!
- Then remove the old gear with the plate welded to it, as well as the flange, remove both inner rings with cages and rollers, take the new gear and install the rear bearing inner ring on it (see photo 1) and then insert this gear into the crankcase gearbox, install a new spacer sleeve, the inner ring of the front bearing and the oil deflector, lubricate the working edge of the new oil seal with Litol-24 grease (For more details on how to install the oil seal and how to lubricate it, read the article linked above, this article is called: “Replacing the gearbox seal on a VAZ”) and install the gearbox flange in its place, stop this flange so that it does not rotate and begin to tighten gradually, then the nut securing it using a torque wrench, you need to tighten the nut until the torque reaches 118 N.m (12 kgf.m) as shown in photo 2, while tightening the nut, also check the moment of resistance of the bearings to rotation of the drive gear (the moment is checked with a dynamometer, this is shown in photo 3) and if it turns out to be less than 157 N.cm (16 kgf.cm) - for new bearings, and for bearings with mileage over 30 km. less than 39.2 N.cm (4 kgf.cm), but the tightening torque will not be exceeded, then leave everything without bringing the nut to a torque of 118 N.m (12 kgf.m), and if the torque turns out to be more than 197 N .cm (20 kgf.cm) - for new bearings and more than 59.0 N.cm (6 kgf.cm) for used bearings, then the very first time you pulled this nut, the bearing tension was exceeded, in this situation it needs to be replaced replace the deformed spacer sleeve with a new one and reassemble everything and adjust the tension of the central flange nut in the same way.
Hammering the drive gear ring and determining the torque of the gearbox flange
Note!
When assembling the gearbox, install the adjusting nuts (One of the nuts numbered 14 is shown in the diagram above for clarity) so that they come into contact with the outer rings of the bearings and then tighten the bolts that secure the left and right covers to the required torque (Install the covers according to the marks made earlier, since the left cover is different from the right), these adjusting nuts, by the way, can be rotated, thereby tightening and loosening them, for this, make a steel plate 49.5 mm wide and 3-4 mm thick and it is necessary to tighten these nuts, but to carry out this operation, adjustment you need to perform several points, the first is you will need to use a caliper to measure the distance between both bearing caps (see photo 4 above), after measuring you should get 0.15-0.20 mm, otherwise make the adjustment, to do this, screw the left adjustment slightly you made the nut with a special plate that you made earlier (see photo 1, the right nut is shown there, and the left adjusting nut is the one that comes from the side of the driven gear, the driven gear is the large gear), you need to tighten the nut until the gap is completely removed in the engagement of the main gears gear and then screw the right nut in the same way until it stops, then tighten the left adjusting nut a little until the lateral clearance in the meshing of the main gear gears is set at around 0.08-0.13 mm (This gap is difficult to check with anything, so it can be determined by touch, to do this, grab the driven gear with your hand and rock it with your hand, namely with your fingers, you will feel the very minimum play and the sound of teeth hitting when rocking should be heard), after setting the preload of the bearings, all using the same adjusting nuts, for this I can’t tighten both adjusting nuts evenly until the distance between the bearing caps is within 0.15-0.20 mm (see Fig. photo 4 above), after that, finally check the lateral clearance in the meshing of the main gears (It should not change), to check it, read the text just above described there and in addition to checking this clearance, grab the driven gear with your fingers and slowly turn it three turns (see photo 2) while using your fingers to control the backlash which should be minimal!
Checking the driven gear for backlash and adjusting this backlash using a special plate and adjusting nuts
Well, in conclusion, we will give some advice, these adjusting nuts regulate the gap between the driven and driving gears of the gearbox, so if this gap goes beyond 0.08-0.13 mm, then in this case, rotate the adjusting nuts and adjust it, if the gap is less position, then by tightening one of the adjusting nuts and loosening the second one to the same angle, ensure that it returns to its specified value!
Didn't find the information you are looking for? on our forum.
DIY differential repair
What can you do on your own to fix this part? Several consistent recommendations will help you solve the problem.
Since it has already been said that the differential is located in the gearbox, therefore, for repairs this unit must be removed from it. To do this, read the article, which talks about how to remove the differential (step No. 30).
Now let's start analyzing the structure itself:
1. Take out the semi-axial gears, turning them around the axis of the satellites 90 degrees.
2. Before removing the satellites, you need to remove the retaining ring from their axis.
3. Now you can easily remove the axle and two satellites.
4. To release the driven gear, you need to unscrew the mounting bolts in the differential housing.
5. Remove the part from the body using a hammer and chisel.
6. Everything that has been disconnected: satellites, their axle, gear - carefully inspect for defects. If the surfaces of these parts, and the surface of the body itself, have irregularities or polyps, carefully remove them with fine-grained sandpaper.
Be prepared for the fact that some defects cannot be eliminated, which means you will have to buy a new part.
7
Pay special attention to the driven gear in the gearbox. Defects in this part may interfere with the normal operation of the differential.
If you find significant tooth wear, chipping or wear, the gear will have to be replaced.
Tip: Drive and driven gears are sold together (as a pair). Therefore, it is better to replace both at once. On the driven gear, the manufacturer must indicate the number of teeth of both the first and second gears. However, “trust, but verify,” says the proverb, and to check, it is better to count and check the number of teeth.
8. Check the suitability of the bearings. Their damage is indicated by pitting and indentation marks on the running tracks and rolling elements. Verdict: requires replacement.
The differential housing itself will have to be replaced if the bearing seats are significantly worn.
The process of shortening a VAZ axle for a mini-tractor
The bridge is trimmed strictly according to the drawing, carefully measuring the parts.
The procedure for shortening the beam:
- The procedure begins by cutting off the cup, which is used to mount the spring.
- Next, carefully remove the end flange.
- Then it is necessary to measure the dismantled axle and check for compliance with the drawing. The required part is marked and cut off with a grinder.
- On the resulting segment, you need to use a notch to mark the place for the groove.
- You need to drill a hole inside the cup for the spring.
- Next, the axle shafts are carefully joined together, and then welded strictly according to the markings.
- The finished solid axle shaft must be installed in the bridge.
- Weld both sides, first selecting a chamfer for the seam.
- To increase the strength, the seams need to be heated and cooled several times.
- The procedure is completed by attaching the bridge to the frame.
It is necessary to take careful measurements of each part. Error in measurements and unequal cutting will lead to imbalance of the structure and instability of the mini tractor.
Failures of CV joints on a VAZ 2109
Insane grinding and knocking noise from the wheels, especially when starting with the steering wheel turned to the side. This is the first sign that the grenades are out of order. The service life of CV joints is quite long, but many factors influence it:
- Driver's driving style. The sharper the starts, the shorter the service life of the hinge. The same goes for braking.
- Caring for the condition of anthers. If there is even a small crack, it is necessary to completely disassemble the drive, wash the grenade in solvent or kerosene, dry, lubricate and install a new boot.
- Quality of the product at the time of purchase. Some manufacturers make hinges from low-grade steel, but this is unacceptable, since the mechanical impact is very large.
Pay attention to the condition of the VAZ 2109 steering rack boot. The comfort of driving a car also depends on it. But replacement is much more difficult
The price of one set of external CV joint is at least 950 rubles. Moreover, the cost may vary, it all depends on the region and the greed of the sellers. The set consists of:
But replacement is much more difficult. The price of one set of external CV joint is at least 950 rubles. Moreover, the cost may vary, it all depends on the region and the greed of the sellers. The set consists of:
- Directly to the hinge.
- Two clamps.
- Anther.
- Pack of lubricant.
- Retaining rings.
But the price of the boot ranges from 150-200 rubles, plus new clamps - no more than 50 rubles. The difference is noticeable, so it is cheaper to replace the boot than to repair the drive.
Removing and disassembling the gearbox
Replacing a VAZ 2110 bearing
Needless to say, before you start replacing the bearing, you should remove the box from the car and disassemble it.
Replacing a bearing on a VAZ 2110
- We install the car on the inspection hole;
- we lift the hood of the car and fix it tightly with something so that it does not wobble;
- remove the battery terminals;
- drain the oil from the gearbox.
- we start by dismantling the crankcase protection (it is secured with bolts that should be unscrewed);
- the ground wire must be removed by unscrewing the bolt;
- we find the tip of the clutch cable, which disengages the clutch and loosen the tightening of the nuts;
- remove the cable end;
- remove the starter and traction relay from the car;
- Now you should loosen the clamp holding the gear shift rod;
- the cable is disconnected from the speedometer drive;
- the reverse light wire is disconnected;
- we separate the guy wires from the car's suspension arms.
- we find how the tie rod ball joint is attached to the swing arm (this is a nut that should be unscrewed);
- Now you should press out the ball joint pin (a special puller is used for this);
- remove the ball joint by unscrewing two bolts;
Bolts securing the ball joint
- We take a pry bar, with which we squeeze out the shank of one grenade of the front wheel drive from the gearbox (the CV joint should be moved to the side);
You need to insert something instead of the grenade shank. For example, it could be an old CV joint (see VAZ 2110 replacing a CV joint - how to do it) or another technological plug.
- repeat the same operation with the second grenade;
- it's time to unscrew the clutch housing shield;
- Now you need to start removing the crankcase itself, which is attached to the cylinder block.
- we proceed to removing the engine, which needs to be attached to a beam by a special eye, using a long bolt with a hook for this;
- unscrew the nuts securing the engine to the gearbox;
- we move the box away from the engine, removing the input shaft from the clutch;
- remove the box.
Analysis of the gearbox
The gearbox has been removed and now needs to be disassembled. Let's start the process:
- The box should be thoroughly cleaned of oil and dirt.
- now the box is placed on its butt (in other words, vertically upward);
- the rear gearbox cover is dismantled (to do this, unscrew six nuts);
- Now you will need to remove the clutch cable bracket;
Dismantling the clutch cable bracket
- We carefully move the back cover of the box from its place, to do this, hitting it with a rubber hammer;
- completely remove the rear cover from the gearbox housing;
- Next, the sealing gasket of the gearbox housing is removed.
- now you need to engage third and fourth gears;
- then, after unscrewing the bolt securing fifth gear, engage 5th;
- move 5th gear down so that the coupling splines engage the gear.
- we unscrew the nut on the secondary shaft, first unlocking it;
- the same thing is done with the input shaft, or rather with its nut;
- the 5th gear synchronizer together with the fork is removed;
- the driven gear is also removed from the secondary shaft;
- The needle bearing is also dismantled, if necessary.
Replacing bearings on a VAZ 2110
After this, you need to dismantle the following parts and elements of the gearbox in order to easily get to the differential:
- input shaft drive gear;
- primary and secondary shaft;
- rear engine mount;
- clutch housing;
- gearbox housing.
In addition, the following must be extracted:
- fork and rod of first and second gears;
- third and fourth gear shift fork;
- reverse fork with gear and axle.
When is a locking differential needed?
And the point here is not only in those moments when the car slips in the mud. Locking the differential will not hurt when driving on snow, ice, sand and similar surfaces where SUVs reign. Despite the fact that the VAZ 2107 is a long way from an SUV, it would be very tempting to improve the car’s cross-country ability in relatively simple conditions, but on slippery roads and in adequate mud.
This is what locking differentials are designed for. These designs allow you to automatically or manually lock the differential and transmit torque equally to both drive wheels. A clutch is responsible for blocking such differentials, which allows minimizing the load on the transmission, ensuring smooth differential locking and eliminating slipping when the wheel is hanging up.
Forks, rods.
The forks should be inspected for signs of wear on the tabs. If the bronze coating has worn off down to the steel, they should be replaced:
Moreover, this needs to be done not because the anti-friction coating has worn off. Even without this coating everything works great. It’s just that when the steel has already shone under the coating, wear reaches at least 0.5 mm or more. The new fork is 7.5mm thick. The thickness of the fork legs matters how much the clutch moves when the gear is engaged. If the feet are too thin and worn out, the gear may be knocked out. In general, as a rule, when a transmission falls out, the clutch, ring gear and fork are worn out. The retainer springs almost never break in these boxes. Also, during emergency impacts, the forks or rods may bend. The rods can also bend when the secondary shaft in the VAZ 2110 gearbox is destroyed. Usually the 1st-2nd gear rod. In this case, the guide cast in the bell is often destroyed.
vote
Article rating
Step-by-step instructions for replacing the inner and outer CV joints of VAZ 2108, 2109, 21099
Interior
After draining the oil from the box and removing the drive, secure the latter in a vice
Remove the old rubber clamps, then the boot
We take a hammer and a block, and with their help we knock out the inner CV joint from the drive. We deliver several strong blows to remove it.
Remove the tip on the CV joint
We take a new CV joint and completely fill it with special lubricant (included)
Using careful blows of a hammer through a wooden block, we hammer the new CV joint into place.
Installing the boot: place it on the CV joint and tighten it with clamps as tightly as you can.
The distance from the end of the CV joint to the end of the boot should not exceed 21 cm.
Outer
Removing old outer CV joint clamps
Freeing the CV joint from the boot
We knock out the outer CV joint from the drive using a hammer and block
We fill the new CV joint with grease and hammer it back onto the drive. We repeat the steps with fixing with clamps and reassembling
After such work, you will immediately notice the smoothness of maneuvers and noiselessness in turns.
Do-it-yourself instructions for replacing (removing and installing) VAZ 2110,2112 gearbox
If the transmission is removed in order to repair the clutch, release bearing or flywheel, then it is not necessary to drain the transmission oil and pull the drive out of it.
It is necessary to remove the gearbox on a VAZ 2110 with an assistant. Procedure: 1.Remove the starter, battery and drain the oil. 2. Disconnect the clutch cable from the release fork. To do this, loosen the tightening of nuts 1 and 2, then remove it.
3. Slide the cover off the cable sheath and unscrew the fastening nut. Remove the cable from the bracket on the gearbox.
4. Disconnect the wires from the speed sensor. You need to compress the spring clips.
5. Unscrew bolt 1, which secures the ignition bracket to the VAZ 2110 gearbox, and two bolts 2 and 3, which secure the box to the engine.
6.You also need to disconnect the reverse sensor connector; it is located at the bottom of the car.
7. Unscrew the bolts securing the jet rod to the gearbox, there are two of them.
8. Loosen the bolt of the gear shift rod clamp and disconnect it from the rod hinge, while it needs to be moved back.
What you need to replace tie rods and ends
To carry out this type of work you will need some equipment and tools:
- The first tool is a twenty-two open-end wrench;
- A puller that will help you remove the ball joint;
- Pliers;
- A hammer, this tool should definitely be in every owner’s home.
Symptoms of faulty steering rods
There are two symptoms that indicate that the steering rods of the VAZ 2107 are faulty:
- The first reason is a knocking sound from the front suspension. Quite a bad symptom with serious consequences. This knocking noise is especially audible when the car is driven on bad sections of the road and at low speeds. It is worth noting that this symptom may also indicate other problems with your car. For example, some suspension elements, ball joints, stabilizer struts and more.
- The second reason that may indicate this malfunction is when the free play of the steering wheel increases. This is noticeable to the naked eye when, when the steering wheel is turned, the wheel itself remains in place and does not move. This makes it very difficult to drive a car at high speed, and especially on bad roads.
If you want to check the serviceability of the steering rods on your VAZ 2107 yourself, there is a way by which you will not need to contact professionals to diagnose the car. You just need to put your car in a pit. Next, you will need to take this rod from below and try to sharply move it up and down, and if you manage to do this with your hands, then you should change the tips.
Next, let's move directly to the process that interests us, this is replacing the tie rod ends of a VAZ 2107 car.
Adjusting the steering gear
If the steering is loose, do not look for wear in the shaft or cardan shafts. The steering gear mechanics may need tightening. There is wear between the gears; it can be eliminated by tightening the bearing. There is an adjusting nut on the shaft shank; it must be tightened to a certain torque specified in the documentation. As the transmission pair wears out, it is necessary to periodically increase the preload of the bearings.
Adjusting gearboxes is a troublesome and time-consuming task, but if you have the appropriate equipment (even homemade), you can perform precision work with high accuracy. Basic measurements are carried out with a micrometer or dynamometer. Adjustment “by eye” is possible, but experienced craftsmen still recommend having precision tools in the garage.
Over-tightening the gearbox accelerates wear of parts, and excessive free play leads to backlash and noise.
Differential repair | Cars VAZ-2115i-14i-13i
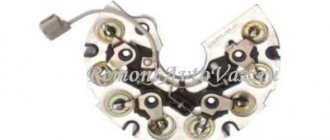
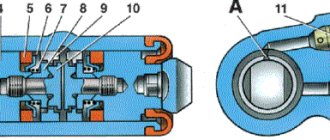
The differential details are shown in Fig.
Differential: 1 – speedometer drive drive gear; 2 – satellite; 3 – semi-axial gear; 4 – driven gear of the main gear; 5 – satellite axis; 6 – differential housing; 7 – differential bearing
You will need: a screwdriver, a 17mm socket.
1. Remove the differential from the gearbox (see “Disassembling the gearbox and troubleshooting its parts”).
2. Turning 90° around the pinion axis, remove the side gears from the differential housing.
3. Remove the retaining ring from the pinion shaft.
4. Remove the pinion axle and two pinions from the differential housing.
5. Remove the bolts securing the driven gear to the differential housing.
6. Press the driven gear off the differential housing.
AUTOFIZIK.RU / auto repair
We assemble the main gear in the reverse order of disassembly, lubricating the bearings and gears with transmission oil.
Having installed the drive gear in the gearbox housing,... ...with a torque wrench, tighten the flange nut with a torque of 16–20 kgf.m, while the gear must be rotated for proper installation of the rollers in the bearings.
We install an indicator with a division value of no more than 0.01 mm on a tripod, resting its leg against the end of the flange...
...and moving the shaft by the flange, we measure the axial play of the drive gear.
To eliminate play, remove the spacer ring installed on the gear shaft (see Dismantling the rear axle) and measure its thickness with a micrometer. We select and install a new spacer ring. It should be thinner than the amount of play removed and additionally thinner by 0.05 mm - if the drive gear bearings are new or by 0.01 mm - if the bearings are left the same. If there is no axial play of the drive gear, use a special torque wrench with a scale of up to 0.5 kgf.m to check the moment of resistance to shaft rotation. With proper adjustment, the resistance moment should be 15–20 kgf.cm for new bearings or 7–10 kgf.cm if the bearings are left the same. With sufficient accuracy, the moment of resistance can be measured using a household steelyard...
...hooking its hook onto the hole in the flange.
In this case, the required values will be less - 3.8–5 kgf and 1.8–2.5 kgf, respectively. If the moment of resistance is greater, we change the spacer ring to another one, 0.01–0.02 mm thicker; if it is less, we select a ring of smaller thickness accordingly. Before assembly, the bolts for fastening the parts of the differential box and the bolts for fastening the driven gear, as well as their threaded holes, are degreased and coated with anaerobic sealant. We pay special attention to the cleanliness of the end mounting surfaces of the gears and the gearbox; the slightest contamination or nicks are unacceptable.
When installing the driven gear on the gearbox, we center it using long M10×1 bolts (you can use bolts from old connecting rods).
When installing the driven gear on the gearbox, we center it using long M10×1 bolts (you can use bolts from old connecting rods). Using adjusting nuts, we tighten the differential bearings with a slight tension, while turning the gear in one direction or the other so that the bearing rollers take the correct position.
To measure the lateral clearance in the meshing of the final drive gears, we attach an indicator to the rear axle housing by moving its probe to the top of the tooth on the outside of the driven gear.
The gap should be 0.15–0.20 mm. Measurements should be repeated on at least six teeth in opposite zones of the crown. To reduce the gap (using a screwdriver or a thin steel rod), loosen the adjusting nut on the side opposite the driven gear and tighten the other. You need to unscrew one nut and tighten the other by the same amount, guided by the grooves of the adjusting nuts. In this case, each unscrewing of the adjusting nut must be completed by tightening it slightly. For example, to loosen a nut by five grooves, unscrew it by six, and then tighten it by one groove. This will ensure that the bearing outer race is in constant contact with the nut and thus ensures that it remains in place during operation. To increase the gap, repeat the entire procedure in reverse order. After adjusting the lateral clearance in the engagement, we check the axial play in the differential bearings, for which:
Installation of new parts and assembly
Then, through a wooden spacer, with gentle blows of a hammer, the part is pushed onto the shaft until it stops.
Attention! Before assembly, you must make sure that there is lubricant inside the CV joint; as a rule, there is not enough of it there. According to the documentation for the VAZ 2114 car, the cavity of the internal grenade must contain at least 80 cm³ of lubricant, and the external one - at least 40 cm³. As a lubricant, you need to use a special thick lubricant “CV joint-4”.
As a lubricant, you need to use a special thick lubricant “CV joint-4”.
The other end of the drive is inserted into the splined part of the gearbox so that the splines coincide. Now you need to get out of the ditch, take a hammer and a wooden spacer and hammer the drive into the socket until it stops. You need to strike carefully, and in no case forcefully. In this case, you need to periodically look under the car, monitoring the process of the internal grenade shaft entering the gearbox.
Anthers need to be changed more often than CV joints themselves, since the unit can last 100-150 thousand km, and tires - at best, 30 thousand. To replace the outer grenade boot, it is not necessary to remove the entire drive; you just need to pull the shaft out of the hub spline. But such a replacement is not only inconvenient, but also meaningless. The reason is that in the near future you will still have to disassemble the car and pull out the entire drive in order to replace the boot of the internal CV joint.
Author's article from the DIY car repair section, which describes the process of replacing the CV joint and its boot on VAZ 2108, 2109, 21099, 2110 cars. The CV joint (constant velocity joint) should be changed if: P during the start or during movement at When turning the wheels, a characteristic cracking sound (knock) is heard. You can verify the correctness of the diagnosis by checking the drive shaft for play (rock the drive shaft by hand). With a dust cover the situation is much simpler. Its condition can be checked by simply turning the front wheel completely in any direction and looking under the wheel. If cracks, breaks, or splashed traces of lubricant are visible on the boot, this means it’s time to replace it.
Photo number 2 shows a homemade key for unscrewing the drive, a trouble-free and reliable tool. Consists of: a chisel to which a 30mm head is welded plus a metal pipe 1.5 meters long. After you have unscrewed the hub nut, you can loosen the wheel bolts (perform all these actions with the car standing on the ground). We lift the front wheel (you can have both at once) of the car and install stops under the body to fix the front part of the car.
You can use the old inner CV joint as a retainer. If this is not done, then after removing the second drive, the differential gears will shift and during assembly it will not be possible to insert CV joints. ) Fix the drive shaft in a vice, remove the clamps from the inner and outer CV joints, turn the boots inside out (if the boots are torn, you can simply cut them off with a knife). Using a hammer and a drift (copper or bronze attachment), we knock the CV joint off the shaft, applying force to the joint cage. Next, if the purpose of the work is to replace the boots: We wash the CV joint with gasoline, removing old grease and trapped dirt. We put a new boot on the shaft and stuff it onto the splines, pre-filled with lubricant P CV joint.
After inserting the drive into the gearbox, it should be seated until the CV joint is completely fixed in the side gear, without hitting the shaft too hard with a hammer along its axis (you should use a softening spacer, for example, a wooden block). Further assembly is carried out in the reverse order, and do not forget to replace the old hub nut with a new one. And after tightening, you need to close the edge of the nut to prevent unwinding. When using an article or photographs, an active direct hyperlink to the website www.
Sources
- https://ladaautos.ru/vaz-2110/mozhno-li-sdelat-zamenu-pylnika-shrusa-vaz-2110-bez-ego-snyatiya.html
- https://expertvaz.ru/2114/zamena-shrusa.html
- https://mir-autoproma.ru/kak-pochinit/619-zamena-pylnika-naruzhnogo-shrusa-vaz-2110.html
Answer
“I did it” last summer, so far it’s quiet.
at Oleg's, tel. 8 926 2290677, Astakhov recommended, Alexey wrote about him in the conference, and Eduard, it seems, built a bridge in front of me. Specializes in transmission, i.e. axles, transfer cases and boxes(?). Prices are average. “Rear axle repair” - $200 plus spare parts. The list of necessary spare parts is only after opening (I drove on my own in the heat, blah :-)). Halabyan st., 10/3 Chrysler bridge 8.251. rear axle oil seal 2 pcs. * 352 RUR. Seal, Shaft, Axle, Rear - Mopar 1-52070427AB2. shank oil seal RUR 384.Seal, Differential, Rear - Mopar 1-520675953. shank bearing, external RUB 768. Bearing, Pinion, Axle, Front - Mopar (1-)052525084. shank bearing, internal RUB 2,208. Bearing, Pinion, Axle, Rear - Mopar 47469795. additive for axles with LSD - RUB 150.4.
— 5% discountTotal, spare parts: RUB 4,004 ($132)
Additionally: transmission oil, 75W90, synthetic, TEXACO Multigear (GL-4/5) 2 l. * 263 rub. = 526 rubles ($17.5)www.oilclub.ru
Total: $200 + $132 + $17.5 = $350 There is no hum, but now I heard so many new sounds that it drowned out :-)
Conclusions: 1. The professionalism of the seller (person) is very important. The store tried to tell me that bearings for the Chrysler 8.25 were out of stock :-( although one bearing from DANA44 was suitable, and the other, it seems, from DANA35. Fortunately, I called in advance and remembered the name of the person who spoke to me on the phone. Manufacturer TIMKEN, If desired, you can easily check the markings on the bearings themselves2 with oil, because I was in a hurry, it turned out slightly wrong, :-)i.e. I would fill it now (QUICK! Thank you! Your point of view on “oil” issues is firmly stuck in my head! :-)) or the front one - Mobil SHC 75W90 1L 366 RUR. GL-4/5 rear (LSD) — Mobil SHC LS 75W90 1L 355 RUR. GL-5 or front - Castrol SAF-X 75W140 1L 478 RUR. GL-5 rear (LSD) — Castrol SAF-XJ 75W140 1L 476r. GL-5 without any of these “Mopar additives” :-)
ps “to the heap” I asked to change the front axle seals (they had been snotty for a long time, but recently, apparently, when replacing the balls, they were disturbed and leaked) 2*10$ - front axle shaft seal (DANA30), Mopar 1-04874477.80$ - work.
I changed the rear axle shaft seal - report and question Actually, I’ve been wanting to for a long time since the seal was slowly leaking. I’ve been sinning for a long time about a clogged breather, and I’ve been looking for this same breather for at least a long time.-) As it turned out, the breather tube goes up from the brake tee, into the spar. It doesn't seem to be clogged. Then I went to buy the oil seal itself - I strongly do not recommend buying anything from Alabyan. - (They sold me a non-original oil seal, but they assured me for a long time that it was the most original, just in OEM packaging. True, they sold it quite inexpensively. On Panfilov this but it costs 30 rubles more.-) Well, then, on the occasion of good weather, I decided not to go to Astakhov, but to do everything with my own hands, near the house. The whole process, including revitalizing the self-supplying mechanism on both rear wheels, with beer and smoke breaks, took as much as 2 hours. For one thing, I found out that my bearings are roller bearings and are quite alive. I also came to the conclusion that I would change the bearing in the rear axle of the Indian myself, on my knees, only in a completely hopeless situation.-) Tomorrow I’ll go change the crosspieces of the front axle shafts. Unfortunately, it was not possible to buy injectable crosspieces. So the choice was made in favor of the original ones. The next question is: do I need to refill the crosspieces with lubricant before installation? I read somewhere that bourgeois crosspieces are sold with transport lubricant...?
Answer
On the advice of Yura Whitebearcub, I put green Castrol LMX in the crosspieces in a tube like a huge toothpaste (I simply wiped the old lubricant off the needles and insides). And for the CV joint I recommend another one - Castrol MS/3 (black) - in the same tube. That's my cardan in the photo. I also bought the original ones, not the syringe ones. By the way, they have good seals. What exactly was done? Can be more?