The relatively complex scheme for distributing torque from the internal combustion engine to the wheels is explained by the universal purpose of the Niva 2121 - if used correctly, it can be used comfortably in the city and along muddy country roads.
Such properties are ensured by the presence of a transfer case with a center differential lock, complementing a 4- or 5-speed manual transmission, depending on the year of manufacture.
The lever located closer to the dashboard is responsible for turning off/on the center differential, the second “small” lever controls the range multiplier and has 3 positions: high and low rows, as well as neutral.
Transfer case location and functions
Location of the transfer case in the Niva 21213
The transfer case occupies an intermediate position in the vehicle transmission between the gearbox and the driveshaft. It has its own body in which its components are located.
The transfer case helps to implement such SUV capabilities as:
- Center differential lock.
- Disabling the drive axle.
- Increased torque of the drive wheels.
- Distribution of torque along the wheel axles.
Transfer case Niva 21213
Model VAZ-21213 is an all-terrain passenger car with permanent all-wheel drive and differential lock. Brand 21213 is a restyled version of the first VAZ SUV, VAZ-2121. RK Niva 21213 has three gears:
- the first - with a gear ratio of 1.2;
- the second, lowered – with the number 2.135;
- neutral
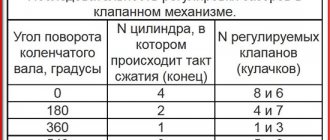
21213 is equipped with 4-speed and 5-speed gearboxes, and when the first speed of the transfer case is turned on, the car operates in standard mode, the gear ratios in the transmission are from 5-speed. The checkpoints are as follows:
- 1 – 4,4;
- 2 – 2,52;
- 3 – 1,63;
- 4 – 1,2;
- 5 – 0,98.
When you turn on the second position of the transfer case lever (reverse position), the gear ratios change (lower):
- 1 – 7,83;
- 2 –4,48;
- 3 – 2,90;
- 4 – 2,14;
- 5 – 1,75.
On ordinary roads, the transfer case is always in first gear, the transfer case control lever (reduction gear) is pushed forward. The neutral gear of the RK disconnects the transmission, and in this position the car does not drive; there is also a neutral in the gearbox.
Motorists often ask the question: why is neutral gear needed in a transfer case? The neutral is used when connecting additional units to the transmission, for example, a mechanical winch; in this case, a power take-off must also be installed.
Idle move
The Chevrolet Niva idle speed sensor ensures the supply of air to the engine during idling. When a signal is received by the ECU, the sensor moves the valve, changing the flow hole in the air valve. If it fails, it will not be possible to repair it, since it has a non-demountable design.
To replace it, you need to prepare a thirteen socket wrench, pliers and a Phillips screwdriver and do the following:
- Unscrew the mounting bolts and remove the housing from the throttle valve
- Disconnect the wiring connector of the engine regulator
- Unscrew a couple of screws on the throttle body
- Removing the regulator
- Remove the O-ring from the existing hole.
To summarize, we can conclude that the failure of any of the above elements can seriously affect the operation of the car, therefore, in the event of a malfunction, you need to replace a new part as soon as possible. All replacement work can be carried out independently.
The transfer case is used to change the amount of torque and distribute it between the front and rear axles. The box has two gears with ratios of 1.20 and 2.135. The front and rear axles are constantly driven and connected by a center differential, dividing the torque equally. To increase the vehicle's cross-country ability, the differential can be blocked, and the front and rear drive shafts become rigidly connected to each other (their rotation speeds are equal).
The transfer case is attached to the body floor on three brackets - rubber-metal supports. The transfer case housing parts are cast from aluminum alloy and connected to each other with studs and nuts. There is a hatch in the upper part of the crankcase, closed with a stamped steel cover. The front cover is centered on the crankcase using two locating pins.
There are cardboard gaskets between the covers and the crankcase (during repairs, a sealant gasket can be used instead). All shafts are sealed with rubber-metal seals (oil seals). The speed sensor drive shaft, gear shift fork rods and differential locks are sealed with rubber rings. There are two holes in the front cover - a filler hole (also known as a control hole) and a drain hole.
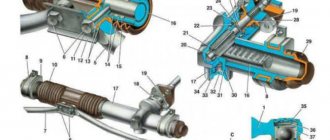
Transfer case with drive: 1 — differential lock clutch fork; 2 — differential lock fork rod; 3 — protective cover of the rod; 4 — lock washer; 5 — bushing of the lever axis; 6 — lever axis; 7 — differential lock lever; 8 — fork locking bolt; 9 — switch for the differential lock warning lamp;
10 — gear shift fork rod; 11 — differential lock lever rod; 12 — control lever bracket fork; 13 — control lever; 14 — gear clutch fork; 15 — spacer sleeve; 16 — spring and locking ball; 17 — clamp spring bushing; 18 — drive shaft flange;
https://www.youtube.com/watch?v=ytadvertiseru
19 — front cover; 20 — drive shaft oil seal; 21 — thrust ring of the bearing; 22 — front bearing of the drive shaft; 23 — high gear; 24 — gear clutch; 25 — transfer case housing; 26 — low gear; 27 — rear bearing of the drive shaft; 28 — adjusting ring of the rear bearing of the drive shaft;
29 — drive shaft; 30 - bushing; 31 — hub; 32 — back cover; 33 — rear bearing of the intermediate shaft; 34 — intermediate shaft; 35 — rear differential bearing; 36 — rear axle drive shaft bearing; 37 - flange; 38 — rear axle drive shaft oil seal; 39 — rear differential housing;
40 — gear support washer; 41 — rear axle drive gear; 42 — satellite axis; 43 — retaining ring; 44 — spring washer; 45 — side suspension bracket; 46 — satellite thrust washer; 47 — front axle drive housing; 48 — satellite; 49 — differential driven gear; 50 — front differential housing;
51 — retaining ring; 52 — spring washer; 53 — front bearing of the differential housing; 54 — differential lock clutch; 55 — installation ring of the front differential bearing; 56 — oil deflector; 57 — front axle drive shaft oil seal; 58 — front axle drive shaft bearing;
The drive shaft is mounted on two ball bearings, the outer rings of which are located in the sockets of the front cover and crankcase. The front bearing inner race is sandwiched between the shaft shoulder and the thrust ring by a self-locking shaft flange nut. The rear bearing inner race is sandwiched between the shaft shoulder and a thrust washer located under the shaft rear end nut.
Also interesting: Niva Chevrolet transfer case: device, connection diagram and how to use?
The nut is locked by pressing its edge into the grooves on the shaft. The drive shaft is secured against axial displacement by an adjusting ring in a groove on the outer ring of the rear bearing, sandwiched between the crankcase and the rear cover. There are two drive gears on the drive shaft. The front (large) is the highest gear; it rotates freely on a heat-treated shaft journal.
Rear (smaller) - lowest gear, rotates freely on a heat-treated bushing mounted on the shaft with tension. The gears have two crowns. The helical (large) rings are in constant mesh with the corresponding gears of the intermediate shaft, and the gear shift clutch is connected to the spur (small) rings when the gear is engaged.
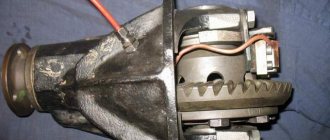
View of the front side of the transfer case: 1 - right suspension bracket; 2 - filler plug; 3 - intermediate shaft; 4 — speed sensor; 5 — speed sensor drive housing; 6 — front driveshaft; 7 — front axle drive housing cover; 8 — left suspension bracket; 9 — rear propeller shaft; 10 — front cover of the transfer case; 11 — transfer case housing; 12 — drain plug.
The device of the VAZ Niva transfer case
The transfer case is not present in all VAZ passenger cars, but only on cars with two drive axles. In the transmission, the transfer case (TC) is installed at the rear of the gearbox; a rear driveshaft is attached to its shank, which connects the transfer case to the rear axle. The front axle is also driven by the steering wheel; it is connected to the transfer case by a front driveshaft.
The reduction gear in the Republic of Kazakhstan is designed to obtain high torque, it is used to overcome difficult sections of the road, and helps to cope with off-road conditions. The VAZ Niva transfer case contains the following main parts:
- the body itself;
- front axle drive shaft;
- intermediate shaft;
- drive shaft;
- gears;
- bearings;
- differential housing;
- satellites;
- differential lock clutch;
- gear shift clutch;
- flanges (for connection to cardan shafts);
- oil seals;
- control levers.
Tips for owners
To make driving your car comfortable, read some important points:
- The usual, standard arrangement of the front and rear handles is forward and backward, respectively. Movement in this mode can and should be carried out in areas characterized by even and smooth surfaces.
- Locking the differential by switching the front handle to the rear position is best on roads characterized by increased slipperiness. This measure will give Niva stability. It is worth understanding that after overcoming the problem area, the handle will need to be returned to its original position.
- As noted earlier, downshift should be activated before a potential obstacle, but not while the car is already stuck.
- It is worth understanding that activating the lock when the vehicle is stationary is sometimes impossible, even if the clutch is depressed. This may be caused by the clutch teeth hitting the gear teeth. In this case, you can try to activate the lock by starting to drive slowly and make a slight turn. If problems arise with disabling the lock, it is recommended to perform the same procedure with the clutch depressed and the steering wheel slightly rocked.
Centering method
To carry out this work you will need a lift, although with some skill you can get by with simple supports. First you need to prepare the car. If there is a lift, it is raised up. If supports are used, the corners of the machine are jacked up one by one and it is placed on them. Please note that all supports must be stable, otherwise the work will be unsafe. You should also prepare the tool in advance. If there are no plans to simultaneously replace other parts, then it is quite possible to get by with a ratchet and a “13” head. During operation, an assistant must be in the cabin.
Adjustments are made in the following order:
- To begin with, you should evaluate the condition of the splines on the cardans. If they are very worn, then most likely you will not be able to perform the alignment correctly. In case of significant wear, parts should be replaced;
- The transfer case mount is inspected. Often the displacement can be seen with the naked eye;
- Next, loosen the transfer case mount. Just don’t unscrew it completely;
- After this, start the engine and “accelerate” the car to a speed of 80-90 km/h. In this case, the transfer case will fall into place on its own;
- The crucial point is to consolidate the result obtained. This can be achieved in 2 ways. Mechanics argue which one is better, but both are used in everyday life. Most often, the engine is turned off, and with its help the transfer case and cardan shafts are stopped.
- All that remains is to quickly tighten the nuts. Disadvantage here 2. Stopping the box in this way can have a negative impact on its condition.
- Also, you need to tighten the fastener as quickly as possible, otherwise it will be of no use. A more reliable, but technically complex method is to tighten with the engine running;
- The car is lowered to the ground and testing is performed.
If the vibration persists, the procedure should be repeated.
A series of downshifts
You can often encounter the following type of misconception: switching the rear handle can increase the power characteristics of the motor. But this is not true. It serves to change the gear ratio between the engine and the wheels. By increasing it, the traction forces on the wheels will increase. There is also a reduction gear in the dispensing mechanism.
DON'T SPEND MONEY ON REPAINTING! Now you can remove any scratch from the body of your car in just 5 seconds.
Its operation can be controlled using the rear handle. When we shift the lever back, we will have a gear ratio of 2.135 - this is a low gear. It is recommended to downshift such a gear only when the car is stationary and the clutch is depressed. Despite the fact that the manual does not contain such a restriction, novice and inexperienced Niva drivers are not recommended to switch while driving, since the Niva transfer mechanism is not equipped with a synchronizer.
Eliminating prerequisites
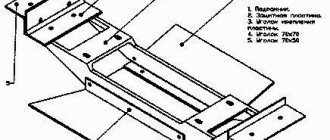
The misalignment of the transfer case occurs due to an undeveloped design. Therefore, many craftsmen strive to modify the fastening so as not to bother with alignment once a year. A special frame is used for this. In recent years, it can be purchased in stores, but you can also make it yourself. The advantages of this modification are the following:
- The transfer case is mounted on the rigid base of the subframe. The attachment to the body is made through a subframe, this allows to reduce the level of vibration transmitted to the body;
- It plays the role of a kind of protection for the crankcase;
- Also worth mentioning is adding additional rigidity to the side members.
- Among the disadvantages, we can mention a slight decrease in clearance. Although, in light of the advantages, this does not play a special role.
To assemble the subframe you will need a square pipe. Some people use a corner, but in this case the structure will be less durable. The support plates are made of sheet steel. Before assembly, you should cut off the old transfer case mounting bolts. Now it will be installed on the subframe. The pipe is cut to size and the frame is welded. After that, holes are drilled in the crossbars for fastening the transfer case. It is important not to make a mistake with the sizes. The next step will be assembling the mount to the body. Sheet steel support plates are welded to the subframe. Holes are drilled in it. After fitting, you need to drill holes in the floor of the car.
M12 bolts should be used for fastening
, as well as thick washers.
After installing the subframe, do not forget to treat it with an anti-corrosion compound. This will increase the service life of the part. This is how, through simple manipulations, you can get rid of one of Niva’s sores. Conclusion
. Even great cars have flaws. The domestic SUV Niva is no exception. During active use, vibrations emanating from the transmission may occur. That’s when the question arises of how to center the transfer case on the Niva. In fact, this work is not difficult, but there are some nuances that are better to know before starting work. Some people, knowing this feature of this car, install a subframe, this can significantly reduce the noise of the transmission.
Niva transfer case. Ways to eliminate vibration
The Niva family of cars differs from VAZ passenger cars in permanent all-wheel drive - they have two drive axles. In total, the VAZ SUV has three differentials in its transmission - one for each axle and another center differential.
1. Oil seal; 2. Thrust ring of the front bearing of the drive shaft; 3. Front bearing cover; 4. Front drive shaft bearing; 5. Transfer case front cover; 6. High gear; 7. Gear clutch hub; 8. Gear clutch; 9. Low gear; 10. Transfer case housing; 11. Rear drive shaft bearing; 12. Drive shaft; 13. Transfer case rear cover; 14. Intermediate shaft; 15. Rear intermediate shaft bearing; 16. Rear differential housing bearing; 17. Installation ring of the rear axle drive shaft bearing; 18. Rear axle drive shaft bearing; 19. Oil seal deflector; 20. Rear axle drive shaft flange; 21. Rear axle drive shaft; 22. Bearing thrust ring; 23. Differential housing; 24. Rear axle drive gear; 25. Satellite; 26. Axle of satellites; 27. Retaining ring of the satellite axis; 28. Spring washer; 29. Driven gear; 30. Differential housing bearing retaining ring; 31. Differential locking clutch; 32. Front axle drive shaft; 33. Front axle drive housing; 34. Retaining ring of the front axle drive shaft bearing; 35. Differential bearing spring washer; 36. Front differential housing bearing; 37. Driven gear of the speedometer drive; 38. Speedometer drive housing; 39. Front intermediate shaft bearing; 40. Gearbox; 41. Elastic coupling; 42. Constant velocity joint; 43. Transfer case; 44. Shims; 45. Transfer case suspension bracket; 46. Rear engine mount bracket.
Differential locking
This mechanism is a kind of distributor of traction forces coming from the engine to the wheels.
An important feature is that the latter have the ability to rotate at different speeds. The importance of having a differential mechanism is due to the fact that during turning maneuvers, the wheel located inside makes fewer revolutions when compared with the number of turns of the outer one.
When the car moves on a flat road and in a straight line with differentials, the traction force is divided equally between all 4 wheels. If there is insufficient adhesion of the wheels to the surface or slipping occurs, the differentials will redistribute the load on the slipping and sliding wheel so that the first receives more force, and the second, accordingly, less.
We have already mentioned UAZ. Despite many similarities, it should be understood that the VAZ’s all-wheel drive is made in the “pat-time” style. This means that when connected, the axes are firmly connected to each other, and rotation occurs at the same speeds. This device imposes some restrictions on the use of all-wheel drive - it can only be used in cases where road conditions allow slipping. In cases with hard asphalt roads and highways, it is recommended to switch the car to single-drive mode.
Sometimes you can come across a misconception about why a small handle is needed next to the shift lever on a Niva. Some car owners believe that it is needed to connect front-wheel drive. However, the front-wheel drive of this car is permanently connected. As is the rear one. Cars of the Niva family have permanent all-wheel drive. The handle actually serves to switch the operating modes of the differential of the transfer mechanism.
In the “forward” position, the differential operates as usual, but if you move it back, the differential is locked, and the forces from the motor are applied to the differentials of the axles, which makes the drive more rigid. It is worth noting that there are also special types of locks for front and rear axles.
In theory, when used in conditions where the car is stuck, it will be able to overcome the obstacle if there is sufficient traction on at least one wheel. In this case, it is better to lock the differential before overcoming an obstacle, but never after entering an area that is difficult to overcome. This application of locking will avoid wear and damage to the transmission.
Eliminate vibration with additional fasteners
Installing the third support of the transfer case on VAZ 21213/21214 vehicles allows you to reduce the level of vibration of the transfer case; with this support it is easier to center the transfer case. The part can be purchased at auto stores or made yourself. The finished product comes with three long studs (for model 2121); to install the third support on this machine, you will need to unscrew the short studs from the transfer case housing and install new studs from the kit. We carry out repairs as follows:
- dismantle the front passenger seat in the cabin;
- remove the floor tunnel lining;
- in the cabin we move aside the carpet covering the body amplifier (in front of the handbrake lever);
- remove the transfer case (alternatively, you can simply hang it up, but removing the third support makes it easier to install);
- We attach the bracket of the new support to the body of the RC;
- we install the transfer case in place, center it in the optimal position, and fasten the side supports;
- we combine the third support with the body, drill two holes in the bottom;
- Using washers, bolts and nuts (from the kit) we attach the support to the bottom of the body.
Vibration is eliminated more effectively by installing a subframe under the transfer case. You can also make such a device yourself or buy a finished product at a car store.
In order to install the subframe, the transfer case must be removed. It is more convenient to carry out such work in a pit; we carry out repairs as follows:
- leave the car in neutral gear;
- disconnect the propeller shaft from the transfer case, it is advisable to mark the driveshaft flange and the drive shaft so that during installation, align the driveshaft according to the marks - this way, the occurrence of unnecessary vibrations is eliminated;
- dismantle the muffler mounting bracket;
- remove the gearbox traverse;
- jack up the transfer case, remove the side fastenings of the transfer case;
- We treat the places where the subframe fits to the body with Movil;
- place the subframe on the gearbox studs;
- we mark the attachment points of the subframe on the side members, drill holes, attach bolts to the body;
- we tighten all fastenings, except for the transfer case supports themselves;
- we perform alignment of the steering wheel;
- Finally tighten the transfer case supports.
It should be noted that installing an additional support or subframe on the steering wheel does not always lead to the desired effect; in some cases, vibration only increases.
Disassembling the transfer case
https://www.youtube.com/watch?v=ytcreatorsru
A complete repair will require an automotive tool kit and a transfer case repair kit (bearings, seals and gaskets, possibly some gears), a hammer and a bearing puller.
- Remove the front and rear covers of the RCP housing. To do this, you will need to loosen the nuts securing the covers and, using a pry bar, pull the cover towards you from all sides. On the other side of the box we perform a similar operation. The front cover will come out together with the shaft responsible for locking the differential, and the rear cover with the shaft responsible for the reduction gear.
- Using a hammer, knock out the differential assembly from the housing. The design of the differential located inside the transfer case is similar to that found in the axles. Having unscrewed the nuts securing the main pair, we open access to the satellites. If there is wear on the satellite teeth, then be sure to replace all the parts.
- We check each bearing for any extraneous sounds during rotation. If there are any, then remove the shaft nut on which the bearing sits and use a puller to press out the old bearing.
- The internal parts of the transfer case are installed in reverse order. It is recommended to use new bolts and nuts to ensure sufficient tightening torque for the shafts and housing covers.
- After assembly, fill in new semi-synthetic oil, not lower than GL-4 classification - 0.9 l.
We study problems and repair methods.
Any car owner definitely doesn’t need to be told why howling and humming are bad. Vibration of the transfer case on a Niva at low speed is quite common. The driver, of course, gradually gets used to many extraneous sounds in the car, but the noise level is high enough to make it impossible to carry on a conversation with passengers while traveling. Due to excessive noise pollution, you will inevitably have to deal with the problem.
Sources
- https://motorltd.ru/snyatie-i-tsentrirovanie-razdatochnoy-korobki-vaz/
- https://www.vazzz.ru/vaz-21213-razdatka-ustrojstvo-shema-tsentrovka-snyatie/
- https://avto-idea.ru/remont/remont-razdatki-na-nive-21213-kak-ottsentrovat/
- https://AutoFlit.ru/2260-kak-otcentrovat-razdatku-na-nive-sposob-dlya-korotysha-i-shevrole.html
- https://NewNiva.ru/kak-ustranit-vibratsiyu-na-nive-21214.html
[collapse]