I was already tired of the crunching sound when turning on second gear; of course, it did not appear suddenly immediately, but over time, from the beginning it was rare and then more and more often, and it also depended on the engine speed when switching (the higher it is, the more likely it is to appear). To avoid crunching, I had to engage the gear 2 seconds after squeezing the clutch, which is insanity, of course.
Everything would be fine, but that’s not all that bothered me; the reverse gear was often engaged with a crunch. There is also oil leakage from the side of the gearbox housing and a rather unpleasant rustling noise from the gearbox side, and it’s time to change the oil; it has already worked (in winter, in cold weather, the car tried to stall or go in neutral). The only conclusion is to remove and disassemble.
I filmed without a hole or an assistant, I drove the car onto a couple of planks and jacked it up
The fourteenth VAZ (like the VAZ 2113 and VAZ 2115) is equipped with a five-speed manual gearbox. This gearbox is similar to the units that were installed on the eight, but the main pair has been changed.
From this article you will learn the technical characteristics and design features of the gearbox on the VAZ 2114, how the repair and maintenance of the fourteenth gearbox is carried out, and what is the current cost of used and new units.
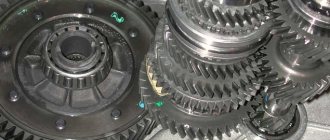
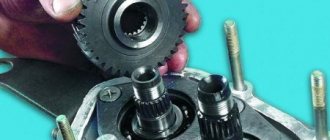
Disassembled gearbox
Troubleshooting
If the VAZ 2109 gearbox howls, then the simplest repair is to check the level and change the oil in the crankcase. To eliminate all other defects, it is necessary to remove the box from the car and completely disassemble it. To do this, you need a closed room, a large number of various tools and experience in repairing such units.
Lack of oil
The oil level is measured using a dipstick installed in the upper part of the gearbox housing. A volume located at any distance between the minimum and maximum marks on the probe rod is considered normal. On the oldest gearboxes that do not have an overdrive fifth gear, the amount of fluid is measured through a hole in the side, closed with a plug. The level should be at the bottom edge of this hole.
Dipstick for checking the oil level on the VAZ 2109 box
To maintain the normal condition of the oil, it should be changed after 75 thousand kilometers. When filling, use API GL-4 standard lubricants with a viscosity of 75W-90, 80W-85 or 80W-90. Some owners specially fill in thick oil of the TM-5 type, which reduces the noise of the box. If replacing the lubricant does not correct the situation and the mechanism continues to make noise, then the problem lies in worn-out gearbox parts.
Replacing the drive shaft bearing
Before replacing the bearings, the gearbox must be removed from the vehicle.
To remove the gearbox you must:
The procedure for removing the box from a VAZ 2109 is shown in the video from the author of AUTO REZ.
After completing the steps described above, you need to disassemble the gearbox and remove the input shaft.
To remove and replace worn bearings, follow the steps:
Wear of gears in the box
To perform the repair, you will need to remove the gearbox from the car according to the instructions described above and completely rebuild the gearbox. In this case, the condition of all parts of the mechanism should be assessed, since not only gears, but also other mechanisms can be worn out.
The sequence for disassembling the gearbox is as follows:
The procedure for disassembling the box is described in detail on the video of the AUTO RES channel.
The drive shaft of the VAZ 2109 box has several gears, one of which is made in the body of the shaft, and the second has a high interference fit. Therefore, the input shaft gears cannot be replaced and are replaced with a completely new shaft. Maintenance of this part consists of replacing the bearings, which are removed with mounting tools or a puller. Only the secondary shaft of the box can be disassembled, and the parts should be marked or laid out in the order of removal. This method makes it easier to reassemble the unit.
Shaft disassembly sequence:
Changing the synchronizer clutch
Work on replacing couplings is carried out on a disassembled box in the same way as changing blocking rings. After removing the clutch and hub assembly, it is necessary to disassemble this unit.
The video, made by user Sem, shows how you can quickly assemble a synchronizer.
Clutch adjustment
To adjust the clutch, do the following:
Measure the clutch pedal travel Unscrew the nuts securing the cable Adjust the cable
Box faults
The design of the “Seven” gearbox is designed for many years of service. Usually the driver carries out the first and even the second major overhaul of the engine, and only after that does the need to repair the gearbox arise.
In addition, the “seven” itself has acquired a reputation as a “workhorse” throughout its long history. The machine really serves faithfully for many years, but this does not mean that each of its mechanisms will not wear out over time.
If we talk about malfunctions of the VAZ 2107 gearbox, then most often drivers complain about three defects: the inability to engage the desired gear while driving, the gear being knocked out and a strong crunch in the box.
The transmission does not start
It is very difficult to drive a vehicle if the driver cannot change gear. On the one hand, the shift lever moves to the desired position, but, on the other hand, switching as such does not occur. Or the lever cannot be set at all to the desired speed switching position.
In any case, the problem lies precisely in the box:
- Some of the moving (hinge) elements of the shafts are very worn out - it is recommended to carry out a major overhaul of the gearbox;
- wear of the blocking rings on the synchronizer - replace the rings with new ones;
- the synchronizer spring is stretched or broken - replace the spring;
- severe wear of the gear splines - only complete replacement of the gear will help.
Knocks out gear when driving
Another common problem with the gearbox is the transmission slipping out of gear immediately after turning it on. The lever simply throws back, and the engine begins to experience overloads, since at high speeds it does not receive the required distribution number.
The malfunction may be associated with different elements of the box:
- jamming of the hinge on the gear shift lever - it is necessary to remove the lever skirt, clean all connections and lubricate them;
- breakage of the lever - it is impractical to carry out repairs; it is easier to immediately replace the lever with a new one;
- the clutch does not work correctly - in this case, the entire blame cannot be placed on the box; it is quite possible that after adjusting the main elements of the clutch, the gear will not be knocked out;
- The forks in the box are bent - it is recommended to replace the entire set of forks.
Device
The design of the VAZ-2114 transmission assumes the presence of the following elements:
- Box gears.
- Shafts. There are several of them. These are primary, secondary and intermediate.
- Synchronizers.
- Reverse gear. It consists of an additional gear and shaft.
- Gear shift lever.
- Transmission housing.
- Drain and filler hole for oil.
- Dipstick and breather.
The gear shift pattern is located on the lever.
As you can see, everything is quite simple and clear. By the way, the first generations of Samara used 4-speed gearboxes. But now they are rarely seen. So, let's take a closer look at the design of the VAZ-2114 Samara-2 gearbox. All main transmission components are contained in the crankcase. It is securely attached to the car engine. It also contains oil. When the gears operate, the gearbox teeth become very hot. Without lubrication, their service life is significantly reduced. Therefore, the crankcase contains from two to four liters of oil, depending on the type of car. For the VAZ-2114 gearbox, it is recommended to use 3.3 liters of gear lubricant. So, let's continue to study the device. As for the shafts, during operation of the unit they rotate in bearings and have a set of five gears with different gear ratios. To ensure that each gear is engaged clearly and smoothly, synchronizers are provided. They smooth out the shock from rotating gears when turning on a certain speed. Gear shifting is performed by the gearshift lever connected to the rocker. It is fed directly into the box. Also in the design of the transmission there is a locking device that prevents spontaneous switching off of the gear and a locking mechanism. It prevents several speeds in the box from turning on at once.
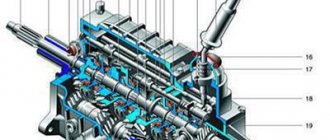
Transmission device diagram
The gearbox mechanism is a system of parts that has an independent structure and characteristic features determined by the model. Before you begin repairing the gearbox, you must familiarize yourself with the diagram of the transmission mechanism in the operating manual. The diagram contains the names of the parts and the structure of the relationship.
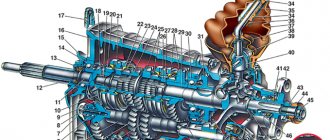
Transmission device: 1 - input shaft; 2 - secondary shaft; 3 — rod for shifting the third and fourth gears; 4 — fork for shifting third and fourth gears; 5 — differential; 6 — fork for switching first and second gears; 7 — fork rod for shifting first and second gears; 8 — gear shift rod; 9 — fifth gear shift fork rod; 10 — gear shift mechanism; 11 — reverse intermediate gear; 12 — clutch housing
Knowledge of the structure of the structure reduces the time spent on identifying mounting fasteners and dismantling components.
Failure of the VAZ 2109 second gear synchronizer
The synchronizer is subject to natural wear and tear during operation. The first signs of synchronizer wear are recognized when the corresponding gear is engaged. For example, on a VAZ 2109 car, the most common gearbox malfunction is the failure of the second gear synchronizer.
When the gear is engaged, a characteristic crunch or crackling sound appears, and only after this the gear can be put into operation. This is due to the fact that the operation of the synchronizer is disrupted, and it is no longer able to equalize the rotation speeds of the shafts and gears, and therefore their wear increases. If you continue to operate the car with a faulty synchronizer, the second speed will simply stop turning on.
Repair of VAZ 2114 gearbox
According to the source of this article, provaz2114.ru, the most reliable method of keeping the mechanism in good condition is prevention of malfunctions (systematic maintenance) and proper operation. But even so, situations are possible that require prompt repairs. When the gearbox cannot be repaired, information becomes relevant about how much a new VAZ 2114 gearbox costs? Estimated price in stores is 16 thousand rubles, used: 4000-10000 rubles. When the gear knob is loose on a VAZ 2114, it is possible that the solution to the problem is to install a new one. The VAZ 2114 gearbox linkage also needs to be replaced.
Instructions for removing, disassembling and assembling the VAZ 2114 gearbox
Removing the gearbox is required when troubleshooting parts and the mechanism of the gearbox itself; when replacing the clutch.
Repair work may require one business day, so the instructions below must be started in the morning. Hiring a partner with experience in this type of repair will reduce time costs and improve the quality of repairs.
Preparation
The preparation process consists of the following steps:
- to warm up the oil to be drained, we drive a vehicle for a distance of 5 km;
- we install the vehicle on an inspection ditch (pit) or drive it onto an overpass;
- We put the car on the handbrake;
- raise the hood;
- fix the raised hood;
- we install the hoist, or use improvised means, or a special device, which is a crossbar to support the engine in a suspended position.
Removing and disassembling the gearbox. Procedure for cleaning gearbox parts
We perform the following steps sequentially:
- We remove the terminals.
- We remove the battery.
- We remove the battery to the side.
- We unscrew the three bolts that secure the crankcase protection.
- We remove the protection.
- If the model is before 2003, then remove the oil level dipstick.
- Using a 17 key, unscrew the plug (plug) of the drain hole.
- Place a five-liter container under the drain hole.
- Drain the existing oil from the gearbox into a container.
- We are waiting for the oil to be completely removed from the gearbox.
- We unscrew the two locking nuts of the starter protective jacket, located below in relation to the pit, and one locking nut on top of the starter.
- Remove the protective jacket of the engine starter.
- Disconnect the power wires to the engine starter.
- We remove the engine starter from below, that is, by descending into the pit.
- Remove the clutch cable.
- Compress the spring holding the block.
- From below, disconnect the block with the wires of the speed sensor under the hood.
- Disconnect the reverse sensor wire connector.
- We unscrew the bolts under the hood connecting the ignition module bracket to the gearbox housing.
- Disconnect the torque rod bracket.
- Loosen the gear shift rod clamps.
- We remove it by pulling the torque rod from the hinge intended for changing gears.
- We take out the gear shift rod.
- Unscrew the fastening bolts to the steering knuckle of the left ball joint.
- We carry out dismantling by disconnecting the lower mounting of the gearbox to the engine (sometimes it is enough to loosen the tightening).
- Unscrew the bots.
- Removing the transmission housing
- We unscrew the bot from the lower left part of the gearbox.
- Using a board, we hang the motor.
- We remove the fixation of the left and rear (attachment to the body) engine mount by unscrewing the corresponding nuts.
- We unscrew the pair of bots that secure the rear engine mount to the transmission, holding the nuts against spinning with a second wrench.
- We dismantle the support.
- We insert a screwdriver into the hole between the engine cylinder block and the clutch housing.
- Using an inserted screwdriver, we move the box along the guides so that the rear part of its body passes over the backlight extension, and the input shaft is disconnected from the clutch.
- We remove the gearbox unit from under the car.
- We clean the gearbox parts, removing deposits with a brush.
- We clean the holes and slots from dirt.
- We wash and blow off the parts and bearings with a stream of compressed air.
- We examine the details of the gearbox.
- If necessary, we replace worn or damaged parts.
- We carry out the assembly, focusing on the procedure indicated above.
Box removal process
Removing the VAZ 2114 box is quite simple, although there are some peculiarities, so it is still advisable to have an experienced partner next to you for the first time.
Tools
- a set of keys;
- Screwdriver Set;
- WD-40 fluid in case you can’t unscrew some part;
Rust converter WD-40
Gears are difficult to shift
Spontaneous gear disengagement occurs
Gears are switched on with noise and crackling
There is an oil leak from the gearbox
- container for draining old transmission oil;
- new oil (if the replacement was carried out a long time ago);
- rags;
- board.
Gearbox VAZ 2114 disassembled
Stages
Since you will have to work under the car, it is better to place the VAZ 2114 car on a pit or overpass; a car lift would be a good solution, otherwise you will have to resort to jacks.
- First you need to remove the terminals and remove the battery.
- Drain the oil from the gearbox into a prepared container by unscrewing the drain plug.
- We remove the starter.
- Remove the clutch cable.
- We disconnect the block with wires from the speed sensor, after compressing the spring.
- We unscrew the bolt attaching the ignition bracket to the gearbox. Then unscrew the remaining bolts.
- Under the car we find and disconnect the block of wires leading to the reverse sensor.
- Unscrew the bolts securing the linkage bracket to the gearbox.
- Having first loosened the gear shift rod clamp, we pull it out, pushing it back.
- We dismantle the wheel drives. You can leave the right one.
- In order for the gearbox to be removed without any complications, unscrew the bolts with which the left ball joint is attached to the steering knuckle.
- We disconnect the lower mount of the gearbox to the engine - sometimes you can get by by simply loosening the tightening of the bracket.
- After unscrewing the bolts, remove the transmission housing cover.
- Unscrew the bolt on the left of the gearbox.
- We carefully and carefully hang the engine using a board or other device.
- At the bottom of the car, unscrew the nut securing the left motor mount.
- We unscrew the two nuts with which the rear motor mount is attached to the body.
- We unscrew the two bolts with which the rear engine support is attached to the transmission (the second key is used to keep the nuts from turning), and remove the support.
- We move the box along the guides.
- This completes the process of removing the box; after completing all the necessary tasks, assembly occurs in the reverse order.
- When you put the box in place, do not forget to adjust the clutch and fill it with new oil.
Latest comments:
Rear
As for the latter, its gear ratio is 3.53. Reverse speed ensures that the transmission shaft rotates in the opposite direction. To do this, it needs an additional shaft with a separate gear. As a result, the number of gear pairs changes to an odd number, and the torque changes its direction. Also, this transmission does not have a synchronizer - it will not be possible to turn it on at speed. The VAZ-2114 gearbox has a gear with an equal gear ratio, which is 0.941. This is fourth speed. Thus, the transmission output shaft rotates with the same force as the secondary one. That is, the angular speed of rotation of the two elements is the same. Motorists call it “straight”.
Features of the device and structure of the transmission mechanism
The fourteenth model is equipped with a five-speed gearbox similar to the unit installed on the G8, with the exception of the main pair.
According to consumer reviews, the lack of quality of the fourteenth gearbox includes the selection of gear ratios: a very short first speed and a long second. This drawback leads to a loss of vehicle dynamics when switching from first to second gear during acceleration.
The gearbox housing, rear cover and clutch housing are the main parts of the gearbox design structure.
Internal device groups:
- first (main pair);
- second (differential with gear ratios).
Main couple
The drive shaft functionality reduces the speed transmitted from the engine to the crankshaft. The transmission coefficient is 3.7. Thus, the main pair of the “fourteenth” is capable of reducing the indicated speed by approximately 4 times. The length of the gears can be changed by controlling the main pair mechanism. What affects acceleration and the maximum possible speed limit of the vehicle.
Differential with gear ratios
The differential gear ratios of the stock VAZ 2114 gearbox include: 3.636 (first speed number); 1.95 (second speed number); 1.357 (third speed number); 0.941 (fourth speed number); 0.784 (fifth speed number) and 3.53 (reverse speed number).
Having an idea of the structural features of the gearbox mechanism, it is necessary to begin preparing tools, materials and tools that will be useful during the removal and disassembly of the box.
Device
To understand the essence of repairing, disassembling and assembling a gearbox, first of all you need to get acquainted with its structure. In the case of the VAZ 2109, the box structure is as follows:
- On the input shaft there is a block of drive gears that are in constant mesh with the driven gears of the gears when moving forward;
- The second shaft has driven gears with needle bearings. There is also a pair of synchronizers located there;
- The secondary shaft is created together with the drive gear of the main transmission;
- The driven gear of the main gear is attached to the flange of the two-pinion differential box;
- Differential bearings are always mounted with interference, which is adjusted by selecting rings of different thicknesses.
Checkpoint diagram
Gearbox device
Gearbox removed and slightly disassembled
Before starting the process, it is necessary to study the structure of the gearbox, as well as its design. This is necessary in order to determine the reasons why the unit needs to be dismantled, as well as to determine the mounting fasteners.
Transmission device diagram
Transmission:
1 – clutch release bearing; 2 – guide sleeve; 3 – input shaft; 4 – roller bearing of the secondary shaft; 5 – secondary shaft; 6 – retaining ring; 7 – satellite axis; 8 – speedometer drive drive gear; 9 – transport plug; 10 – wheel drive oil seal; 11 – tapered roller bearing of the differential; 12 – axle gear; 13 – satellite; 14 – differential box; 15 – clutch housing; 16 – driven gear of the main gear; 17 – drain plug; 18 – adjusting ring; 19 – driven gear of the 1st gear of the secondary shaft; 20 – synchronizer for 1st and 2nd gears; 21 – driven gear of the second gear of the secondary shaft; 22 – retaining ring; 23 – persistent half ring; 24 – driven gear of the third gear of the secondary shaft; 25 – synchronizer for 3rd and 4th gears; 26 – driven gear of the fourth gear of the secondary shaft; 27 – needle bearing of the secondary shaft gears; 28 – ball bearing of the secondary shaft; 29 – thrust plate; 30 – driven gear V of the secondary shaft transmission; 31 – 5th gear synchronizer assembly; 32 – nut; 33 – thrust washer; 34 – drive gear V of the input shaft; 35 – rear cover of the gearbox housing; 36 – ball bearing of the input shaft; 37 – gearbox housing; 38 – roller bearing of the input shaft; 39 – breather; 40 – input shaft oil seal
Transmission removal process
When the design of the element has become clear, you can proceed directly to the process of removing the gearbox. It is worth noting that this procedure may be associated with unit repair or auxiliary operations, such as, for example, clutch replacement. So, let's consider the sequence of actions:
- First, you need to install the car on the inspection hole, since the gearbox is removed downwards.
- We remove the “minus terminal” to de-energize the car.
- We dismantle the engine protection from below, if present.
- Remove the front wheels.
- Disconnect the speedometer and clutch cables.
- Next, you need to disable the rocker drive.
- On the gearbox side, the engine mount must be removed.
- Now that the preparatory operations have been completed, let's move on to removing the necessary assembly. Drain the oil from the gearbox.
- We remove the internal CV joints from their seats.
- After dismantling the fasteners, disconnect the gearbox from the engine.
- We dismantle the unit completely.
- If necessary, reassemble in the reverse order.
Reasons for dismantling
Gear selection mechanism removed from the gearbox
As mentioned earlier, the gearbox is dismantled for repair and restoration operations. Perhaps this is the main reason, but it is worth considering the issue of removing the unit in more detail:
- The first and main reason for which removal of the gearbox will be required is the repair of this unit itself.
- Replacing the clutch becomes the second main reason for dismantling the gearbox.
- Along with the previous reasons, removal of the unit will be required when completely dismantling the main power unit.
- Other reasons why it may be necessary to dismantle the gearbox, such as: repair of the front part of the body after an accident, slipway work, repair of the chassis and failure, as well as others.
What are synchronizers made of?
Most often, synchronizers are made of brass or steel. Metal rings are formed either by forging or using a powerful press. In this case, the gear rims can be coated with a protective coating of molybdenum, iron, and copper. In modern gearboxes there are synchronizers covered with a layer of carbon fiber. The purpose of the coating is to reduce noise and provide high friction when in contact with the gear. Carbon coated rings offer excellent performance, but are quite expensive to produce, so such parts are only found in the transmissions of high-end sports cars.
Assembly and troubleshooting of VAZ 2110, 2111, 2112 gearboxes
Troubleshooting VAZ 2110 gearbox: 1st and 2nd gear
Independent troubleshooting of gears, couplings, forks, etc. In the gearboxes of front-wheel drive gearboxes 2108, 21083, 2110 and its derivatives. Gears can be either 2108, 2110 or 2111 models, old and new models. Undoubtedly, the new gearbox elements are updated and improved. Such gears have a hole in the center for oil supply and lubrication. The synchronizers are of a different type and reinforced.
The 1st gear gear can still be driven, there are small chips on the teeth on the synchronizer side, I’m glad there are no cavities in the helical teeth.
All the synchronizers in the gears fly into the bucket, because the gaps have already decreased by more than 0.6 mm at the points of contact with the gears.
Measuring the gap between the 1st gear and the synchronizer, gap 0.60mm. 1st gear engaged well, without noise and easily.
Measuring the gap between the 2nd gear and the synchronizer, gap 0.20mm. What was the reason for engaging second gear with a crunch and crackle.
The synchronizer hub for 1st and 2nd gears is still alive, but there are minor cavities on the teeth, it can still roll.
1st and 2nd gear synchronizer clutch. The teeth on the meshing side of the 1st gear gear are in satisfactory condition, but the teeth on the meshing side of the 2nd gear gear are completely cut off. The teeth on the meshing side with the reverse gear are in satisfactory condition. For this reason, it was difficult and with a bang to engage 2nd gear, and when moving backwards, reverse gear spontaneously switched off.
2nd gear gear. The teeth on the helical are in excellent condition and do not even have shells. But the teeth on the meshing side to the 1st and 2nd gear synchronizer clutch are in satisfactory condition.
Reverse gear. The teeth seemed to be ground, which was the reason I turned off the reverse gear when moving backwards.
1st and 2nd gear fork on the 1st gear engagement side. There is no wear and tear.
1st and 2nd gear fork on the 2nd gear engagement side. Wear has polished the bronze coating.
1st and 2nd gears assembled, 1st gear engaged. PLEASE NOTE that the synchronizer clutch faces the 2nd gear and the groove faces the 1st gear, DO NOT CONFUSE IT!
1st and 2nd gears assembled, 2nd gear engaged. PLEASE NOTE that the synchronizer clutch faces the 2nd gear and the groove faces the 1st gear, DO NOT CONFUSE IT!
New 1st and 2nd gear shift fork with rod, bronze coating should be on both sides. The rod is old and will change gears more than once. NOTE! How to secure the fork in relation to the grooves of the rod.
New 1st and 2nd gear shift fork with rod, bronze coating should be on both sides. The rod is old and will change gears more than once. NOTE! How to secure the fork in relation to the grooves of the rod.
Troubleshooting gearbox 2110: 3rd and 4th gear
Independent troubleshooting of gears, couplings, forks, etc. In the gearboxes of front-wheel drive gearboxes 2108, 21083, 2110 and its derivatives. Gears can be either 2108, 2110 or 2111 models, old and new models. Undoubtedly, the new gearbox elements are updated and improved. Such gears have a hole in the center for oil supply and lubrication. The synchronizers are of a different type and reinforced.
3rd gear gear. The helical tooth is in excellent condition, the teeth on the side that engages the synchronization clutch are in satisfactory condition.
All the synchronizers in the gears fly into the bucket, because the gaps have already decreased by more than 0.6 mm at the points of contact with the gears.
3rd and 4th gear synchronizer hub, excellent condition. DO NOT BE CONFUSED! with 5th gear hub.
Synchronizer clutch for 3rd, 4th and 5th gears. On the 3rd and 4th clutches, on the side of the teeth that engage the 3rd gear gear, there are chips and dull teeth.
The 4th gear gear is in excellent condition of the helical and teeth on the side that engages the synchronizer clutch.
3rd and 4th gear shift fork. Serious wear on the 3rd gear engagement side. The bronze coating was polished as much as possible and began to devour the metal in a circle.
3rd and 4th gear shift fork. Wear on the 4th gear engagement side. The bronze coating was polished down to metal.
New 3rd and 4th gear shift fork with rod, bronze coating should be on both sides. The rod is old and will change gears more than once. NOTE! How to fix the fork in relation to the grooves of the rod, where the blue dot is, the metal should not be sanded, and if it is sanded, then you installed the fork from the 5th gear.
New 3rd and 4th gear shift fork with rod, bronze coating should be on both sides. The rod is old and will change gears more than once. NOTE! How to fix the fork in relation to the grooves of the rod, where the blue dot is, the metal should not be sanded, and if it is sanded, then you installed the fork from the 5th gear.
3rd and 4th gears assembled, 3rd gear engaged. NOTE! that the groove of the synchronizer clutch faces the 3rd gear gear, DO NOT CONFUSE IT!
3rd and 4th gears assembled, 4th gear engaged. NOTE! that the groove of the synchronizer clutch faces the 3rd gear gear, DO NOT CONFUSE IT!
Troubleshooting gearbox 2110: 3rd or 5th gear
independent troubleshooting of gears, couplings, forks, etc. In the gearboxes of front-wheel drive gearboxes 2108, 21083, 2110 and its derivatives. Gears can be either 2108, 2110 or 2111 models, old and new models. Undoubtedly, the new gearbox elements are updated and improved.
5th gear gear. It is similar to the 4th gear, but the helical tooth in the 5th gear is smaller in diameter than the 4th gear. Excellent condition, like new, apparently not driven much in 5th gear.
All the synchronizers in the gears fly into the bucket, because the gaps have already decreased by more than 0.6 mm at the points of contact with the gears.
5th gear synchronizer hub, excellent condition.
Original 5th gear fork with original rod, bronze coating on both sides has not been erased. This company will engage in 5th gear more than once. NOTE! How do you need to secure the fork in relation to the grooves of the rod, where the number 5 is, the metal should be polished, and if it is not polished, then you installed the fork from the 3rd gear.
Synchronizer clutch for 3rd, 4th and 5th gears. The 3rd and 4th gears have the same clutch, excellent condition, like new.
5th gear fork, excellent condition, like new. To distinguish it, the metal of the 5th fork was ground, while the metal of the 3rd and 4th was not polished.
5th gear assembled, 5th gear engaged. NOTE! that the groove on the synchronizer clutch is NOT FACED! to the 5th gear gear, DO NOT CONFUSE!
Troubleshooting gearbox 2110: gear selection and shift mechanism
Gear selection and shift mechanism 2110, cams and springs are in excellent condition
Gear selection and shift rod. The condition is excellent despite the abrasions, but there is no play in the bushing in the crankcase. The cam is removable; preferably, if it is removed, it is necessary to drip aerobic thread lock onto the bolt threads.
Hinge 2108, excellent condition. If, in case of replacing the hinge and reassembling it, it is necessary to drip an aerobic thread lock onto the bolt thread and screw it to the rod.
Assembling a VAZ 2110 gearbox: purchasing components
We use only original spare parts and new AvtoVAZ models. Clutch, hub, nuts assemblies for 1st and 2nd gears. Synchronizer coupling article 2110-1701127-10 or 21100-1701164-00, hub article 2108-1701119
Front secondary shaft bearing (rear support). Not dismountable, i.e. the plastic separator and the rollers on the bearing are not removable; only the inner ring of the bearing will be removable. which is pressed onto the secondary shaft. Italian company TRIALLI. Expensive but high quality. article 2108-1701180
A new 2nd gear gear of a new type, has 2 holes for oil supply, and a seat for a new type of synchronizer with an increased diameter.
The new 3rd gear gear of a new type may not have 2 holes for oil supply, the seat for the synchronizer of a new type has increased in diameter.
Accordingly, we install a new synchronizer ring on the new type gear. New and old synchronizers are not interchangeable with each other, i.e. It will not be possible to install a new type synchronizer on an old type gear and vice versa. With three lugs without markings and increased internal diameter.
On the left is a new-style synchronizer, on the right is an old one, since I have an old-style 1st gear gear, then we install an old-style synchronizer, and on the new 2nd gear gear we respectively install a new-style synchronizer. Old and new synchronizers fit into the synchronizer hub seat but are not replaceable between gears. Article number of the new synchronizer 2110-1701164, article number of the old one 2108-1701164-10
New 2nd gear gear. Article 21100-1701127-00 or 2110-1701127-10
Clutch, hub, crayon assembly for 1st and 2nd gears, also of a new model. Article 21100-1701175-00
We change all the retaining rings on the secondary shaft because if you don’t change it, the gears or synchronizer hub may fall out. On the left is the new ring, on the right is the old one, it has stretched out a lot.
An old-style synchronizer with six lugs and markings 145, the internal diameter is smaller than that of the new model.
Front input shaft bearing (rear support). Not dismountable, i.e. the plastic separator and the rollers on the bearing are not removable; only the inner ring of the bearing will be removable. which is pressed onto the input shaft. Italian company TRIALLI. Expensive but high quality. article number 2108-1701031
Assembling a VAZ 2110 gearbox: installing 1st and 2nd gears on the secondary shaft
We install the 2nd gear gear on the lower side of the secondary shaft up to the thrust ring.
We install the synchronizer on the 2nd gear gear.
We measure the gap between the gear and the synchronizer. It turned out 0.95 - 1mm. That's how it should be.
Using a mandrel (preferably an aluminum pipe), using gentle blows, hammer the synchronizer hub onto the shaft until it stops, and focus on the synchronizer, where there are no teeth and the square on the synchronizer should face the place where the spring fits at the synchronizer hub. We check that the 2nd gear gear should rotate smoothly on the shaft, and the synchronizer should have a slight play up, down and to the sides
We install the synchronizer clutch, the teeth should be facing the second gear gear, as described in the tutorial, insert the spring, ball and cracker. We put a locking ring on the shaft to keep the synchronizer hub from falling out. We install the synchronizer, not forgetting to point it with a small square and where there are no teeth on the retainer spring and put on the 1st gear gear.
Next, we install the drive gear of the secondary shaft so that the groove (indicated with tweezers) on the gear faces the 1st gear gear.
Then, install the retaining ring. It is thicker than the one that is installed on the synchronizer hubs.
We clamp the secondary shaft through a mandrel in a vice up to the thrust ring and, using a piece of wood or a copper hammer, press the ring of the (lower) front bearing of the secondary shaft into place with gentle blows.
Assembled 1st and 2nd gear on the secondary shaft. We shift the clutch into the 2nd gear and then into the 1st gear and apply lithium grease based on molybdenum disulfide from SMT2, which ensures low friction of the clutch synchronizers, hubs and gears, high temperature and mechanical stability during the first and subsequent gear engagements and running-in.
Assembling a VAZ 2110 gearbox: installing 3rd, 4th gears on the secondary shaft
Turning the shaft over, install the 3rd gear gear up to the thrust ring, and insert the synchronizer ring. Using a mandrel (preferably an aluminum pipe), using gentle blows, hammer the synchronizer hub onto the shaft until it stops and focus on the synchronizer, where there are no teeth and the square on the synchronizer should face the place where the spring fits at the synchronizer hub. We check that the 3rd gear gear should rotate smoothly on the shaft and the synchronizer should have a slight play up, down and to the sides. The gap turned out to be 1.05mm, which is not a defect.
As described in the tutorial, insert a spring, a ball and a cracker. Before installing the synchronizer ring, lubricate the hub with SMT2 grease.
We install the synchronizer clutch, note that the groove on the clutch is directed towards the 3rd gear gear.
We put the retaining ring on the shaft up to the hub of the 3rd and 4th gears. We use lithium grease based on molybdenum disulfide from SMT2, which ensures low friction for synchronizers of clutches, hubs and gears, high temperature and mechanical stability during the first and subsequent gear engagements and running-in.
Install the synchronizer ring. Where there are no teeth, the small square on the synchronizer ring should face the place where the block fits at the synchronizer hub. We check that the 4th gear gear should rotate smoothly on the shaft, and the synchronizer should have slight play up, down and to the sides.
Then, we put on the 4th gear gear all the way
We measure the gap between the 4th gear gear and the synchronizer ring, it turns out to be 0.87mm - 0.90mm.
The 4th gear thrust washer has a thickness of 3.4mm - 3.5mm. DON'T BE CONFUSED! with a 5th gear thrust washer which has a thickness of 5.5mm.
Install the 4th gear thrust washer. Thin, thickness 3.4mm - 3.5mm.
All 4th gears are installed on the output shaft, two clutches are installed in the neutral position to facilitate further assembly of the gearbox. All gears, rings, hubs and synchronizer couplings are lubricated with SMT2 lubricant.
Assembling the VAZ 2110 gearbox: pressing bearings into the crankcase, assembling the crankcase
Using a mandrel (preferably an aluminum pipe), using gentle blows, we hammer the input shaft bearing behind the outer ring of the bearing to the bottom of the seat.
We install the rod and gear selection mechanism.
We install a plastic oil pan and, through a mandrel (preferably an aluminum pipe), with gentle blows, hammer the secondary shaft bearing behind the outer ring of the bearing to the bottom of the seat.
The clutch release fork has been assembled, the input shaft oil seal has been replaced and a new release bearing in a steel casing has been replaced.
I lubricated everything with grease on the CV joint, preferably using a thin thread to tie the release bearing behind the ears to the clutch release fork levers. This method will prevent the release lever from falling out and will make it easier to install the gearbox on the car.
Using a semi-automatic machine, I welded the levers and ground them at the clutch release fork so that they wouldn’t come off in an inopportune case.
Replaced the clutch fork boot and plug.
Gearbox tuning VAZ 2110, 2111, 2112
We change the GP 3.7 VAZ 2110 (63-17) to the GP 3.9 VAZ 2108 (63-16) - Buy the GP 3.9 (63-16) or take it from the old 4-speed gearbox of the VAZ eight. you also need from the VAZ 2108 gearbox: 1st gear gear, 3rd-4th gear shift clutch, 4th gear gear, 4 needle bearings, needle bearing spacer ring, needle bearing bushing, 2 half rings, ball from two half rings fixing the ring of half rings. — With the VAZ 2110 gearbox there remains the lower bearing of the secondary shaft, the 1st-2nd gear shift clutch, the 2nd gear gear, 5 pcs synchronizers, the 3rd gear gear, 2 pcs retaining retaining rings, a ball bearing washer, the ball bearing itself, the fifth bushing washer gears, 5th gear clutch, clutch retaining ring, nut.
What was left behind at checkpoint 10
The gearbox is almost complete.
— What it gives: — Firstly, it is more reliable in operation, due to the fact that the 08 secondary shaft is solid, and the 10 is tubular. — Secondly, it is more dynamic during acceleration, and more powerful uphill. — Moreover, I have a VAZ 2111, and it is 50 kg heavier than the same 10. Yes, and the manufacturer initially planned to install GP 3.9 on them on the VAZ 2111. - And the only downside of this matter is the consumption on the highway is 50-100g. at 100 km. — In tuning stores, one naked GP 3.9 costs about 4 thousand. rubles, but if you look in stores, in wholesale warehouses, you can still find it. - I bought and found everything separately, a large one (63-16, price 700 rubles, and a 16 tooth secondary shaft at a wholesale warehouse, price 600 rubles) - And everything about everything with all the fluff (gaskets, gears, gear oil, sealant and .d.) cost me about 4 thousand rubles.
https://www.drive2.ru/l/280652/, https://www.drive2.ru/l/285563/, https://www.drive2.ru/l/285736/, https://www .drive2.ru/l/286522/, https://www.drive2.ru/l/316252/, https://www.drive2.ru/l/316310/, https://www.drive2.ru/ l/385188/, https://www.drive2.ru/l/491653/, https://www.drive2.ru/l/1802670/
next article:
Replacing CV joints VAZ 2110, 2111, 2112
Contents of the article: Replacing the outer CV joint boot of a VAZ 2110 Replacing the CV joint boot of a VAZ 2110 1. Replacing the outer CV joint boot
Rating 5.00 [1 Vote]
Gearbox synchronizer 2110, device
Synchronizers are installed in passenger cars at all gearboxes. They work on a specific principle - equalizing speed using friction. When the difference between the speed of the gears and the shaft is large, the frictional force must reach a slightly higher level to synchronize their actions. This phenomenon is observed when the highest gears are engaged.
The main element of the synchronizer is the hub, where internal and external splines are provided. Internal splines are used to engage the secondary shaft and, at the same time, there is a possibility of axial movement of the shaft in different directions. The lower splines thus engage with the engagement clutch, which ensures rigid coupling of the gears and the gearbox shaft. From the outside, the engagement clutch is connected to the PP plug.
In addition, the gearbox synchronizer includes a blocking ring, which is necessary to ensure good synchronization and to prevent the clutch from closing when equalizing speeds. Inside the ring there is a conical surface that is designed to exchange actions with the friction cone of the gears. And to create conditions for blocking the engagement clutch, splines are installed on the outside of this retaining ring.
Replacing bearings
Most often, problems with the gearbox begin with the bearings breaking. Therefore, the bulk of all breakdowns lead to the driver needing to disassemble the gearbox and change the bearings.
Bearings cannot be repaired, since their design does not allow replacement of parts (rollers). Therefore, if the product fails, it is completely replaced.
Main shaft bearing
To change the input shaft bearing, you need to have the same tools as when disassembling the gearbox. The work is not difficult, but it can take a lot of time (depending on the physical fitness of the performer and his skill).
The operating procedure is as follows:
- Clamp the input shaft with a vice. It is better to line the jaws of the vice with a soft cloth so that they do not deform the surface of the shaft.
- Use a puller to clamp the bearing and begin to slowly pull it off the shaft.
- Periodically you need to tap the bearing with a hammer and rotate the shaft between hits, otherwise misalignment may occur in the rollers and it will be very difficult to remove the bearing.
- Gradual knocking out will cause the bearing to jump off the shaft.
- Press a new bearing onto the shaft using the same method.
- It is important to hit only the inner ring of the bearing with a hammer and do it carefully.
The input shaft bearing can be replaced on an unassembled box using the same method. Only in this case it will be impossible to use a vice.
Video: replacement instructions
Secondary shaft bearing
Replacing the secondary shaft bearing is carried out according to the same principle as the primary one. The only difference is that different types of bearings are used for different shafts.
According to GOST, closed (6–180502K1US9) and open (6–50706AU) type bearings are used to equip the input shaft of the VAZ 2107 gearbox. An open type bearing (2107–1701033) is used to equip the secondary shaft.
POSSIBLE FAULTS
Despite the imperfect operation, the VAZ 2114 gearbox, when used correctly, is distinguished by good endurance and durability. If you do not hesitate to prevent and promptly eliminate breakdowns, repairing it is not expensive. Let's consider the main gearbox malfunctions that the owner of the fourteenth may encounter:
- Lack of speed fixation when switching. If the speeds are out of whack, the cause is most likely worn teeth on the gears and clutch. Accelerated wear of these parts is caused by incorrect gear shifting and non-compliance with the speed limit. The problem is resolved by replacing the gears.
- The gear shift lever is tight. The reasons are mechanical damage to the teeth of the lever fixing on the hinge or wear of the reaction rod; it’s also a good idea to check the integrity of the plastic parts of the gearbox drive;
- The VAZ 2114 gearbox is humming. Most often, the gearbox is humming in neutral gear. First of all, you need to check and, if necessary, add oil (in general, the box may hum due to the use of low-quality lubricants). If the oil is normal, the problem is wear of the bearing on the input shaft, which can only be determined through diagnostics or by disassembling the gearbox;
- Crunching sound when changing speed. Here it is necessary to change the worn out synchronizer, and it must be changed immediately after the problem has been discovered, because if you tighten it, the gear unit will completely fly off;
- Knock. The gearbox on a VAZ 2114 can knock both under load and without it, and in any gear. The cause of the knocking noise is a damaged drive gear of the problematic transmission.
One of the key factors for the trouble-free operation of gearbox number fourteen is the use of high-quality lubricants. The most suitable option is GL-4 mineral oil. It is not cheap, but it does its job at 5+; when using mineral oil, VAZ gearbox repairs are usually required extremely rarely.
Most VAZ 2114 owners agree that the best gearbox oil is 75W90. It is distinguished by greater fluidity than typical gearbox oils, due to which the lubricant better gets into those places of the gearbox, the lubrication of which is provided exclusively by splashing. Good options for 75W90 are Hypoid-Getriebeoil TDL and Liqui Moly Vollsynthetisches Getriebeoil (GL-5).
Malfunctions and their elimination
Gearbox repair largely depends on the nature and type of fault. There are several options for the breakdown of this unit, in each of which appropriate actions should be taken to eliminate them.
Malfunction
Possible reasons
What do we have to do
There is noise in the gearbox
- The teeth on the gears are worn out;
- Bearings are worn out;
- The oil level in the gearbox has decreased
- Add oil;
- Replace worn bearings;
- Replace seals if necessary
- The clutch is not fully depressed;
- The rod that controls the gear shift mechanism has become deformed;
- The integrity of the jet thrust has been compromised;
- The joint or rod that selects the gear is loose;
- The speed change drive is incorrectly adjusted;
- The plastic components of the gear shift drive are broken
Removal and installation of gearbox VAZ 2114, VAZ 2115, VAZ 2113, Lada Samara 2
Removing the gearbox.
Place the vehicle on a lift or inspection ditch. Raise the engine hood and lock it in this position. Removal work carried out from inside the engine compartment of the Lada Samara 2:
– disconnect the wires from the battery, from the starter traction relay; – disconnect the ground wire from the clutch housing; – disconnect the lower part of the VAZ 2113 clutch cable as described in subsection. "Clutch"; – unscrew the two upper bolts securing the clutch housing to the engine block and the two upper nuts securing the starter, attach a bracket for lifting the power unit to the left stud of the engine exhaust manifold;
Installing a cross member to support the power unit: 1 – cross member 67.7820.9514
– install cross member 67.7820.9514 on the drain gutters to support the engine and hook it onto the bracket installed on the exhaust manifold stud. If there is no cross member, hang the power unit with a hoist. Removal work carried out from below the car: – remove the engine mudguard and the lower cover of the clutch housing; – drain the oil from the VAZ 2114 gearbox; – disconnect the wires from the reverse light switch;
Mounting the gearbox on the car: 1 – engine; 2 – bracket for fastening the power unit; 3 – suspension arm extension bracket; 4 – stretching; 5 – gearbox; 6 – wheel drive shaft; 7 – suspension arm; 8 – anti-roll bar; 9 – rear support of the power unit; 10 – clamp; 11 – gear shift lever drive rod; 12 – internal hinge housing
– loosen clamp 10 (Fig. 3.11) and disconnect rod 11 from the hinge of the gear selection rod of Lada Samara 2; – unscrew the nut of the stud securing the gearbox to the VAZ 2115 engine; – disconnect the ball joints of the suspension arms from the steering knuckles; – using a puller 67.7801.9524 or sharply hitting the body 12 of the internal joint with a hammer through a drift, knock out one hinge from the side gear, then fix the side gear with a technological mandrel or plug used when transporting the differential (otherwise the unfixed side gear may fall into the gearbox housing) ; then knock out the second hinge; – move the wheel drive shafts to the sides;
NOTE If it is difficult to separate the wheel drive from the side gear on the car, remove the gearbox assembly with the wheel drive and on a workbench, using the same puller, press the hinge out of the side gear.
– unscrew on the left side the three nuts of the studs securing the gearbox to bracket 2 of the power unit suspension, and then the nut from the bolt securing the bracket itself. Having removed the bracket from the gearbox studs, remove the suspension bracket 2 from the body spar eyelets; – unscrew the bolts securing the rear support 9 of the power unit suspension; – unscrew the lower nut securing the starter and remove it; – install a special stand with a hydraulic lift under the gearbox; – slightly lower the engine by extending the support rod of the cross member or lowering the hoist, unscrew the lower bolt securing the crankcase to the engine block and move the gearbox assembly with the clutch housing away from the engine to separate the gearbox shaft and the driven clutch disc; – remove the VAZ 2113 gearbox.
How to extend the service life of the gearbox on a VAZ 2114?
You can do without involving an auto specialist if you operate (use) the gearbox correctly, since it is designed for a long service life. The owner of a passenger car only needs to monitor the oil level; if it is low, it must be topped up. Sometimes it is worth changing the oil completely. The main parameters for replacement are specified in the technical passport of the vehicle, but it is better to do this every 60-80 thousand km. mileage
The rapid wear of the VAZ 2114 manual transmission components is affected by the driver’s aggressive driving and frequent and abrupt shifting of the gear lever.
As we see, it is quite possible to extend its “life” with your own efforts and attentive attitude to the iron horse, and who, where will serve you and in what ways depends only on the owner.
Synchronizer design and how it works
If a car enthusiast has already imagined a complex mechanism, then we hasten to assure him that the synchronizer is designed quite simply and does not include either electrical or hydraulic components. When studying it, one can draw an analogy with some other auto mechanisms that solve the problem of discrepancy between the rotation speeds of various elements. Its main features are speed and incredible mechanical strength. So, the synchronizer includes the following elements:
- Hubs with so-called breadcrumbs;
- Locking rings;
- Engagement clutch;
- A gear having a friction cone.
The basis of the mechanism is a hub with special external and internal splines. Internal splines allow the hub to have a permanent connection with the transmission shaft. External splines are responsible for connecting the coupling to the hub. The hub has 3 grooves, spaced 120 degrees apart. Spring-loaded crackers are inserted into the grooves, which are responsible for fixing the coupling in the neutral position. The neutral position is called one in which the synchronizer is not yet turned on.
Another important element of the synchronizer is the clutch. It is needed in order to ensure a sufficiently rigid connection between the gearbox shaft and its gears. The clutch is located on the hub, and on its outer side it is connected to the gearbox fork. The locking ring, located almost here, is designed to synchronize the rotation speed - in this it is helped by the friction force, which prevents the clutch from closing in cases where the speed of rotation of the shaft and gear is not the same. Here it is also worth talking about double synchronizers, which have a specific design. In the most common and simplest synchronizers, the inner part of the ring has a conical shape. In a double synchronizer, in addition to this ring, there are a couple of additional rings - outer and inner. The surface of the gear is not conical, because synchronization is provided by additional rings.
Now it’s time to understand the operation of the gearbox synchronizer. If it is not engaged in operation, the clutch occupies the middle position, while the gears can rotate freely on the shaft. No torque is transmitted. As soon as the driver begins to select a gear, the unit fork moves the clutch along the splines to the gear, and it, in turn, moves the locking ring - the crackers act on it. Immediately after this, the ring rotates in the other direction, and the coupling splines engage with the gear ring as they move forward. Thanks to this, the primary and secondary shafts have a fairly rigid connection and their rotation speeds are synchronized. As you can see, there are quite a few stages of operation of the synchronizer, but in reality it starts working very quickly - much less than a second.
How to repair a gearbox on a VAZ 2107
A four-speed gearbox was installed on the “old” model VAZ, and a five-speed gearbox on the “new” model VAZ. However, working with both mechanisms is not much different from each other. The essence of the repair work is to perform the following steps:
- Removing the box from the car.
- Disassembling the gearbox into its component parts.
- Replacement of failed elements with new ones.
- Assembling the box.
- Installation of a gearbox on a car.
It should be noted that repairs should only begin if there are clear signs of a faulty box. As a preventive measure, it makes no sense to interfere with the structure of this mechanism again.
Preparing tools
To carry out all of the above work, you will need to prepare in advance:
- heads for 13 and 17;
- extension to the heads;
- Phillips screwdriver;
- flat screwdriver with a thin blade;
- flat screwdriver with a powerful flat blade;
- impact screwdriver;
- tweezers;
- wrenches 13 (2 pcs), 10, 17, 19 and 27;
- circlip puller (or pliers);
- hammer.
How to remove the gearbox
The box can only be repaired after it has been removed from the car, so you will need to be patient and time-consuming. Repairing a gearbox is clearly a difficult and slow task.
To remove the box from a VAZ 2107, you will need to drive the car into a pit or viewing platform. The jacking option will not work, since it will be impossible to complete all stages of the work:
- Remove the wire from the negative terminal of the battery.
- The first stage of work is carried out directly from the salon. For convenience, it is necessary to remove the panel in which the radio is located.
- Press the gear shift lever and insert a flat-head screwdriver into the hole in the gearbox locking sleeve.
- Using a screwdriver, pull the bushing towards you.
- Disconnect the rod from the gear shift lever.
- Use tweezers to hook the edge of the damper insert and remove it.
- Using two flat screwdrivers, press apart the petals of the damper insert and move them apart.
- Then remove the damper and bushings from the gear lever.
- In the cabin, move the foot mat near the gearbox.
- Using a Phillips screwdriver, unscrew the four screws on the box lid.
- Remove the cover from the gear shift lever.
- The second stage of work is carried out directly under the car. The first step is to remove the exhaust manifold pipe from the box.
- Disconnect the clutch mechanism.
- Immediately remove all connections from the gearbox (at the same time, you can check the integrity of the wires).
- Disconnect the cardan drive.
- Remove the flexible shaft mounting mechanism from the speedometer.
- Unscrew the two bolt connections on the side cover of the gearbox.
- Remove the box from the car.
- Place something strong and stable under the body of the box, as it may fall out.
Video: dismantling instructions
Attention! The gearbox on the VAZ 2107 weighs 23 kilograms (including oil), so it is recommended that it be dismantled by two people.
How to properly disassemble the box
Repair work on the gearbox is possible only after identifying the real cause of the breakdown. Therefore, it will be necessary to disassemble the device correctly and safely for each component of the box and perform troubleshooting.
To ensure the disassembly process goes quickly and without interference, it is recommended to immediately prepare the following tools:
- impact screwdriver;
- wrench 10;
- socket wrench 13;
- three-jaw puller;
- vice;
- tweezers;
- torque wrench.
Of course, as necessary, gaskets, oil seals, and those parts that were discarded during the work will be needed.
Operating procedure
Disassembling the box yourself in a garage is a completely doable task. However, the work will require maximum concentration and attention:
- After removing the gearbox from the car, it is recommended to wash the housing from dirt. You can even use kerosene or white spirit to ensure the surface of the box is clean.
- Remove the bell (casing).
- Turn the box over and unscrew the cover bolts.
- Remove the gear block plug from the rear cover.
- Pull out the retaining ring with tweezers.
- Press out the gear block bearing.
- Press out the reverse gear bearing.
- Remove the secondary shaft oil seal.
- Pull out the thrust washer from the rear bearing of the secondary shaft.
- Press out this bearing.
- Remove the speedometer drive gear and pull out the roller ball (clamp) behind it.
- Remove the gear fork mounting bolt.
- Block the shafts by inserting a thick bolt or a powerful screwdriver between them.
- While turning the input shaft, pull it towards you along with the gears and bearings.
- Then pull out the secondary shaft.
- The intermediate shaft comes out easily.
Basic faults
The clutch is an essential part of a car using a manual transmission.
In addition to knowledge about the operation of the clutch, it is important to have an understanding of malfunctions
The most common of them:
- The clutch does not disengage completely. Air entering the release drive creates the feeling of a sinking pedal, as a result of which the driver cannot completely disengage the clutch;
- the clutch does not engage. Common cause: cable break;
- The clutch pedal refuses to return to its original position. Cause: the return spring has failed or is disconnected;
- loud noise when disengaging the clutch. The noise indicates wear of the release bearing;
- The clutch is not fully engaged. There are many reasons: wear of the drive disk linings, faulty springs, small pedal travel.
Types of gearboxes (speeds)
Currently, there are 3 types of gearboxes in cars:
- mechanical, speeds are switched manually using a special lever;
- automatic, in which the gear change occurs without external influence, but only when the gas or brake pedals are pressed. Reverse gear in such cars is activated manually.
- mixed (variable). In this type, the gearbox operates in automatic mode, but under certain conditions it can be briefly switched to manual control.
The most popular because of maintenance, ease of replacing parts and inexpensive repairs is the manual gearbox. It is divided into 3 subtypes: 4-speed, 5-speed and 6-speed. Five speeds for the gearbox are familiar and are the most common.
POSSIBLE FAULTS
Despite the imperfect operation, the VAZ 2114 gearbox, when used correctly, is distinguished by good endurance and durability. If you do not hesitate to prevent and promptly eliminate breakdowns, repairing it is not expensive. Let's consider the main gearbox malfunctions that the owner of the fourteenth may encounter:
- Lack of speed fixation when switching. If the speeds are out of whack, the cause is most likely worn teeth on the gears and clutch. Accelerated wear of these parts is caused by incorrect gear shifting and non-compliance with the speed limit. The problem is resolved by replacing the gears.
- The gear shift lever is tight. The reasons are mechanical damage to the teeth of the lever fixing on the hinge or wear of the reaction rod; it’s also a good idea to check the integrity of the plastic parts of the gearbox drive;
- The VAZ 2114 gearbox is humming. Most often, the gearbox is humming in neutral gear. First of all, you need to check and, if necessary, add oil (in general, the box may hum due to the use of low-quality lubricants). If the oil is normal, the problem is wear of the bearing on the input shaft, which can only be determined through diagnostics or by disassembling the gearbox;
- Crunching sound when changing speed. Here it is necessary to change the worn out synchronizer, and it must be changed immediately after the problem has been discovered, because if you tighten it, the gear unit will completely fly off;
- Knock. The gearbox on a VAZ 2114 can knock both under load and without it, and in any gear. The cause of the knocking noise is a damaged drive gear of the problematic transmission.
One of the key factors for the trouble-free operation of gearbox number fourteen is the use of high-quality lubricants. The most suitable option is GL-4 mineral oil. It is not cheap, but it does its job at 5+; when using mineral oil, VAZ gearbox repairs are usually required extremely rarely.
Most VAZ 2114 owners agree that the best gearbox oil is 75W90. It is distinguished by greater fluidity than typical gearbox oils, due to which the lubricant better gets into those places of the gearbox, the lubrication of which is provided exclusively by splashing. Good options for 75W90 are Hypoid-Getriebeoil TDL and Liqui Moly Vollsynthetisches Getriebeoil (GL-5).
General symptoms
Symptoms are manifested by seven signs, which include:
- When you shift gears, a crunching sound appears;
- the sound of knocking in the box;
- oil leak;
- there is no speed fixation;
- tight lever movement during switching;
- The control room is buzzing;
- noise in the gearbox.
Each of the listed symptoms has its own etymology and an exact picture of its manifestation, which objectively characterizes the root cause of the malfunction.
Crunch in the gearbox
This type of repair requires disassembling the gearbox structure.
The main reasons, a sign of which is a crunching noise during gear shifting:
- faulty gearbox synchronizer (definitely requires replacement of the synchronizer);
- malfunction of the clutch basket (during operation of the vehicle, the “petals” may fly off). The violation is eliminated by replacing the part, and a new clutch disc is also installed;
- Damage to the clutch cable is classified as an indirect cause of gearbox malfunction, but if the cable breaks, the vehicle cannot move;
- factory defect of the gearbox shaft.
Knocking at the checkpoint
The sounds of gearbox tapping are ambiguous due to their multiplicity. Therefore, the picture of the malfunction is accurately established by diagnosing the vehicle.
The box starts knocking if:
- The oil level is not set correctly. An indirect indicator is the amount of oil being poured;
- the distance between the brakes and clutch packs is either too small or, conversely, too large;
- sagging appeared in one of the valves in the box;
- The solenoid has failed.
Oil leakage
If there is an oil leak, the repair task is facilitated by the ability to determine the location of the leak, but most often in practice this is impossible to determine.
Faults that cause oil leakage are the following:
- the seals are worn out;
- the shafts are worn out;
- there was a malfunction in the gearbox input shaft play;
- parts are depressurized: formation of cracks, microholes, etc.;
- The speedometer drive shaft seal is worn out.
Speeds are flying out
This kind of phenomenon occurs during gear shifting. The main reason for this malfunction is worn teeth on the gears and clutch. A factor contributing to the development of weakening speed control is a violation of the rules of gear shifting technique, which occurs when the speed limit is not observed. Replacing the gears of the specified parts eliminates the described problem.
The handle is tight
Factors under the influence of which the movement of the handle is difficult are damage to the locking teeth of the lever itself, wear of the jet thrust, and violation of the integrity of the gearbox drive parts.
The box is humming
This sound appears mainly during neutral transmission. The main reason is the low quality of lubricants. Therefore, the first action that must be performed when this type of technical problem occurs is to check and, if necessary, add oil. If the box continues to hum, then it is necessary to perform diagnostics, since the bearing on the input shaft may be worn out.
Noise in the CP
The box begins to make noise when the oil level is insufficient. This situation can be resolved by adding oil. If the noise does not stop, then it is caused by wear of the seals and mechanisms. This can be eliminated by installing new parts to replace worn ones.
Upon completion of the process of identifying the malfunction, its cause and source, as well as the factors influencing the occurrence of malfunction of the gearbox, it is necessary to become familiar with its structure and the structural features of the mechanism.
Tools, materials and supplies necessary for removing and disassembling the gearbox
Before starting actions to remove, disassemble and repair (or replace) the gearbox, it is necessary to prepare the following tools, materials and means, as well as equipment:
- Tools: sets of keys and screwdrivers;
- Consumables: rags, board;
- Means: WD-40 liquid (designed to make it easier to unscrew parts), also known as WD-40 rust converter for dismantling work; a container with a volume of approximately 5 liters (required when draining the transmission oil used in the box); new oil for the gearbox (this is not necessary, but if the oil was changed a long time ago before the repair work was carried out, then this should be done during the repair of the gearbox);
- Suspended equipment suitable for lifting (car lift, jack).
The equipment will not be needed if the vehicle is placed on a pit or overpass during repairs.
What is differential preload
The car differential distributes torque from the drive shaft to the right and left axle shafts. The differential consists of 4 bevel gears. Not big in size. If the wheels rotate with the same load, then the differential distributes the rotation force in half (50:50).
If one wheel hits, for example, ice, then the differential provides more rotational force to one wheel and less to the other. The wheel that is on the ice receives an increased angular speed and will become the driving wheel, and the wheel that is spinning on the asphalt will no longer receive rotational speed and will become the driven wheel. Because of this, the fact that the torque is transmitted to only one wheel, and to the one that is (in this case) on the ice, the control and maneuverability of the car is greatly deteriorated. But, in order to maintain controllability and cross-country ability, the leading wheel had to be the wheel that is on the asphalt. To avoid such an unnecessary effect, a device was invented - an automatic limited slip differential.
Self-locking differentials
The limited friction mechanism is a multi-disc differential, a viscous coupling, a Quaif and Thorsen self-locking differential that performs partial locking automatically, without the driver switching the handle.
The difference between an automatic differential and a symmetrical one is that an automatic self-locking one has a spring pack of friction discs.
The auto differential consists of:
- driven worm (semi-axial) gears;
- driving worm (satellite) gears.
The axes of the satellites and semi-axes are parallel to each other. If one wheel, say the right one, begins to rotate slower than the wheel opposite, then, accordingly, the axle shaft with gear rotates more slowly and rotates satellite 2 at the same angular speed. Satellite 2 transmits rotation to satellite 3. Satellite 3 transmits rotation to the gear of axle 4. The result is different angular speeds of the wheels when turning.
Due to the fact that the torques in the screw engagement are different, axial and radial forces appear that press gears 1 and 4, satellites 2 and 3 with their ends to the differential cover. Worm satellites 2 and 3 are pressed against the surfaces of the holes in which they sit. Thanks to the forces generated in this case, the axle shafts are blocked. How much the axle shaft will lock is determined by the locking coefficient.
Characteristics of the self-locking differential:
- differential locking coefficient in % (CBD) (depends on the inclination of the teeth, if helical, or, if it is a disc, then the angle of the cup);
- locking preload in kg (this is the static resistance between the 2 axle shafts).
CBR is the ratio of the moments of force of the lagging behind to the advancing, that is, the torque of the lagging wheel is divided by the torque of the wheel that rotates faster.
Advantages of a limited slip differential:
- The driver does not need to engage the self-locking differential himself; everything happens automatically.
- Eliminates slipping at different wheel traction values.
- Improves cross-country ability and driving dynamics of vehicles on different roads.
- Acceleration efficiency increases on different road surfaces.
- Parts of self-locking and conventional differentials are interchangeable.
- Any axle shaft will not break because the wheels are not completely locked.
- Disabling, that is, unlocking is carried out by releasing the gas pedal.
Self-locking helical differentials are effective for a regular car. Such devices are reliable. The working service life of screw self-blocks is the same as that of gearboxes (gearboxes). They are smoothly activated and deactivated.