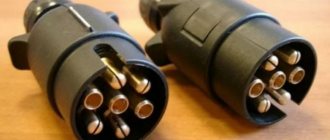
Priora controller connector: how to properly connect the alarm system
Installation of the security system is quite simple and the primary connection points for the Priora alarm system are located on the controller connectors. First of all, connection is made to X1: 12V power supply to the red wire (numbers 2,3), turn signals are connected to the blue and blue with a black stripe wire (pins 14 and 15).
This connection stage is responsible for the normal functioning of the turn signals during alarm installation. And in addition, they will guarantee the correct operation of this part of the car’s electronics.
Next, work is done with connector X2, to which the wires from the ignition and hood will be supplied and connected. To connect the ignition, you will need to connect the orange wire (numbered 9) to the connector. A white wire with a black stripe (pin 17) is connected from the hood. This work is carried out for the following cases:
1. Preventing an attacker from trying to open the hood.
2. Prevent attempts to damage or remove the battery.
3. Normalization of autorun operation.
4. Correct functioning of the protection system.
The next step will be for Priora to connect the connection points on the last X3 connector. The work is quite simple and consists of connecting the wires leading to the limit switches. For the front doors, you will need to connect the brown wire (pin 7) for the passenger door and the blue/black wire (pin 6) for the driver's door to the connector.
Next, connect the yellow wire with a red stripe (pin from the trunk) and the gray wire with a red stripe (pin 1) for the rear doors.
The most famous and popular security systems
Many different companies produce car security alarm kits. Moreover, one company has in its assortment both one-way and feedback systems. For Priora owners, the most popular were the following:
These are the top 10 alarm systems that dominate the domestic market. They are the ones that are most popular among Russian car owners. Of course, in principle, any of them can be installed on the Priora with your own hands, you just need to know what and where to install the Electrical package from Priora
Features of connecting the alarm to the lock on the driver's door
Installing a central lock on the driver's door allows the owner to avoid the main reason for car theft: opening one of the passenger doors. That is why you should carefully study the car alarm connection points on the Priora in order to ensure maximum protection and ease of use of the vehicle.
For the central locking to function, you will need to connect two wires to the driver's door. They should be triggered by a break in the brown wire when the lock is closed and, accordingly, the locking buttons are activated.
For the modern Lada Priora, the alarm connection points responsible for the normal operation of the autostart are also very important. You will need to connect a brown wire with a red streak to the dashboard connector. And the brown/white wire is connected to the generator. All this allows you to control the autostart procedure. The last connection point will be the brown/blue wire from the handbrake.
Why is everything so difficult?
It would seem that we only need to manage the locks. Why then connect to the window lift motors?
The opening of the passenger doors is carried out by the second impulse (relay K1 is activated). And elements K2 and K3 at this moment block the power windows. If they are not blocked, the windows in the doors will lower during the entire control pulse. And even in 0.8 seconds they will open noticeably.
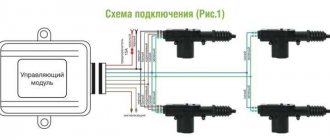
Of course, connecting the signaling system in a Priora is more difficult than in many domestic cars. At the same time, the “Grant” in the “Norma” configuration uses a similar scheme. Be that as it may, the Lada Priora is the flagship of VAZ. And probably, difficulties with the electrical part should not confuse a competent car owner. It is also known that the standard control unit can be reprogrammed, and then unlocking occurs in one step. In this case, the connection is made according to “Scheme 1”.
What is a car alarm
The possibility of increased control and warning range, as well as reliable operation in extreme urban radio interference, is ensured by the use of a 128-channel patented transceiver with FM modulation and a narrow bandwidth.
Thanks to a specialized signal processing program, narrow-band filters, as well as reception and transmission channels optimally distributed along the edges of the 433.92 MHz frequency range, it became possible to improve the signal-to-noise ratio by 8-10 dB and double the range and noise immunity.
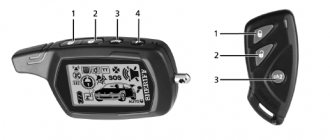
Remote starting and control of the operation of various types of engines is provided by a specialized processor. The existing key fobs implement an intuitive control principle. The pictograms on the keychain are presented in Russian.
The StarLine A91 Dialog car alarm can be installed on various cars with gasoline, diesel or turbocharged engines, with an automatic or manual transmission.
Thanks to more than 60 standard, programmable functions, not only reliable protection is provided, but also comfort when using a car alarm such as StarLine A91 Dialog.
Security systems with feedback
These are much more complex alarms. Many of these systems are controlled via satellite communications. In addition to the functions listed for one-way signals, there are, as a rule, many more additions, for example, autostart. When the car can be started to warm up without leaving home. And the display of the key fob displays information about the state of the car, open and closed doors, temperature and engine speed.
Also, this system is able to establish the location of the vehicle via GPS satellite.
Installation process
First of all, let's consider what you will need when installing a car alarm:
- signaling;
- driver's door activator;
- screwdriver;
- soldering iron, solder, rosin;
- insulating tape;
- additional protective diode.
The first step is to remove the steering shaft trim, then unscrew the 2 self-tapping screws securing the instrument panel trim, and just below that there is another self-tapping screw and a nut. Next, you need to install an LED in the left windshield pillar, a shock sensor on the cross beam, and install a service button in any convenient place. The antenna is mounted on the windshield.
The process of connecting the 18-pin connector of the alarm unit (required wires for connection):
- black wire - ground;
- a short loop of black wire - if the automatic transmission is left in a loop, if it is a manual transmission, it is cut;
- green-black and green-yellow wires are connected to the turn signal lamps;
- gray wire - siren control output;
- blue-black wire - door limit switches;
- the orange-gray wire is connected to the hood end switch, it also needs to be connected to the engine temperature sensor;
- the orange-white wire must be connected to the trunk end;
- The pink wire is connected to the minus of the “immobilizer bypass”;
- gray-black wire - control by generator signal during automatic start;
- orange-violet wire - connects to the handbrake.
Setting up autostart - Starline alarm
First you need to understand that there are two types of engine starting - remote or automatic. Remote start is needed, for example, to warm up the car before driving. Automatic engine starting involves periodically starting the engine, for example at night, to maintain the desired temperature. Autostart can be configured so that the car starts at certain intervals or when the temperature drops below a preset value.
Conditions for autorun
Remote engine starting can only be performed if the following conditions are met:
- The gear knob is located in neutral (gears are off)
- Ignition off
- The hood, trunk and all doors are tightly closed
- Parking brake engaged (handbrake)
If any of these conditions are not met, you will not be able to start the engine remotely.
Preparing the car
In order to put the car in security mode with the Starline autostart function enabled, you need to take the following steps:
1. Stop, do not turn off the ignition. The engine must be running. 2. Turn off the gear, the shift lever should be in neutral position. 3. Put the car in “handbrake” - turn on the parking brake 4. Press button 1 on the key fob and hold it for 3 seconds. You will hear a melodic sound signal. You have 30 seconds to complete the following steps. 5. Turn the key to turn off the ignition and remove the key from the lock. The engine will not stall, but will continue to run. 6. Get out of the car and make sure that all doors, trunk and hood are closed.
After you close the last open door, trunk or hood, the alarm will automatically turn off the engine and lock all doors - the security mode is turned on.
Only after successfully completing these steps will the autostart function be possible and the engine can be started remotely.
Remote start
If you have correctly prepared the car for autostart (closed the door with the engine running and the alarm turned off), then you can start the engine using the key fob in any of two ways:
1. Press button 1 and hold it for 3 seconds. or 2. Select the “START” icon and press button 2.
After this, the alarm will make its first attempt to start the engine. If the engine does not start, a second attempt will be made, and the starter operating time will increase by 0.2 seconds each time. There will be 4 such attempts in total. If the engine does not start any of the four times, you will hear 4 beeps from the key fob.
If the engine starts successfully, the corresponding icon will be displayed (it varies on different Starline models, usually the exhaust gas icon), the car will blink its dimensions 3 times and you will hear 3 siren signals.
The car will warm up for a certain period of time, which is set in the settings. Options: 5, 10, 15, 20 minutes. One minute before the end of the set time, the inscription “r01” will appear on the key fob display. When the time is up, the alarm will turn off the engine, and the exhaust gas icon will disappear on the key fob and the inscription “r00” will appear.
Autostart based on temperature
In winter, many people need to warm up their car at night so that there are no problems with starting in the morning. When you enable autostart based on temperature, you can set the ambient temperature value at which the engine will start. The following temperature values can be programmed: -5, -10, -20, -30.
To enable the temperature start function, select the icon with a thermometer and the inscription “START”, and press button 2 on the key fob. At the same time, you will hear a melody sound and the value of the set temperature threshold should be displayed.
To turn off automatic start based on temperature, select the thermometer icon again and press button 2 on the key fob.
If, while the engine is warming up, you need to get into the car (to start driving or just take something from the cabin), press button 1 on the key fob - the locks will unlock. Within 30 seconds, insert the key into the ignition and turn it to turn the ignition on. If you do not have time to do this, the locks will be locked again and the security mode will turn on. In order to completely exit the autostart mode, lower the handbrake - the dimensions will blink once and a melody sound will be heard - you can drive.
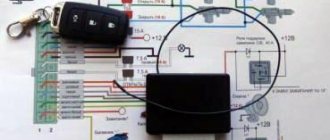
Car alarm connection points for Lada Priora
Block to the right of the brake pedal: hood switch (-) - white/black in the middle connector ignition (+) - orange in the middle connector trunk opening (-) - blue/red in the small connector door switch (-) - white/black in the small connector trunk limit switch (-) - yellow/red in the small connector
original siren - gray/black on the fuse box
To control the central locking , cut the brown wire in the driver's door and connect it according to the diagram:
Let's connect further
The connection in the driver's door is made using two wires. If you use remote start, then the following must be done. First, open the ignition switch connector. +12 Volts should be connected here. A brown wire is used for these purposes. Also, don’t forget about the ignition and starter.
In the first case, a blue-black conductor is used, and in the second, a red one.
The dashboard also has its own connector. Here you should perform certain manipulations related to the connection. The tachometer is installed on a brown-red conductor. The generator will be brown and white, and the handbrake will be brown and blue. Here you should not forget about the additional inclusion of a diode in the circuit.
Essentially, this is all you need to know when connecting alarm points on a domestic Lada Priora car. If everything is done in accordance with the diagram, then the alarm will work just perfectly.
There are common mistakes, for example, some install wires on the wrong pin. In this case, you can come to the conclusion that as a result of starting the alarm will simply burn out
You should always pay attention to the polarity of the supply voltage. Otherwise, you may be very disappointed in your own work.
So, we talked about what alarm connection points exist on our favorite car - Lada Priora. As you can see, all the work comes down to the elementary installation of limit switches and wires into the corresponding pins. The alarm connection points on the Priora can be called primitive. Some other car brands have much more bells and whistles in this regard.
Alarm on a Priora is a serious issue; everyone is afraid for their car, trying to protect it to the maximum. The Priora is equipped with an alarm system from the factory - an immobilizer (immobilizer). On a Lada Priora car, it allows you to partially protect the car from theft. The immobilizer on the Prior is a factory anti-theft device combined with the car's electrical package, which is located under the center console. Owners immediately try to disable the immobilizer on their Priora, because they consider it archaic and prefer to install a more advanced alarm system on the car instead of the standard anti-theft one. Installing an alarm on a Priora will cost approximately 10,000 -17,000 rubles.
Disabling the immobilizer on a Priora is not easy. The engine is started by an electronic engine control system, which also blocks its operation when the immobilizer is turned on. And already in the electronic control unit of the car, in the place where the EEPROM circuits are stored, the process of data exchange with the immobilizer takes place, and at the ECU level there is a ban or permission to start the engine. You can turn off the alarm on a Priora yourself, but this requires knowledge of electronics and special tools.
Car alarm connection points for Lada Priora 2011
Ignition switch: + 12V - brown Starter - red IGN - blue/black
Tidy: Tacho signal - brown/red Handbrake - brown/blue (For more details, see Diagram 1)
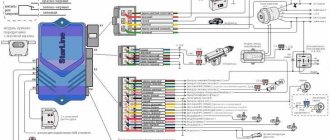
Connector X3 (See Fig. 1) BCM: Driver's door switch - blue/black Right front door switch - brown Rear door switches - gray/red Trunk switch - yellow/red Opening the trunk (low-current input, possible without a relay, additional channel directly to alarm) - blue/red
Connector X1 (See Figure 1) BCM: Turns - blue, blue/black
Ts.Z. - brown; The wire is located inside the driver's door, in the harness from the button block. (See Diagram 3 for details)
Hood tip - white/black; Connector X2-17 (If an engine temperature sensor is used, then according to scheme 2)
Notes on implementation of schemes
Let us immediately note: if there are no window lifters, the second diagram will not contain parts K2/K3. Then you only need to cut one wire. Sometimes only the rear windows are missing. This means that relay K3 is excluded. And the diodes connected in parallel with the winding can be absolutely anything.
Diode, zener diode - everything will do
Now we list the requirements for an element called “relay”:
- Operation voltage – 12 Volts;
- Switching current – 10 A or higher;
- The current consumed by all relay windings should not exceed the value specified in the instructions for the signaling. Usually it is 200-300 mA.
It is the last requirement that is often violated.
Diode with relay, ready module
In order for “scheme 2” to work, it is necessary not only to assemble it, but also to program the main unit: you need to enable the “2-step unlocking” option. And be that as it may, control impulses cannot be made too long. Use values of 0.7-1.1 seconds.
Power cables (cord X1-6) can only be connected using twists.
The cross-sectional area of the wire must be sufficient to withstand a current of “10 Amps” (this does not apply to signal circuits). A fuse protecting the power circuits must be installed. And of course, before installation, remove the negative terminal of the battery.
Safety
When it comes to safety, the Ford Explorer, like the Ford Focus, received a maximum rating from the American Highway Traffic Safety Administration. The protection of the driver and passengers is provided by innovative technologies, such as Active City Stop - an automatic braking system that scans the situation on the road up to 50 times per second, Curve Control - a braking system on sharp turns, AdvanceTrac - electronic stability control with a function to prevent the vehicle from rolling over, a tracking system behind blind spots.
The Explorer is equipped with 10 latest-generation airbags: front, side, curtain airbags for all three rows of the car, as well as driver and passenger knee airbags. The body structure of this SUV is both lightweight and durable. The pillars are made of high-strength steel, and the front part of the body is made of rigid composite material. Thus, in the event of a collision, the car frame will protect everyone inside as well as the capsule of a racing car. That's why the Ford Explorer was awarded the Top Safety Pick award as one of the safest and most reliable cars.
Ford Explorer engine
The Triton V8 SOHC engine has a capacity of 4.6 liters and contains 24 valves. In general, the engine is capable of developing power approximately equal to 292 hp. The torque reaches 407 Nm. The American can easily accelerate to 100 km/h in just 9 seconds! The six-speed gearbox is distinguished by a high degree of engine power transmission and precise speed shifts. However, a car of more than two tons also needs to be well fueled. So, this car “eats” approximately 27 liters of gasoline per hundred kilometers.
A high level of comfort is ensured by the high-quality suspension that the Ford Explorer boasts. On the one hand, this suspension is characterized by a high degree of rigidity, which, of course, is not a characteristic feature of American cars.
However, on the other hand, this suspension is very convenient and provides the proper level of comfort. The Ford Explorer is exactly the kind of car that you don't want to accelerate. This is the car in which you want to slowly and impressively sail in traffic. This does not mean that the Ford Explorer is slow or clumsy. Not at all! If you smoothly press the accelerator pedal, this car will quickly pick up speed and overtake any car that it encounters in the same direction.
Eventually
The immobilizer is a truly outdated device in principle, and it is disabled or bypassed. In return, you can install a reliable alarm system and “secrets”, which are more likely to protect the car from intruders, and not from its own owner. Modern anti-theft systems, of course, are “hackable with a glance,” but they give the owner an accurate idea that everything is fine with the car.
Probably every car owner has thought about protecting their vehicle, and the most common protection option is an alarm system. A car alarm is an electronic device that is installed in a vehicle and is designed to protect it. The alarm emits a sound and light signal, thereby notifying the vehicle owner and everyone around about unauthorized intrusion into the vehicle interior. The installation of an alarm requires initial preparation, namely, the owner must find the alarm connection points. This is exactly what we will talk about today.
So, in this article you can find answers to these fairly common questions:
- Standard car alarm Priora;
- Malfunctions of standard alarm systems and methods for solving them;
- Alarm connection points for a Priora car;
- Installing an alarm system on a Priora car.
Important functions of the Starline A93 alarm system
What areas does Starline A93 protect:
- All opening parts: doors, hood, trunk, parking brake, brake pedal, control, through limit switches
- Body, vibration response, two-level shock sensor, tilt sensor
- Ignition, control via input to the ignition circuit
- Engine - blocking relay, code relay StarLine R3 (optional)
- Interior space - additional sensor (optional)
Anti-theft device options:
- Security mode with sound and light alarms
- Providing alarm alerts to a key fob with an LCD display
- Silent activation/deactivation of security mode
- Silent security mode
- Security mode with engine running
- Turning security on/off without using a key fob
- Automatic return to security mode in case of accidental shutdown
- Automatic arming
- Immobilizer mode
- Anti-robbery mode
- Panic mode
- Programmable personal code for emergency disarming of the security mode
- Engine blocking and its preservation when dismantling the car alarm
- Programmable 2-step engine lock release
Self-diagnosis and fault detection functions:
- Indication of trigger causes for 11 zones
- Alarm of a faulty zone when arming
- Automatic monitoring of the status of security sensors with disabling faulty ones and reporting their malfunction
- Indication of the fact of activation by sound signals
- Indication of car alarm by LED and on the key fob display
- LED indication of limit switch serviceability
What service functions does this model have:
- Activating sensors before turning off the interior lights and bypassing the door area
- Disabling security, adjusting the volume of signals
- Remote disabling of the shock and tilt sensor in security mode
- Remote control of the central locking system (central locking)
- Central locking control from the ignition switch
- Two-step lock opening
- Two-pulse closing of door locks
- Six channels for controlling additional equipment
- Car battery voltage monitoring
- Determining the temperature inside and outside the car
- Search from car
- Light alarm for open doors
- Turbo timer mode
- Remote programming of functions and key fobs
- Service mode
- Car interior light control
- Call from car
- Insurance against accidental pressing of key fob buttons
- Registering new key fobs and deleting lost ones from the system memory
- Setting the time, alarm clock, timer
- Main key fob charging control
- Possibility of working together with GSM modules StarLine M20, M30 and StarLine M21, M31 (car alarm control and monitoring its status via GSM channel
- Remote and automatic start, extension, engine stop
- Remote engine start in cars with a start-stop button
- Works with any engine: gasoline/diesel
- Transmission choice: manual or automatic
- Monitoring engine operation using signals from a tachometer, generator or mains voltage
- Protection against starter overexposure when starting the engine
- Understanding the remaining engine operating time on the key fob
Actuators
If only one of the doors does not open or malfunctions regularly occur, the culprit is most likely a malfunction of the activator. The thing is that it works in tandem with a motor. The latter sometimes has windings that burn or the gears that cause the lock rod to move become unusable. This unit cannot be repaired - it is simply replaced with a working one.
Also, quite often problems with central locking occur after replacing or disconnecting the battery. In general, the entire locking system is powered by the on-board battery; for this reason, it is undesirable to disconnect it without good reason. De-energization leads to malfunctions of the controller, and sometimes to its breakdown.
The usual process of changing a lamp on the dashboard causes difficulties for the driver who is new to electrical engineering, especially cars. This system in a car features many devices and devices. When it comes to connecting two systems, even experienced auto electricians can remember our client is left with curses and even gray hair. This especially applies to issues when it is necessary to integrate an alarm system into a standard electronic system. Let's see how to connect the alarm to the central lock quickly and without stress.
Central locking is a rather complex system, which includes electronic and also mechanical components. This system allows you to carry out different manipulations with different car locks at once. For this purpose, it is quite easy for the driver to turn the key, or, in other words, press the small button on the remote control. The system is capable of controlling not only door locks, but also the gas tank flap lock, and also the trunk lid. You will prefer the design of the accounting system to be quite complex, and the process of connecting a security system that allows you to conduct accounting (software) to the central lock without some knowledge of its structure is unrealistic.
The central lock consists of several connected parts. This is a control unit, door sensors, buttons, and of course activators.
This is actually the brain of the central locking system. A couple of years ago, this popular rumor was that the unit was placed in a single housing with a connector, and no one had any problems with such a task as connecting the alarm system to the standard central locking.
In newer car models, this block is possibly branched into separate elements. These parts come in variations and are located in different places in the interior and engine compartment. The function of this block is to monitor the status of limit switches, as well as buttons and contacts. In some models, the unit is additionally equipped with a radio signal receiver for the key fob. The most difficult part of connecting the alarm system is finding this block.