VAZ 2109 battery lost charging
No charging on VAZ 2109
If you are faced with a lack of charging of the battery on a VAZ 2109, you should not immediately change the generator. The reason may be the lack of power to the generator excitation winding.
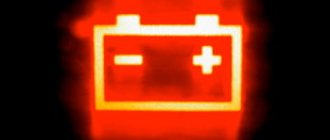
The generator winding is powered through a control lamp in the instrument panel. This lamp is red with a painted battery.
When you turn on the ignition, the lamp should light up, and go out when you start the engine. If the lamp does not light up when the ignition is turned on, then you need to perform a simple check. This test will show what is faulty - the generator, lamp or wiring.
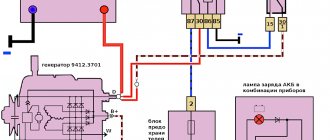
Remove the thin pink wire from the alternator that runs from the dash lamp to the alternator.
Apply ground to this wire and turn on the ignition. If the problem is with the alternator, the dashboard light will come on. If the lamp does not light, then the problem is either in the lamp, which is more likely, or in the car's wiring.
It should be borne in mind that in older cars, 100 Ohm resistors were installed in the fuse blocks. And this algorithm may not be suitable for testing.
If self-repair is problematic, call and come for service at 8 926 3988228.
Typical malfunctions and methods for their elimination
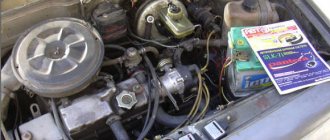
To prevent unit failure, it is necessary to ensure its high-quality and timely maintenance. As you can see from the photo of the diagram, the unit consists of many different components, so the likelihood of it breaking due to improper maintenance is quite high.
So, in what cases is a VAZ generator repaired:
- The indicator light on the dashboard does not turn on, although the unit and all equipment are working normally. Most likely, the problem is an open circuit or burnout of the indicator itself. In some cases, the reason is poor contact of the diode with the wiring; in this case, you only need to clean the contacts of the connection connector.
- The indicator on the tidy, as well as the instruments themselves on the control panel do not work. Apparently, the reason for this is the failure of the safety element, which will need to be replaced. Also, the reason may be a break or unsoldering of the wiring.
- The warning light comes on after the engine starts, but it disappears after the driver presses the gas. The essence of the problem lies in the fact that the generator unit is not excited at low engine speeds; in most cases, this is due to the desoldering of the resistor elements in the block. Conduct their diagnostics and, if necessary, solder them again.
- Another malfunction is that the indicator continues to light when the engine is turned on, while the voltmeter needle on the dashboard is in the red zone. In this case, there may be several reasons for the problem. First of all, it could be the strap slipping - you need to check it and, if necessary, tighten it. Also, the reason may be a short circuit or breakdown in the diode elements of the winding; much less often, a malfunction occurs when the voltage regulator fails.
- Another sign is that the indicator does not light up when the engine is running, but the voltmeter needle on the dashboard is in the red zone. In this case, you first need to diagnose the presence of contact between the regulator connector and the brushes. If the contact is normal, then check the brushes (they may freeze), as well as the slip rings; for the latter, the problem of oxidation is relevant. In addition, the cause of the problem may lie in the failure of the voltage regulator; usually we are talking about a break in the wiring between the contact and ground. The same symptoms appear in the event of a short circuit on the positive valves of the rectifier element.
- When the engine is running, the voltmeter needle is located in the red zone - this symptom indicates damage to the voltage regulator. In particular, we are talking about a short circuit that can occur between ground and also contact Ш. The problem can only be solved by replacing the regulator.
- If the unit is significantly louder than usual, there may be several reasons for this. First, you should check the functionality of the bearing elements, as well as the tightness of the pulley nut. In some cases, the loud operation of the unit is due to the creaking of the brushes. The brushes themselves may be of poor quality, but it is possible that the problem is dust getting on the slip rings.
Price issue
The price in this case depends on the manufacturer.
1. KATEK device (price - about 5 thousand rubles)
2. LKD unit (price - approximately 4500 rubles)
3. Startvolt generator (market price - about 7200 rubles)
No charging VAZ 2109
>When driving a car, you should always pay attention to whether the battery is charging. The VAZ 2109 battery is needed only to start the engine. While the engine is running, all electrical appliances of the VAZ 2109 operate from. Naturally, if the generator stops working, the battery doesn’t last long. How can you tell if the battery has stopped charging? There is a standard voltmeter on the instrument panel. According to its readings, it is very clear whether the generator is working or not. When the VAZ 2109 engine is running, the voltmeter should show a voltage of about 13.5 - 14 V. If you notice that the arrow is always tilted to the right, that is, the on-board voltage is less than 12V, then there is no charging from the generator. It is also very convenient to monitor the voltage of the on-board network of the VAZ 2109 using a digital tachometer. It measures the voltage from the generator with an accuracy of tenths of a volt.
Generator VAZ 2109
I recently had the following situation: I was driving and I saw that the voltage on the instrument panel voltmeter was about 11 Volts. Clearly, there's something wrong with the generator. Well, as usual, there is no time to repair it, it’s dark and cold outside, there is no garage. Well, as always, you need to drive a car every day, you can’t do without it. Therefore, at night every day I put the battery on charge, and in the morning I put the fully charged battery in the car and drove. If you drive only during daylight hours, that is, without headlights, then the battery may last for several days. If, as I did, you have to drive to work in the dark in the morning, then in the evening the battery will run out completely. Of course, it all depends on how often you turn off and start the engine. A lot of battery energy is wasted just for rotating the starter, you can also try to drive without it, then the battery is needed only for the operation of the ignition system and light signaling (stops, turns). Until recently, I believed that no matter how dead the battery was, the VAZ 2109 could always be started from the pushrod. It turned out that this was not true. There is a certain degree of discharge when the starter no longer has enough strength to turn the crankshaft, but it is enough. I pushed it, put it in gear, started up and everything was fine. However, if the battery is completely dead, it does not even have enough power to form a spark. , don’t push, the VAZ 2109 won’t start until you recharge the battery. But still, what to do if the VAZ 2109 battery has lost charging? Of course, not every one of us is an electrician and can check the generator with all its diodes, stabilizers and collectors. The very first thing to do if the VAZ 2109 generator stops working is to check the generator brushes. It’s easy to understand that the VAZ 2109’s brushes are faulty or worn out. Turn on the ignition and look at the instrument panel.
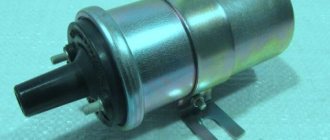
Checking the serviceability of the VAZ 2109 generator brushes
If the brushes are faulty, then the battery charging lamp will not light up when the engine is not running. Or it will glow very dimly. After you start the engine, the light will continue to glow dimly. The dim glow is visible only in the dark; it cannot be seen during daylight hours. If the brushes are in good working order, then when the engine is not running, the battery charging lamp lights up brightly; if it is started, it immediately goes out. It should be noted right away that the VAZ 2109 produced before 1993 has old-style brushes. On the new VAZ 2109, brushes of a new type are installed, immediately with a voltage stabilizer. However, there are both new and old samples of VAZ 2109 brushes on sale. The cost of VAZ 2109 generator brushes is about $3-5. Replacing the VAZ 2109 generator brushes is very simple, the sequence is as follows: 1. Remove the ground from the battery
Removing the mass of the VAZ 2109
2. Disconnect the chip from the generator brush housing and remove the wires from the central stud of the generator.
Disconnect the wires from the VAZ 2109 generator
3. Now unscrew the two bolts securing the brushes to the VAZ 2109 generator housing. And slowly remove the brushes from the generator housing.
We unscrew the bolts securing the generator brushes of the VAZ 2109
4. If you want the new brushes to last a long time, you need to clean the generator commutator. To do this, loosen the nut on the generator mounting bracket, loosen the belt and remove it. We take fine sandpaper, press it against the commutator, and we ourselves rotate the generator using the drive wheel. In this way, graphite deposits from previous brushes are removed from the commutator. And the wear of the new brushes will be long. 5. Now we insert new brushes into the housing of the VAZ 2109 generator and clamp them.
Generator brushes VAZ 2109
6. We put back all the chips and wires of the VAZ 2109 generator.
VAZ 2109 generator brushes replaced
We check the functionality of the generator as indicated above.
ABOUT REPLACING THE GENERATOR SET ON A CAR
It so happened that replacing the VAZ generator is necessary. The necessary spare part has been purchased. By the way, some car enthusiasts replace serviceable components with more powerful units. The reasons for this can be very different. Basically, this is the installation of new, additional electricity consumers. Powerful audio systems, good headlights, illumination of body kits and other similar “things” require an increase in the power of the generator set.
In such cases, a generator from Priora or Kalina is usually purchased and installed. Its generated current is approximately 115 A, while the standard device produces 80 A. Its mounting is similar to the standard one, only the drive belt pulley needs to be replaced. The matter is not very difficult; even inexperienced drivers can cope with it.
Required tools for replacing generators:
- Wrenches for “10”, “13”;
- Open-end wrench 17x19;
- Screwdriver Set;
- Mount.
If the work is carried out in a garage with an inspection hole, then the following procedure can be recommended:
- Disconnect the engine protection. You can release it only in the area of the generator set and leave it hanging;
- Using a “10” wrench, tighten the nut on the protruding contact bolt of the generator and remove the wires from it. Also disconnect the connector from the brush assembly;
- Unscrew the tensioner bolt, the bolt securing it to the cylinder block and remove it from the engine;
- Now the nut of the bracket axle is unscrewed to mount the generator. This action is performed with a key set to “19”, remove the nut with the spacer washer and knock the axle out of the bracket.
The generator can be removed from the engine compartment and a new one installed in its place. Installation is carried out in reverse order. Connect the previously disconnected wires and connectors, and replace the drive belt. After this, you can try it out at work. Before starting the engine for testing, a few words about how to properly tension the alternator belt. This process is slightly different for different engine displacements. With a volume of 1.5 liters, the belt is tensioned by moving the generator housing away from the engine block with a pry bar. With a volume of 1.6 liters, tighten the belt using the tensioner screw.
Removing the generator on a VAZ 2113-2114-2115 without any hassle.
Take care of your car!
The operating principle of the VAZ 2109 - 2114 generator.
In order to understand why on the VAZ 2109 - 2114 the generator gives little charge or does not charge at all, you need to understand how it works and know the principle of its operation.
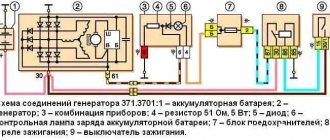
The generator consists of five main parts shown in the figure below: armature - 5, stator - 6, relay-regulator paired with brushes - 10, diode bridge - 9, housing - 3.7.
The operating principle is as follows:
- a positive wire goes from the battery to the diode bridge (9) and the diode bridge (9) is connected to ground through the housing (3.7) of the generator
- voltage through the diode bridge (9) is supplied to the stator (6) of the generator and a magnetic field appears in the stator
- when the car starts, the engine, using a belt drive, turns the generator rotor (5)
- in the rotor (5), rotating in the magnetic field of the generator (6), a current appears
- The current is removed from the rotor by brushes (10) and through a relay-controller (10) is supplied to the car battery.
Failure to comply with any of the points leads to a malfunction of the VAZ 2109 - 2114 generator.
We repair the voltage regulator and relay
Removing the voltage regulator in a VAZ 2109 car is not difficult. The technical features of this car model allow this work to be performed without removing the generator. The only tools you will need are standard screwdrivers and wrenches.
To replace the voltage regulator in a VAZ 2109, the first thing you need to do is purchase a new element. Nowadays, this will not be difficult, because it is sold in any auto store. Recently, the use and application of three-level regulators has become widespread. However, VAZ cars are still produced with standard regulators.
The main difference between the three-level regulator and the standard one is the new relay. The three-level regulator relay is much better in performance and quality than the standard one. This type of regulator makes the voltage more stable and of higher quality and protects the entire electrical system of the car from significant fluctuations in the network. Before performing any type of replacement work, it is recommended to charge the battery. After completion, install everything in the reverse order and take new measurements with a tester at the battery terminals.
Reasons why the VAZ 2109 - 2114 generator does not charge.
To find the reason why the VAZ 2109 2114 generator does not work or does not charge well, you need to check for serviceability each of the points above that describe the operation of the generator.
Point one: the diode bridge does not receive positive voltage from the battery.
The cause of the malfunction in this case may be the wire itself or its connection to the diode bridge or battery. Try cleaning the connection terminals, and if that doesn’t help, test the wire.
Poor contact with the negative wire is not considered, since in this case the engine would not start at all.
Point two: diode bridge and generator stator.
If voltage comes to the diode bridge, but charging does not occur, then it should be checked for functionality. To find out how this is done, read the article “Checking the diode bridge of VAZ 2109 - 2114”.
After checking the diode bridge, if it is working properly, we ring the stator winding. To do this, select the continuity mode on the multimeter and apply the probes to the first and second contacts of the stator, and then to the first and third.
If there are no cliffs anywhere, we move on.
Point three: VAZ 2109 - 2114 alternator belt.
The carburetor version of the VAZ had a thin V-belt, and the injection models have a wide belt with cores, but this does not change the operating principle. Charging may not go well due to belt slippage. This malfunction is manifested by a strong belt whistle. The belt may also start to whistle when you turn on energy consumers such as headlights, heated glass, stove fan, etc. If you hear a belt whistle, try to replace it as soon as possible. This is one of the reasons why the VAZ 2109 -2114 generator does not charge well.
Point four: generator armature VAZ 2109 -2114.
There should be no breaks in the armature, as well as in the stator. Test it by placing the multimeter probes on the brush tracks.
If the anchor does not ring, it should be replaced.
Point five: brushes with a relay-controller.
The brushes of the VAZ 2109 -2114 generator wear off over time on the armature tracks. If their length is less than 5 millimeters, then they are not able to press tightly against the anchor, thereby not charging the vase battery.
But it happens that the relay-regulator fails before the brushes are worn out. To check it you will need:
- 12 volt light bulb
- car battery
- two 1.5 volt batteries
- several wires
We connect the light bulb and battery to the relay regulator as shown in the figure below. In this case, the lamp should be on.
Now we add two batteries to the circuit, as in the figure below. The light should not be on now.
If the light comes on in both cases - the relay - the regulator needs to be changed.
Now you know all the main reasons for the malfunction of the VAZ 2109 - 2114 generator. If you have questions, leave them in the comments!
Diagnostics
The search for a faulty element begins with checking the battery charge level. To measure the voltage at the terminals, use a multimeter or voltmeter. It is necessary to take readings in two modes:
- without load with the ignition turned off and the minus terminal removed;
- under load: by turning the key in the ignition and turning on any consumer (low beam headlights, air conditioning).
The multimeter probes in voltmeter mode are connected in series: the positive terminal is a red contact, the negative terminal is a black one. The normal value of the battery voltage at rest with a 100% charge is 12.05 - 12.6 Volts.
Important! The battery voltage directly depends on the state of charge: if the level is reduced to 10%, then the maximum voltage without load at the terminals will be about 11.3 Volts. The test under load should be carried out carefully, observing safety precautions: when turning on the ignition, do not touch the power terminal and cable with bare hands
The multimeter readings are taken twice: when the engine starts, and after 20-30 seconds. When starting the engine, the power current can reach a peak of up to 670 Amps, depending on the power of the unit. The battery supplies a significant part of the energy to the starter for the initial crankshaft rotation - at this moment the voltage at the terminals drops. A value of 8-9 V is considered normal; if the drop during startup is critical and reaches 6 V, then the battery is completely faulty
The test under load should be carried out carefully, observing safety precautions: when turning on the ignition, do not touch the power terminal and cable with your bare hands. The multimeter readings are taken twice: when the engine starts, and after 20-30 seconds. When starting the engine, the power current can reach a peak of up to 670 Amps, depending on the power of the unit. The battery supplies a significant part of the energy to the starter for the initial crankshaft rotation - at this moment the voltage at the terminals drops. A value of 8-9 V is considered normal; if the drop during startup is critical and reaches 6 V, then the battery is completely faulty.
After measuring under load, the voltage on a working battery is restored within 15-30 seconds. It is measured again, determining the charge capacity. Next, be sure to check the oxides on the terminals, the condition of the power cable for damage to the insulation, and the reliability of fastening the ground wire to ground.
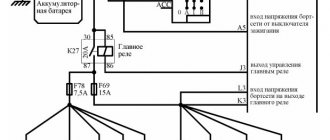
A blown fuse in the mounting block is diagnosed by the condition of the fusible link. In order to determine which of them is responsible for the battery indicator light, you need to use the electrical diagram in the technical description of the car (the location differs depending on the brand of the power unit). The fuse is included in the common circuit and controls several consumers: all indications on the dashboard, cigarette lighter illumination, interior light. Typically this is socket F3, rated at 10 Amps.
The electrical circuit is first inspected, checking the contact fastenings and breaks. If no visible violations could be detected, then the multimeter is turned on in ohmmeter mode and each section is “ringed” separately: from the battery to the generator, from the rotor terminals to the fuse mounting block, the ignition coil and the instrument panel (contacts of the control light).
Why is the battery charging light on?
A faulty relay in the mounting block is tested for voltage with the on-board power supply turned on. The voltage at the relay output must be at least 9 Volts.
The diode bridge and the generator voltage regulator relay are checked with the engine running: at idle, the unit speed is increased to 4000 rpm and the voltage is measured with a multimeter at the rotor terminals. If the indicator is around 14.5 Volts, then the generator components are working properly.
Often the reason for the lack of battery indication is a minor reason: a burnt out light bulb or a poorly secured fuse in the socket. To eliminate the violation, it is enough to move the fallen fuse and put it in place in the socket until it stops.
If the failed element is not installed and the warning light does not light up, then computer diagnostics are carried out, reading error codes in the ECM. To do this, use the ODB-2 connector (under the steering column), a computer or laptop with the program installed, or a special scanner. All errors are recorded by the system in the ECU (electronic control unit) memory log; the structure of the codes is given in the technical description of the car - they are different for all models. Using a scanner or laptop, they decipher the system error and determine the cause of the failure. This diagnostic method provides a complete picture of the condition of all components over the entire period of their operation.
Checking additional diodes
The short circuit of additional diodes can be checked without removing and disassembling the generator according to the diagram shown in Figure 6.
Just as for checking the valves of the rectifier unit, it is necessary to disconnect the wires from the battery and the generator, remove the protective casing of the generator and disconnect the wire from the “D+” terminal of the voltage regulator.
Connect the “plus” of the battery through a lamp (1–3 W, 12 V) to terminal “D” of the generator, and the “minus” to one of the phase terminals of the stator winding.
If the lamp lights up, then there is a short circuit in one of the additional diodes.
You can find a damaged diode only by removing the rectifier unit and checking each diode individually.
A break in additional diodes can be detected with an oscilloscope by the distortion of the voltage curve on plug “D”, as well as by low voltage (below 14 V) on plug “D” at an average rotation speed of the generator rotor.