Installing a turbocharger on a car is one of the most effective engine tuning options. With proper selection, installation and configuration, this unit seriously increases the engine power (up to one and a half times). Among the various design options, the most common are high-pressure devices equipped, unlike other models, with a bypass valve. It serves to ensure stable operation of the power unit at high pressure and high speeds. It should be noted that diesel engines do not have separate emergency pressure relief systems: all regulatory processes are carried out using the geometry of the turbine and the volume of the fuel-air mixture supplied to the cylinders. How the device is operated on gasoline engines and how the turbine actuator is independently adjusted is described below.
A nuance: in the slang of car owners, the actuator has a couple of other names - vacuum regulator, as well as wastegate. These terms refer to a single part that protects the turbocharger from overload.
Work principles
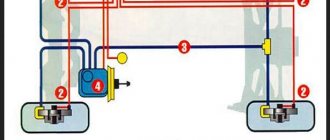
The vacuum regulator is installed in front of the turbine in the engine exhaust manifold. How does a turbine actuator work? The principle is simple: as the crankshaft speed increases, the pressure of the exhaust gases increases, and the actuator’s task is to pass them past the turbine itself. This is what happens when the valve opens. At the same time, more air gets inside, which makes it possible for the supercharger to accelerate as much as possible. Simply put, a wastegate uses the principle of a conventional pump in its operation, converting pressure energy into movement of the rod. But there are other systems.
Let's summarize.
A turbine actuator is a unit whose main task is to protect both the turbine itself and the engine as a whole from overpressure.
The principle of operation of the actuator can be different, it all depends on the manufacturer and the specific device of the system.
Repairing and adjusting the actuator is not an easy task, both in diagnosis and in the repair itself. If you are reading this material, then it is probably too early for you to interfere with the operation of this system; only specialized services will help. If you want to figure it out on your own, you need to acquire service literature on this topic from a specific manufacturer, which is not always easy, due to the rare desire of such a manufacturer to share such secrets, reducing their own profits from the service.
I recommend reading:
What is the difference between 5W40 oil and 10W40?
Car battery life - what affects it and how to extend it.
Service life of winter tires.
What do tire markings mean?
Design features of the vacuum regulator
The most widely used devices are Bypass type, which are offered in two versions:
- Closed cycle turbine actuator. Here, excess pressure enters the heated sector of the device through the bypass channel. This technology reduces inertial losses that occur when the turbine wheel increases its speed. When excess pressure is generated, the diaphragm begins to bend. As a result, the force of the return spring is overcome, the device opens and everything “extra” flows into the bypass channel.
- Blow-Off. The “pump principle” also applies here. The difference is that the excess is released into the atmosphere: the process is accompanied by a characteristic sound.
Summarizing
The inspection methods listed above allow us to assess the condition of an automobile turbine in approximately 95% of cases. As practice shows, floating bearings most often fail in turbines. Because of this, the blades damage its body, but the pressure is still built up. The main sign of partial turbine failure is increased oil consumption. In very rare cases, the cooler simply jams. In any case, when buying a used car with a turbocharged engine, you must always check the condition of its turbine.
Why do you need to adjust the turbine actuator?
Indeed: it would seem that you installed a new part on the engine and use it! But here such a moment will not pass: in the absence of proper adjustment in the area where the turbocharger is located, trembling (rattling) of the device will be observed (it is especially strongly felt when the engine is revved up and stopped). Another consequence of incorrect adjustment (or lack thereof) is low boost.
Nuances: the last problem can also appear if there is a lack of tightness in the intake system. On some car models, a malfunction is signaled by the on-board computer, which writes, for example, “weak boost.”
Jrone › Blog › Signs of turbine failure and their causes
Like all other components of the vehicle, the turbine cannot avoid periodic breakdowns, which as a result require immediate repair intervention.
Some of them may be completely insignificant, but others pose a serious threat, negatively affecting the operation of individual vehicle devices. In this article we will talk about the main signs and causes of such problems, and also find out whether you can cope with them on your own. There are several common signs that your car's turbo is having trouble. The first and most characteristic sign of existing problems is expressed in the emission of blue smoke from the exhaust pipe (it is especially noticeable when the car accelerates strongly, however, when the engine runs stably at constant speeds, the smoke disappears). The cause of this phenomenon is the combustion of oil, which accidentally entered the engine cylinders due to its leakage from the turbocharger. In addition, black exhaust gases may also appear from the exhaust pipe, indicating the combustion of a rich mixture due to an air leak either in the charge lines or in the intercooler. Another reason affecting the formation of black exhaust is a faulty turbocharger control system or some kind of defect. The third sign of problems with this unit is white smoke emerging from the same exhaust pipe. The reason for its formation is most often to be found in a clogged turbine oil drain line. Increased oil consumption and traces of oil leakage found on the turbine and on the air duct pipes are the fourth sign of a turbocharger malfunction, which is caused by clogging of the air supply channel, coking of the turbine axle housing, or clogging of the oil drain line. In some situations, the driver may notice that the acceleration dynamics of the car have deteriorated significantly. In this case, it would also be useful to remember the turbocharger, because any damage to it or a breakdown in the control system for the operation of this unit limits the flow of air into the car engine, which causes a decrease in its capabilities. The next sign indicating a malfunction in the functioning of the turbine is the appearance of noise when the engine is running, and the reason here lies in an air leak between the engine and the compressor outlet. In addition to the noise (or instead of it), you can also hear the grinding noise that accompanies the operation of the turbocharger. Visual diagnostics of the unit housing will help you determine its source, since it is its cracks, various deformations, as well as the contact of the blades with the edges of the cracks that signal the need for an immediate replacement of the turbocharger. If you notice that your faithful friend has begun to “eat” a lot, and for some reason the exhaust toxicity has increased sharply, this means that it is time to look at the air filter and/or the air supply channel to the turbine, because clogging of these parts directly affects the appearance of the specified problem. Finally, the last of the most common signs of compressor failure is an oil leak on the compressor side. The reason for this is not original and is based on the same coking of the turbocharger axle housing, its damage or disruption of the proper operation of the lubrication system.
Source
How to adjust the turbine actuator
The device is configured in two ways, each of which allows you to increase the efficiency of the turbocharger.
Boost setting
The simplest method is to replace the spring: the stiffer it is, the greater the impact on the membrane and vice versa. It all depends on what is required: to reduce the force of the gases on the vacuum regulator or to reduce it.
The next method is to adjust the thread at its end. Loosening will lead to a lengthening of the wastegate rod, and tightening, on the contrary, will reduce the length of the part. In the latter case, the damper is pressed tighter and more force will be required to open it. The result of this action is faster spinning of the turbine wheel impeller.
Application of solenoid
It is also called boost control. Installing this device increases the boost force. The solenoid is mounted in front of the vacuum regulator. The solenoid simply releases some of the air, “facilitating” the functioning of the valve.
Stem adjustment
To perform this operation, it is recommended to remove the turbocharger from the engine (on some car models you can reach the adjusting nut without removing the unit). This will give you the opportunity to see how the “gate” closes. If the rod is made shorter, it will press harder and vice versa.
Adjustment process (you will need pliers and a 10mm wrench):
- remove the bracket from the rod and loosen the nut;
- tighten the adjustment screw (you need to turn it to the left) with pliers;
- at the same time, look at the “gate”, which should close all the way;
- lightly tap the valve with the key: if you hear a rattling sound, continue tightening until it disappears (here it is worth considering that 1 full turn of the screw corresponds to approximately an increase in pressure on the membrane of 0.3 Bar);
- tighten the nut and put the bracket in place.
After this adjustment, the vacuum regulator will close completely. To check the correctness of the settings, start the engine and test it in different modes with throttle changes. There should be no extraneous sounds (including when the engine is turned off).
Adjustment and Settings
After replacing a worn valve, you need to make the correct adjustment. Practice shows that incorrect adjustment of the actuator leads to the fact that when the engine is over-throttled, the operation of the turbine will be accompanied by constant trembling. A sign of incorrect tuning is insufficient boost even at high engine speeds. This can also happen due to insufficient tightness of the system, so it is better to entrust this stage to specialists.
In specialized car services, setting up a diesel actuator is carried out in three ways:
- Replacing the spring. The simplest technique is based on installing a stronger and more elastic part that can significantly increase pressure. Installing a spring made of a softer material has the opposite effect - the pressure decreases. In this way, the desired indicator is achieved.
- End adjustment. By loosening the end of the actuator, you can lengthen the valve thrust, and by tightening it, you can shorten it. The reduction in thrust leads to the fact that much greater effort has to be made to open the damper, and accordingly, the impeller spins much faster.
- Installation of boost controllers. The mechanism is installed before the valve and is able to adjust the pressure to the desired parameters. The controller independently releases some of the excess pressure, reducing the load on the actuator and making its work more productive.
Wastegate replacement
Its full repair is possible only in a specialized technical center, where the device can be most accurately diagnosed. Causes of vacuum regulator failure:
- termination of the functioning of the electronic unit responsible for opening/closing the valve;
- drive gear failure;
- failure of the electric motor that ensures proper operation of the shutters.
If it turns out that repairing the vacuum regulator will be quite expensive, then it is advisable to replace the turbine actuator with a new part. The process is carried out as follows:
- Remove the old cuff.
- Clean and degrease the seat and the new part with acetone.
- Using adhesive sealant, install a new cuff.
- There are caps on the body and there must be a gap between them to allow for additional lubrication.
- Glue the membrane with the same product and roll it in a circle.
The difficulty of repairing the most modern models of actuators lies in the presence of complex electronic components, the breakdown of which leads to failure of the servo drive. You can’t do without professional equipment here. This could be, for example, a Turboclinic tester. It allows you to diagnose and adjust electronic components of systems such as Toyota, Garret, MHI, IHI.
First turbine builder
Design and principle of operation of a turbine on a diesel engine
However, the first person who built one of the very first efficient turbochargers was not Daimler, or even Diesel. Alfred Büchi is considered the first engineer to build a turbine. A patent for this invention was received in 1911. The first turbine was designed in such a way that it could only be used on large marine engines. The use of compressors on diesel cars did not make sense.
You may be interested in: Renault Logan: dimensions, technical specifications and review
Then turbines began to be used in aviation. Since the 1930s, military aircraft with gasoline engines equipped with turbines have been regularly mass-produced in the United States. The first truck in history equipped with a turbocharged diesel engine was built in 1938.
In the 60s, General Motors produced the first models of Chevrolet and Oldsmobile passenger cars with supercharged gasoline carburetor engines. The first compressors, however, were not very reliable, so they quickly disappeared from the automotive market.
How to extend the service life of a product
Using simple rules, you can seriously extend the life of both individual elements of the turbocharger (including the vacuum regulator) and the entire device as a whole. The following describes the operational features in different engine operating modes:
- Start the engine. When starting, try to use gas to a minimum, and keep the engine at idle speed for at least a minute. The fact is that in a turbocharged compressor the necessary parameters are established within a few seconds if good lubrication is supplied. If you turn on the gas at the very beginning of the power plant start-up, the impeller will be forced to spin in conditions of insufficient oil supply, which will lead to its breakdown.
- Start in winter. If the engine has not been running for a long time or you have to start the engine at sub-zero temperatures, start only at idle speed so that the oil fills the turbocharger.
- Stopping the engine. Before the ignition is turned off, let the power plant run for a while on XO. Otherwise, temperature changes will occur in the turbocharger, and oil will abruptly stop supplying the components of the device, which will still spin by inertia.
- Idle speed. It is not recommended to keep them for more than half an hour. If this time interval is exceeded, the impeller will rotate at insufficient speed, which risks the penetration of oil vapors through the connections. As a result, a bluish exhaust appears from the muffler.
- Actions before starting the engine for the first time after a major overhaul. First make sure the turbocharger lubrication system is full. Next, without starting the engine, turn the crankshaft so that the oil begins to circulate. Start the engine and let it idle for ten minutes.
Compliance with these recommendations will extend the life of the turbocharger and avoid premature adjustment, or even costly repairs.
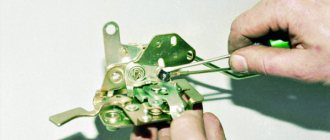
Actuator device repair
Repairing the Corolla E150 clutch actuator will stabilize the operation of the robot. Do-it-yourself repair procedure.
Check clutch
To do this, you need to accelerate the vehicle to 50–60 km/h, switch the robot to manual adjustment mode and engage fifth gear. In this case, you need to depress the gas pedal as much as possible and make sure that the speedometer and tachometer needles move synchronously. This indicates that the clutch is working properly.
Determine actuator error
To determine possible errors, it is necessary to stop the machine, move the robot to the neutral position, turn off the parking brake and the ignition system. Using SST, connect the TC and CG pins of the DLC3. Next, you need to turn on the ignition system, while releasing the brake pedal. The diagnostic system will start. All dashboard lights will flash, and if an error occurs, a red gear will appear and flash at regular intervals. If no errors are found, then blinking will occur without long breaks.
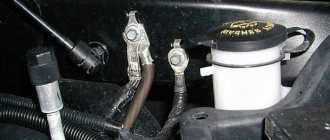
Remove and disassemble the MMT
In order to troubleshoot the actuator, it must be removed. You can get to the mechanism only by removing the battery and its platform. Then it is worth disconnecting the chips from the engine and sensor. Afterwards, you can remove the actuator directly (it is secured with three bolts).
Next, the engine is disconnected from the actuator, and the internal space of the mechanism is cleaned of dust and dirt.
Replacing brushes should be carried out with extreme caution, since new breakdowns are possible during this process. You should immediately check the Corolla 150 clutch actuator motor; to do this, you need to look at the wiring
There should be no plaque, dirt or “oldness” on it. If there is an unpleasant burning smell, it means that the actuator motor has burned out and should be replaced.
Next, you can disassemble the MMT. To do this, you need to unscrew the fastening elements of the sensor; it is also worth remembering the exact location of this part. After the sensor has been removed, you need to find a plate with antennae; it is attached to nuts that need to be unscrewed. To determine the correctness of the disassembly process, the rod is placed in a certain position. To do this, you need to take a screwdriver and turn the rotating element in the groove of the drive motor. The rod should be extremely compressed inward.
Afterwards you can dismantle the fastening elements and open the MMT cover. Next, the drive rod is untwisted and pulled out. It is necessary to clean the mechanism from old grease and clean the block from dirt and dust.
After cleaning, it is necessary to diagnose the MMT for the presence of possible breakdowns. One of the simplest diagnostic methods is the following: you need to pull out the spring and assemble the entire mechanism to check. Most often, bushings wear out, and the most common problem is a poorly manufactured drive. Therefore, before purchasing a new actuator, you should ask yourself: where is this important mechanism made?
Install the device
During assembly, all components are installed in the reverse order. In this case, it is necessary to lubricate all bushings, bearings and the worm shaft. After installing the actuator, the rod is placed in its outer limit position and “started” half a turn. The sensor is placed on the antennae, after which the part is rotated clockwise, this is necessary to fix the sensor with fasteners. Afterwards you need to lubricate the clutch fork, install the drive, chips on the motor and the drive sensor.
In the end, all that remains is to install the battery and adjust the clutch position.