Print this article Font size 16
The exhaust system does not have a complex design or device at all. Its main task is to release exhaust gases. But it's not that simple. If you released exhaust gases into the atmosphere, the damage to nature would be enormous. Therefore, modern developments have been applied that allow gas to be purified before exiting, making them safer for the environment.
Bottom view
Let's study the exhaust system using the example of the VAZ 2109 model.
Muffler device for VAZ 2108 and 2109
It should be noted right away that the mufflers of the VAZ 2108 and VAZ 2109 cars are practically no different from each other in design. The only difference is the dimensions: the exhaust pipe on the “nine” is 8 cm longer.
The muffler on VAZ 2109 and 2109 cars consists of two parts:
- main muffler;
- additional muffler (aka resonator).
The main muffler body has the shape of an oval pipe and is made of alloy steel. The housing has a number of partitions that form resonator compartments. There are also two exhaust pipes (exhaust and inlet) and the main exhaust pipe. All these elements are connected using rolling. Spot welding is practically not used in such devices, so as not to reduce their corrosion resistance.
The resonator body is a round tube with an aluminum coating. Inside there is another pipe with holes, at the ends of which there are mounting flanges. With their help, the resonator is connected to the gas receiver of the car.
About repairs
Some owners resort to muffler repair. But it must be said that such measures, if not useless, are at least temporary. The fact is that gases can break through not only outside the muffler, but also inside. That is, after installing the patch, the exhaust sound will not change. The cost of a new muffler for a “nine” is now about a thousand rubles. And it will last much longer than the old repaired one.
How to determine whether a muffler is faulty
It is not difficult to understand that the muffler of a VAZ 2109 car is faulty:
- the volume of the engine increases sharply, the engine begins to growl;
- In this case, the engine power is reduced by two or even three times;
- the cabin smells of exhaust fumes;
- if the driver does nothing, the growl of the engine is replaced by a deafening roar, which can sometimes be accompanied by pops similar to pistol shots.
All this suggests that a hole has formed in the muffler housing. If you don't do anything about it, then problems are inevitable:
- If the muffler is faulty, carbon dioxide contained in the exhaust gases may end up in the vehicle interior. This gas is colorless and odorless, but causes severe headaches and dizziness. And if exposure to dioxide lasts for a long time, it can lead to the death of the driver;
- Driving with a faulty muffler cannot be called comfortable;
- Driving with a faulty muffler is expensive: there are rules to limit noisy driving. Violation of these rules may result in fines.
Malfunctions
Due to its simple design, this system is very reliable and rarely requires attention. But nothing lasts forever, so over the years the muffler and other elements burn out. Most often, it is the muffler that fails, as it takes the entire blow. It can burn out both outside and inside. In the latter case, the breakdown can be determined by the loud exhaust sound. Driving with such a muffler is not dangerous, but not very comfortable. Firstly, sound insulation suffers, and secondly, gases can break into the cabin. Therefore, it is better to replace this element immediately, given that it costs a penny.
Main malfunctions of VAZ 2109 and 2108 mufflers
There are several typical muffler breakdowns that owners of VAZ 2109 and VAZ 2108 cars encounter:
- Holes appear in the main muffler housing. Due to high temperatures accompanied by strong vibration, the case simply burns out. The cause can be either thermal or chemical corrosion. The problem is solved by applying a patch and subsequent welding of the damaged body;
- The muffler constantly overheats. As a rule, this occurs due to coking of the holes in the resonator partitions. In this case, hot exhaust gases accumulate in the silencer, and engine power rapidly decreases. To eliminate the problem, the muffler body is opened, damaged resonator partitions are replaced with new ones;
- The muffler is ringing. Ringing in a muffler occurs when the resonator partition in its body is completely or partially torn off. The problem is eliminated in the service using spot welding;
- The muffler is knocking. This is observed when one or more mounting hangers are broken. After this, the muffler body begins to dangle under the bottom of the car, periodically hitting it. It is not possible to fix such a breakdown on the road. The only way out is to slow down to a minimum and drive to a car service center with an inspection pit, where mechanics can replace the broken fasteners.
Main elements of the exhaust system
The muffler resonator is installed immediately after the exhaust pipe and the catalyst, and its task is to level out pulsations of the gas flow. In cross-section, it looks like a perforated pipe placed inside a metal chamber of a larger diameter. The pipe can change its cross-section on the way from the inlet to the outlet of gases.
The main muffler may have a more complex design and has the main function of noise reduction. Modern systems can have almost all noise reduction schemes in the rear muffler can. The chamber through which the main pipe passes can have several sections, each of which has noise reduction at its own level. Typically, these chambers are filled with heat-resistant fiber material, which further dampens vibrations and absorbs sound vibrations.
The design of a car muffler is constantly evolving, and we try to follow the news from the design bureaus of the most progressive automakers and tuning studios. Stay with us, and let your mufflers only please the ears of avid motorists. Happy travels to everyone!
Replacing the muffler on VAZ 2109 and 2108
Replacing a muffler on VAZ 2109 and VAZ 2108 cars always begins with the selection of the necessary tools and materials. Here's what we need to get started:
- new muffler;
- set of open-end wrenches;
- set of socket heads with ratchet;
- pliers;
- flashlight.
Sequencing
In order for the result of the work to please the car owner, it is advisable to act according to the following algorithm:
- The car is installed on the inspection hole. The engine is turned off and wheel chocks are placed under the wheels.
- The muffler pipe is disconnected from the resonator pipe. To do this, the nut on the clamp is held with a 13-mm open-end wrench, and the bolt from below is unscrewed using a socket head with a ratchet.
- The clamp, freed from the bolt, is slightly bent with pliers and removed.
- The muffler is held under the bottom by a system of rubberized suspensions. There are three hanging hooks on the muffler body. To remove the muffler, you need to lift it slightly so that all the hooks are disengaged (usually at this moment a characteristic click is heard).
- The muffler removed from the hangers is removed from under the car.
- A new muffler is installed in place of the old muffler. All installation operations are carried out in reverse order.
When installing the silencer, you should pay attention to the reliability of the connections and make sure that it is correctly secured under the bottom of the car.
Video: removing the muffler on a VAZ 2109
Exhaust system repair
Muffler failure can occur from mechanical shock or exposure to harmful chemical elements and moisture. In this case, the device can be repaired at a car service center or with your own hands.
Repair of VAZ 2109 muffler with small cracks and burnouts
So:
- Initially, it is necessary to dismantle the muffler. The procedure itself is not too complicated; the time it takes to complete it will depend on the type of muffler mounting and the skills of the motorist. The main difficulty when unscrewing the device is to remove rust on the fasteners, which contributes to the parts sticking to each other.
- After removing the element, it is necessary to carry out a thorough diagnosis and determine the reason why the muffler malfunctioned. A thorough visual inspection of the external and internal surfaces will give an idea of the nature of the problems that have arisen.
- If no visible defect is found on the outer surface, there are no burns or through holes from rust, then most likely the underlying cause of muffler failure will be a problem with the internal resonator. In this case, it is necessary to repair or replace the resonator. The old device is cut out using welding tools and the new one is welded. Welding and repair of the product is carried out in compliance with work rules in accordance with safety regulations.
- When small external burnouts are detected, special means are used to repair the muffler. Many auto stores offer various sealants for sealing cracks.
- Before applying the sealant, the edges of the crack are thoroughly cleaned of soot and rust is removed. This is done immediately before applying the sealant. A greater effect is achieved if the instructions for applying the material to the surface to be repaired are strictly followed. The basis of most sealants is silicone, which is sufficiently resistant to elevated temperatures. The operating range of high-quality material can reach a thousand degrees.
- If burnouts are found on the outer surface that are difficult to seal with sealant, fiberglass is used. In this case, it is fixed to the damaged areas of the muffler using epoxy resin containing some additives.
- After fixing all the errors, the muffler is installed in place and the car is warmed up at idle speed for an hour, for better hardening of the epoxy resin.
At the same time, you can clearly see how the plugs on the VAZ 2109 engine were replaced. If there is no leakage of coolant, then the replacement of the VAZ 2109 cylinder block plug was done efficiently and in the near future no replacement of the VAZ 2109 block plug will be needed.
Repair of a burnt-out muffler VAZ 2109
Most often, the muffler burns out on the front wall, where the “gander” enters the can; the “gander” can burn out or at the junction of the muffler with the resonator. In the last two cases, repairs are carried out quickly: it is enough to weld a repair insert or a piece of pipe.
Tip: Very often it is not practical to repair the muffler. Its walls are very thin, and if it practically burns out when welding one hole, another appears nearby. Moreover, such repairs, despite the fact that the price for them is small, are only a temporary measure and it is better to replace the muffler as soon as possible.
Carrying out welding work:
- Welding is carried out semi-automatically. To apply the overlays, metal one or two millimeters thick is taken.
- The welding area is cleaned down to the thick metal that has not yet burned.
- To perform a high-quality restoration of the muffler, it is necessary to remove the mounting strip from it.
- The can and the gander are connected. It is very important to correctly align the parts relative to each other. First, you need to weld the parts, try them on the car, and only then thoroughly weld them, as shown in the photo.
Connection of a can and a gander
- For a more reliable connection, two pads are welded to the front wall and the gander.
- To reduce rattling and breaking off of the “gander”, a small brace is installed.
Final muffler repair
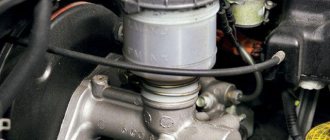
Replacing the fuel filter of a VAZ 2109 car
When replacing or repairing a muffler, it is best to replace the fuel filter, which is recommended to be changed after twenty thousand kilometers traveled by the car. Filters require more frequent replacement if the car is fueled with bad gasoline. Replacement is carried out in the following sequence:
- The fuel filter is located in front of the exhaust pipe behind the fuel tank. The bolts tightening the bracket holding the filter are loosened.
- The fittings of the pipelines - outlet and inlet - are unscrewed. For this, two “19” keys are used. One is installed on the nut located on the filter housing, and the second unscrews the nut of the pipeline fitting.
Disconnecting the fuel filter of a VAZ 2109 car
It is necessary to remember the location of the fuel direction indicator before removing the filter. The filter is removed from the bracket.
Fuel filter VAZ 2109
When installing a new part, you need to focus on the indicators that are printed on the surface of the filter. If the installation is performed incorrectly, fuel will not flow into the pipeline. It is imperative to install the O-rings, otherwise there will be a fuel leak. The filter is installed in the reverse order. Then start the engine, inspect the joints for the presence of fuel drops. When they appear, the seals of the fittings and the tightening of the nuts are checked.
Assembly of a double muffler for a VAZ 2109
Before describing the process of assembling a double muffler, I would like to note that in order to successfully carry out such an assembly, the driver must be able to work with a welding machine. If you don’t have such skills, it will be much easier to buy a ready-made double muffler for the VAZ 2109 in a specialized store.
Double muffler assembly sequence
To install the muffler, follow the sequence of operations:
- The muffler is removed from the car in accordance with the instructions presented above.
- A hole for a pipe with a diameter of 5 cm is carefully cut out on the side of the muffler body. Then the upper part of the muffler body is carefully cut off, and all resonator partitions are removed. In their place is installed a perforated metal mesh, twisted into a tube.
- The pipe is inserted into the body and welded to it. Its end is inserted into a twisted perforated mesh, in which a hole is previously cut. This end is welded to the mesh.
- A pair of L-shaped pipes are welded to the standard muffler pipes.
- For heat and sound insulation, the entire structure is filled with glass wool.
- The previously cut off upper part of the muffler housing is put in place and welded. The resulting design is shown in the photo below.
- Now the double muffler is installed on the car.
Replacing a muffler is not a particular problem even for a novice driver. All you need is a viewing hole, a couple of keys and a little patience. But the repair of this device almost always involves welding work. And if the car owner does not have such a skill, then it will not be possible to do without the help of qualified auto mechanics.
The most common problem with the VAZ 2109-2108 exhaust system is muffler burnout, and this often happens even after 50,000 km. Here, first of all, everything depends on the quality of the steel from which it is made. The factory one, as a rule, lasts much longer than the ones installed afterward, since the quality of the original parts is somewhat higher. If your car's muffler is burnt out, it needs to be replaced.
Of course, there are some owners who try to repair the burnt areas, but such “patches” obviously won’t last long, and sooner or later you will still have to replace the part with a new one. For this job you will need the following tool:
- head deep 13
- ratchet handle
- open-end or socket wrench 12 or 13 (depending on the installed mounting bolt)
So, the first step is to disconnect the muffler from the resonator, for which you need to unscrew the clamp. Use one key to hold the bolt from turning, and use the second to unscrew the nut:
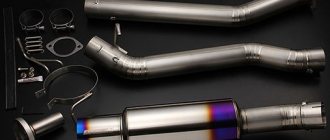
Tuning the exhaust system of VAZ 2109 (099)
For the most part, tuning the exhaust system on cars of the VAZ 2109 model range involves installing a direct-flow system instead of the standard one. This is exactly what we will talk about. But, first, let’s briefly examine the theoretical side of the issue.
A few words about the theory of direct flow for the VAZ 2109
It is known that exhaust gas backpressure occurs behind the exhaust manifold. This pressure interferes with the increase in power of the power unit, and therefore it must be reduced as much as possible. In other words: if you reduce the level of back pressure, the efficiency of exhaust gas emission from the combustion chamber will significantly increase, which will accordingly allow a larger volume of fuel mixture to be pumped into it. In turn, the more fuel mixture enters the cylinder, the more power it can develop.
The main objective of a direct-flow system is to minimize output losses. Thus, due to the “forward flow”, the car reacts much faster when the gas pedal is applied and has greater torque.
Design features of a direct-flow muffler
Today, the market for tuned auto parts offers a fairly large assortment of various direct-flow mufflers for the VAZ 2109. Moreover, the design of most of them is the same.
The main element of such a muffler is a perforated pipe. Thanks to perforation, incoming exhaust gases expand quite effectively in the muffler housing (“barrel”). Due to this, their faster removal is achieved.
An interesting point: a really high-quality tuning muffler for the VAZ 21099 can be more than 80% of a straight pipe in total length. That is, if such a muffler was installed on your car, the resistance of the exhaust system would be only 10% greater than if you drove without a muffler at all.
Pipes for modified exhaust
Of course, one upgraded muffler is not enough to create an effective direct-flow system. In particular, in addition to the muffler, appropriate pipes must also be used. Such pipes must be of a sufficiently large diameter so that they can pass the maximum volume of gases with minimum resistance.
It should be noted that, as a rule, such pipes, in addition to a fairly significant diameter, have a special core inside. Thanks to this, even with any bends, the throughput of the pipeline remains practically unchanged.
It must be emphasized that not all pipes with a core are equally productive. An ideal exhaust system will only be achieved if only one pipe is installed after the exhaust manifold, and its beginning coincides with the outlet of the exhaust manifold. In practice, forward flow is created by welding short transition elements with already made bends. In this case, special attention is paid to the quality of welding work, because during the joining process, “growths” of molten metal can form inside the pipe. Such growths will impede the passage of gases, which is extremely undesirable.
Features of the system design
The structure of the exhaust gas removal system has a similar structure on all domestically produced cars. One such example is the VAZ 2109.
The exhaust system of the car in question has the following structure:
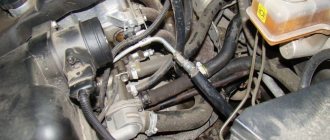
- Receiving type pipe. A special-purpose probe is mounted in the pipe cavity. The capabilities of the device include processing the composition of emitted gases, which makes it possible to analyze the mixture used as a flammable liquid and, according to incoming data, make the necessary changes, which implies monitoring the quality of the liquid;
- A catalytic converter is installed after the exhaust pipe. The functions of this element include cleaning the gas mixture from harmful elements, which is the main task of the excretion system;
- Additional muffler. This element is fixed using a clamp. Its mounting location is located on the catalytic converter. An additional muffler is installed to reduce the sound waves generated;
- Main muffler. This element is secured to the additional muffler using an identical clamp. Its function is comparable to that of an additional muffler.
Paying attention to the exhaust system of the new VAZ 2109 car, you will notice that it is installed on rubber mounting hangers screwed into the bottom.
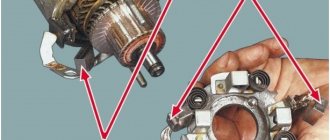
Device
In total, this system includes several elements. This:
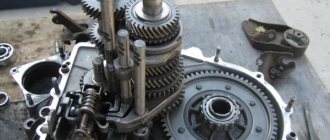
- An exhaust manifold. This is the very first part through which gases pass after combustion. People call the collector a spider for its characteristic shape. This element is supplied to each of the four cylinders of the internal combustion engine. Then all these pipes are combined into two, and then into one single pipe. There are also sports manifolds with a 4-2-1 exhaust pattern. They are installed to increase power. As practice shows, gases move more freely along the path, but the driver still will not feel a significant increase in power.
- Reception pipe. It connects to the collector. There is a special probe inside this pipe. This is an oxygen sensor, or lambda probe. If we talk about the VAZ-2109 exhaust system (carburetor), there is no such sensor in the system. But on car injectors, a lambda probe is required. The slightest problems with it may be accompanied by a “Check Engine” lamp on the instrument panel. In fact, the exhaust pipe has the simplest device. There are no sound-reflecting partitions or special fillers. This is an ordinary hollow pipe in which a single sensor can be located.
- Catalyst. As in the previous case, this element is present only on injection versions. There is no catalyst on carburetor engines. What is this element needed for? Its main task is to reduce the concentration of harmful substances in exhaust gases. Passing through the catalyst honeycomb, harmful metals are converted into harmless oxides. Thanks to the use of this element, the machine began to comply with the environmental standard Euro-2 and higher. The catalyst is the most expensive element in the VAZ-2109 exhaust system (injector). Therefore, when it malfunctions, many install flame arresters or simply knock out the core and weld the walls, leaving the catalyst empty inside.
- Resonator. This element is present on both carburetor and injection versions. A resonator is installed behind the catalyst. What is his task? The resonator serves to absorb the main noise from the exhaust gases. Thanks to this element, the sound of gases becomes less. The resonator is designed simply. This is a metal case with a perforated pipe inside. Additionally, there may be a partition inside.
- Main muffler. The resonator can be called an auxiliary muffler, but the main sound energy is absorbed by the last muffler, located under the rear bumper. It enters the resonator and absorbs up to 90 percent of the sound. The structure of this element is somewhat more complicated. The basis here is also taken from perforated tubes, but there are several of them, as well as chambers. Usually these are three or four tubes and two chambers. Passing through this entire labyrinth, the gases lose their energy and exit without unnecessary sound.
The main reasons for loss of performance
Despite many nuances, the structure of the exhaust system of the car in question is of a high level of quality. Since the design is quite simple, there is practically nothing to break there, except perhaps a violation of the structure of the muffler. Most often, a decrease in the performance of the muffler occurs as a result of the appearance of holes. A broken muffler is common on roads with poor quality surfaces.
Tuning
Those who want to change the exhaust sound to a sportier one can install a straight-through Stinger muffler. The exhaust system of the VAZ-2109 is also modified by installing a “Stinger” brand spider.
As a result, gases will freely leave the combustion chamber. But you need to understand that the exhaust sound will increase several times. Since there are no such labyrinths in a direct-flow muffler, all gases go directly into the atmosphere.
The car will sound sporty, but there is no need to talk about a significant increase in power. A more correct solution is to install such a muffler after upgrading the engine. You can start by installing a 16-valve head, then change the intake system, mount a turbine, and so on. There is no point in installing direct flow on a simple VAZ engine. The standard exhaust system already copes with the exhaust from a simple atmospheric engine. In the case of installing a turbine on a “nine”, such modification is simply necessary.
Removal and restoration of the main muffler
Quite often, when using a VAZ 2109 car, problems arise with the performance of the muffler. This often happens as a result of careless driving when the car hits a bump or hole. A hole appears, which disrupts the work. The operation of a vehicle with a damaged exhaust gas exhaust system is limited by special technical regulations. One way or another, to restore functionality, it is necessary to repair the element responsible for neutralizing sound vibrations.
Where is it located and how does it work?
The muffler is installed on the underbody of the vehicle at the end of the exhaust system.
As a rule, a resonator is installed in front of it, closer to the engine, which reduces low-frequency vibrations and plays the role of an additional component in the exhaust system.
Despite the seemingly small size of the device, the sound wave travels through it for several kilometers. This is achieved by the presence of labyrinths inside the muffler, which attenuate sound waves.
The further a wave travels, the more energy it loses and the smaller the sound becomes.
To understand what a muffler consists of, you need to understand what types of devices there are and how they differ from each other.
Removing the additional muffler
The process of replacing an additional muffler is also not difficult; it is enough to understand a little about the essence of this event. To begin with, the main muffler is disconnected from the additional one. In addition, the element is connected to the catalytic converter, which should also be disconnected. This is done using a spanner type wrench. They unscrew 2 bolts.
After this, the element rises a little and is freed from the rubberized parts of the suspension. If difficulties arise, use a hard metal object, such as a screwdriver. Removing the additional muffler is easier. Installation of a new part or a restored one is carried out in order, only in reverse order.
Measures to replace the catalytic converter
The performance of this element is quite high. Violation of its functioning is a fairly rare case, however, understanding and knowledge of the basics of its dismantling and repair, in the future, can make life much easier. Before starting repairs, you should familiarize yourself with the safety rules. All elements, one way or another involved in the process of removing exhaust gases, heat up to high temperatures during operation. The catalyst is no exception; its temperature can exceed 600? C. It will take longer to cool down than cooling the mufflers.
Removing the catalyst is possible according to the following scheme:
- To begin with, the catalytic converter is freed from an additional type of muffler. When unscrewing the bolts, a spanner is used to fix the nuts;
- After this, in an identical way, the catalyst is freed from the receiving tube, on which it is held with bolts;
- After removing all possible fasteners, the catalytic converter can be removed from the rubberized suspension part of the car.
After reviewing the information, you can draw certain conclusions about the complexity of the repair. All work, in fact, is quite feasible without outside help, the main condition is the availability of tools. The greatest attention is paid to safety, since the problem of the car’s performance can be solved without problems, which cannot be said about the health of the body.
Dual Exhaust Installation Steps
- First of all, you need to remove the old muffler.
- Afterwards, you should hang the right part of the new muffler on the right side of the car (previously placed on a lift), while using the existing cushions. In this case, the left part does not need to be fastened; you just need to connect the muffler to the resonator using a clamp and seals.
- Next, you need to connect the left part of the muffler to the main part through the pipes. In this case, it is necessary to take into account the location of the fastening rod, and it is also necessary to calculate the place where the holders in the form of brackets will be placed.
- It is necessary to use a drill to make two holes with a diameter of 1.5 mm in the spar. These holes can attach a holder, which is screwed with self-tapping screws.
- The completed operations allow you to move on to attaching the main left part. Fastening is carried out by inserting the muffler cushion directly into the bracket-shaped holder; the exhaust rod is also inserted into the cushion.
- The opposite side of the muffler is secured using O-ring clamps. This fastening should not be too tight.
- All the work done allows us to move on to the process of adjusting and establishing symmetry between the two exhaust pipe tips. Initially, loosely tightening the connections will allow the installation to be fine-tuned.
Catalyst
Replacing the catalyst on the “nine” is an impractical operation due to the cost. It is much cheaper to replace this element with a flame arrester. The exhaust system of the VAZ-2109 (injector, 8 valves) will not change its characteristics, and the exhaust will remain quiet. The only thing that will change is the toxicity of the gases. The exhaust will be more pungent. So what does it take? First, the catalyst itself is removed. To do this, you will again need a set of keys and an inspection hole. After unscrewing all the fasteners, the part is taken out. A flame arrester is installed in its place. A ready-made flame arrester is ideal in size. There are a lot of these sold in stores.
How to get rid of muffler knock?
Please note that if the muffler rings, growls, hums, or makes any other noise, we recommend that you do not carry out repairs yourself, but contact a professional car service center. For example, our company’s employees conduct thorough diagnostics, thoroughly examining the problem area in the pit, after which they decide on certain actions.
Possible prerequisites and methods of dealing with unpleasant extraneous noise in the muffler when venting gas or in other situations:
- A knocking sound on the underbody may be due to an improperly lengthed or bent muffler. It is likely that the device bends against the edge of the gas tank. Another reason for this situation is the incorrectly positioned hooks by which it is suspended. A specialist will determine where the pipe needs to be bent so that the sound stops.
- If the muffler hits something in the rear in the trunk area or the main can knocks under the rear seats, then the entire system may need to be seriously overhauled. There are two options - change the angle of the pipe or adjust the bend of the section running under the rear beam. In the second case, there is no need to remove the entire muffler; it is enough to work with the last elbow. The bend is changed by cutting with a grinder and then welding.
- The muffler knocks on the beam - a problem that often occurs among owners of VAZ 2114, 2107, 2110, 2115, 2109, Kalina, Priora, Lada Vesta, etc. When the engine slows down, a knocking sound begins on the beam or body. Many solve this problem by tightening the clamp so that the muffler is practically pressed against the bottom, or by bending both parts of the device using a sledgehammer.
- Sometimes, after replacing the resonator or for other reasons, the rubber fastenings become displaced, and when braking, the muffler begins to hit the gas tank with its knee. Most likely, this is due to the fact that the receiving length of the new resonator is longer than the old one. In this case, the beating occurs longitudinally, so tying it up will not help. It can be solved either by replacing the resonator with a suitable one, or by cutting out a ring from it and welding it.
- If, after lowering the landing, rattling of the muffler appears during acceleration, it is often necessary to do the knee digestion. For low cars, the solution of installing rubber bands is not suitable; they quickly break. It makes more sense to install dropplates - a kind of metal clamps. They securely hold the beam and the entire mass of the muffler.
- There are extraneous noises due to burnt-out partitions in the rear part of the muffler, a malfunction of the catalyst or the barrel itself.
- A pebble may get into the muffler. It is not always easy to remove it; in some cases it is necessary to drill out one of the holes in the perforated screen, since this screen is made with a recess.
In addition, it is strongly not recommended to put an air filter on the muffler - this is often what is advised to do when there is a knock, but it can catch fire. There were many precedents. They also often ask what to put under the muffler to prevent knocking - there is no need to put anything, this is an unprofessional and temporary solution.
Ideally, you should always install original spare parts on your car - resonators, mufflers, exhaust system elements, protection. Then the risk of knocking will be minimized. After examining the car, our service staff will give competent advice on how best to get rid of the unpleasant situation - by repair or replacement. Together we will find an option that suits you in terms of quality, timing and financial costs.
Silencer - purpose, device, operation
An important element of the exhaust system is the muffler; operating a car without it is impossible. As a rule, the muffler is located at the rear of the vehicle and, in conjunction with the exhaust system, serves to remove harmful gases from the engine, bypassing the vehicle interior.
Car mufflers are made from stainless, aluminized and regular black steel. Stainless steel “silencers” are practically not available for sale due to their high cost and long service life (their service life is 10–15 years). Aluminized mufflers are installed on VAZ 2114/2115. They are common in the domestic and European markets (service life 3–7 years). Regular black steel mufflers are cheap substitutes and last only a few months, so are rarely used.
What is a “glushak” for?
Main functions of the muffler:
- reduction of noise during fuel processing;
- reduction in the rate of gas release and their temperature.
The muffler is attached with special rubber pads to curved metal hooks, softening vibrations from the car exhaust
All elements of the exhaust system are exposed to high temperatures, so the coating (anti-corrosion paint, mastic) that is applied to the muffler burns out. The exhaust system of the VAZ 2114/2115 is mounted under the body on the bottom of the car.
The resonator is an important part of the exhaust system; it directly affects engine power. The faster the exhaust gas is removed from the resonator, the faster and more power the car develops.
The design of the pipe consists of all the necessary elements, therefore, when exhausted, the exhaust gas is correctly distributed throughout the exhaust pipe
The muffler on the VAZ 2114/2115 is attached to the bottom of the car with special rubber bands, clinging to flat hooks on the side and top. Why is an elastic band used, and, say, not a metal fastener?
For the VAZ 2114/2115, the muffler is a volumetric sealed metal chamber, divided inside by various partitions. The entire exhaust gas flow passes through the muffler sections and is finally extinguished and cleaned. If you look at the muffler diagram, it will look almost the same on all cars.
The principle of removing exhaust gases from a car muffler
Repair methods
Often traveling along our “magnificent” roads, you now and then run over all kinds of bumps, potholes, and holes. If, after passing another similar obstacle, the car begins to make noticeable noise, which was not the case before, then the most likely outcome is a hole in the main muffler. The presence of a hole does not allow you to work calmly, quietly and efficiently as before.
The law of the Russian Federation states that it is prohibited to operate a car with a broken muffler. Therefore, the only correct solution would be to repair the unit.
There are two ways to repair the main muffler:
- Replace with a new one. Practical, easy and fast. You can do this kind of work with your own hands without any problems.
- Fill the hole. This option is suitable only if the hole can be welded given its size, and you also have experience in welding. It is better to entrust welding to professionals.
Replacing the main muffler
To remove the muffler, follow fairly simple step-by-step instructions.
- Arm yourself with a 13mm deep socket socket, a 13mm spanner and a ratchet.
- Drive the car into the inspection hole, or lift it using a lift. Although you are unlikely to have a lift in your garage. But almost all garages in auto cooperatives are equipped with pits.
- Wait until the entire exhaust system has cooled completely, otherwise burns will occur.
- Disconnect the main muffler from the resonator, that is, the additional muffler. To do this, find a tie rod. The fastening nut is grabbed with a spanner to avoid turning. At the same time, the bolt is unscrewed using a ratchet.
- After unscrewing the bolt, remove the fasteners, disconnect the exhaust system elements, remove the clamp and free the main muffler from the resonator.
- Carefully remove the front part of the silencer from the rubberized suspension.
- Remove it from the rear suspensions and pull the damaged element out.
- Then act according to the circumstances. As we noted, a broken muffler can be welded, or a new one can be installed in its place.
- Reassembly is carried out according to the instructions provided, only in the opposite sequence.
When choosing a new main muffler, focus on the characteristics of the factory product. If you want to modify the rear of the car, simply install a decorative nozzle on a regular pipe. You should invent something with the modernization of the aircraft only if work is being carried out on the technical modification of the car - tuning.
Dismantling worksReplacing the resonator
To change the additional muffler, follow the instructions provided:
- By analogy with the previous stage, disconnect the main and additional mufflers;
- Disconnect the element from the catalyst. Here you have to use a spanner wrench to unscrew a pair of mounting bolts;
- Lift the unit a little and disconnect it from the rubber hangers;
- In some cases, this cannot be done manually. In such a situation, use a flathead screwdriver to pry out the hangers;
- The dismantling process is even easier than in the case of the main muffler;
- Installing a new element is performed in the reverse order.
Changing the catalyst
Let’s say right away that failure of the catalyst on a VAZ 2109 is quite a rarity. But it will not be superfluous for anyone to understand the features of replacing this element.
When the engine is running, the catalyst heats up to 600 degrees Celsius, so it takes longer to cool down than a pair of mufflers. Make sure the element is cool before starting work.
To dismantle and replace devices you need:
- Disconnect the additional muffler from the catalyst. To do this, hold the nuts with a spanner wrench, and unscrew the fastening bolts with a second tool;
- Using a similar method, the bolts connecting the catalyst and the receiving pipe are unscrewed from their places;
- Next, the catalyst is carefully removed from the rubber hangers;
- We take a new catalyst and install it in the reverse order.
The exhaust system provided for the VAZ 2109 model is outrageously simple. This pleasantly pleases the owners, since they do not need to spend a lot of effort, time and money on repairs. Most of the work is done independently.
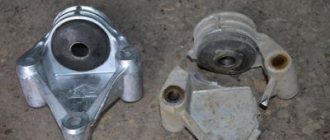
Engine support cushions
If, while driving, knocking noises are heard in the engine area, regardless of whether the car is driving on a flat road or on bumps, and at the same time the car begins to vibrate, shake, or the steering wheel hits, then you should pay attention to the engine mounts, especially often on VAZ 2110/2115 and others, the lower support of the internal combustion engine (on the gearbox) fails
You also need to check the condition of the left and right airbags. To do this, just grab the engine and shake it. If the unit wobbles freely, there is something wrong with its supports. Strong vibration of the internal combustion engine may also be observed during its operation.
There is only one way out - replacing the failed support cushions.
Wheel rim bolt pattern for VAZ, Ford, Opel, Nissan, bolt pattern table
Muffler device (diagram)
The design of the muffler has already been partially discussed, now let’s delve deeper into the topic.
You probably already realized that mufflers have many distinctive features; no devices have the same design; each manufacturer introduces its own innovations to improve the design of its brainchild.
The main goal is to reduce the sound as much as possible without losing engine power.
In a typical production car, the muffler takes from 5 to 7% of the power. To achieve absolute silence, you need to either increase or install an additional device with a resonator, and this will take another 5 to 7% of the power. The total is 10–15%, which no one wants to lose.
Those. It turns out that it is not so easy to make an ideal muffler so that there is little noise and no loss of power.
The design of the product is largely influenced by:
- Engine capacity;
- Tuning or regular engine installed;
- Make of the car and its purpose (sports or regular);
- Who is the manufacturer.
The classic muffler for most cars consists of:
- Inlet and outlet pipes;
- Internal pipes;
- From two or more expansion chambers;
- Internal partitions;
- Helmholtz resonator.
The sound entering the device through the inlet pipe is reflected from the walls and travels a distance of more than 1 km, constantly weakening.
The resonator serves to weaken the most powerful component of the sound wave, which a conventional labyrinth cannot cope with.
The chambers in the muffler are of different sizes because the length of the sound waves is also different.
The inlet pipe, as a rule, has holes and is considered dissipative, since sound entering it is partially dissipated in the first chamber.
The waves move chaotically in space, reflecting from the walls and constantly losing energy. This occurs due to the force of friction against air molecules.
The more of the wave remains in the first chamber, the more the wave attenuates.
The remaining waves pass into the second scattering chamber; however, it is not easy for them to pass from a narrow pipe into open space since, according to the law of acoustics, a sound wave seems to collide with a wall of air.
Part of the wave is not able to enter the second chamber and is reflected back from the interface and partially absorbs the oncoming flow.
The same waves that were able to get into the second chamber are randomly reflected from the walls, absorbing each other and losing energy during friction with the air.
But the main component of the sound wave passes further and enters the Helmholtz resonator.
The sound wave again has to leave the narrow space into the free chamber, and it seems to press on the air in the resonator, creating air vibrations.
This creates a reverse sound wave that has the same frequency as the original one. They collide and destroy each other.
Some of the waves remaining in the second chamber enter another pipe and are transported to the third chamber.
There again, sound loss occurs due to friction with the air, and only after this the weakened wave enters the output pipe, and from there out.