So. How did this topic originate? Dad's VAZ 2115 has an injector with gas equipment
,at first, they started when the engine started. Often the car had to be turned over 2-3 times for a long period. Then problems with idling began. Afterwards, when I sharply pressed the gas pedal, the car sneezed.
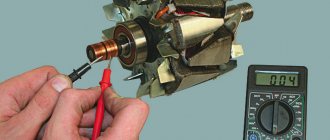
We decided to see which of the cylinders were not being completed by tearing out the explosive wires from the spark plugs. It hit them horribly. The measurements showed: - infinity - infinity - 16 kOhm - infinity Such readings are not acceptable.
Explosive manufacturers indicate that the difference between us should be + -2-4 kOhm. The values vary, but should not exceed 20 kOhm. It was decided to change
Now the market is cluttered with a large number of manufacturers, but which one is the best is determined, as usual, by experiments. And experiments, as usual, hit the wallet not once, but twice or even three times.
We started digging on the Internet, looking for reviews, and came across a video that talked about how to make an explosive of zero resistance yourself. The advantages are: -Increased service life (copper core) -Increased spark power (Starting the engine in cold weather, increasing engine stability, improving the combustion range of the mixture)
Thanks to the copper core and almost “zero” resistance, these wires will transfer the most powerful spark from the coil to the spark plug without loss. A powerful spark (as a result of installing such wires) can provide such indicators as: - efficient combustion of fuel. A powerful spark ignites all the incoming fuel. The fuel does not fly into the pipe, but burns, which increases power. The maximum force on the piston develops. — the engine does not lose power and operates more economically, with lower toxicity — it will eliminate interruptions and misfires caused by a weak spark. - simplifies starting in cold weather
We went to the auto parts store and decided to check out a brand new set of BBs. The result showed: -5.81 kOhm -6.71 kOhm -6.31 kOhm -8.41 kOhm, that is, the difference between the new explosives is already over 3 kOhm. Not an order of magnitude. And the cost of the set is 650 rubles.
It was decided to invent) Many people make Neon advertisements from wires; you can’t find them for sale in our village, but there is a simpler solution , this is to buy explosives from GAZ-53. There are 9 of them in the set. Measurements showed zero resistance. Cost 450 rubles.
In general, we made 15 wires and the problems completely disappeared at once. In order to carry out dismantling and installation, the following tools are needed:
It was decided to change it on my car, my measurements were much better than those of my father’s car: -
Upon completion of the work, I measured 2 armored wires to choose from, the result is obvious:
I did a test drive, and the feeling of growth is felt, it is not great, of course, but it is felt that the engine is spinning up clearly faster.
So, now let's move on to the numbers.
.
Set 450 rubles
.
A kit was made for a 2115 injector and a 2109 carburetor; there are still enough wires for one set per injector.
If you bought the kit in a store, it would cost about 1800 for 3 cars, this is even the cheapest kit, but here it’s 450 for 3 cars. It’s up to you) Have a good trip, a powerful spark and no problem starting)
In one of the issues of the magazine "Behind the Wheel" a review of high-voltage wires (HVP) for carburetor "Samar" was carried out. Now I propose to consider the choice of high-voltage wires (HVP) for injection engines in order to know one of the possible reasons why the engine “troubles”, and in winter or in the rain it is difficult or does not start at all. I encountered one of these problems at the beginning of autumn. Why do I need GDP for the injection Samara? Let this remain a little secret for now. As you know, there is GOST 14867-79, which defines the basic requirements for GDP. Brief excerpts from it: High voltage wires TU 16-705.273-83. Purpose: use in shielded car ignition systems Brand: PPOV (P - wire; P - polyethylene insulation; O - irradiated; B - polyvinyl chloride sheath). Operating conditions: -climatic version O according to GOST 15150-69. — operating temperature from minus 60 to 110°C. — the wire is resistant to oil, gasoline, ozone, mold, and does not propagate combustion. Safety requirements: according to GOST 12.2.007.0-73. Technical characteristics: - maximum voltage of ignition pulses transmitted by the wire, kV - 22 - breakdown voltage of the wire, kV, no less than - 40 - electrical capacitance of the wire, pF/m, no more - 100 - service life - 8 years - warranty period is set at 5 years from the date of putting the wire into operation with operating hours not exceeding 2000 engine hours or 40 thousand km of vehicle mileage Design and principle of operation The conductor is made of copper wires and corresponds to class 4 according to GOST 22483-77, insulated with radiation-modified polyethylene grade 153 -118 according to TU 6-05-05-77. A sheath of polyvinyl chloride plastic compound, grade IT-105, in accordance with GOST 5960-72, is placed on top of the insulation. Nominal cross-section of the conductor, mm2 – 1.0 Number and diameter of wires, mm – 19×0.26 Nominal diameter of the conductor, mm – 1.3 Minimum radial thickness, mm: insulation – 2.0, sheath – 0.55 Maximum outer wire diameter, mm – 7.3. However, since 1979, due to changes in the circuitry and design of ignition systems, their operating conditions and the requirements for them have changed greatly. This is due primarily to the introduction of Euro 2, 3, 4 standards and the transition to microprocessor-based non-contact ignition systems, which required an increase in spark power, and secondly, to stricter requirements for electromagnetic compatibility (EMC) due to an increase in the number of electronic systems vehicle and ensure their reliable operation. Let's approach the selection of one of the most important components of a car's ignition system from a practical point of view. We will define the following as the main parameters: the active component of the resistance, the breakdown voltage, the level of the created electromagnetic field and, of course, the price. The education of a software engineer received at a university and work related to the development of information security systems made it possible to select the necessary set of equipment to evaluate each of these parameters from a practical point of view. So, the composition of laboratory equipment: - MY68 multimeter
— universal breakdown installation UPU-1M
— P3-31 electromagnetic radiation level meter with a set of LF/HF probes (in the frequency ranges 0.01...30 MHz and 0.03...300 MHz).
Considering that the range of ambient temperatures in which wires have to operate in central Russia is quite wide - from minus 30 to plus 30 degrees C, and, taking into account the temperature of the engine compartment - up to plus 100 degrees C., and also the fact that what The more rigid the wires, the faster their contacts in the connections loosen; I suggest that you immediately opt exclusively for wires with silicone insulation. Here are some of them: Slon / Ween / Cezar / Horse / Tesla / Finwhale.
Recommendations for connecting high-voltage wires.
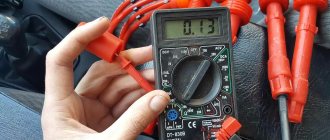
The first step is to check the high-voltage wires for resistance using a multimeter tester.
Resistance should not exceed 20 KoM. When you install the wires, do not be lazy to lay them out correctly, without kinks, so that they do not come into contact with other parts of the motor. This will increase their service life. Lay the wire correctly and secure it. The first cylinder in front-wheel drive cars VAZ 2108, VAZ 2109, VAZ 2110 is located closer to the timing belt. If you look at the engine from the front, the first cylinder is the leftmost). The cylinders are counted from left to right - 1, 2, 3, 4.
The procedure for connecting high-voltage wires on a VAZ 2108, VAZ 2109, VAZ 21099 with a carburetor engine
The central high-voltage wire comes out of the distributor cover and is directed to the ignition coil.
The outlet of the distributor cover , directed towards the front of the machine , is connected to the first cylinder.
The output of the distributor cover , directed downwards , is connected to the third cylinder.
The rearward outlet of the distributor cap is connected to the fourth cylinder.
The output of the distributor cover, directed upward , is connected to the second cylinder.
The high-voltage wires in the ignition system of the VAZ 2109 are designed to transmit an electric current pulse from the ignition distributor to the spark plug. A high-voltage wire has the following characteristics: 1. Resistance 2. Electrical voltage of transmitted pulses 3. Breakdown voltage
High-voltage wires VAZ 2109
1. The most important parameter that you should pay attention to when choosing high-voltage wires for a VAZ 2109 car is resistance . According to the technical data sheet of the VAZ 2109 car, the wire resistance should be 2.55 kOhm. I remember my surprise when, out of curiosity, I decided to measure the resistance of the wires on my nine and saw the numbers 7 - 8 kOhm on the multimeter screen. There is a simple logical explanation for this: the lower the resistance of the high-voltage wire, the higher the level of electromagnetic interference emitted by it. Modern cars are equipped with a large number of microprocessor and microelectronic devices, which are subject to regulated requirements for the level of electromagnetic compatibility. Therefore, for imported wires intended for modern injection foreign cars, the resistance of the high-voltage wire is 9 - 25 kOhm, this is a completely normal figure. It’s another matter when a VAZ 2109 made in 1991 has such wires. I’ll explain why: the greater the resistance of the high-voltage wire, the weaker the spark on the spark plug. Also, the higher the resistance, the later the ignition becomes. Therefore, a VAZ 2109 with a high-voltage wire resistance of more than 10 kOhm will have higher fuel consumption and will be much more difficult to start in winter. Of the electronics, the old VAZ 2109 only has a switch and an economizer, so they are not as demanding of electromagnetic interference as modern foreign cars with dozens of sensors, immobilizers, on-board computers and other electronics. Checking the resistance of an explosive wire is very simple: take a regular multimeter, set it to resistance measurement mode and measure the resistance of the wire.
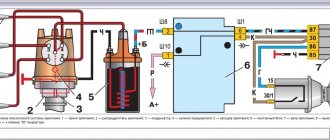
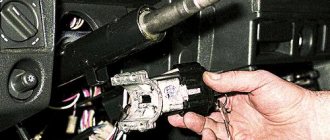
Pinout of lock VAZ-2110, VAZ-2111, VAZ-2112
Pinout of the ignition switch VAZ-2110:
- comes +12V for the microphone of the sensor of the inserted key;
- the mass comes when the driver's door is open;
- +12V goes to the starter (pin 50);
- +12V goes out after turning on the ignition (pin 15);
- +12V goes out when the key is inserted to pin 5 of the BSK;
- comes +12V to illuminate the lock cylinder;
- +12V comes from the battery (pin 30);
- not used.
Diagram, procedure for connecting VAZ high-voltage wires.
First, let's decide which of the four cylinders is first?
The first cylinder in front-wheel drive VAZs is located closer to the timing belt. If you look at the engine from the front, the first cylinder is the leftmost). And then everything is simple - from left to right - 1, 2, 3, 4.
In rear-wheel drive VAZ Classic and Niva, the first cylinder is located closer to the front bumper of the car.
General tips for connecting high-voltage wires.
Checking high-voltage wires. To check the wires, you will need a multimeter tester. Check the resistance of the wires - it should be no more than 20 KOhms (in practice, the longest wire of cylinder 1 has a resistance of up to 10 KOhms). If the wire resistance is more than 20 Kom, it must be replaced. Carefully inspect the wires for chafing on parts of the motor or other wires. In case of significant abrasion, replace the wire. In case of minor abrasion, it is possible to lay the wire so that it does not rub and fix it in this position.
Laying wires. Do not try to connect the wires in a bundle. Disassemble the wiring harnesses, release the wires from the plastic holders. Connect the high-voltage leads to the corresponding cylinder spark plugs. Lay the wires so that they do not rub against each other, engine parts, or hoses. Avoid sharp bends and tension on the wires. After connecting all the wires, secure them into the bundle with special comb holders included in the delivery kit.
The procedure for connecting I/O wires to a VAZ carburetor (2108, 2109, 21099)
The central wire from the distributor cover always goes to the ignition coil (bobbin).
The outlet of the distributor cover, which faces towards the front of the car, is connected to the first cylinder.
The outlet of the distributor cap, looking down, is connected to the third cylinder.
The outlet of the distributor cap, looking rearward, is connected to the fourth cylinder.
The outlet of the distributor cap, looking up, is connected to the second cylinder.
The procedure for connecting high-voltage wires to a VAZ Classic, Niva with a carburetor and distributor.
Central wire from the ignition coil (bobbin)
1 cylinder - above the vacuum corrector. Next, clockwise, the order is 1-3-4-2.
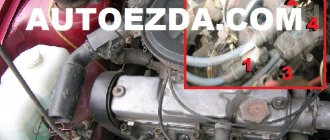
Injection VAZ produced before 2004 with an old-style ignition module (4-pin low-voltage connector)
Actually, on the module body it is already indicated which cylinder the pins correspond to - but we duplicated them in red in case the module gets completely dirty, and you might not be able to see it in the photo.
Specifications
| Type | Volume | Power | Torque | Overclocking | Maximum speed | Number of cylinders |
| Petrol | 1.3 l | 64 hp | 94 H*m | 16 sec. | 160 km/h | 4 |
| Petrol | 1.5 l | 72 hp | — | 14 sec. | 156 km/h | 4 |
| Petrol | 1.5 l | 78 hp | 115 H*m | 13 sec. | 160 km/h | 4 |
More details
The Nine has a small but quite playful engine, and the car is also front-wheel drive, which adds great comfort for movement. The car was equipped with a manual transmission in two versions: 4-speed and 5-speed.
In terms of engine, the VAZ 21099 has several modifications.
In 1987, the first nine came off the assembly line with an engine capacity of 1.3 liters, which produced 65 horsepower. Specialist. Organizations and the police needed a fast car, so the Volga Automobile Plant produced the 2109-20 with a rotary engine (145 horsepower), which allowed the car to reach speeds of up to 200 km/h. VAZ 21091, on the contrary, had a 1.1 liter vegetable engine. Since 1990, a more powerful VAZ 21093 model with a one and a half liter carburetor engine was also released. The VAZ 21093i received the same engine, but it was already an injection-type engine. The engineers of the Volga Automobile Plant, having worked on injection, borrowing the system from the VAZ 2111, produce an even more spirited 1.5-liter engine, but with a power of 75 horsepower. This motor received the VAZ 21093-20.
It has an independent suspension at the front, like Mac Pherson. The rear suspension was semi-independent with a transverse beam; this type of suspension was installed on many front-wheel drive cars of that time.
Connection features
The order of connecting high-voltage wires must be strictly sequential, since each cylinder of the engine corresponds to a specific socket on the ignition module. Considering that there is a numbering of the sockets on the ignition module body, the risk of confusing anything is minimal.
The procedure for connecting high-voltage wires of the VAZ 2114 injection type depends on the year of manufacture of your car. Fourteen cars before 2004 had 4-pin ignition modules installed, and cars after 2004 had 3-pin coils.
The connection diagram for VAZ 2114 high-voltage wires to the ignition module (until 2004) is as follows:
Connection diagram for VAZ-2114 with ignition coils (after 2004):
In the pictures you can see the numbers of the landing slots. Each number must have a corresponding cylinder connected to it (cylinder numbering is counted from left to right).
To correctly install high-voltage wires on the VAZ 2114, follow the following algorithm of actions:
- Turn off the ignition. Open the hood and remove the power terminals from the battery;
- We remove the old GDPs from the mounting sockets on the module and cylinders;
- We remember the location of the high-voltage wires of the VAZ 2114 and connect new GDPs according to the diagram. Before replacing, it would not be amiss to draw this very diagram by hand on paper so as not to confuse anything;
- We connect power to the battery and, to check whether we did everything correctly, start the engine.
When installing the wiring, do not try to connect individual air intakes to each other with plastic clamps; to do this, you must use the comb holder that comes with them. A thin clamp can easily wear through the insulating coating. Also make sure that the GDP does not bend.
Connecting armored wires on VAZ 2115 and 2113 is carried out in a similar way.
How often should GDP be changed?
According to the recommendations of Avto-VAZ, replacement of high-voltage wires of the VAZ 2114 should be done every 30 thousand kilometers. In practice, motorists rarely comply with these replacement deadlines, since if the wires do not have any mechanical damage, they can travel about 100-150 thousand km.
When the service life is exceeded, the internal resistance of the GDP increases, which negatively affects the transmission of the electrical impulse. This leads to problems with ignition and acceleration dynamics, since when the supply of current to the spark plugs is delayed, the normal engine operating cycle is disrupted.
Typical electrical wiring faults
Malfunctions, as a rule, boil down to the fact that electric current either does not flow to the spark plug at all, or if it does, it is in limited quantities. And this happens for the following reasons:
- When the current-carrying conductor through which the impulse passes breaks
- If there is a current leak, this means that the insulation is damaged, there is a breakdown of current on the side
- The resistance value exceeds the permissible value
- There are problems with the contacts (either with the spark plug, or with the distributor and ignition coil).
If a current-carrying wire breaks, then an internal spark occurs, in other words, a spark discharge is formed between the ends of the broken wire, which greatly reduces the voltage and also causes a parasitic electromagnetic pulse to occur. So:
- The resulting impulse, of course, negatively affects the correct operation of the vehicle’s electrical sensors
- Just one such defective high-voltage electrical wire often causes vibration and interruptions in the operation of the motor.
- In addition, a damaged high-voltage electrical wire leads to ignition in the cylinder with some delay or even every other time, then the synchronization of the operation of the cylinders and the engine as a whole is disrupted
Checking electrical wires
Anyone can check the wires, and do it with their own hands; this does not require electrical knowledge, or special hard-to-find tools or assistants, only the knowledge of what to do and in what order:
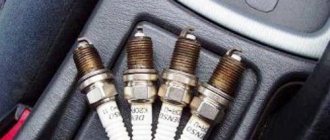
- First, you need to check the spark plug wires on the VAZ 21093 visually for visible damage (for example, cracks, kinks, etc.).
- Then you should make sure that there is no breakdown, this can be done even in the absence of any measuring instruments, it will be enough to look under the hood, with the engine running, when it gets dark, if there is a breakdown, then a spark will be visible while the engine is running on the broken electrical wire
- You can also check high-voltage electrical wires using a wire; you just need to take a piece of wire at night and strip the ends on both sides. Then you need to close one end of the wires to ground (this is the body of the machine), and take the other end with your hands and move along the entire length of each electrical wire, not missing joints and caps, etc. A spark will occur at the breakdown points
You can also measure the resistance of high-voltage electrical wires; for this we need a tester (multimeter):
- Turn on ohmmeter mode
- We remove the wire from the spark plug of the first cylinder, disconnect it from the distributor (see The device of the VAZ 2109 distributor: the difference between contact and non-contact ignition systems and adjusting the ignition timing)
- We connect the multimeter electrodes to both ends of the wire and check the readings
For serviceable electrical wires, the resistance varies from 3.5 to 10 kiloohms, it all depends on the type of electrical wires themselves. The resistance value is usually indicated on the insulation of armored electrical wires. When checking each wire, the spread between the values cannot exceed 2-4 kiloohms. If greater variation is detected, the wires should be replaced. By the way, the replacement is made as a set, that is, all together at once; the price here is not a reason to save money all together. In conclusion, we present to your attention the resistance readings for the most popular armored electrical wires:
- Tesla brands have a resistance of 6 kOhm
- Brands Slon (Elephant) with a range from 4 kiloOhm to 7 kiloOhm (where 4 kiloOhm goes to the 1st cylinder and so on up to 7 kiloOhm on the last cylinder)
- ProSport brands have almost zero resistance
- Brands Cargen (Kargen) with a resistance of 0.9 kiloOhm
Note: The resistance of armored electrical wires varies and largely depends on the thickness, length, and material used to make the wires.
Functionality check
To accurately determine whether it is time to change the high-voltage wires of the VAZ, you need to check their performance with a multimeter.
This operation will take you no more than 15 minutes:
- Turn off the ignition;
- We remove the wires: disconnect the first end from the ignition module, the second from the cylinder;
- We switch the tester to ohmmeter mode and connect the multimeter probes to the wire contacts.
If the high-voltage wires on the VAZ 2114 are in normal technical condition, the multimeter will show a resistance within the value indicated on the wire insulation; if the readings are different, the armored wires on the VAZ 2114 need to be replaced. The process must be repeated on each wire in turn.
If the test shows disappointing results, there is a possibility that the problem of increased resistance lies in oxidized contacts. In this case, you can try to revive the VVP by wiping the contacts with VD-40 or carburetor cleaning fluid.
Also, the cause of problems with ignition can be a breakdown of the GDP. You can determine it visually in the dark - take a flashlight and open the hood of the fourteenth, find and inspect the armored wires, if you notice a slight spark on the insulation - the air intakes are broken and need to be replaced.
What are the dangers of ignition malfunctions?
The optimal operation of the entire AP depends on the performance of all its elements, as well as the set torque. In practice, carburetor internal combustion engines require more precise adjustment.
We suggest that you familiarize yourself with the problems in more detail:
- The power unit detonates. When the driver presses on the gas, ringing sounds begin to be heard from under the hood. In practice, such problems appear in vehicles due to the timing being set too early. As a result, this causes the internal combustion engine to malfunction, and this can subsequently lead to deformation of the piston rings.
- When the engine starts, black smoke comes out of the exhaust pipe. Such problems usually indicate that the advance angle is set incorrectly, the timing is too late. Of course, correct adjustment will allow you to get rid of this problem.
- When idling, the power unit oscillates and operates unevenly.
- The internal combustion engine operates intermittently, when the driver presses the gas, dips appear. That is, the driver presses on the gas, but the car does not accelerate.
- The power of the power unit has decreased, that is, it takes much more time to gain speed. This problem may be due to the fact that the fuel-air mixture does not completely burn in the cylinders of the internal combustion engine.
When such problems occur, the car owner should start diagnosing the SZ, and if necessary, adjust the torque. In practice, most malfunctions are associated with this. But before you start making adjustments, you need to make sure that all components are working correctly. It is necessary to diagnose the spark plugs, the condition of the high-voltage wires, the coil and the distributor. Only if all these elements are intact, you need to start adjusting.
Kiel Blinton 05.12.2010 - 17:56
Good day everyone! Forgive me if the topic is button accordion, but there is no one else to ask. Question - I have an engine 2110 engineer, I bought high-voltage wires and foolishly removed the old ones, but I didn’t remember the connection sequence. If I am facing the car, then the numbering of the candles is 1 2 3 4? But how do they all connect to the square ignition module? If anyone knows, please explain or draw a diagram, please.
Attached images
Post edited by Kiel Blinton: 12/05/2010 - 18:03
Sereshka 05.12.2010 - 18:01
Kiel Blinton (05.12.2010 - 17:56)
:
Good day everyone! Forgive me if the topic is button accordion, but there is no one else to ask. Question - I have an engine 2110 engineer, I bought high-voltage wires and foolishly removed the old ones, but I didn’t remember the connection sequence. If I am facing the car, then the numbering of the spark plugs is 1 2 3 4. But how are they all connected to the square ignition module? If anyone knows, please explain or draw a diagram, please.
There should be numbers on the module itself.