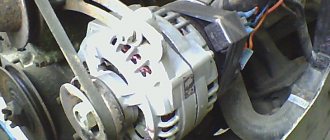
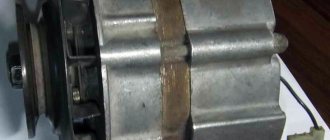
Generator brushes
If the battery of your VAZ2112 car is periodically discharged, the headlights are dim, while the engine is running, the battery discharge lamp is lit or blinking on the dashboard, all this indicates a malfunction of the generator. There can be many reasons, but you shouldn’t rush to change the entire generator, or rush to a service station where you’ll pay good money for a crap repair (this happens quite often). Most often, the reason lies in a small regulator relay block with brushes and a capacitor. Replacing the brushes of a VAZ 2112 generator usually solves problems for a long time and seriously, it is not expensive, takes minimal time, and anyone can do it with their own hands (you don’t even need to remove the generator from the car for this!). Brushes serve to transmit electrical contact from the generator rotor to its outputs and then to the battery and other parts of the machine’s electrical circuit. Good contact and stable transmission of voltage from the generator, stable charging of the battery and the brightness of the headlights when the engine is running depend on their condition.
Checking the generator voltage regulator for VAZ 2108, 2109, 21099 cars
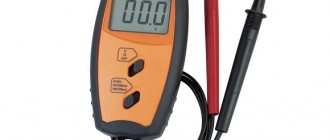
To check the voltage regulator of the generator of VAZ 2108, 2109, 21099 cars, you need a DC power source with the ability to regulate the output voltage.
Necessary tools and equipment
— Power supply with the ability to manually adjust the output voltage
— Multimeter or voltmeter
— Indicator lamp 5 W 12 V
Preparatory work
— Assembling an electrical circuit
We connect the negative terminal of the power supply and the negative probe of the multimeter to the ground of the voltage regulator.
To the “plus” terminal of the regulator we connect the positive terminal of the power supply and the positive terminal of the multimeter.
We connect the test lamp to the brushes of the voltage regulator.
It is necessary to strictly observe polarity when assembling the electrical circuit, since if assembled incorrectly, the regulator will burn out.
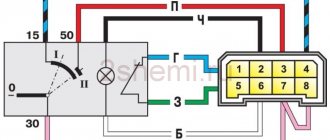
The procedure for checking the generator voltage regulator for VAZ 2108, 2109, 21099 cars
We check the generator voltage regulator 37.3701 produced after 1996 for “breakdown” and “breakdown”.
Apply 13 V voltage to the voltage regulator
Turn on the power supply and set the multimeter to voltmeter mode. See diagram above. The control lamp in the circuit should light up. A working regulator supplies the optimal voltage current to the generator rotor winding. If the lamp does not light up, then there is a “break” in the regulator and needs to be replaced.
Gradually increase the voltage
At a value of 14.5-14.7 V, the control lamp should go out. A working regulator does not allow the voltage to rise above this limit. If the control lamp continues to light, then the regulator is “broken” and must be replaced.
Gradually lower the voltage
The control lamp should turn on at a voltage of at least 13.2 V.
Notes and additions
— The voltage regulator of VAZ 2104, 2105, 2107, 21213 cars is checked in the same way.
— Before carrying out the inspection, we inspect the regulator: if it is too dirty, clean it, are too worn (less than 5 mm) or hang when moving the brush, then replace the regulator with a new one.
— Scheme for checking the voltage regulator of the generator of VAZ 2108, 2109, 21099 cars up to 1996.
TWOKARBURATORS VK -More information on the topic in our VKontakte group
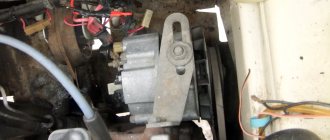
How to remove the generator on a VAZ 2108 yourself step by step instructions
In order to remove the VAZ 2108 generator with your own hands, you must perform the following procedure:
- In order to easily remove the VAZ 2108 generator, it is necessary to remove the engine protection.
- During the dismantling process, the VAZ generator must be removed together with the bracket, since its fastening bolt will be impossible to pull out due to the position of the body side member.
- Now disconnect all electrical terminals from the generator
- Then you need to loosen the adjusting nut and the generator mounting nut from below.
- Move the generator forward and remove the loose belt
- Unscrew the bolt and remove the adjusting bar
- We find it at the bottom of the engine compartment (shown in the photo) and unscrew the two bolts securing the bracket.
- Then, carefully pushing down, remove the VAZ 2108 generator
- After repairing or purchasing a new generator, we install it in the reverse order, taking into account the fact that the long bolt securing the bracket should be closer to the generator drive.
- After completing the installation of the VAZ 2108 generator, tension the drive belt
Signs and causes of malfunctions.
Failure of the relay regulator of a car generator occurs for a number of reasons:
- Short circuit of the field winding turns (interturn short circuit). It is one of the most dangerous malfunctions, since it not only disables the RR, but in the future is fraught with complete failure of the generator. Replacing the regulator turns out to be a temporary measure - the short circuit reduces the inductive and active resistance of the winding, the RR is subjected to increased current (and therefore thermal) loads, and soon fails again and requires replacement.
- In alternating current generators - breakdown of rectifier bridge diodes. It is diagnosed unambiguously; along with replacing the regulator, replacement of the rectifier modules is required.
- Brush assembly failure (abrasion, mechanical destruction of brushes). Wear of brushes does not necessarily provoke a malfunction of the RR, so in practice there are cases of replacing only brushes in combined units. It is not recommended to resort to such a replacement, since the reliability of the relay-regulator after such a repair is questionable. The low cost speaks in favor of a complete replacement of the unit.
- Short circuit at the regulator control output.
- Natural aging of PP elements.
Failure of the regulator relay leads to undercharging or overcharging of the battery. A malfunction can be judged by the loss of battery capacity, as a result of which starting the engine is difficult or impossible.
In the second case, the cause is boiling off of the electrolyte. A sign of a problem is the intense formation of plaque on the pin contacts and terminals of the battery, surrounding the structural parts of the car.
Problems are also signaled by:
- When the ignition is turned on, the battery charge/discharge indicator does not light up on the dashboard.
- In cars where the indicator is connected directly to the battery charging circuit from the generator, the light on the dashboard remains on after the engine is started.
- The brightness of the head light (low/high) fluctuates when the speed of rotation of the power unit shaft changes.
The first case does not necessarily indicate a malfunction of the RR - there may be oxidation or loss of contact, or burnout of the indicator lamp. The following clearly indicate problems in the battery charging circuit, lack of stabilization of the generator output voltage. When such signs appear, diagnosing the performance of the relay regulator is mandatory.
For your information! Failure of the regulator is dangerous not only for the battery. Exceeding the permissible voltage limits at the generator output and its sudden changes with engine speed create additional loads on electrical equipment and lead to breakdowns of on-board electronics power supplies. In addition, overheating of the excitation winding is possible (as a result, the insulation of the windings is broken, the generator requires replacement). Accelerated (due to increased current and thermal loads) wear of brushes and their destruction cannot be ruled out. Possible results are generator failure with unpredictable consequences for electrical equipment, mechanical jamming leading to belt breakage, etc.
Reasons for failure of the VAZ 2108 generator
Experts believe that the main reasons for the failure of the VAZ 2108 generator are:
- voltage regulator failure;
- damage to the diode bridge (aka rectifier);
- wear of current collecting brushes;
- defects in the charging circuit wires;
- damage or operational wear of the pulley;
- wear of slip rings or commutator;
- short circuit of individual turns on the stator winding;
- bearing failure.
Every self-respecting car enthusiast should understand what causes generator malfunctions most often and how they can be dealt with. It is also necessary not to forget that timely prevention helps to avoid serious problems. Towards the end of the article, we will look at some tips that will help you learn how to test the generator yourself. But let's first learn about the internal structure of the node.
What to do if there is a malfunction?
Some drivers underestimate the importance of the relay regulator. If there are problems with this device, the battery will not be able to fully charge or, on the contrary, will receive the maximum possible current, which will lead to boiling off of the electrolyte. Delaying replacement of a faulty relay will result in battery failure. Replacing which will cost you much more than a small relay.
If you find problems with this device on the road, and you still have a long way to go, then a regular 12 V light bulb can temporarily replace the regulator. This is, of course, not a full-fledged relay, but you can get home without putting an excessive load on the battery. This is done as follows (consider first the example of 591.3702-01):
- The relay is disconnected from the generator;
- Terminals “B” and “B” are connected to each other by a piece of wire;
- Terminal “Ш” is connected to the body of the brush assembly;
- The wire going to pin “30” must be disconnected and insulated as reliably as possible;
- The light bulb crashes into the wire going to pin “15”.
- In integrated relay regulators, the connection occurs a little differently:
- The relay is disconnected from the diode bridge;
- The light bulb is connected to a wire running from the generator to the relay.
Before you set off, make sure everything is assembled as it should be. To do this, observe the reaction of the lamp to changes in engine speed. At high speeds it burns brighter, and at lower speeds it burns “quieter”. This indicates the charging process.
About the compatibility of voltage regulators and VAZ generators
Depending on the generator, installation of a new type of voltage regulator can be done without modifications, or it may require replacing the terminals on terminals “B+” and “D+” and modifying the diode bridge of the generator.
A simple replacement of the LV without modifications can be carried out on generators:
- — 372.3701 installation RN 1702.3702-01 — VTN.
- - 9402.3701/3202.3771 installation RN 9111.3702 - VTN, 9111.3702I2 - VTN, or 9333.3702-02 - VTN.
- — 5102.3771 installation RN 846.3702 — Orbit.
Pre-check
To check the generator voltage regulator you will need a multimeter. We start the engine and measure the generator voltage with a multimeter. We connect one probe of the measuring device to terminal 30 of the generator (the same pin on the rear wall of the generator, to which there are usually two, sometimes three wires and secured with a nut). The voltage should be between 12.5 - 12.8 volts.
Then we start the engine and again measure the voltage at the generator terminals. At idle there should be at least 13.2 volts, but not more than 14 volts. Then we increase the engine speed to 3500 rpm, in this case the voltage limits should be within 14.2 - 14.5. The voltage should not exceed 14.8 volts. If it is higher, then the battery is being recharged.
Then we turn on the high beam headlights, heater, hazard warning lights and other devices and again measure the voltage at the generator. It will drop under the load of switched on devices, but the voltage value in this case should not be lower than 13.2 volts. If it is below the minimum - “undercharging”.
In both cases, it is necessary to check the voltage stabilizer.
How is the replacement performed?
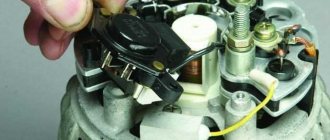
You will need a Phillips screwdriver. On a VAZ 2112, replacement of alternator brushes is carried out in the following order:
- Disconnect the battery terminal wires
- Then we disconnect the block with the wiring from terminal “D” of the electric generator and the wiring from the bolt (terminal “B+”)
- Push back the three latches and remove the plastic protective cover.
- Using a screwdriver, unscrew the two screws securing the brush holder (arrows point to them in the photo below)
Using a screwdriver, unscrew the screws securing the brush holder
- Carefully remove the brush holder to keep the brushes intact, and disconnect the block with wiring from it
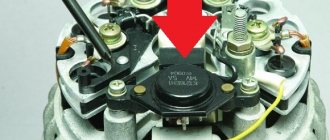
- Then remove the fastening nut from the contact bolt
- We take out the spring washer
- Remove the spacer washer, then disconnect the capacitor wire tip from the contact bolt
- Unscrew the screw securing the capacitor and remove it
Removing the capacitor from the electric generator
That's all, the removal process did not take much time, the cost of repairs, buying a new unit is a pittance, is it worth overpaying and going to a service station?
Checking the voltage regulator relay Toyota Camry
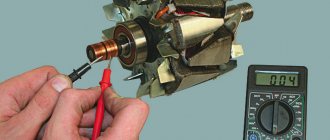
We provide reference data regarding this regulator. But from the wire from the battery we connect the relay-regulator, to the brushes of which we connect a 12V light bulb, this can be done with small alligator clips, the main thing is not to break the graphite elements.
A small diagram for understanding. If you connect everything in a calm state, the light will simply light up and stay lit, this is normal, since the brush assembly is a conductor of electricity from the shaft.
Let me remind you that in a calm state, the voltage on the brushes will be approximately 12.7V. Now we need to raise the voltage on the charger to 14.5 V, the lamp will light, but when this threshold is reached it should go out! If you lower the value, the lamp should light up again. Then your relay-regulator is working, it passed the test. If the voltage reaches 15 - 16V and the light is on, this means the relay has failed; how to check the relay, the generator regulator on a Toyota, replace it!
Here's a simple check. Now a short video on the topic. Checking a separate relay Similarly, you can check a new type of regulator, that is, a separate one, here the verification process is much easier.
This is a separate element, so we simply unscrew it from the body or from the generator cover and attach it to our stand. Once again, I want to remind you that it is advisable to have a 12V power supply, then the checking process is much easier. If not, we use a charger with adjustment modes and connect it according to the lower diagram. The check is the same, we increase the voltage to 14.5 V, the lamp should go out, if not, or turns off at a voltage much higher, then the relay has failed and needs to be replaced.
Check instructions
Diagnosing a generator is not an easy task, so you need to follow a certain sequence of actions. First of all, it is necessary to check the generator relay, then the diode bridge, then the stator and, finally, the rotor. I advise you not to improvise in this situation, but to strictly adhere to the instructions given.
The fact of overvoltage in the area of the vehicle's on-board network can cause more than one device to stop working. The generator relay regulator is needed in order to maintain the correct potential difference. To check whether this device is functioning normally, you need to:
- Switch the multimeter to voltage measurement mode.
- Start the car.
- Measure the voltage level at the battery terminals or at the generator outputs. The optimal value should fluctuate around 14-14.2 V.
- Press the accelerator (this is where the assistant mentioned earlier comes in handy). The voltage level should not change by more than 0.5 V. If this is not the case, then we can confidently say that the relay regulator is faulty.