If you plan to service your car yourself - in your garage, then you cannot do without auxiliary devices.
To repair a car, you may need a variety of tools, ranging from a reverse hammer to straighten dents on the body and ending with a universal wrench for an oil filter.
We want to talk about another useful device for the garage, which is a puller
external
CV joint
grenade .
You can buy such a device in a store, but it will be much cheaper to make it yourself - from what you have on hand.
Using homemade
With a puller, you can dismantle not only the CV joint body itself, but also its individual elements - for example,
the outer boot
.
In general, the design of this device is quite simple, and making it yourself will not pose any problems. Dimensions
in most cases the same.
In this article we will take a closer look at two different options for a homemade device. But which one to give preference to is up to you to decide.
CV joint device
A constant velocity joint is a part of a car's chassis that transmits driving force from the engine to the wheels. Thanks to the special design of the mechanism, the machine can drive evenly even on uneven surfaces.
While driving the CV joint:
- removes the load from the drive shaft;
- dampens vibration;
- synchronizes the wheels.
The hinge design is a bearing assembly with a floating cage. The hub and axle shaft of the vehicle suspension are attached to its edges. Because of its appearance, this transmission element is also called a “grenade”.
CV joint device
The CV joint consists of 2 parts:
- External, connects the wheel hub and operates at angles up to 70°.
- Internal, attached to the drive and operates in a range of 20°.
Each hinge is protected from dirt and moisture by a special cap - anther. If it breaks, lubricant will leak out, sand will get in, and the chassis will break.
Inside the CV joint there is a cage with metal bearings, which includes the axle shaft. The chassis assembly is fixed using splines and a spring stopper located in a separate groove on the shaft. Without special tools, it is very difficult to disconnect such fasteners.
Basic hinge malfunctions and their symptoms
The comparative simplicity of the design and the small number of components makes this unit quite reliable and capable of working for a very long time without any intervention. But this hinge also has a drawback - it is very sensitive to contamination.
The working elements of the unit - balls, rollers, grooves along which they move, and needle bearings - have a high degree of surface treatment. And sand and dust have a fairly strong abrasive effect, so when they get inside, they lead to intense wear of the surfaces, which ultimately causes the destruction of the unit.
Rubber boots are used to prevent contamination from entering. So they are the “weak point” of the angular velocity hinge. During the operation of the car, the rubber, constantly in contact with the environment, gradually “ages”, and cracks appear in the boot, through which sand gets into the joint.
In general, this is the only reason why these nodes can break. And since they cannot be repaired, they are replaced.
Note that the appearance of a crunch indicates that the hinge has already received damage that cannot be repaired. There are some measures you can take early on. First of all, you should wash the hinge, apply new grease and replace the boot. Then you can change the sides of the installation (that is, for example, swap the left inner hinge with the right one). Another option is to add small shavings of soft plastic to the lubricant.
But since the component parts have already been damaged, all of the above measures only slightly extend the service life and ultimately the unit will have to be replaced, and it is better to do this before it completely collapses, which usually happens along the way.
From the above, it can be understood that the only way to preserve the hinge is to periodically check the condition of the boot and, if even the slightest damage is detected, immediately replace it. After all, a rubber element will cost much less than a CV joint.
Replacing a CV joint is a relatively simple operation to perform, but there are a number of nuances when carrying out an operation with an external and internal unit. Also, the specifics of the work depend on the design of the hinge.
Next, let's look at how to replace external and internal CV joints using the example of several cars that use different types of drive shafts.
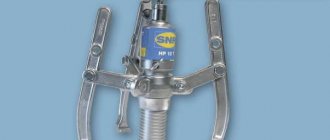
Operating principle of the puller
The tool is a mechanism that is attached with some bolts to the axle shaft, and with others it squeezes the inside of the grenade out. Depending on the type of device, the methods of use vary.
The inertial CV joint puller works on the principle of a reverse hammer. One part of the tool is mounted to the shank, the other, with a sliding weight, is fixed on the axle shaft using an eye. By a sharp movement of the cylindrical weight in the opposite direction from the part, the hinge is removed from the spline joint without damage.
To dismantle a grenade using the wedge method, you will need a tool with 2 support platforms. One consists of clamps that are put on the axial connection. The other is a split ring for the joint cage. Between them on the sides, wedges are driven in with hammers. After a couple of blows, the axle shaft moves a few millimeters, releasing the part from the stopper.
CV joint puller in action
The screw puller is suitable for working with fastening units of any size. Consists of 2 sliding platforms. They are connected to each other by longitudinal plates. Each has holes that are needed to adjust the working distance. One platform is fixed with a clamp, the second is fastened to the spline joint of the shaft with a jaw. Then twist the hub nut until the locking ring clicks. After which the hinge can be removed without effort.
Replacement
If problems arise with grenades, you should determine which ones have problems. Next we will look at how to change the drive and how to remove it. Additionally, we recommend watching the repair manual video.
The procedure for replacing inner and outer CV joints differs from each other, therefore each stage should be considered separately.
Let's start with the internal.
Inner CV joint
Rubber boots are a vulnerable element of the grenade design. It is not uncommon that by replacing the boot, washing the grenade with gasoline and applying new lubricant, it is possible to solve the problem. If the wear of the CV joint is insignificant, such measures can replace a full repair.
But if you discover the breakdown late, you will have to completely replace the inner CV joints.
- Apply the handbrake and install chocks under the wheels.
- Unscrew the hub nut using a wrench and a socket. Carefully remove the punching elements from the nut with a punch. This way you will be able to preserve the carving on the garnet. The nut itself will need to be replaced with a new one during reassembly.
- The main thing here is to unscrew the nut, lowering the wheels to the ground. Otherwise, you risk breaking the differential and other gearbox components.
- Raise the car using a jack on the desired side, first loosening the wheel nuts. Remove the wheel.
- Drain the gearbox oil. This can be done earlier, at your convenience.
- Release the steering knuckle from the ball joint at the bottom. To do this, unscrew a pair of mounting bolts.
- Since you have already removed the hub nut and unscrewed the ball joint from the steering knuckle, proceed to removing the splined part of the grenade. To do this, pull the brake disc and strut assembly towards you. She has a decent ride. Just remember to turn the steering wheel all the way so that the tip of the steering wheel extends as far as possible.
- Pry the inner grenade with a pry bar, which will allow you to remove the drive.
- Having taken out the CV joint, look at the condition of the oil seal in the gearbox. If you find traces of leaks, be sure to replace the element.
The internal drive (CV joint) is designed to work with smaller angles, its boot is less susceptible to negative influences. Therefore, the internal grenade is changed quite rarely.
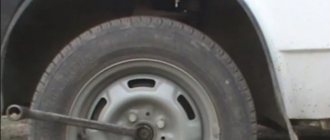
Outer CV joint
The outer grenade wears out more actively, so replacement is carried out more often.
Under no circumstances remove two CV joints from the gearbox at the same time. Otherwise, it will cause the gear to become misaligned. Remove one at a time or insert special inserts in place of the hinge.
If you have extensive experience in such matters, it is quite possible to knock out an external grenade right under the car. It saves time and effort
But such a task requires increased attention and caution in actions. Ensure that the axle shaft is stationary or has limited movement. If this is not done, the axle shaft will move when hitting the grenade clip with a hammer
Because of this, the inner CV joint will simply come out of contact and split into parts inside the boot. Therefore, you will have to dismantle the unit completely, and this is a very difficult task. You can hold the axle shaft with your hands, but a more effective means is a hand vice or a gas wrench. It is better to enlist the support of a partner. This is the best option. Take a fairly heavy hammer with a short handle. If damaged, cut, turn or move the boot to the side so that it does not interfere with striking. The blows should be made sharp, but at the same time careful. There is no point in hitting the element with great force. Due to successive blows, the resistance of the locking ring should weaken, which will allow the outer grenade to be removed from the axle shaft. Thoroughly treat the seating area with gasoline, clean it with a rag and put a portion of new lubricant into the hinge. A new boot is put on the axle shaft and a brand new CV joint is mounted.
To secure the boot to the axle shaft and body of the new grenade, many use ordinary plumbing clamps. The practice of VAZ 2109 owners shows that they are more convenient and more efficient than standard fasteners provided by the factory.
Changing CV joints is not the easiest task, but this stage cannot be called incredibly difficult either. The main thing is to use high-quality new grenades so that in the next few tens of thousands of kilometers you will forget about them. But they didn’t remind us of themselves.
Varieties
Pullers are distinguished by the method of removing the CV joint from the car suspension. The following 3 types are common:
- universal;
- with steel cable;
- with a reverse hammer.
A universal puller is needed to remove grenades from most front-wheel drive and all-wheel drive vehicles. The tool consists of 2 clamps with an eye in the center. They are fixed on the shaft. When tightened with the hub nut, the hinge is released from the stopper.
A steel cable puller is designed to quickly remove the CV joint. The loop is placed at the base of the hinge and with a sharp grab the grenade is pulled out of the hub.
CV joint puller with steel cable
A tool with a reverse hammer is an inertial device for safely dismantling the chassis suspension using a moving “weight”.
How to make from scrap materials
When repairing a car in the garage, you cannot do without a puller. You can buy it at the store, but some drivers prefer to save money and make it themselves. Using a homemade tool, you can easily replace the outer boot and remove the grenade from the car without removing the box.
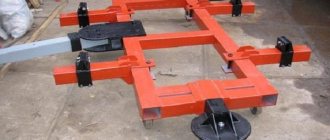
To make the simplest device you will need scrap metal and a welding machine. Before starting assembly, it is recommended to watch video reviews and drawings of a CV joint puller with your own hands on the Internet. Then proceed according to the following algorithm:
- Take a steel sheet 7mm thick and cut 4 identical strips.
- Weld them together in pairs to get 2 plates 14 mm thick.
- Cut 2 “elbows” from the remaining metal and weld all the blanks to a piece of pipe.
- Make a clamp for the shaft with an upper and lower jaw from steel.
- Fix the structure in the center of the pipe
- Weld long metal plates to the jaws.
- Drill holes on the sides of the clamp and in the knees.
CV joint puller from scrap materials
The tool is ready for use, all that remains is to clean it with a grinder and paint it. The disadvantage of the device is possible deformation under heavy loads. To avoid this, the clamping jaws must be made of sheet metal 15 mm thick.
A similar screw puller can be made from an old grenade clip. It needs to be sawn, and then a platform with a clamping clamp must be welded to it.
You can assemble an outer CV joint puller with your own hands, which works on the principle of a reverse hammer, using reinforcement. Weld a transverse eye on it to the size of the hub tail. Insert a heavy sledgehammer with a through hole into the reinforcement, and install a shock-resistant stopper at its other end.