Every car owner strives to keep their car in optimal technical condition. And the more modern the car, the more difficult it is to maintain it yourself.
But many continue to actively drive cars with a carburetor engine under the hood. And the K126G can easily be considered among the popular and sought-after carburetor systems.
Moreover, the K126 has many modifications. And each of them is installed on certain vehicles. In this case we are talking about UAZ cars.
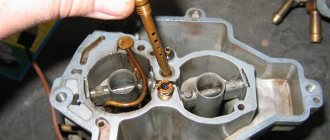
Carburetor assembly
The float should swing freely on its axis without jamming, while ensuring a needle stroke of at least 1.5 mm.
The fuel level in the carburetor float chamber should be 18.5-21.5 mm below the upper plane of the body and correspond to the marks on the carburetor body, which are visible through the inspection windows.
To obtain the correct level in the float chamber, it is allowed to bend the float bracket.
The diaphragm mechanism must be sealed. The test is carried out at a special stand.
At a vacuum of 1500-1700 mm water, st. No more than three air bubbles per second are allowed.
The diaphragm mechanism cover and the diaphragm drive linkage cover must be sealed.
The throttle axis should rotate freely in the bearings without jamming. The circumferential clearances between dampers and housings should not exceed:
— for throttle valves—0.06 mm;
— for air dampers — 0.2 mm.
When the air damper is completely closed, the damper throttles should open at least 12° from their full open position.
Full activation of the economizer valve should be with the throttles fully open.
Trial
The assembled carburetor must be checked for leaks and the height of the fuel level in the float chamber using a device model NIIAT-355.
At an excess pressure of 0.3–0.32 kg/cm2 for gasoline with a specific gravity of 0.720–0.750 g/cm3, the fuel level in the float chamber should be 20 ± 1 mm to the plane of the carburetor connector.
The performance of the accelerator pump must be at least 10 cm3 per 10 piston strokes.
Checking the complete activation of the economizer valve is carried out by measuring: the gap between the bar and the economizer drive nut, the distance between the upper plane of the carburetor cover and the upper plane of the bar.
The gap between the bar and the nut of the economizer drive rod when the top plane of the bar is positioned at a distance of 13 ± 0.2 mm from the top plane of the float chamber connector should be 3 ± 0.2 mm.
The distance between the upper split plane of the carburetor cover and the upper plane of the bar should be 21.5 ± 0.2 mm.
Checking the operation of the diaphragm mechanism of the centrifugal speed limiter is carried out on a special stand.
The carburetor speed limiter, when working with a reference sensor, must provide automatic limitation of the engine crankshaft speed when operating with an air filter within the following limits:
- according to the speed characteristic - 3200-3400 rpm;
- at idle speed - 3450-3550 rpm.
All carburetors coming out of repair must be tested on the engine in order to determine their basic operating qualities, ensuring:
— ease of starting the engine;
— stable engine operation at low idle speed;
- no failures in work.
The minimum stable engine crankshaft speed when idling should be in the range of 400-500 rpm.
When checking engine operation in various modes (with and without load), the carburetor must ensure a smooth transition without failures from one engine operating mode to another.
Carburetor adjustment
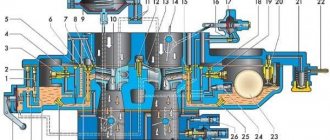
The idle speed adjustment is carried out using a thrust screw 1 (Fig. 3), which limits the closing of the throttles, and two screws 2, 2, which change the composition of the working mixture, on a well-warmed-up engine and with a working ignition system.
Particular attention should be paid to the serviceability of the spark plugs and the correct gap in their electrodes. When adjusting, it should be taken into account that the carburetor is a two-chamber carburetor and the composition of the working mixture in each chamber is regulated independently
When adjusting, it should be taken into account that the carburetor is a two-chamber carburetor and the composition of the working mixture in each chamber is regulated independently.
When starting the adjustment, tighten screws 2 as far as possible and then unscrew them two turns each.
Start the engine and set screw 1 to the smallest throttle opening at which the engine operates quite stably.
Then deplete the mixture with one of screws 2, turning it ¼ turn at each test until the engine starts to work intermittently.
After this, enrich the mixture by turning out screw 2 by ½ turn. Perform the same operations with the second screw 2.
Having adjusted the composition of the mixture, try to reduce the idle speed by unscrewing the thrust screw 1 of the throttles, and then again lean the mixture with both screws alternately, as indicated above.
To check the idle speed adjustment, sharply press the throttle pedal and release it sharply.
If the engine stops, the speed must be increased using the throttle stop screw.
A properly adjusted engine should operate steadily at 475 - 525 rpm.
Device Features
The carburetor of the model in question has a fairly simple adjustment, as well as the ability to configure it yourself.
It’s not for nothing that the K126G began to be actively installed on cars from the UAZ family. In total, they can have 3 types of carburetors:
- K151;
- DAAZ Solex;
- K126G.
Moreover, the latter option is most often found on cars of this brand. K126G is included in the basic package of the UAZ Bukhanka. It is also actively installed on the UAZ Hunter, as well as the UAZ Patriot.
This carburetor is ideal for two UAZ engines. These are UMZ 417819 and UMZ 421810.
Structurally, the carburetor under consideration consists of:
- accelerator pump;
- devices for dosing hot food in the first chamber;
- dosing devices in the second chamber;
- economizer;
- air damper;
- idle mechanism.
The device also has a number of additional and small elements. But each of them is aimed at maintaining and improving the operation of the entire system.
Device repair and adjustment of carburetor to 135
Carburetors K-126, K-135. Guide - part 1
Operating principle, device, adjustment, repair
Publishing house "WHEEL" MOSCOW
2002 This brochure is intended for car owners, employees of service stations and people studying the structure of the car, and examines the theoretical foundations of carburetion, design, features, possible methods of repair and adjustment of carburetors K-126 and K-135 Leningradsky (now "PEKAR"), installed on cars of the Gorky and buses of the Pavlovsk Automobile Plant. The brochure is intended for car owners, service station workers and people studying the structure of the car.
Carburetors of the K-126 series represent a whole generation of carburetors,
produced by the Leningrad Carburetor Plant, which later became PEKAR JSC (Petersburg Carburetors), for almost forty years. They appeared in 1964 on the legendary GAZ-53 and GAZ-66 cars simultaneously with the then new ZMZ-53 engine. These engines from the Zavolzhsky Motor Plant replaced the famous GAZ-51 along with the single-chamber carburetor used on it.
A little later, in 1968, the Pavlovsk Bus Plant began producing PAZ-672 buses, in
In the seventies, the PAZ-3201 modification appeared, and later the PAZ-3205, and all were equipped with an engine made on the basis of the same one that was used on trucks, but with additional elements. The power system did not change, and the carburetor was also, accordingly, of the K-126 family. .
The inability to immediately completely switch to new engines led to the appearance in 1966
ZMZ-53 engines were improved and changed. Last major change
Signs of a carburetor malfunction
Like any other mechanical device, a carburetor cannot operate without failure all the time. The reasons for this may be:
- clogging of jets and channels;
- wear of gaskets or seals;
- violation of regulations of systems and mechanisms.
Symptoms that the carburetor is operating in emergency mode include:
- unstable idling (floating speed);
- inability to start or complicated starting of the power unit;
- reduction in engine power;
- jerks when starting from a standstill, as well as failures during acceleration;
- increased fuel consumption;
- detonation.
Naturally, the above signs may indicate other problems in the fuel system or ignition system, but flushing, cleaning and adjusting the carburetor will not harm it in any way.
Table: main malfunctions of the K-126G carburetor
| Signs | Possible faults |
| The power unit does not start at all. Gasoline is observed to leak from under the float chamber gasket. | The engine starting system is not adjusted. The carburetor overflows fuel due to a maladjustment of the float mechanism (the level is too high). |
| The engine starts after several attempts, but periodically stalls. | The carburetor filter is clogged. The quality of the mixture is not adjusted. |
| The engine shoots or "sneezes" into the carburetor. | The adjustment of the float mechanism is incorrect (level is too low). The quality of the fuel mixture is incorrectly adjusted (lean mixture). |
| The power unit is unstable only at idle, while the speed “floats”. | The fuel jet of the idle system is clogged. The adjustment of the mixture quality is disrupted (lean mixture). |
| There is a decrease in the power qualities of the power plant. Detonation occurs under load. | The fuel jets are clogged. The accelerator pump is malfunctioning. The fuel mixture is too lean. |
| There are jerks at start, dips when pressing the gas pedal. | The accelerator pump is faulty. The carburetor strainer is clogged. The quality of the fuel mixture is not adjusted (too lean). |
| Increased fuel consumption. | The fuel level in the float chamber is incorrectly adjusted (too high). The adjustment of the cold start system is broken (the air damper does not open completely). The air jets are clogged. The amount of incoming fuel is incorrectly adjusted. |
Instructions for adjusting idle speed K126G
The stability of the engine is adjusted using two screws. One determines the quantity of the fuel-air mixture, and the second determines the quality of its enrichment in the K126G. Adjusting the carburetor, the instructions for which are given below, is carried out in stages:
- With the car turned off, tighten the mixture enrichment screw until it stops, and then unscrew it 2.5 turns.
- Start the car engine and warm it up.
- Use the first screw to achieve neat and stable engine operation at approximately 600 rpm.
- The second screw (enrichment of the mixture) gradually depletes its composition so that the engine continues to operate steadily.
- With the first screw we increase the number of revolutions by 100, and with the second we reduce them by the same amount.
The correctness of the adjustment is checked by increasing the speed to 1500 and then closing the throttle valve. The revolutions should not fall below the permissible values.
About carburetor systems
So, what is a carburetor? Translated from French, carburation means “mixing.” From here the purpose of the device becomes clear - to create a mixture of air and fuel. After all, it is the fuel-air mixture that is ignited by a spark from a car’s spark plug. Due to their simplicity of design, carburetors are now used on low-power engines of lawn mowers and chainsaws.
There are several types of carburetors, but in all cases the main components will be a float chamber and one or more mixing valves. The principle of the float chamber is similar to the valve mechanism of a toilet cistern. That is, the liquid flows to a certain level, after which the shut-off device is activated (for a carburetor this is a needle). Fuel enters the mixing chamber through a sprayer along with air.
A carburetor is a fairly delicate device to configure. The K126G carburetor must be adjusted with every maintenance and any problem. A correctly configured fuel-air mixture supply unit ensures uniform engine operation.
Additional Tips
The k126g device is best cleaned using Mole. At the same time, in K126g you need to carefully monitor the condition of the jets. They are very fragile in it. For greater efficiency of the K126g, craftsmen bore the diffuser diameter to 27 mm. This gives the engine agility compared to the standard K126g.
The k126i device was installed on the GAZ 52, the engine of which had 6 cylinders. The K126i was designed specifically for this car. The diameter of the K126i diffuser was only 23 mm, which is not enough for such an engine. This carburetor gives more agility than the K126gm, but is still not sufficient for this car. So k126i needs to be modified independently.
K126 was installed on Muscovites. All advice from car enthusiasts regarding the K126 device boils down to replacing it. By upgrading it can be converted to 126n. So the Soviet people did not favor the usual K126. Nevertheless, there are Muscovites that are still in excellent condition and running. This speaks volumes about the quality of the machine, one of the components of which is the K126.
The k126n device is ideal for a Muscovite car. K126n is a little harder to set up, but this does not make it less popular. Many car enthusiasts prefer k126n.
Fuel level in carburetor K126
On 126 old-style models, the float chamber housing was equipped with an inspection window, through which it was very easy to determine the gasoline level (visually - 2/3 filled with gasoline).
The carburetor units of the new model do not have this window, and since the fuel level mark in the K126 carburetor is located outside the body, and the fuel is inside the chamber, it is almost impossible to verify whether the float mechanism is adjusted correctly without dismantling the top cover. But there is a fairly simple way to determine the level without disassembling the carburetor, and it is also not necessary to remove the unit.
Let's look at how you can find out the gasoline level using the example of the K135 model (a complete analogue of the K126, which is installed on GAZ-53/3307/66 trucks):
- take a plug (plug) from any old 126th or 135th carburetor, drill a hole in it so that you can attach a piece of the rod from a gel pen;
- the structure must be made airtight, for example, the joint must be treated with epoxy resin;
- We place a piece of transparent tube from the windshield washer onto the rod;
- unscrew one of the plugs on the main body of the carburetor, having previously placed a jar under it so as not to spill gasoline;
- instead of the factory plug, we install a homemade design, while lifting the tube upward, we manually pump gasoline into the chamber with a gas pump;
- Now fuel has appeared in the transparent tube, and its level in the float chamber can be seen clearly.
If the level is more or less than the required norm, it must be changed. To do this, dismantle the air filter assembly with the housing, unscrew the screws and remove the carburetor cover, bend the float tongue in the desired direction and check again how much fuel is in the chamber, repeat the operation if necessary.
Disassembly
Alas, it is not always possible to adjust the carburetor system just by rotating the screws.
In some cases, when the carburetor is seriously contaminated, it will have to be dismantled and then cleaned and adjusted.
In general, removing the K126G from the car is not so difficult. It is enough to disconnect all connectors, hoses and lines, unscrew the nuts and from the studs, grabbing the gasket, and remove the assembly.
It is much more difficult to disassemble the carburetor into its individual components.
The main task for which disassembly is carried out is washing all internal cavities. Often, due to their contamination, it is not possible to adjust the system in the usual way and return the carburetor to stable operation.
Such measures relate to adjustment and are not repair work.
You need to start disassembling only if the case and external elements have been thoroughly cleaned of dirt before doing this. In this situation, carburetor cleaner will be an excellent assistant.
K126G is disassembled according to the following algorithm:
- first you need to undo the tie rod fastenings of the existing lever;
- then you should remove the end of the rod responsible for low speeds from the hole that appears;
- 7 small screws are also unscrewed, with the help of which the cover is held from the float chamber;
- the lid is carefully lifted and then removed;
- there will be a gasket under the cover, and it is important not to damage it during dismantling;
- Now you can remove the float axis and the float itself from the cavity of the chamber itself;
- Grabbing the spring, the needle is simultaneously removed from the fuel valve;
- to remove the air damper, you will need to unscrew a couple of mounting screws;
- then the screw securing the drive lever bushing is unscrewed;
- the damper should be pulled out without separating it from the lever and return spring;
- You also need to unscrew the filter cap and also remove the mesh;
- at the next stage, the float chamber is disassembled;
- all components must be carefully separated from each other and pulled out strictly in a vertical position;
- on the outside of the carburetor body, the plugs are turned off to get to the jets in the first and second chambers;
- this will now allow you to get the jets themselves and the economizer valve;
- inside the carburetor only a diffuser with a mixing section remains;
- It is absolutely forbidden to touch small diffusers, since you will not be able to return them to their place on your own.
Carburetor malfunctions
Failure to comply with the periodicity of vehicle maintenance can lead to breakdowns. Malfunctions in the fuel supply of the gas 53 carburetor device stop normal operation for various reasons and conditions. When identifying faulty components, it is necessary to determine which unit is malfunctioning during operation. There are times when breakdowns are caused by incorrect operation of the ignition system. Before repairing, it is necessary to check the ignition system for the presence of a spark. The carburetor to 135 should be opened only in cases where the fuel supply system has been checked. Fuel supply may be difficult due to clogged fuel lines or hoses.
The main malfunctions in the operation of the gas 53 carburetor may be enrichment or over-depletion of the mixture. Both factors may be the result of incorrect adjustment to the 135, lack of tightness in the system, or clogging of the fuel supply system.
- High fuel consumption, unstable idling;
- Dips during acceleration or increased loads, a consequence of jamming of the accelerator pump drive piston;
- Clogged jets. Occurs in an aggressive operating environment, faulty filters;
- Depressurization of the body of the float chamber K135 leads to a lean mixture when the internal combustion engine operates unstably in certain modes;
- Fuel overflow into the combustion chamber due to malfunctions of the float system needle leads to difficulty starting the car.
Washing and purging of systems with air flow and units is carried out when one of the causes of unstable operation is identified, as well as as a preventative measure. Typically, it is recommended to entrust gas 53 carburetor repair to specialists; they are equipped with the necessary tools and skills for high-quality work. You can adjust the idle speed groove with your own hands by removing the air filter.
Advantages and disadvantages of K126G
The K126G carburetor is quite popular among UAZ owners. It is valued for a number of advantages that are missing from more modern models:
- stable operation in the presence of clogging;
- unpretentiousness to fuel quality;
- sufficient economy.
The K126G carburetor, the mixture quality of which is adjusted regularly, will work without any problems. Simplicity of design is a guarantee of reliability. In this case it will comply, but subject to scheduled maintenance.
The K126G has one unpleasant drawback. If overheated, the device body may become deformed. This occurs when the carburetor threads are over-tightened.
Adjustment and repair
Without completely disassembling the device, it is possible to adjust only the idle level with your own hands. Fuel consumption depends directly on the crankshaft speed. The principle of operation involves adjusting the gas carburetor with 53 quality and quantity screws.
There are several adjustments:
- The amount of gasoline in the float chamber;
- Setting up the economizer operation;
- Accelerator pump piston stroke;
- Number of revolutions, idle jet.
Correct idle speed control is carried out on a working engine. Usually the procedure is performed after prophylaxis in order to exclude other possible causes of unstable operation.
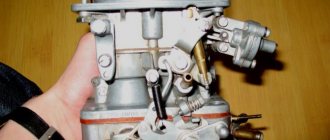
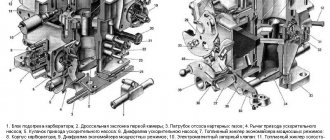
Type of carburetor without cover: 1 economizer rod; 2 drive bracket for echonomizer and accelerator; 3 — accelerator piston; 4 - main air jets; 5 — accelerator pump fuel supply screw; 6 — “quality” screws; 7 — “quantity” screw
The process and scheme for adjusting the idle speed on the 53 carburetor is the following operating principle:
- The adjusting screws of a cold engine are tightened until they stop, then unscrew 3 full turns. It is possible to adjust the carb using a slotted screwdriver;
- Warm up the engine to operating temperature;
- The number of revolutions to 135 is adjusted by ear with a screw, since the car is not equipped with a tachometer. The revolutions should be kept between high and low, weaving and jerking are unacceptable;
- The K135 quality screw is tightened until the level of engine interruptions begins; it is necessary to adjust it gradually, adjust the groove with your own hands, until normal, stable operation is achieved.
- The quantity is adjusted on both chambers, parallel to each other;
- In cases where the car stalls when releasing the gas, it is possible to increase the operating speed.
Repair of the gas 53 carburetor is carried out in case of significant damage to the components or detected contamination. Flushing is carried out on demand; too frequent a procedure can forget the fuel supply channels and damage the devices. The most common method is to clean the float chamber. Deposits are removed only with the top layer, since stuck-on dirt can get into the inlet part of the channels and disrupt the operation of all systems. The causes of soot and deposits are poor quality or old fuel filters. Carburetor gas 53 when flushing, you should immediately replace all fuel and air filters.
During the disassembly process, it is necessary to check the condition of all elements of the system. We will repair jets, dampers and the accelerator pump, which have thin channels that, when clogged, affect engine operation.
Maintenance and possible adjustment of the gas 3307 carburetor installed on a gazelle car does not require complete removal from the engine. The plant has provided that dismantling the air filter makes it possible to routinely check the condition and adjust the idle speed. When completely cleaning and replacing components, the assembly is removed from the engine. Proper technical operation and filter replacement make the need for a complete overhaul minimal. It is enough to carry out preventive maintenance as contamination occurs in the form of flushing the K-135 carburetor.
Flushing is carried out using a flammable liquid. There are special means, the principle of which allows liquid to be delivered under air pressure to hard-to-reach places and grooves. External washing is carried out with a brush until deposits and dirt are completely removed.
Care should be taken when washing internal parts, as there is a possibility of breaking seals or clogging the channels with dirt.
How it works
In the case of the K126G carburetor, there are 2 chambers at once, where the processes of mixing the working air-fuel mixture take place. These are certain proportions of fuel and oxygen.
When the key is turned in the ignition switch, fuel begins to flow into the first of the chambers. Then, as the torque increases, it is formed in the second chamber.
The structural elements of the carburetor system allow a strictly dosed amount of fuel and air to pass into the chambers. This allows you to form a mixture with optimal proportions.
If an engine that operates under high load and at high speeds needs a rich mixture, then the economizer has its say.
The solenoid valve increases the air flow through the air damper, which is constantly open. This enriches the mixture.
Adjusting the K-126 carburetor on a UAZ
The “golden age” of carburetor engines has long passed. Today, all car systems are controlled electronically. Nevertheless, there are people who value their UAZ “war horses” with a carburetor for their simplicity and reliability. If you are one of them, this article is for you. We will tell you how to install the K-126GU carburetor on a UAZ.
Design and technical characteristics of K-126GU
The K-126GU two-chamber carburetor with a falling flow of the fuel mixture is the basic model for UAZ vehicles. To set it up correctly, you need to have an understanding of the structure, parameters and operating principles of the unit.
Essential elements:
- two working chambers for mixing fuel with dosing systems;
- economizer;
- accelerator pump;
- idle speed device.
The unit allows uninterrupted operation in all possible modes. It is worth noting that the K-126 has a simple and reliable design. When properly configured, it provides fuel consumption per 100 km:
- for urban conditions 13 l;
- on the highway 11 l.
Installation
First of all, we dismantle the air filter. Next, we remove one by one:
- damper drives;
- hoses (fuel supply and vacuum corrector vacuum extraction).
The unit is mounted on the flange of the engine intake pipe. Secure the carburetor with four nuts. Additionally, spring washers are used. We check the integrity of the rubber gasket, if necessary, change it. At the final stage, we attach the damper drives and pipes.
Setting procedure:
We check the tightness of the unit (special attention to the areas where hoses are attached, plugs and gaskets). If we find a fluid leak, we fix the problem; pump in fuel (6–8 times using a manual fuel pump); close the air damper, start and warm up the engine; as the engine warms up, gradually open the damper; at the moment when the antifreeze temperature reaches +40 °C, fully open the damper; screw in the screw that regulates the quality of the fuel mixture until it stops; unscrew the “quality” screw 5 turns; bring the liquid temperature to 90 °C; increase the crankshaft speed to the maximum possible amount; smoothly tighten the screw for adjusting the amount of fuel mixture until interruptions in engine operation begin; unscrew the “quantity” screw half a turn; check the performance of the engine
We press the gas pedal and then sharply release it. If the engine stalls, increase the speed.
https://youtube.com/watch?v=7S2GJxqoCpA
Conclusion
Despite its “venerable age”, the K-126 carburetor continues to be used. The reasons are simplicity, reliability, ease of maintenance. With minimal maintenance effort, the unit will operate smoothly for years.
Conclusion
Despite its “venerable age”, the K-126 carburetor continues to be used. The reasons are simplicity, reliability, ease of maintenance. With minimal maintenance effort, the unit will operate smoothly for years.
Maybe you know some special methods for tuning the K-126 carburetor? Share your experience in the comments. Pass on your skills to young car enthusiasts.
We have more or less figured out the carb structure. Now how to repair and adjust it? The adjustment consists of setting the gasoline level in the float chamber and setting a stable idle speed.
In general, Nail Poroshin explains well about carburetor adjustment:
So, the level in the float chamber is set by bending the float level tongue. At the same time, bending the float travel limiter sets the valve needle travel. <All photos/pictures will come later> It should be noted that during operation the reeds “sag” and the fuel level in the chamber increases. Therefore, when adjusting, you should focus on the minimum setting limit.
Stable idle speed (provided the carburetor and engine are in good working order) is established as follows: 1. Warm up the engine. 2. Tighten the “quality” screw (toxicity of the mixture) until it stops, but not too much. Unscrew one turn. 3. Using the thrust screw of the throttle valve (screw for the “amount” of air), set increased speed, about 900...1200 rpm. Thus, our setting will be optimal for the transition regime. 4. Slowly and smoothly unscrew the “quality” screw. The revolutions should increase for some time, then stabilize, this is the so-called “slide”. (if you turn it further, the speed will start to drop again, we don’t need that). 5. Use the throttle valve thrust screw (the “quantity” screw) to reduce the speed to 600...700 rpm. 7. Press sharply and immediately release the gas. The engine should accelerate and reset without stalling or stalling.
More. Adjusting the idle speed only affects the idle speed (unexpected, right?). More precisely, on the stability of the engine at idle and smooth operation in transient mode. All. This does not affect engine consumption or performance at all. Why? Yes, because the jets are x.x. and adjustment of h.x. are valid only as long as the transition system operates. Next, the GDS is turned on, which has nothing to do with idling.
How to Correctly Adjust the Carburetor Gas 53
Adjusting the GAZ-53 carburetor
The GAZ 53 carburetor has a two-chamber system, each of which operates on 4 cylinders. The throttle valve is equipped with a drive for both chambers at once, so fuel is dosed synchronously to all cylinders. To ensure rational fuel consumption at different engine modes, the carburetor is equipped with several systems for regulating the composition of the fuel mixture (FM).
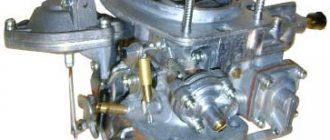
This is what the carburetor installed on a GAZ 53 looks like
The carburetor was originally brand K126B, and its subsequent modification was K135 (K135M). Fundamentally, the models are almost no different, only the control scheme of the device has changed, and on the latest releases a convenient viewing window was removed from the float chamber. Now it has become impossible to see the gasoline level.
Applicability of K126G
A carburetor marked “K126G” was installed and is still serviced on Gaz-24 “Volga” and UAZ vehicles, with mainly UMZ-417 engines. UAZ car owners especially love this model for its unpretentiousness and ability to work even with clogged fuel.
With minor modifications (drilling a hole), the K126G is installed on UMZ-421 engines. And this could be either a UAZ or a Gazelle. The predecessor of the K126G can be considered the K151, and the next model is the K126GM.
Adjusting the K126G carburetor is the most popular question among carburetor technicians. But first, let's look at various problems that can happen with the K126G.
This is interesting: Oil pressure sensor on ZMZ engines: characteristics, check and replacement