VAZ floor tunnel lining: removal and installation
The rose-colored dream of any car enthusiast: I unscrewed a couple of screws, poked them with a screwdriver, screwed them on, and the car was in perfect order! But no... sometimes you have to disassemble several mechanical components, unscrew and tighten many screws and nuts in order to adjust, for example, the movement of the gearshift lever or the parking brake system.
Repairing breakdowns in the gearbox is not so easy. This is an assembly that is securely fastened to the floor of the vehicle and covered by the floor tunnel lining. To disassemble and repair this mechanism, you will first need to dismantle the upper and lower cladding and then install it in place. We disassembled a VAZ 2110 car. The procedure is similar for other models.
Dismantling the upper and lower lining of the floor tunnel
First of all, it should be noted that the lining should be removed after cleaning the floor in the cabin, after which disconnect the “?” terminal. from the battery and perform the following steps.
1. There are two mounting screws on the right and left sides of the floor tunnel lining. Unscrew them and remove both trims.
3. The lining, which is located on the facing, is removed by pressing its front part under the parking brake lever. Take it off too.
4. Remove the gear shift lever handle by pulling it up.
5. The car gearshift lever cover is attached to latches on each of the four sides. To remove it, press out each one with a screwdriver.
6. Now you can move on to the cladding itself. Unscrew the central fastening screw.
7. Fold the front seat back, which raises the front edge. This will open access to the middle fastening of the cladding. Remove the screws on both sides of the cladding.
8. Slide backwards and remove the top lining of the tunnel. It is installed in the reverse order of removal.
9. Move the seats forward. There are air vents underneath them. They can be removed by unscrewing the fastening nuts.
10. The lower tunnel lining is secured with six nuts. Unscrew each one and remove the lining itself.
11. When the manipulations to repair the required unit have been completed. All that remains is to install the lower lining of the car floor tunnel. This is done in the reverse order of dismantling. Pay attention to the sockets of the air vents: both should fit into the holes on the lower lining.
As you can see, there is nothing difficult in dismantling the floor tunnel lining. This event requires attention to detail and adherence to order.
Do-it-yourself removal and installation of a torpedo on a VAZ 2110
The need to remove and replace the dashboard on a VAZ 2110 car may arise when repairing devices and parts located under its surface. In particular, it is with the removal of the dashboard that the car’s air intakes are inspected. Sometimes they can become clogged and prevent your heating or air conditioning systems from working properly. The process of removing and replacing the dashboard on a VAZ 2110
is not particularly simple. To carry it out, you will need to be patient and master the skills of masterly working with instruments.
In today's article we will tell you how to remove, replace, install, modify and improve the dashboard on a VAZ 2110 with your own hands. In addition to all this, we will give you a photo report of the work done and show you an interesting thematic video.
Interior part 3 + tunnel tuning
In general, I continue with the interior of the cabin. This time the tunnel has undergone tuning.
Lower part in gloss black Upper part in chrome
+ I also made improvements to the heating system for the rear passengers (the idea was taken from the site - lada2111.rf/tuning-other/91-dorabotka-pechki.html)
Everything is there and described in detail, I did it my way. Maybe it’s a collective farm, but it’s blowing for the rear passengers. And the main thing is that it’s sealed, which is important. Well, and most importantly, in 2 colors for aesthetics) The cabin has become even more comfortable. All that’s left is to buy a new cover and gear knob
Well, chrome door pockets
I can say that this color (chrome) is not easily soiled like white. And it looks brighter. Again, who to carry and how to take care of the interior)
The next thing awaits me 1) Boring the bottom + secret details
Source
COMMENTARE • 0
- Tekeyev EldarVor 6 Monate
???
- Vahan KazaryanVor 6 Monate +1
?
- SERGEY GORSHKOVVor 11 Monate +1
Total: 12 + 1 more. Everything is clear and without snot.
- Dmitry SmirnovVor year +1
How to unscrew them, the fucking seat is in the way
- leonardini1996Vor year +1
Oh fuck you! I found at least one video where they explained it quickly and clearly
- VIRTUAL plusVor year +1
If only all the roles on YouTube would be filmed like this!
- myasnoy ruletikVor year +2
Fast, informative, without chewing snot. Beautiful. Thank you.
How to properly remove a torpedo on a VAZ-2110 without damaging it: step-by-step instructions
In the design of the VAZ-2110 car, the torpedo is the most revealing part. Every driver wants to sit in a beautiful and expensive interior while driving. But the factory panel has a moody, angular appearance. This becomes especially noticeable after using the car for a long time, when abrasions and scratches begin to appear on it. Each driver solves this problem in his own way, some purchase a new factory dashboard, others install a panel from foreign car manufacturers. A beautiful trim from a third-party manufacturer allows you to decorate the interior to the level of a foreign car. Whatever option is chosen, you initially need to know how to remove the dashboard on a VAZ-2110 car in order to install another one.
The material from which the pad is made is much softer than the factory panel and is not surprising at the presence of a grinding noise while the machine is moving.
In most cases, motorists dismantle the standard panel precisely because of grinding and squeaking. There are several options for the updated panel for the VAZ-2110, which differ in their design. The panel is available for sale as a set:
- New version of the panel, significantly different from the factory design.
- Brackets, buttons, instrument panels and air vent inserts.
- Set of wires and block for switch.
- Buttons for low beam, fog lights, dimensions and heating.
- Special plugs that are installed in places where there are no buttons.
from VAZ 2110 to VAZ-217220 (Priora)
- experienced forum member
- Group: Users
- Messages: 1,797
- forum member
- Group: Users
- Posts: 115
- repair of movable property
- Group: Users
- Posts: 518
- Megatheronosaurus
- Group: Users
- Posts: 14,452
- Pachimushta Zhrukhot!
- Group: Users
- Posts: 4,591
Post edited by Zerg: 02/09/2013 – 19:07
- experienced forum member
- Group: Users
- Posts: 2,357
Zerg (02/09/2013 – 19:04) wrote:
- forum member
- Group: Users
- Posts: 115
Post edited by Marty McFly: 02/09/2013 – 19:47
- Chip-Tuning
- Group: Users
- Posts: 1,787
- forum member
- Group: Users
- Posts: 115
fastrex (02/09/2013 – 21:16) wrote:
Post edited by Marty McFly: 02/09/2013 – 21:25
- experienced forum member
- Group: Users
- Posts: 2,478
Post edited by DenisCHCH: 02/09/2013 – 21:40
- experienced forum member
- Group: Users
- Posts: 2,478
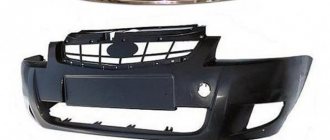
better sell your unfortunate ten, buy a short-winged eight, wash down the roof and style it ala DeLorean - this will be a “PROJECT” worthy of respect.
And if you still decide to go for a ten-wheel drive, there is a front prior bumper, complete for painting, 600 RUR
Post edited by DenisCHCH: 02/09/2013 – 21:44
- Chip-Tuning
- Group: Users
- Posts: 1,787
DenisCHCHCH (02/09/2013 – 21:41) wrote:
better sell your unfortunate ten, buy a short-winged eight, wash down the roof and style it ala DeLorean - this will be a “PROJECT” worthy of respect.
And if you still decide to go for a ten-wheel drive, there is a front prioro bumper, complete for painting, 600 rubles. Post edited by DenisCHCH: Today, 21:44
Why are you pushing a man to cramp, he wants style.
- Megatheronosaurus
- Group: Users
- Posts: 5,388
fastrex (02/09/2013 – 21:50) wrote:
- Chip-Tuning
- Group: Users
- Posts: 1,787
- forum member
- Group: Users
- Posts: 115
DenisCHCHCH (02/09/2013 – 21:30) wrote:
Yes, it’s not pissed here yet) shitting means we’ll be here
Professor_ (02/09/2013 – 21:54) wrote:
fastrex (02/09/2013 – 21:50) wrote:
it will look normal and it will all cost a penny and it will be nice and cheap
Delivery by Russian Post (cash on delivery, no prepayment)
Advantages: the most widespread network in Russia, delivers to any corner of the country, including remote ones. Flaws:
- high cost of delivery of heavy or large parcels, as well as the weight of one parcel should not exceed 20 kg;
- long delivery times and queues in large cities for receipt.
To send your order by Russian Post:
- Place an order in our online store by phone or on the website (registration is not necessary);
- After we receive it, our manager will contact you by phone to clarify the cost, delivery time and your wishes. Next, we will pack your order carefully and then send it to you;
- You will receive the tracking number of the shipment via SMS from us and from the Russian Post; the message will indicate the full cost of the purchase, including delivery to your locality (that is, the cost of your order plus the cost of delivery by cash on delivery). You can control the status of the order coming to you using our tracking service, as well as independently, on the Russian Post website using the track number;
- To the Post Office, you will only have to pay the cost, including delivery.
Delivery time may vary depending on how far your locality is from Togliatti and usually ranges from 5 to 14 days.
The cost of delivery is calculated based on the volume, weight of the selected product and the distance to the recipient's settlement.
Required for sending:
- indicate full name recipient;
- Your mailing address;
- Your phone number (contact);
- Post office code.
Russian Post commission for cash on delivery service:
- purchase price up to 1,000 rubles. – 70 rubles + 5% of the amount;
- purchase price from 1,000 to 5,000 rubles. – 80 rubles + 4% of the amount;
- purchase price from 5,000 to 20,000 rubles. – 180 rubles + 2% of the amount;
- purchase price from 20,000 to 500,000 rubles. – 280 rubles + 1.5% of the amount.
Russian Post - Delivery of goods up to 20 kg throughout Russia. https://www.pochta.ru
Delivery time and cost Track the parcel Calculate delivery by mail
Prerequisites
The car constantly throws up problems that have to be solved either using independent knowledge, ingenuity and tips from experienced car owners, or by contacting a service center. In the latter case, the result will be more expensive, but not always of better quality.
Even if you are not going to do this right now, it still doesn’t hurt to know how to properly disassemble the panel on a VAZ 2110, and even more so if you are one step away from this work.
Instrument panel VAZ 2110
Steering wheel cover
Without braiding, the steering wheel on the VAZ 2110 seems thin and slippery, which does not have the best effect on driving safety. So after buying a car, car owners usually install a braid on the steering wheel. You should choose size “M”, intended for steering wheels with a diameter of up to 39 cm (this is the standard wheel for the VAZ 2110).
The purchased braid is put on the steering wheel, its edges are tightly sewn together using a clamp needle and strong nylon thread.
Installing a torpedo on a VAZ 2110 - step-by-step instructions
In order to install the instrument panel of a VAZ 2110 (torpedo), you must perform the following steps:
- Install the instrument panel so that the guide pins fit into the holes on the instrument panel.
- At the same time, move the steering column adjustment knob into the hole on the instrument panel.
- Using a screwdriver, drive the threaded rods into the holes on both sides of the panel.
- Install the foot warmer air duct so that the air duct fits into the hole in the air distributor housing.
- Connect all terminals to wires in reverse order. Secure the panel and reinstall all components that were removed during disassembly. After completing the work, check the operation of all devices.
Dismantling the floor of a VAZ 2110 for sound insulation
First of all, it is necessary to dismantle the seats and remove the instrument panel.
To successfully remove the instrument panel, you can use the following instructions:
- Disconnect the negative terminal from the battery;
- Next, we look at the steering wheel housing, the ignition switch and the steering wheel;
- We unscrew and remove the two self-tapping screws securing the right panel of the floor tunnel lining (photo below);
- · Similarly, remove the left shield; · We remove the plug for the floor tunnel lining cover by slightly prying it with a screwdriver (photo below);
· Using a Phillips screwdriver, unscrew the screws securing the lining cover: two of them are located in the middle part of the tunnel (in the photo below - on the left) and two in the rear part of the tunnel (in the photo below - on the right).
· After this, lift the cover of the floor tunnel lining slightly (photo below);
- · If your VAZ 2110 is equipped with electric windows, then to carry out the following actions you must first disconnect the connectors from the control keyboard; · After this, disconnect the cigarette lighter wire connector (photo below);
· The holder of the gearshift knob cover from the floor tunnel lining cover can be detached more easily if it is slightly pryed from below with a screwdriver (photo below);
- · After this, you can remove the cover of the floor tunnel lining;
- · Next, using a 10mm wrench, unscrew the nut securing the interior heating air duct (in the photo below - on the left) and remove the air duct (in the photo below - on the right);
· In the front (in the photo below - left) and in the rear (in the photo below - left) parts of the fastening there are two nuts each, which also need to be unscrewed (using a 10mm socket);
· Now you can remove the housing of the floor tunnel lining (photo below);
· Unscrew the screws securing the glove box hinge bracket with a Phillips screwdriver (photo below);
· To remove the glove box itself, you need to disconnect the wires from the lampshade (photo below);
- · On the left, under the cover of the mounting block, and on the right, under the glove compartment, there are two more self-tapping screws that hold the instrument panel fastening - we unscrew them using a Phillips screwdriver;
- · On each side of the lower side fastening of the instrument panel, unscrew one self-tapping screw (for this we use a Phillips screwdriver - photo below);
· Using a size 8 wrench and a Phillips screwdriver, unscrew two more screws securing the panel to the controller brackets (photo below);
· We remove the side nozzles for heating and interior ventilation from their sockets by prying them from below with a screwdriver (photo below);
· The upper fastening of the instrument panel is held in place by two nuts - we unscrew them with a 10mm socket (photo below);
· Lift the instrument panel, remove it from the studs and move it toward you (photo below);
· Disconnect the wire connectors and remove the headlight hydraulic corrector. After this, you can completely remove the panel (photo below).
After the instrument panel is unscrewed and removed, remove the dashboard from the upper side pins.
When disassembling the interior, it is recommended to put each nut, bolt and other small parts into separate bags and label them: this way, when reassembling, it will be easier for you to understand what was removed and where it came from.
After this, we remove the carpet - underneath there is standard sound insulation (photo below).
In some places you can see standard vibration isolation. The vibration material we have chosen will be glued just on top of the standard one. First you need to remove the factory sound insulation and degrease the surface (for this it is best to use White Spirit).
Since for the convenience of soundproofing the interior you have to disconnect all the wires, it is better to sign them with a marker or mark them in some other way when disconnecting.
Improvement and tuning of the dashboard on the VAZ 2110
One of the most popular ways to modify the dashboard on a VAZ 2110
is its sound insulation. In order to do this, you must perform the following steps:
- We remove the tidy, I already told you how to do this earlier
- Next we foam, but under no circumstances should you pile up a huge pile of foam at once, it won’t dry out in a week.
- Don’t forget to try it on so that later it doesn’t turn out that your steering wheel touches it, or it’s just too high.
- In principle, all the work consists of two things, you cut, foam, cut again and so on many times.
- Next, we apply the cheapest putty we could find.
- Next we cover the dashboard with Shumka.
- We install the torpedo back.
You can modify the dashboard of a VAZ 2110 in different ways, someone covers it with leather, someone inserts an LCD monitor into it; when tuning a car, everything depends on you and your fantasies and desires.
Trial re-upholstery of the VAZ 2110 tunnel)
Hello everyone!) I looked at the work on reupholstering the interior on drive2 and again I wanted to try to do something myself))) The first experience was with the ceiling (Link). To be honest, I screwed up a little there =) At first glance, everything seemed just great, but then I found some minor flaws. The navigator's lamp and visors seem to have been spared the glue or did not have time to press it in time and the carpet did not stick in sections. Probably my mistake is that, having no experience, I started working from the most difficult terrain place. The rest of the area is holding up perfectly, I tried to tear it but it doesn’t work... the backing breaks first. Here) It will be necessary to correct it somehow. In general, we forgot about the ceiling and switched to the tunnel! As they say, “the eyes are afraid, but the hands are doing” Process:
1) I made a support template for the pattern using paper tape. This operation has already been described by many people, there is nothing special here. Then I figured out where the parts were and cut them.
neon lights for the room on the wall
2) 80-100th sandpaper prepared the surface of the plastic for better adhesion to the glue.
Because the spare part was not in the best condition, I had to putty it to remove the unevenness. At the same time, the recess next to the cigarette lighter and ashtray was sealed.
3) The fabric I chose was leatherette, red and black. I bought it in fabrics because I couldn’t find anything suitable anywhere else. The leather is not very thick, but I think it will be suitable for this part of the interior.
4) We cut and cut, sew. Then we try it on so that everything roughly matches the fitted part and falls into place. Oh yes, I want to note that my mother helped me with all the sewing tasks, for which I thank her very much) I couldn’t have done it alone.
5) Next, for me, the most difficult stage is sizing. Because I messed up the ceiling, I was a lot more careful here. I bought glue on tap, explained to the seller that I was looking for poligrip 999, if we understood each other correctly, then that’s what I bought. (poligrip 999)
Source
What to do with the wires?
You will probably be amazed at the number of wires located in the panel space, intended to power various devices in your VAZ 2110
. It would be more convenient to remove everything along with the bundle of wires. But take your time. It is unlikely that you are going to change anything on a completely new car, so in the future you will spend a long time figuring out which wire comes from what, and how to connect it. So that it turns out that disassembly went quite smoothly, but reassembly led to a slight stupor.
So try to disconnect all the connectors and wires that you can. Now you can finally remove it
panel and remove it from the car. For fresh traces, do not forget to separate (you can tie in a pile) the entire wiring harness that belongs directly to the instrument panel, and mark the rest with self-adhesives. This will help you a lot when you start installing new equipment.
Noise Removal
Basically, the panel rattles both due to improper installation and because the three parts that make it up touch each other, which causes creaks and rattles in the cabin.
That is why sound insulation is necessary, which the manufacturers did not take care of properly, and it is up to the owner to finalize it. Modelin can be used as sound insulation. They can paste over:
- All places where three parts of the panel touch;
- Those parts of the panel where it comes into contact with the radio, on-board computer, etc.;
- All bolt holes are also covered with modelling. It won’t hurt to screw them in, but there will be additional sound insulation, as well as protection against heat loss;
- Sides of the glove compartment;
- "Black box" in those places where it comes into contact with the panel.
It is better to cover the back of the panel with bitoplast. There is advice - also use vibration material, but this is not necessary.
The remainder of the bitoplast can be placed at the bottom of the glove compartment. Now, sound insulation done by yourself will eliminate squeaks, and replacing the lining will be pleasing to the eye.
Removing door trim in Lada 2110
The first step is to remove the factory upholstery. This must be done carefully and approximately in the following sequence:
- Using a screwdriver, unscrew the screws that hold the factory upholstery in place.
- Remove the handle for lowering/raising the door glass, for which you must first remove the lock.
- Remove the panel holding the door handle.
- Unscrew the door lock button.
- Lightly pry up the upholstery with a screwdriver and carefully remove it. Plastic pistons are used to secure it. They may be broken when dismantling the casing, but this is not a problem - you can buy new ones in the store.
Preparatory work
Some are satisfied with dismantling without removing the remaining components of the interior, but this takes extra time and complicates the process as a whole. In order not to add more work to yourself, it is recommended to clear the interior for free movement. Strictly observing the sequence, you need to remove:
- armchairs;
- glove box;
- steering wheel;
- disassemble the floor tunnel. To do this, you need to unscrew the screws and move the part back a little.
We dismantle the lower part in the same way. The next step is to remove the glove compartment, after which you should remove the relay and mounting block. As you disassemble, you need to mark all the wires. Particular attention should be paid to the speedometer.
Why doesn't the cigarette lighter work?
Failure of the electric cigarette lighter and other disturbances in the electrical network are associated primarily with its misuse. So, with the advent of automotive household appliances that provide comfort and maintenance, the socket began to be used as a power outlet. Connecting household appliances to the socket is made easier by the fact that they are sold together with power adapters.
Additional connection of household appliances leads to an excessive increase in the load on the network, for which it is not structurally designed. The current of the electric cigarette lighter network is limited by fuse F18 at 25 A. The consequence of exceeding the network load can be a blown fuse, failure of the electric cigarette lighter, or, worst of all, if the fuse does not work, a fire in the electrical wiring. After such an incident, it is necessary to identify and eliminate malfunctions.
Removing and installing the cigarette lighter through the tunnel
In VAZ 2110, 2111, 2112 models, the cigarette lighter is located on the right side of the console next to the gear lever. To dismantle the electric cigarette lighter with this tunnel design, you must perform the following steps:
- Disconnect the negative terminal from the battery.
- Remove
the side plates of the tunnel by first unscrewing two screws on each side. - Disconnect the power plugs for the electric cigarette lighter and the backlight from the mains on the right side of the tunnel. This is done so that nothing holds the top panel of the tunnel when removed.
- Use a flat screwdriver to pry up the LADA trim under the handbrake lever and remove it.
- Remove
the cover from the gear shift lever in the same way - Use a Phillips screwdriver to unscrew the screw under the gear shift lever housing.
- Move the front seats all the way back.
- Unscrew the two screws securing the floor tunnel, one on each side.
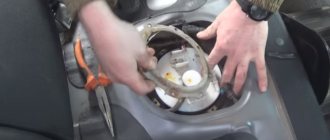
- Remove the top cover of the tunnel with the electric cigarette lighter by hand.
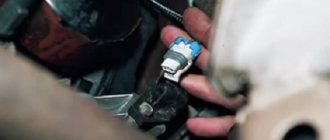
- Disconnect the backlight lamp from the cigarette lighter housing. To do this, you need to squeeze the lamp screen and slightly pull it back along the length of the groove on the body of the electric cigarette lighter.
- Inside the cylinder of the cigarette lighter socket, use a screwdriver, or better yet, tweezers, to release the hook with the light guide.
- Pull the socket out of the panel.
- Push the light guide out.
Diary of a VAZ 2110|Total modification of the interior #3|Removing the tunnel I How to remove the tunnel
Points 1 to 9 describe dismantling the tunnel, and points 10 to 11 describe disassembling the cigarette lighter. Installation is carried out in reverse order. This is a complex procedure. As drivers say, because of such a small thing, half the car needs to be disassembled. Therefore, craftsmen are looking for other less expensive ways to dismantle the electric cigarette lighter. Their description is given below.
How to remove and replace the cigarette lighter on a VAZ 2110, 2011, 2112
A cigarette lighter is an electrical device in a car designed to light cigarettes. In a modern car, the functions of the electric cigarette lighter have been significantly expanded - it is now used to connect a recorder, battery and phone chargers, a tire inflator, a car vacuum cleaner and even a video player. The device has become so important for users that today it is difficult to imagine a car without it.
And although the design of the electric cigarette lighter is not complicated, sometimes it causes a lot of trouble, and sometimes it “allows motorists to light a strong cigarette.” Disturbances in the electrical network not only lead to the failure of the cigarette lighter and the hassle of replacing it, but also, under certain conditions, to a short circuit in the electrical wiring. So there are enough reasons to discuss the topic of repairing and replacing the car cigarette lighter.
Replacing the cigarette lighter through the mounting window
During the first disassembly, a small mounting window is cut in the tunnel on the passenger side to make it easier to access the cigarette lighter next time without disassembling the tunnel.
.
To perform the replacement procedure through the mounting window inside the console, you must:
- Disconnect the negative terminal from the battery.
- Through the mounting window inside the tunnel, disconnect the power plugs for the electric cigarette lighter.
- Moving away from you inside the tunnel, remove the backlight.
- Having previously bent the hook (steps 10-11), push the nest out from the inside of the tunnel.
- From the interior side, remove the light guide from the hole in the panel.
After dismantling, you can replace the cigarette lighter or burnt out lamp. The installation procedure is carried out in reverse order.
Heir to the “ten”: how the Lada Priora was created
At the end of the difficult nineties, when the VAZ-2110 in the eyes of the potential audience was still a new model and was just reaching its designed production capacity, VAZ had long understood that the car, which they began to create back in the eighties, required, if not a radical replacement , then at least a cosmetic update.
Greeted by clothes
World experience has suggested that, first of all, modernization requires the appearance, which for the “ten” turned out to be very peculiar for a number of reasons. Thus, the designers were faced with a difficult task: it was necessary not only to “refresh” the car, but also to rid it of the heaviness characteristic of the “pregnant antelope” of the tenth model.
It became obvious that not only the typical replacement of bumpers or some kind of lining would be required, but also a complete rework of the front and rear parts. After all, in order to radically change the optics, you will have to change the hood, which on the “ten” extends over the front wings. And the rear bumper, which connects vertically with the rear fender, visually made the car look heavier. And finally, the rear wheel arches required revision, because of which the car looked, as they say, weak-willed.
The designers did not immediately come to a final decision - the appearance of the serial Priora was preceded by five previous, in its own way, search options. Initially, VAZ tried to solve the issue with “little loss” - using optics from the VAZ-2123 (Chevrolet Niva) and minimal modifications to the hardware. Due to technological limitations, during modernization it was impossible to change the stamps of the roof, doors and sidewalls, which, however, is rarely done during a classic facelift.
For quite a long time, designers had to look for the shape of the rear part. And they found her! The general style of the stern is reminiscent of some European cars of the late nineties (for example, Opel Vectra B). The final appearance was formed at the beginning of 2001 - in fact, it was at that time that the “ten” required a cosmetic rewrite.
Pre-production sedan VAZ-2170
It was understood that the update would affect not only the sedan, but also the 2112 hatchback, as well as the 2111 station wagon. After the sedan, the production of the five-door with the index 2172 began, and then the station wagon 2171
In this form, Priora appeared before the public in 2003
The interior was not easy for the designers either. Given strict restrictions (for example, the seats could not be touched), VAZ made its own, quite interesting version called Status (it can be seen on prototypes), but. then the development was ordered to the Italian engineering company Carcerano Creative Engineering, at that time recently (in 1999) founded in Turin by Pier Luigi Carcerano.
VAZ version of the Status interior
True, the company was not so much a design studio as an engineering enterprise, and in fact, with the design of interior options from the Italians, everything did not work out quite smoothly at first. Tolyatti designers had to go to Italy and, figuratively speaking, “adjust with a file” the European creation to the level of the VAZ school. And this is without irony: after all, by that time VAZ designers had extensive experience in designing car interiors and its practical implementation at the level of launching into production.
It is interesting that the designers practically did not work with soft material, limiting themselves to milling a cube made according to a mathematical model. Nevertheless, objectively, the design of the interior parts (especially the dashboard!) of the Priora should be recognized as the best of the VAZ cars of the period before the tenth years of this century.
Priora has a completely “foreign” interior. It looks, for example, like the interior of a Chevrolet Lacetti
Not just cosmetics
In addition to changes visible to the naked eye, in the process of transforming from a “ten” to a Priora, the car has noticeably changed at the level of technology. There are fewer deviations in body panels; stamps, joints, and welding are made more accurately. This was facilitated by the purchase of certain equipment (in particular, face stamps) in Japan.
In terms of the number of original parts, the Priora differs from the VAZ-2110 almost as much (!) as, for example, Kalina! Yes, despite the external similarity and the similar basis of the frame, the car was subjected to a serious modernization during the renovation process - the old technologies did not want to fit in with the new level at which they wanted to make a model in Tolyatti!
And although the layout and platform of the Priora have not fundamentally changed compared to previous front-wheel drive vehicles, on the “seventy” it was thoroughly “shoveled”, eliminating many of the shortcomings inherent in the “ten” chassis. The suspensions received new parts and characteristics of elastic elements, the steering was equipped with an electric booster, and the brakes became more efficient and lighter. Even the 16-valve engine, which at one time seemed like the ultimate dream and the height of perfection, received pistons with a shortened skirt and a new crank mechanism. We don’t need to tell anyone that the engine with index 21126 ended up being very peppy, but at the same time economical and environmentally friendly.
Moreover, Priora became the first VAZ model modified to meet EuroNCAP requirements and received airbags and belt pretensioners as factory equipment! Also, for the first time, VAZ used partial multiplex wiring - the so-called CAN bus. No matter what evil tongues may say, the VAZ team managed to quite successfully modernize their problem child of the tenth model, bringing it closer in terms of technology to modern developments of that time. After all, Priora, from the point of view of progressiveness of design, was in no way inferior to, for example, the same Logan and at the same time noticeably superior to Nexia and Lanos.
Priora was even supplied to Germany
Priora's optics were also designed at a fundamentally different level. Modern, beautiful, efficient head optics are exactly what the “blind” Samara-2 and cars of the tenth family lacked.
The first production cars had 2110 wheels
And the equipment could be unprecedentedly luxurious by the standards of former VAZs. Full power accessories, heated seats, air conditioning, electric power steering and even ABS - Priora was originally conceived as a competitor to foreign-made cars, not only in terms of price, but also in terms of comfort! At the same time, the equipment was not just nominally present in its place, but also functioned quite normally.
The silhouette of the Priora turned out to be quite dynamic: it is practically devoid of “tens” heaviness
Long-lived
A prototype of the future Priora was ready in 2003. However, the VAZ-2170 installation series was released only in 2006. From the beginning of 2007, the number of Priors produced began to be measured in the hundreds, and by the end of the year the plant reached a volume of 6,000 cars per month. Already at the beginning of 2009, the Priora completely replaced the “ten” on the assembly line, becoming at that time the most powerful and well-equipped VAZ car. A nice-looking car with a fairly dynamic engine and quite well-stuffed with options, it quickly found its buyer and is still in production, becoming a real long-liver by the standards of the modern automobile industry.
Did you like the article? Subscribe to the channel to stay up to date with the most interesting materials
You can make payment in one of the ways convenient for you:
- To a SberBank or Alfa-Bank card. The most profitable method for the buyer, as well as the most convenient one, is to use the Sberbank Online service, Alfa-Click, an ATM, or through an operator at the bank. After placing your order, the manager will send you the card details. If you do not have a SberBank or Alfa-Bank card, you can also top up your card using the details at any SberBank or Alfa-Bank branch. Payment is credited within an hour.
- Yandex money. Customers who have Yandex.Wallet can quickly and easily pay for an order in our online store, the commission will be 0%.
- Yandex.Checkout is an online payment acceptance service. A convenient option with a large selection of payment methods for your order: plastic cards of any banks, including credit cards, in cash through terminals, ATMs or phone shops, Qiwi Wallet, Yandex.Money, WebMoney, from your phone balance, purchase on credit (payment in installments) . Please carefully check which email address you provided during the ordering process, as you will receive a receipt for payment for your order. Yandex.Checkout commission for transfer will range from 3% to 6% .
- QIWI wallet. If it is more convenient for the client to use a QIWI wallet or, if it is not available, to pay through the nearest QIWI terminal, the manager will provide you with the wallet number. Commission 0%.
- Payment at any bank using an invoice or receipt (+3% to the cost). If you do not use electronic wallets and plastic cards, we provide the opportunity to make payments at any bank in Russia. The site manager will send you a pre-filled receipt “Form No. PD-4” by e-mail; please carefully check the e-mail address you provide. The bank commission will be approximately 3% and depends on the bank itself
- Cash on delivery upon delivery by the Transport Company (payment for purchase upon receipt of the order).
- Cash on delivery upon delivery by Russian Post (payment for purchase upon receipt of the order). The order arrives at the post office, after which you pay its cost and pick it up, in which case the Russian Post charges a commission.
What will you need to tune a VAZ tunnel?
- Another tunnel with a VAZ2110 or VAZ2112.
- Fiberglass.
- Epoxy resin (this photo report used 5 small packages).
- Putty for plastic.
- Drill or grinder with a grinding attachment.
In the process of finalizing the tunnel, you will often have to remove/install it, so for convenience it is recommended to discard the right seat. At the beginning of the fitting, we figure out how the upper part will stand (the distance, the angle of inclination can be made at any angle, the main thing is that there are no difficulties with shifting gears), and we saw it off.
The upper part of the tunnel must be fixed; duralumin plates and screws are suitable for this. If nothing interferes, we remove the structure and make the back wall from fiberglass with epoxy. There will be no extra thickness, especially when smoothing, but it is not necessary to increase the thickness from the outside. After drying, it is better to try it on again in place, because the angle may change.
Then we remove the clamps and make the walls completely, but without transitions to the torpedo. We customize it according to location. We cover the transition areas with masking tape, place our blank, and make the transitions. If the air temperature is below zero (for example, -5C), then you need to take into account that the material will take a long time to dry (maybe up to 3 days).
We remove the dried workpiece, remove the tape, increase the thickness as necessary, level it with fiberglass, and putty the tunnel. After drying, remove all bulges with sandpaper.
The high tunnel for the VAZ is now ready, all that remains is to properly decorate it. You can use: painting, film, or reupholstery. In our case, it was painted in a dark matte color (the picture shows a temporary option for now).
Replacing seats in Lada 2110
You can do the seat trim yourself, or order it from the car manufacturer. If you decide to modify the seats yourself, you can choose one of the following options:
- Install new jerseys and covers. New elements will only visually change the interior, but will not affect the comfort of the driver and passengers.
- You can do the cladding yourself, which may not be possible for everyone. After removing the old material, it is advisable to replace the old worn-out foam rubber.
- Install seats from another car. But finding ones suitable for the VAZ 2110 is quite difficult.
Tunnel for VAZ 2110,2112 a la Priora
Greetings to all!