A car generator is an important element of the electrical system. With its help, mechanical energy is converted into electrical energy. This energy occurs when the engine rotates. The unit serves to supply electricity to all electronic components of the vehicle. The device is also needed to recharge the battery.
They replace this part when it is not possible or makes no sense to repair it. Often, replacing a car generator is required for vehicles with significant mileage. Experienced motorists often decide to replace the generator themselves. However, this operation is quite a difficult undertaking. Let's figure out what the algorithm of the procedure is.
How to independently replace an old faulty generator with a new one
During the operation of a car, problems associated with a malfunction of the generator often arise.
If any occur, the driver will have to make repairs. First of all, you need to determine the cause of the generator failure. If repairs cannot be performed, you will have to buy a new one and replace it.
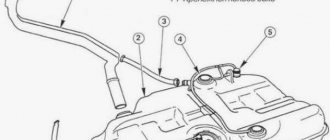
Removing the generator. The replacement process, especially on older cars, is quite difficult. You should prepare in advance a set of tools that will be required for this. There are three main ways to remove the generator: pulling it up, pulling it towards you, lowering it, sliding it under the engine, or pulling it out through the wheel arch. Depending on which part of the car we are talking about, you can choose one of these methods.
Experienced drivers can easily remove the element on their own, but beginners will have to contact a car service center so that the center’s employees can help carry out the repair.
The order of actions. In order to avoid any unpleasant and negative consequences, you need to follow a certain procedure, which is important, otherwise it will simply be impossible to achieve the desired result.
So, first of all, you need to disconnect from the engine all elements that may interfere with the removal of the generator itself. Then you need to remove the drive belt from the pulley. As soon as these actions are carried out, it is worth unscrewing the generator mounts. Only by following this sequence of actions can you remove the broken element.
After repair work, it will need to be installed back. If it is impossible to repair the generator, then you need to purchase a new one and install it in the sequence described above.
The thermostat, battery, and various kinds of wires and pipes can become obstacles to successful removal. If there are no markings on the wires, then there may be problems during its connection.
The new generator will allow drivers to continue operating the car without any problems without any serious problems or troubles. Drivers should be more attentive and monitor the technical condition of the car. A faulty generator will not allow the car to be actively used, so drivers will have to carry out repairs.
Conclusion. It is possible to prevent the need to replace a generator with timely prevention and care. But if it was not possible to avoid a breakdown, then it is best to complete all the work in a timely manner.
Source
If you need to change
In most cases, if problems arise, this unit will have to be either repaired or replaced. When replacing, be sure to choose the right new unit - it must be compatible with the existing machine. The choice of an analogue should be made with the participation of a specialist.
The same instructions that can be found, for example, on specialized websites on the Internet will tell you how to change the generator There are differences depending on the car model, so there cannot be a universal list of works. Typical operations to change a car's alternator would be:
- Disconnecting the generator from the battery.
- Removing the drive belt leading to the auxiliary units. You can immediately change the belt, which does not have a very long service life.
- Removing the generator itself. It is typically bolted on and the entire process can be accomplished using a standard set of tools.
Installation is carried out in reverse order.
All this takes a little time, but, in addition to changing the generator , it is advisable to check the condition of the adjacent units - at least visually. This will help you see a number of problems in the initial stages.
You can replace or buy a generator at any car service center. This is a typical procedure, the cost of which can be found out in advance.
The generator is traditionally used in all cars with internal combustion engines, and serves to convert the mechanical energy of engine rotation into electricity. The device is an electrical equipment with a complex design, and its failure leads to battery discharge and even engine failure. To ensure a long service life of the product, it is necessary to follow the rules of its operation, as well as promptly identify and repair any breakdowns that occur.
How to remove the generator
Sometimes it happens that a car generator completely fails and cannot be repaired. This happens in two cases, after a serious accident, when the generator housing is broken or when the housing falls apart due to age. In such cases, repairing the generator is impractical and it is easier to replace it with a new one. It also happens that after installing a powerful sound system on a car, the owner begins to notice that the standard generator does not have time to charge the battery. In this case, the generator is replaced with a more powerful one.
Often, old cars have simple and reliable generators that work for decades without replacement. When removing such units, it is often necessary to cut off the fastening elements, as they literally “stick.”
Replacing a generator, especially on older cars, is a rather complicated and problematic procedure. You need to stock up on a set of tools in advance that will help you remove the generator from the car yourself. On some foreign cars, the generator can be removed from above, while on others you have to work through the wheel arch or even from below. First you need to decide how it will be easier to remove the generator on a particular car. In order to prevent fasteners from breaking, all fasteners must be treated with WD-40 liquid. To simplify the process of removing the generator, it is advisable to carry out work on a pit or a lift.
Preparation for repair
As a rule, the need to check the generator appears before repairing it - when the corresponding symptoms appear. Signs that it is not working or its performance has deteriorated significantly are clearly noticeable and understandable even to a non-specialist. How to change and how to check the generator can be read in the relevant literature or look for tips on the Internet, but without experience it is better to entrust this to professionals. These are inexpensive services that will obviously be comprehensive, but will take relatively little time. Please note that these procedures require special equipment and standard tools.
The procedure for removing the generator with your own hands
When removing the generator, you need to follow this sequence:
- All units that block access to the generator are removed from the engine;
- Remove the drive belt from the generator pulley;
- The generator mounts are unscrewed;
- The generator is removed.
The thermostat, battery, and various wires and pipes may interfere with removal. If you do not mark the wires during removal, problems may arise when connecting the generator (if you have a diagram for installing and connecting the generator, you don’t have to mark the wires).
To remove the generator belt, you need to loosen the generator mount and change the position of the tension roller. After this, you can easily remove the belt. Before you begin the procedure of unscrewing the bolts that hold the generator in place, you should spray the fasteners with Vedashka. If everything is done correctly, the generator can be easily removed from the engine compartment.
How to install headlights on a walk-behind tractor
Headlights are installed on large walk-behind tractors. The generator power is sufficient for installation of equipment and operation of devices. To install headlights, you can purchase a lighting device at an auto parts store or make one yourself.
To do this you need to buy an element for the headlights. If the house has a moped or a car that has spare headlights, then they can be used for installation on a motor cultivator. Then you need to prepare the wire and switch.
First of all, you need to install the switch. Then install the headlight on the steering column or on the front of the engine and install the wiring. If the unit has holes for connecting a headlight, then it must be connected to it. Then the cord is connected to the switch, and from it leads to the headlight. After this, the wiring is connected to the steering column using insulating tape and a prepared clamp.
Will you be able to install (change) a walk-behind tractor generator yourself, or would you prefer to seek help from professionals?
Detailed instructions on how to remove a generator with your own hands using the example of a VAZ 2107 generator
The step-by-step diagram for removing the VAZ 2107 generator looks like this:
- Before starting work, you need to completely de-energize the car; to do this, you just need to remove the negative terminal from the battery;
- The engine protection on the right side and the mudguard are removed;
- You need to disconnect all the wires from the generator, while remembering their location (if you have an installation diagram, you don’t have to remember);
- Now you need to disconnect the generator from the engine housing (this will definitely be difficult);
- We get the generator. If it does not unscrew, fill the fastenings with a wedge and knock out the bolt with a hammer (you don’t need to hit it too hard, otherwise you can tear out the fastenings).
If the bolt does not want to come out, the generator will have to be removed along with its fasteners. To remove the fasteners, you need to unscrew two bolts. Sometimes you come across three-bolt fasteners.
Often, to remove the generator assembly with mountings, you have to remove the cooling radiator. Just don’t take it out and dismantle all the radiator pipes; just move it to the side to gain access to the brackets. Having removed all obstacles, you can easily get the generator with fastenings.
Sometimes the removal and installation of a generator follows a simpler scheme; this happens when replacing a relatively new generator with a more powerful one or when the car is still new. In this case, some specialists manage to pull it out through the right wheel arch. The removal procedure is no different from the above, only you will not need to remove the radiator. To remove the generator through the wheel arch, you need to turn the steering wheel all the way. Before removing the generator, be sure to remove the drive belt from the pulley.
General design of the device
Automobile generators are produced in compact and traditional forms, differing in size, housing design, fan layout, drive pulley and rectifier assembly. Moreover, all devices have the following common components:
- Frame. Serves to accommodate most of the structural elements of the device. It consists of a front and back cover connected to each other by bolts, which are made of a non-magnetic alloy that easily gives off heat. Ventilation windows are made on the surface and mounting paws are provided.
- Rotor. Designed to create a rotating magnetic field. For this purpose, an excitation winding is mounted on its shaft, which is placed in two pole halves. At the end of the shaft there are two slip rings for powering the field winding. Most rotors have a fan impeller and a drive pulley on the shaft. The shaft itself rotates on a pair of ball or roller maintenance-free bearings.
- Stator. Designed to generate alternating current, and structurally includes a metal core with windings. The core is made of steel plates, in which 36 grooves are made for the windings. The 3 windings placed in them form a three-phase voltage.
- Brush unit. Transfers excitation current to slip rings. It consists of two brushes made of graphite, which press springs, and a brush holder. On new types of generators, the brush assembly and voltage regulator are mounted in a single non-separable housing.
- Rectifier. Converts the alternating voltage generated by the generator into direct current of the on-board network. Structurally, it is made on heat sink plates with mounted power diodes.
- Voltage regulator. Maintains the generator voltage within specified limits, stabilizes it at different engine speeds, and also changes the battery charging voltage based on the air temperature (the lower the temperature, the higher the voltage).
- Generator drive. It is made in the form of a pulley, connected to the crankshaft by a V-belt or poly V-belt and rotates 2-3 times faster than the engine crankshaft.
Installation of a new generator
The new generator should be installed in accordance with the installation diagram. First, the generator is installed in its place, then the mounting bolts are tightened. Then the generator belt is put on, which will need to be adjusted later, and all the chips and wires are connected. There is no need to put on the protection yet; you will still need to adjust the belt. When carrying out the adjustment procedure, you must tension the belt strictly according to the installation instructions.
When installing, you need to pay attention to the condition of the rollers, tension bar and bottom bolt. It is better to replace them immediately if they have play (rollers) and damaged threads (bolts). It should be remembered that the rollers must be installed without distortions.
Features of adjusting the alternator belt
For stable operation of the generator, the drive belt must be tensioned in accordance with the manual. Weak tension will lead to belt slipping, and the battery will not be fully charged, which will lead to its failure. With increased energy consumption, the battery may run out even during a short stop.
The procedure for adjusting belt tension takes no more than 15 minutes (if you have experience). You should not give money to a service station; this procedure is done with a pair of wrenches.
- You need to slightly loosen the locknut on the tension bar. If this is not done, you will not be able to turn the adjusting bolt. If the washer reservoir is in the way, you can dismantle it, but this is not a prerequisite;
- By rotating the tensioner bolt, you should achieve the optimal tension moment for the alternator V-belt;
- At the end of the procedure, all you have to do is firmly tighten the locknut on the tension bar;
- All that remains is to check the belt tension.
The inspection procedure must be carried out without fail to ensure that the belt tension has been carried out correctly. You need to turn on the ignition and inspect the dashboard, where the battery charging light should light up. After this, you need to start the engine and let the car idle. If the battery charge light goes out after a few seconds, the belt is tensioned correctly. If the light comes on and goes off periodically, then you should tighten the belt more.
Even a novice car enthusiast can adjust the belt. The main thing is to strictly follow the instructions and diagnose the belt tension.
Replacement of the generator can be avoided if preventive maintenance of this unit is carried out in a timely manner. You should not remember about the generator when it completely stops doing its job, otherwise even a new battery can be damaged.
Source
Functionality check
Before removing the generator from the Ford Focus 2 for replacement or repair, you should first verify that it is faulty. The verification technology is very simple and fast.
Before diagnosing performance, it is necessary to loosen the positive terminal on the battery.
And then we do this:
- start the engine;
- wait until the speed stabilizes;
- turn on the headlights;
- With the engine running, remove the positive terminal from the battery.
If the generator is working properly, the power plant should not stop; on the contrary, its speed should increase slightly, since the ECU will adjust the operation of the motor to provide the on-board network with energy.
Stopping the unit after removing the terminal will indicate a malfunction of the generator and the need for its repair or replacement. And to do this, the unit needs to be removed from the car, which turns out to be not so easy.
You can use the official instructions, which are presented below, but it does not reflect all the subtleties and nuances of the work, and therefore is more suitable for familiarization than as a detailed guide that everyone can understand.
Replacing the generator step by step
Briefly, the spare part replacement scheme looks like this:
- Attachments are removed to provide access to the part;
- the drive belt and rollers are disconnected;
- the generator is removed from the car and a new spare part is placed in its place;
- the replaced part is connected and its operation is checked.
You can purchase the unit yourself or entrust the selection of the device to professionals. Auto centers cooperate with many manufacturers. Therefore, when ordering a replacement car generator, you may be offered a new part at a fairly competitive price. In this case, deliveries are made directly without intermediaries. Therefore, the purchase will be more profitable than purchasing a spare part in a retail store.
Manufacturers of automobile generators
Foreign and domestic cars are equipped with generators of both our own production and third-party manufacturers. Replacing a product with a similar one from a different manufacturer is possible with compatible mounting, power, similar parameters of the generated current, dimensions and belt drive pulley. Most often, generators from the following companies are installed on cars:
- Bosch. Installed on most European car brands. It is characterized by simplicity of the device and reliability.
- Cargo. Danish company specializing in the production of starters and generators. It supplies products to many automakers, the price of the products is slightly cheaper than the original.
- Delco Remy. An American manufacturer present on the automotive components market for more than a hundred years. The products are of impeccable quality and durability, possessing all the necessary international certificates.
- Lucas. Large British manufacturer of original quality car parts.
- Magneton. Czech manufacturer specializing in the production of starters and automobile alternators. The products are characterized by an optimal price-quality ratio.
- Valeo. A French concern formed as a result of the merger of several companies producing generators and other components for cars. The product is structurally and operationally similar to Bosch.
Algorithm for replacing the unit step by step
Now we will give in more detail the process of replacing a part in a car service. Step-by-step algorithm:
- part diagnostics. Produced using a professional stand. To do this, the spare part must be disassembled into its component parts;
- elements of the device are cleaned and inspected in detail. Thanks to this, repair work will be most effective;
- then each component of the generator is diagnosed separately, and all existing faults are identified through testing;
- The cost of repair work or replacement of the device is approved. After carrying out the diagnostics, the service center workers give the customer a completed conclusion. Based on the document, the cost of the unit maintenance service will be determined. The total amount is agreed upon with the car owner;
- carrying out repair work. In this case, all damaged components of the device must be replaced. Any breakdown detected during diagnostics will be eliminated. Elements that have expired must be replaced;
- the node is assembled and tested. The manipulation is carried out using a stand. This is how you can make sure that the mechanism works as expected, without failures.
Node malfunctions
Symptoms of a malfunction are:
- Increased noise from under the hood (squealing, squeaking);
- No battery recharging;
- Lack of electricity when using the car’s electrical equipment (the headlights shine dimly, and when they are turned on, the warning lights on the dashboard dim).
At the same time, despite the fact that the generator is connected to the self-diagnosis system, a fault signal is not always displayed on the on-board computer. In this case, the breakdown can be identified experimentally.
Features of the generator replacement process
Why does the generator fail? The device consists of several moving components. Over time, parts wear out, which leads to malfunctions of the mechanism. If the worn-out elements are not replaced, the device stops working. What could indicate a breakdown?
The first warning sign for a motorist is that the battery is undercharged. If you installed a completely new battery, and the engine does not start after a day's rest, then this is the first sign of a malfunction of the unit. When the failure is on a larger scale, the low voltage logo appears in the circuit. Due to this problem, malfunctions may also occur in the operation of other car systems.
Cleaning contacts
Even modern generators and starters, designed for start-stop systems, are designed quite simply and have no fundamental differences from their ancestors. However, before taking tired components for repairs, it is important to make sure that the car’s electrical system is generally in good working order and that our heroes are not being terrorized by other enemies. Otherwise, you will soon have to pay decent money again for repairs or restoration.
The death of a generator is very often associated with a substandard battery, which significantly increases the load on the unit. For this reason, the diode bridge and stator winding in the generator often burn out, and on some BMW models, even the stator itself. After such a disaster, the generator can be safely thrown into the trash.
Also, the life of the generator drops noticeably if it ends up in an area of oil or antifreeze leakage. When the generator operates, the brushes naturally wear out and produce dust. And because of the oil that gets onto the generator, moistened dust particles return to the contact zone of the brushes and commutator - and, as they say, active abrasive wear occurs out of the blue.
In half of the cases, repairmen receive burnt starters, tortured by the car owners themselves. They turn the starter for too long (especially in winter) and overheat it in an attempt to start the engine, which may not start for a long time for a number of reasons.
Types of repair work
When the device is replaced, check the condition of the belts and rollers. These parts are classified as consumables and therefore must be replaced from time to time. Various components of the unit may fail. Let's name what repair work in this area is carried out most often:
- replacing the overrunning clutch. The part is not repaired, it is replaced with a new spare part;
- replacing an external or built-in relay;
- changing the device belt;
- replacing brushes.
Each of these parts must be in full working order. The successful functioning of the entire system as a whole depends on this. If even one element fails, this entails a malfunction of all other parts. It is important to promptly check the condition of each device component. This guarantees long service life of the unit in the future.
Source
Signs and causes of generator malfunction
Malfunctions of a car generator are conventionally divided into electrical and mechanical. Electric ones include:
- Wear and failure of brushes.
- Poor contact or broken electrical circuits.
- Short circuit of the rotor windings.
- Damage to the voltage regulator or diode bridge.
Mechanical failures usually occur when the bearings wear out, which causes radial runout of the rotor, which will touch the stator winding and cause a short circuit. A generator malfunction can be judged by the following signs:
- While the engine is running, the battery discharge lamp lights up or flashes.
- Battery overcharging or regular discharge.
- Dim operation of headlights and electrical appliances while the engine is running.
- The intensity of the headlights varies depending on the engine speed.
- Extraneous sounds are heard from the generator during operation.