Main process
Using a screwdriver, remove the windshield blower nozzles.
Then the upper fastener, consisting of three clamps and bolts holding the instrument panel, is removed. The next step will be dismantling the amplifier. After a visual inspection of the bottom of the console, remove the corresponding screws that are located at the bottom of the panel. Next, the wiring of the instrument assembly is dismantled by unscrewing the pads and clamps. The wiring system associated with the ignition switch is also inspected and removed. Together with it, the ground fastening, the power supply structure of airbags and other components with an electrical connection are disassembled. The final step is to dismantle the Priora dashboard itself with the center console. The part in question is a rather weighty part; it is advisable to have an assistant to remove it from the cabin. At this stage, the operation to remove the center console can be considered completed and further planned work can begin.
Features of dismantling
How to remove the console on a Lada Priora yourself
The process will not take much time, it is quite simple, you will not need special tools, just a cross-shaped twist. But before you find out how to remove the console on a Priora, learn about some of the features of the procedure.
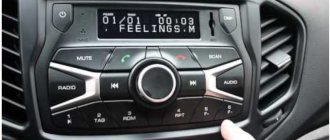
Disassembly always begins with removing the radio and disconnecting the wires. To remove it, press the special buttons on the sides of the device; you should hear a characteristic click. Pull the radio towards you, disconnect the wires.
Now you need to remove the compartment in which the radio is located, after which the car owner will see two self-tapping screws, they must be unscrewed during the process of dismantling the console.
How it's done
The disassembly procedure itself is not so complicated as it is troublesome. Indeed, you will have to spend a lot of time to get to the last bolt on the panel. Let's look at step-by-step instructions on how to properly disassemble the console on a Lada Priora:
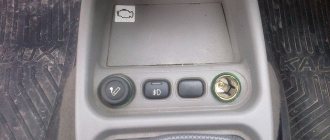
Tighten the fasteners of the air deflector, and then remove it from the console. Next, you will need to unscrew the left heating nozzle, which is secured with 2 screws. Repeat the procedure for the right side. Next in line will be the rear window defogger activation button. To remove it, you just need to pry it with a minus screwdriver and pull it out. The button must be disabled immediately. After this, the ashtray is removed. The glove compartment lid is secured to the panel using special pins that must be removed from the gaps. The console cover is secured with 4 fasteners. They need to be twisted, after which the cover can be easily picked up with a screwdriver with a minus blade and removed. If your vehicle has a radio, it should be disconnected from the cable harness. The radio is dismantled by unscrewing two fasteners located on the sides of the slot. Next, you can remove the lining itself, which is fixed on special springs. The alarm button is removed, then it must also be turned off. Since you have already moved on to the harness, it would be a good idea to immediately turn off the clock, the heating button and the heating system control unit. Now all the above elements should be removed
The clock is simply carefully squeezed out of the panel, and the control unit is fixed with 4 screws. Let's move on to the nozzle of the ventilation system. It is held in place by eight latches that must be opened sequentially
First we remove the top ones, and then the bottom ones. Now it's the turn of the fuse box. It is held on by a single screw, so it won't take much time. It's time to turn off the glove compartment light, just pull out the block. Then twist and remove the switch. Let's move on to the glove box lighting. It is hooked and carefully removed. The lighting fixture is mounted on clips that need to be opened. The air ducts on the Lada Priora are secured with two screws. We unscrew and put them away, the order does not matter. Now let's move on to the air flow distributor gear motor. Unscrew the 2 screws and set the device aside. We proceed in the same way with the air duct for heating the feet and the distributor itself.
That's all, actually. Now the panel of your Lada Priora has been dismantled, and you can perform any manipulations. If any points remain unclear, we suggest watching the video instructions on our website. Assembly is carried out in reverse order.
How to remove the instrument panel, tuning, modifications
Interior climate system of Lada-Priors (VAZ-2170)
Removing the instrument panel on VAZ 2110, 2111 and 2112 cars is not an easy task. But at the same time, it is possible to carry out this repair yourself, if you have the necessary tools at hand, as well as clear instructions.
Regarding the action plan, there are not many detailed guides on the Internet for removing and installing the instrument panel, and all this is due to the fact that the procedure has a number of difficulties and subtleties that not everyone can remember when writing such an article.
However, I will try to make material that will at least 90% help give the overall picture and the main points that should be taken into account when removing the panel on a VAZ 2110-2112. To perform the repair you will need the following tool:
- Phillips screwdriver, both short and long
- 10 mm head, preferably deep
- Ratchet handle or crank
- Wire cutters or sharp knife
- Flashlight if necessary
Removing and installing the instrument panel on VAZ 2110, 2111 and 2112
Before you begin this repair, you must do the following:
After this, you can proceed to further actions. We immediately remove and remove all the elements of the panel, such as: the standard clock, the heater control unit, the display unit, as well as the central deflector, and do not forget about the buttons with the radio. As a result, we get approximately the following picture:
Next, using a screwdriver, pry up and remove the plugs at the upper corners of the instrument panel mounting. In reality it looks like this.
On the other side, we do the same, after which, using a socket and an extension, we unscrew the nuts securing the instrument panel in the upper part.
Now let's move on to the remaining attachment points. At the bottom, in the left and right parts of the panel - in the corners, there is also one screw that needs to be unscrewed. The first one is shown below.
The second one is located on the right side of the panel in the same place - at the bottom in the corner. Also, immediately unscrew the self-tapping screw that secures the diagnostic block:
Now we move on to the side fastening points of the frame, which are located in the center on each side - the photo below shows the left side:
On the right everything will be the same. Next we move on to the internal frame fastenings, which are located in the following places. The first one is under the fuse mounting block, to get there we open the cover and look inside the panel:
The second one on the right is visible when the glove compartment lid is open:
Of course, the mounting block will also have to be removed so that it remains intact with the sub-panel wiring.
- We thread it inside with the instrument panel pulled back; you will also have to cut off some of the wiring fastening clamps, for example, in this place, which is shown in the photo:
- Now we are trying to remove the VAZ 2110 panel, moving it to the side on both sides, evenly, without much effort or sudden movements.
In the photo above you can see that the headlight hydraulic corrector tubes were cut off, since in my case they were simply not needed. If you need to save them, do everything carefully and remove them by pulling the control unit out of the instrument panel. Next, we finally remove the panel, of course, after first disconnecting all the wires that will interfere with this.
Installation occurs in the reverse order, connecting all wires and connectors to their places, blocks and switches, as well as other elements that were removed as a result of this procedure.
Installation of Europanel instead of the usual one on VAZ 2110, 2111 and 2112
Many owners who have owned a VAZ 2110 for a long time would like to change the boring panel to a more modern one. In this case, you can install a new type of panel from cars manufactured after 2006, or from the “Bogdan” versions, which are analogues of the tenth family, except that they were assembled in Ukraine.
With such alterations, basically you won’t have to change anything, but it’s worth considering that in this case you need to buy a complete Europanel:
- instrument panel frame assembly with trim
- instrument panel (combination)
- buttons and switches
- heater deflectors
- New heater control unit
- sub-panel wiring
- steering wheel, cover and switches
Only in this case everything becomes without any problems with minimal labor costs.
Connecting a new
Installation of a new audio device is carried out in the standard mounting hole. When using alternative equipment that has a different configuration of the front part, transition frames are used to allow the unit to harmoniously fit into the interior of the car. For switching, adapters are used to ensure compatibility between the wiring harness on the car and the connector on the player body.
On Priora 2 cars, the standard configuration did not include a standard radio; in its place there was a trapezoidal pocket that could accommodate a 1 din head unit. But additional sealing of the resulting cracks or the manufacture of a decorative frame is required.
Many owners place the radio in place of the plug located below the standard mounting socket. Algorithm of actions:
- Remove the rubber mat in the niche located below the climate control controls. Remove 2 screws.
- Pry up and remove the decorative cover of the gear shift knob, under which there are 3 more screws.
- Remove the lower part of the console, providing access to the lower mounting points of the front cover of the instrument panel console.
- Remove the plastic cover above the control buttons, under which there are 2 more screws.
- Remove the decorative frame.
- Remove the cover and modify the seat to a size sufficient to install the guide shaft.
- Install and secure the shaft in the console, and then insert the radio into it.
After installing the shaft, it is necessary to mount all the removed parts in the reverse order. The same scheme is used to replace the original radio on Priora 2 cars.
Removal and installation of the instrument panel Lada Priora, VAZ 2170, VAZ 2171, VAZ 2172
How to remove a torpedo on a grant video
Useful tips When installing the instrument panel, you may need clamps to secure the wiring harnesses, since in some cases it is easier to cut them when dismantling the panel. Depending on the vehicle configuration, a different number of pads with wires may be used. Therefore, when separating the pads, mark them relative to each other. This will make the job easier when installing the instrument panel. Mark the free pads separately.
You will need: 8" and 10" socket wrenches, flat and Phillips blade screwdrivers.
1. Disconnect the wire from the negative terminal of the battery. 2. Remove the steering wheel (see “Removing and installing the steering wheel”). 3. Remove the steering column trim (see “Removing and installing steering column trim covers”). 4. Remove the VAZ 2172 steering column switches (see “Checking and replacing steering column switches”). 5. Remove the floor tunnel linings (see “Removing and installing the floor tunnel linings”). 6. Remove the lada priora instrument cluster (see “Removing and installing the instrument cluster”).
7. Remove the right and left screws securing the center console of the Lada Priora instrument panel.
8. Using a screwdriver...
9. ...remove the side window heating nozzles on the right and left.
10. Using a 10mm socket wrench, unscrew the two nuts of the upper fastening of the Lada Priora instrument panel on the left and right.
11. Turn the three latches and remove the fuse and relay box cover.
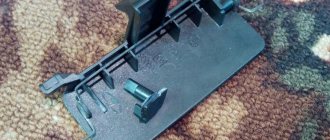
12. Remove the four screws securing the instrument panel amplifier of the Lada Priora...
13. ...and remove the amplifier.
14. Turn inside out from the bottom left...
15. ...and on the bottom right there are two screws securing the Lada Priora instrument panel.
16. Remove the screw securing the instrument panel to the left of the steering column...
17. ...and the fastening screw located on the right under the instrument panel.
18. Using a size 8 wrench, remove the bolt securing the ground wires of the instrument panel to the body bracket.
19. Move the clamps of the VAZ 2171 instrument panel wiring harness blocks to the right...
20. ...and disconnect the three harness pads from the pads installed on the bracket.
21. Disconnect the wiring harness block of the Lada Priora ignition switch (lock).
22. Disconnect the wiring harness connectors from the electric power steering.
23. Using a 10mm wrench, unscrew the nut securing the ground wire of the instrument panel harness from the bracket for the electronic units.
24. Slide the pad lock...
25. ...and disconnect the instrument panel harness from the ignition system harness.
26. Disconnect the instrument panel harness connector from the electrical accessories control unit.
27. Slide the lock...
28. ...and disconnect the instrument panel harness connector from the airbag control unit.
29. Remove the instrument panel and remove it from the interior of the Lada Priora.
Note Since the instrument panel is quite bulky and heavy, this operation should be performed with an assistant.
30. Install the VAZ 2170 instrument panel in the reverse order of removal.
Instrument panel of a Priora car, prices of analogues, instructions
› Characteristics of Priora and its spare parts
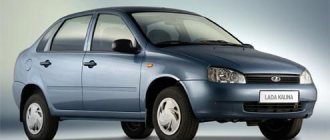
Priora has several panels, depending on the year of manufacture, plus non-standard ones made specifically for it. Everyone knows how important it is to know the instantaneous status of instruments and machine parameters.
The panel, also known as the control panel, on a Lada Priora car is, in fact, brief information about the condition of the car at the moment. It contains all the basic information, from movement speed to indicator readings on malfunctions of the main units and components of the machine.
When something in it doesn’t work, it’s immediately alarming, because it’s current information. A description of all the icons and their meaning can be found below in the article. Technology is gradually developing, so the dashboard is becoming more and more technologically advanced. But since the Lada Priora is a low budget car, the panel on it is of the same quality.
On the first devices, the backlight often does not light up, or is only half lit. Of course, this doesn’t look good on Priora.
The instrument panel on the Priora car changed with the restyling of the 2nd Lada car. And Lux cars come with navigation. In fact, its basic functionality remains the same - all basic information is visible. Here you can monitor the operation of the engine, monitoring the speed, and understand that it is time to take the car for maintenance when one of the lights comes on. The price of a first (1) and second (2) generation part starts from 6,000 rubles and above. Tidying saves you from speeding, helps you refuel on time and prevent the Priora from boiling.
Standard instrument panel - article number and price
The original car tidy exists in three types.
- the first is an option for a pre-restyling car;
- the second panel is for a restyled car;
- and the third is the “Lux” option for the restyled one, which has become faintly similar to all previous torpedoes.
Each of them contains standard elements such as a tachometer, so their functionality does not decrease. . Who wants to do tuning of the instrument panel, this option is for them.
Priora first generation
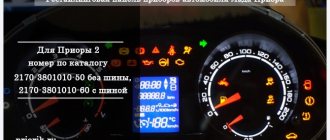
The instrument cluster for the first generation Lada Priora received catalog number 2170-3801010. Cost – about 6,000 rubles. Everything is standard with it - from left to right there are four arc scales with red arrows: odometer, speedometer, coolant temperature, fuel level. Below the speedometer there is a small on-board computer display, and above the arches are all the indicators, including the direction indicators.
Priora 2
For the Priora “Lux” variation there are two more “subtypes” - with or without a CAN bus. Different subtypes were made so that the panel could be connected to any car. Catalog number – 2170-3801010-50 without tire, 2170-3801010-60 with tire. It is distinctive in that it contains an elongated display with a screen that can highlight the navigator.
The catalog number of the combination for the “Norma” assembly is 21720-03801010-20. Cost – 6,500 rubles. Like the “Lux” version, it received a brighter speedometer and odometer, and the coolant temperature along with the fuel level indicator is hidden at the bottom of the speedometer and odometer. The base will not create a route on the display, but will show all the information in color.
How to remove the instrument panel on a Priora
In order to remove the dashboard of a Priora car, follow the following instructions:
- Disconnect the negative terminal from the battery.
- Using a Phillips screwdriver, remove the four screws securing the plastic trim. Pull it towards you.
- Further under the cladding on the top on the sides there are two more self-tapping screws. Unscrew them, then pull the combination towards you.
- Unclip the wire clamp and disconnect them. Remove the instrument cluster.
Manufacturers and prices of analogues
Analogue options are presented by the following manufacturers:
- Flash x4/2/x-104 – 9,000-11,000 rubles (similar to the “Lux” version);
- Gamma GF822/GF819/GF818/GF821/GF822s – from 25 to 30 thousand rubles; GF619 – 14,000 rubles;
- VGO k310 – 6,500 rubles.
Icons on the factory dashboard
All indicators should light up like a Christmas tree for three seconds when the engine starts. If some icon remains, it means the system is signaling a breakdown. To make it easier to understand all the indicators, here is a schematic picture:
1,5,9,10 are already known scales that display the main parameters that can change. 19 – on-board computer display. Further:
- 2 – Icon indicating the operation of the braking system.
- 3 – Battery condition. If the light remains on, the battery is discharged or the charge level is too low.
- 4.7 – Doublers for direction indicators (“turn signals”).
- 6 – Oil level (indicates low level).
- 8 – Handbrake. Lights yellow when the lever is tightened.
- 11 – “Gasoline light bulb.” Lights up when there are only 10 liters left.
- 12 – Button for switching on-board computer modes.
- 13 – “Emergency”.
- 14 – Electric power steering (indicates a breakdown).
- 15 – High beam on.
- 16 – Side lights/low beam.
- 17 – Airbag condition (malfunction).
- 18 – Immobilizer (if you hear a beep and the icon itself blinks, the immobilizer is faulty).
- 20 – Seat belts not fastened.
- 21 – Unsatisfactory condition of the service brake system.
- 22 – Disabling the airbag.
- 23 – ABS malfunction.
- 24 – “Check”, “Check Engine” - engine failure.
Possible faults
Connecting a voltmeter to the on-board network
A digital voltmeter in a car must meet two main requirements:
- show the voltage on the battery as accurately as possible;
- turn off when the engine is not running so as not to discharge the battery while parked.
Accurate data on the voltage on the battery can be taken directly from its terminals. To do this, you need to connect the wire from the positive terminal to the installation location of the voltmeter. To prevent conductor resistance from causing a voltage drop across the device, the wire cross-section must be at least 0.5 mm.
The wire must have strong, good insulation so that a short circuit does not occur over time.
It is important that this way of connecting the wire bypasses the standard fuse box, so care should be taken to protect the circuit from overload. For safety, install a fuse between the battery and the wire going to the voltmeter
Otherwise, the wiring may even catch fire in the event of a short circuit.
It is best to lay the wire into the cabin to the place where the voltmeter is installed in the general wiring harness of the Priora. To do this, you will have to bring it into the cabin and stretch it under the dashboard.
It is ideal to dismantle the entire torpedo for this, but this is a complex and time-consuming job. The problem is solved by partial disassembly: removing the dashboard or center console. To do this, there is no need to disconnect the wiring harnesses; you just need to move the “tidy” a little to be able to pull the wire to the right place.
It is enough to connect the second wire of the voltmeter to ground where it is convenient. When connecting a voltmeter to the wires of the ignition switch, tape recorder or other wires located in the dashboard area, its readings will be lower due to the voltage drop across the contacts and connections.
In order for the voltmeter to turn off when the ignition is turned off, an electromagnetic relay must be inserted into the gap in the wire between it and the battery terminal. The relay winding should be powered from any wire on the ignition switch, on which voltage appears after turning the key.
If you have no experience or desire to tinker with laying the wire from the positive terminal of the battery to the car voltmeter
https://www.youtube.com/watch?v=YF1bygfROUw
The first step, of course, is to dismantle them. This is quite easy to do on a VAZ classic, but not so much on a Priora. In order to remove the watch, you need to remove the plastic decorative panel. Then remove two screws, and we will find a couple more under the ashtray.
But it doesn’t end there, there are still screws waiting for us, we will find them after we remove the radio. And only then can you remove the panel by gently pulling it towards you. Take a knife or flat screwdriver and press on a fairly tight latch.
Now we need to disassemble the watch, and this is easier than removing it. We see four latches on the sides; we snap them off. Now carefully remove the arrows. If desired, the arrows can be replaced, if, of course, there are other more elegant ones at hand. But you don’t have to do this, since we are annoyed by the shade of the arrows, and not by the elements themselves. Therefore, they can simply be repainted, but this must be done carefully and efficiently. To do this, we degrease the hands, and at the same time remove the annoying orange color with a solvent. Then everything is simple: as paint, you can use ordinary office putty, or, as it is also called, a touch, because buying a can of white enamel for two arrows is not constructive. In addition, moisture will not get inside the watch anyway, so the touch will fit perfectly - it gives an even white color and dries instantly.
Voltmeter selection
Of the domestic automobile voltmeters on the market, you can only find devices from UAZ and VAZ 2107. Both of them are poorly suited for installation in a Priora. The first one has a rough appearance and is more suitable for installation on a tank than in the interior of a modern car. The second does not have an external housing, and its dimensions do not allow the device to be neatly placed on the Priora panel. Therefore, it is better to find special tuned devices or use a digital car voltmeter made in China, inserting it into a button or instead of the dial of a Priora watch. Such devices are distinguished by good accuracy, low price and attractive appearance of the digital panel.
How can I set up my radio to receive calls from my phone?
A special feature of the installation is the ability to communicate between the radio and the telephone. This function is available through the existing Bluetooth system. Connecting a mobile phone to the system is not difficult. The work takes about 10 minutes, and it is performed according to the following scheme:
1. Bluetooth is activated on the mobile device.
2. On the radio panel, press the button with the handset (left or right).
3. After the device name is displayed on the radio screen, you need to connect by pressing the confirmation button on the mobile phone itself and entering the code “0000”.
4. The PIN code is changed by pressing the Scan button on the radio, entering a new combination and confirming using button 8.
5. To make a call, enter the subscriber’s name on the numeric keypad, select his number and press the left button with the phone icon.
6. The right button with the image of a handset ends the conversation.
To receive a call when Bluetooth is activated, the driver must press the button on the radio panel with the handset lifted. The connection may take about 5 seconds, but there will be no problems with subsequent communication.
In the improved Lada Priora, the standard radio transmits sound from the phone to standard speakers. Speakerphone allows the driver to be minimally distracted from the driving process, not break the law by talking on a mobile phone while on the road, and at the same time conveniently answer important calls. This system is attractive and is present in most modern foreign cars.
The high-quality equipment of the model allows you to get maximum comfort when buying a domestic car. But the standard Priora 2 radio is installed only on the “Lux” modification.
In other configurations, the owner will have to carry out modifications independently. And instead of a standard audio system, if desired, you can install a more expensive, but also more functional device.
Source
How to remove a VAZ 2110 torpedo
In the interior of the VAZ 2110, the dashboard is the most noticeable part. Every driver wants to sit in a stylish and well-maintained interior. But the standard panel looks angular and gray. This is especially noticeable after long-term use, when abrasions, scratches and cracks appear on the panel.
Motorists solve this problem in different ways - some install another standard dashboard from a VAZ 2110, other drivers prefer to install a Europanel - this is the name of the trim from a third-party manufacturer. The trim allows you to transform the interior and turn the “ten” into a foreign car, at least on the inside. Whatever you choose, removing the panel is a must.
In this material we will tell you how to properly dismantle the standard panel and install the Euro version.
This is what a standard VAZ 2110 torpedo looks like
Alternative torpedo
The alternative dashboard is softer than the standard “tens” dashboard, but the main advantage is the absence of unpleasant grinding and squeaking. Motorists decide to get rid of the standard one precisely because of the squeaking. For the VAZ 2110 car there are several types of panels that differ in design.
Lada Priora Sedan › Logbook › Removing the center console of the Priora
I’ll just tell you this for those who don’t know.
To remove the center console you need a Phillips screwdriver.
1. Remove the cover "*** Open ***" and the ashtray below. 2. Take out the buttons (they come out from the front, just pry them off with a flat-head screwdriver)
3. Take out the “emergency lights” button (the same as those buttons)
4. We take out the radio along with its box.
5. 2 bolts in place of the radio (they will be at an angle towards you)
6. 2 bolts in the pocket where the cover was *** Open *** 7. 2 bolts in the ashtray 8. Now pull the console towards you, smoothly without jerking (resistance is possible)
9. The console will not come out completely, because... the clock and control unit for the stove are connected there. The clock connector is located between the air ducts
Now turn off the control unit of the stove.
Well, that's all, we have the console in our hands, congratulations!
By the way, I want to “hoard up” a little. To remove the watch, unfasten the latches on the console
, and to remove the used stove, unscrew 4 screws from the console.
Step-by-step instruction
1. Set the steering wheel to the lower position.
2. Next we need to remove the instrument panel trim. It is secured with four Phillips screws.
Unscrew the 2 screws on top.
In order to get to the lower mounting screws, you need to remove the plastic from the bottom of the steering wheel.
To remove, turn the three latches counterclockwise half a turn.
After turning the clamps from above, pry up the plastic with your hand and remove it.
3. Unscrew the 2 lower screws securing the instrument panel trim.
4. Using both hands, remove the cover. Let's start from the top.
Be careful not to break the latches.
5. Unscrew the 2 screws securing the dashboard using a Phillips screwdriver.
6. After unscrewing the screws, pull the dashboard slightly towards you.
7. Next you need to remove the connector that goes to the dashboard. The connector comes with a clever lock.
Press the latch in the indicated place below with a flat-head screwdriver.
After pressing, use a screwdriver to move the lock back. There is a boss on the latch that a screwdriver hooks onto and you can pull the latch back.
After the lock is removed, the connector can be easily removed from the instrument panel by hand.
8. We remove the instrument panel and perform the necessary operations, for example, replacing the panel backlight lamps.
9. We perform assembly in reverse order.
Video lesson
Source
Voltmeter instead of a Priora watch
The current time is displayed on the Priora dashboard, so there is no particular need for a separate clock.
To install a voltmeter instead of a clock you will need:
- digital voltmeter with LED scale of suitable size;
- hot glue;
- file;
- knife or jigsaw;
- a piece of plexiglass or CD case;
- a piece of tint film.
To install a voltmeter in the body of a standard clock, you need to dismantle it and remove the mechanism. After this, you need to install the voltmeter panel into the case, slightly filing its corners. It is better to secure the panel to the housing with hot glue.
There is a hole in the middle of the glass for the time adjustment knob, so you need to find a replacement for it. You can cut new glass from a CD case or from a piece of plexiglass. To hide the “filling” of the voltmeter, the glass should be tinted before installation, for example, with a piece of tinting film. In this case, only the luminous LED display of the voltmeter will be visible from the outside.
Next, all that remains is to solder the wires to the voltmeter terminals and insert the voltmeter instead of the Priora clock. Connecting the wires will be discussed below.
Why do you need a voltmeter in the Priora cabin?
Most modern car models do not have a voltmeter on the instrument panel. Manufacturers decided that information about the on-board network voltage is not needed by the driver. This indicator is monitored by the on-board computer, which signals problems in the event of an obvious malfunction of the charging system or the vehicle’s on-board network. At the same time, a voltmeter is one of the most popular additional devices installed by car owners. This is caused by the following circumstances:
- the device allows, if necessary, continuous voltage monitoring;
- analysis of voltmeter data allows you to determine the load on the generator and its operating efficiency.
What does the dashboard consist of?
The Priora instrument panel contains all the necessary parts that no modern car can do without:
- regulator of external lighting and internal panel lighting;
- switch for turning, side and headlights;
- signal regulator;
- car instrument cluster;
- windshield wiper and washer regulator.
This is how the dashboard works
In addition, the panel contains an ignition switch connected to the anti-theft system. It contains 3 positions. Among the secondary mechanisms, we can note the presence of regulators for the rear window heating system, alarm and interior cooling. It is also worth mentioning the glove compartment, built-in clock and radio input jack.
How to easily and quickly remove the dashboard on a VAZ 2110 with your own hands?
Without a doubt, the dashboard is the most noticeable interior detail in a car, because it is located right in front of the eyes of passengers and drivers. The need to remove the dashboard on a VAZ 2110 may arise for car owners for a variety of reasons.
So, by removing this part, you can get full access to all the electrical components of your vehicle, replace the burnt-out wiring with a new one, connect additional devices or lighting, install a Euro trim or sound insulation.
Options for replacing the standard VAZ 2110 panel:
Old-style panel trim for VAZ 2110 Panel trim for VAZ 2110 Euro-2 Panel trim for VAZ 2110 Euro-1 Panel trim for VAZ 2110 Euro-3 Panel chestnut trim for VAZ 2110 (instrument panel in the center) Panel chestnut trim for VAZ 2110 (instrument panel in the center) Trim panels VAZ 2110 Kashtan Panel trim VAZ 2110 Kashtan Panel trim VAZ 2110 Kashtan
If desired, you can cover the dashboard with various materials of your choice, thereby making the desired changes to the interior of the cabin.
Subtleties
I would like to say right away that removing and replacing a torpedo on a VAZ 2110 will require a lot of time and patience from you
In addition, all repair work must be carried out extremely carefully and carefully so as not to accidentally break the fastening, since the dashboard will not fit back as it should and will creak when driving
To work you will need the following tools:
- marker;
- self-adhesive labels;
- set of screwdrivers and wrenches.
Removal instructions
It is recommended to remove the VAZ 2110 torpedo in the following sequence:
- Interior details. Before starting work directly, it is necessary to prepare the interior, since disassembling the front panel of the VAZ 2110 is best done with room for maneuvers. Therefore, the first thing we do is remove the front seats and steering wheel of the car. It is advisable to carry out dismantling in exactly the same sequence as indicated above, since otherwise it will be extremely difficult to remove the driver’s seat. In order not to break anything, consider your strength when pulling the wheel out of the column splines; to do this, loosen the steering wheel nut a little, and then pull it towards you while loosening it from side to side;
- Transmission tunnel. After the salon is prepared and there is a place to work, we are faced with the next task - dismantling the floor tunnel in the salon. Simply unscrew the screws and push the top of the part being disassembled back. Then do the same with the bottom of the tunnel;
- Steering wheel and steering column. Unscrew the screws on the steering column casing of the VAZ 2110, and then remove the steering column switches. Mark all the wires and connectors released during disassembly with a marker or labels; this will later work to your advantage when, when assembling the torpedo, you end up with a large number of wires of different colors. It is recommended to use the marking especially for owners of cars that are already equipped with an audio system and alarm system;
- Glovebox. The next stage of work will be to dismantle the glove compartment, after which it is necessary to remove the relay and mounting block. Don’t forget to mark the wires as you work and take special care with the fragile speedometer and other dashboard elements that also require special treatment;
- Torpedo. And now we can move on to the immediate purpose of the repair - we have to remove the dashboard. To do this, it is necessary to unscrew the screws in the resulting void behind the glove compartment and unscrew the fastenings. After that, use a screwdriver to hook the air duct on the left side and remove it. Then all that remains is to unscrew the nut, holding the torpedo with your hand, the torpedo and pull it out from the studs, at the same time do not forget to mark the wires with a marker so as not to get confused.
How to disassemble a shower stall: removing the doors, dismantling the side partitions, disassembling the frame
Shower cabins have long been part of our everyday life. Knowing how to disassemble them, you can always refuse the services of professional plumbers if there is a need to repair the device or disassemble it altogether. Who knows what the coming day has in store for us? Perhaps there will be a need to move, then dismantling skills will come in handy. Why should anyone pay? You can save your budget a little.
Preparatory work
No matter how modern and reliable the device is, sometimes there comes a time that requires a professional approach to dismantling. Perhaps repairs are needed or a move is planned, or maybe the sealant just needs to be changed.
Undoubtedly, in the process of assembling a complex technical device, at some moments competent outside help is simply required. But disassembling is not reassembling; you can easily handle this on your own. There is no need for any special tools.
Of all the tools that will be useful for work, you will need:
- knife;
- screwdrivers;
- sealant remover.
Before you begin to disassemble the shower, you should wash it, drain all the water, and then wipe the entire surface and other elements.
How to dismantle a shower cabin with your own hands
Before you start disassembling everything, you need to clean all the silicone seal. A special tool is used for this. Of course, you can use a knife, but it may scratch the plastic.
Reference! All joints treated with silicone remover must be disassembled within fifteen minutes. Otherwise, the product will wear off and the work will have to be repeated.
Many “professionals” recommend cleaning the sealant with gasoline or another solvent in cases where there is no special composition. This can be done if you plan to throw away the cabin. It is better to use a regular knife as it causes less damage.
You need to start disassembling the cabin from the doors. And only then remove the side partitions, and then work on the frame and pallet.
Removing the doors
The design of all doors in shower cabins is completely identical. The top and bottom sides have emphasis on the rollers; under them there are guides along which they move.
To remove the door, you need to unscrew the fixing screws of the upper rollers; as soon as the play is felt, you can push the door beyond the side of the guide. The lower part is then easy to pull out of the groove. After this, the door must be slightly lifted and pushed into the cabin.
Attention! The doors are made of thick tempered glass. Therefore, they weigh quite a lot. It will be difficult for one person to cope with their dismantling. The help of a partner will come in handy.
All actions when removing the door must be carried out especially carefully. Tempered glass cracks easily, even from minor impacts.
Removing side partitions
Despite the fact that the side partitions have a simple attachment, they are very difficult to remove. They are inserted into the grooves of the side profile of the frame facing the wall. On the opposite side they are supported by a stand located in the center. They are secured with fasteners at the top and bottom.
First of all, you need to remove this particular fixing fastener. After that, the screws that hold the stand in the center are unscrewed and it moves into the central part of the cabin. Now the partitions can be pulled out of the side groove and pressed into the cabin.
Silicone may affect the speed of operation. It would be better to remove it. This is easy to do with a knife. The main thing is to treat the surface from the side of the metal elements, and not vice versa.
Disassembling the frame
First of all, you need to unscrew the fixing fasteners that hold the partitions, pallet and ceiling to the frame. Next, the sealant is cleaned at all joints. Now you can remove the upper half of the housing.
To make the frame easier to disassemble, it is recommended to remove it from the pallet.
Attention! If two people take part in the work, then the frame can be removed directly with the side partitions. This will make it easier to dismantle them.
Once the sealant is removed, you can remove the side panels, not forgetting to unscrew the screws that hold them to the arches. After this, the fasteners are removed from the wall guides. Here you need to be especially careful and careful, it is important not to damage the slots of the screws and other elements of the body. The upper and lower arcs are secured with self-tapping screws to the wall guide. Using a screwdriver or cordless screwdriver, you can easily get rid of these fasteners.
Once the frame is dismantled, you can remove the back wall from the pallet.
Removing and installing the panel (dashboard) Priora
If you decide to install sound insulation for the engine shield, or paint or reupholster the panel, then carefully study the instructions on how to remove and install the Lada Priora dashboard yourself.
A necessary tool. Phillips and flathead screwdrivers, 10mm head, pliers with narrow jaws.
Before starting work, you should disconnect the negative terminal from the battery. Then remove the steering column switches.
Remove the fuse box cover:
- Turn the three locks of the mounting block cover 90°.
- Unclip the fuse box cover.
Disconnect the wires from the ignition switch. Then remove the instrument cluster. and remove the central floor tunnel. Disconnect the wires from the electric power steering:
Then in order:
- Unclip the plastic clips and remove the left A-pillar trim. Remove the right A-pillar trim in the same way.
- Pry off the left door glass blower nozzle using a flat-head screwdriver with soft material underneath to avoid scratching. Similarly, remove the blower nozzle on the right side.
- Unscrew the nut of the upper fastening of the Priora panel, it is located in the cavity under the door glass blower nozzle, using a “10” socket. Unscrew the nut on the right side in the same way.
- Unscrew the bolt securing the ends of the ground wires of the dashboard using the same key.
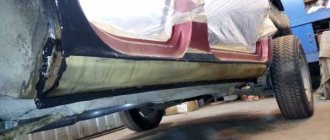
Rear bumper
To carry out body work or replace damaged elements (reflectors, parking sensors), you need to remove the bumper on the Priora. This work is simple and differs from dismantling the front structure only in the number of fastening screws.
In some cases, difficulties arise when removing the side wings from the grooves, especially at low air temperatures. Doing these steps may cause the plastic to crack. The same problems arise on Kalina 2. Due to the unique shape of the buffer, it can be difficult to push it out. However, if you follow all the requirements of the vehicle’s operating instructions, dismantling can be carried out without difficulty.
How to remove the rear bumper from a Priora
For cars of different versions, the dismantling of the buffer differs only in the locations of the fasteners. For example, on a sedan the screws are screwed into the trunk frame vertically from top to bottom, while on a Priora station wagon - horizontally. Due to the shortened end part of the hatchback body, it is difficult to reach the structure fasteners in the arches.
For comfortable work, it is recommended to remove the rear wheels.
To remove the rear bumper on a Priora you must:
- Unscrew the 2 fastening bolts on the trunk frame, and then the 2 nuts connecting it to the body at the bottom of the car.
- The wings of the structure are held in place by 3 screws located in the wheel arches.
- After dismantling the fasteners, the buffer is removed.
- Inside it there is a structural reinforcement, which is fastened with self-tapping screws.
- The reflectors are screwed on with one nut.
Installation
If the structure being installed does not have an amplifier and reflectors, then use the corresponding elements from the removed part. Installation of the bumper on the Priora body is carried out in the reverse order of removal. The work is easy to do with your own hands. After the structure is installed in place, it is secured with bolts and screws.
When installing the SE bumper, problems arise with the installation of the amplifier. To secure it to the structure, it is necessary to cut off the upper horizontal shelf of the attachment to the body. The amplifier located inside the buffer is attached using self-tapping screws. Some car enthusiasts do not install this part. Lastly, screw the wings to the arch and install the wheels.
About the console
Lada Priora was produced with an interior in two color options: gray and black. It is worth noting that a light interior was installed on the first Priora models, starting in 2007, and later a black interior with black seats and upholstery was added to it. But the center console itself was not subject to changes in color, and many owners of this car repainted or covered the Priora’s center console with film.
Modifications to the center console allowed for a more formal look that would suit the tastes of every owner. Many installed 2DIN radios with a large screen or completely replaced the standard multimedia player with something more advanced and powerful.
2DIN radio in Priora
It should be noted that when installing a 2DIN radio in a standard Priora console, you need to work with a hacksaw and cut out a completely additional capacity for various kinds of small things. But with the console from the luxury Priora, such alterations do not need to be done.
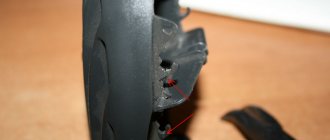
Types of radio mounts
To choose a method for removing a car player, you need to understand how it is fixed inside the panel. The following types of fastenings exist:
- on 2 side clamps;
- on 4 latches located on the side and top of the case;
- fastened with self-tapping screws or screws to the brackets.
Example of mounting a standard head unit
Note. The last method of fixation is typical for standard devices that are supplied to the car by the manufacturer.
Latch on mounting frame
The principle of fastening with latches (clamps) is that the body of the radio is enclosed in a metal mounting frame, and is not directly built into the panel niche. This intermediate part, which has special petals with protrusions or grooves (depending on the brand and model of the device), is securely fixed in the niche. The player body is equipped with mating latches that engage when the player is inserted into the socket.