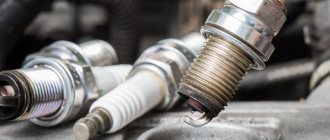
Candle set
Any motorist knows that spark plugs are used in a gasoline engine. The principle of their operation is quite simple and intuitive, but they can still hide many problems. The service life of spark plugs is very long, it all depends on whether the carburetor or injector supplies fuel. It should be noted that replacing a spark plug on a VAZ 2107 may not bring the expected result, since the service life of parts is affected by the technical condition of the engine and other systems.
For the VAZ 21074 carburetor, only those models of spark plugs that are designed for this type of injection are suitable. If an injector is installed in the car, the requirements will be slightly different. The type of ignition system is also important in determining the spark plug parameters used for a particular engine. In addition, many problems can be diagnosed by the color of the electrode. Experience and logic will help answer the question why candles are black or reddish.
VAZ 2107 | Replacement and maintenance of spark plugs
The engine is equipped with spark plugs of type A14DVR or LR17YC.
You will need: a special spark plug wrench “21” with a rubber ring inside, round wire probes.
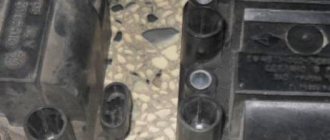
1. Remove the spark plug tip with the seal without disconnecting the high-voltage wire from the tip.
2. Using a spark plug wrench, unscrew the spark plug and remove it from the cover well (the spark plug remains clamped in the rubber ring of the key).
3. If cracks are visible on the spark plug insulator, the threads or spark plug electrodes are damaged, replace the spark plug.
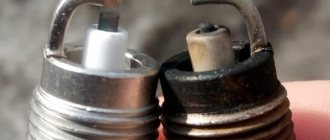
Pay attention to the carbon deposits that cover the bottom of the candle. If light brown carbon deposits evenly cover the spark plug with a thin layer, it does not need to be cleaned, since it does not affect the operation of the ignition system. If there is no carbon deposits at all, it means that the engine is running on a lean mixture or with an increased ignition timing. If the spark plug is covered with a matte black soot that is easily erased, this indicates that the engine is running on an over-rich mixture. Shiny black carbon deposits indicate that too much oil has entered the engine cylinder. Black carbon deposits must be cleaned off with a sandblaster, and then the spark plug must be blown out with compressed air. You can clean carbon deposits from a candle with a stiff hair brush, after first immersing the candle in gasoline for 20–30 minutes. It is not recommended to clean off carbon deposits with sharp metal objects: they will leave scratches on the spark plug, which will accelerate the carbon formation process. If the elements of the engine control system are in good working order, oil consumption is normal, and the spark plugs are constantly covered with a black coating, then the spark plugs are faulty, regardless of their service life.
4. After cleaning the carbon deposits, check the gap between the spark plug electrodes. Check the gap only with a round feeler gauge, since when checking with a flat feeler gauge, the depth of the recess on the side electrode, which is formed during the operation of the spark plug, will not be taken into account. The gap should be 0.85 mm. If the gap differs from the specified value, adjust it by bending the side electrode.
It is prohibited to bend the central electrode - this will lead to cracks in the insulator and failure of the spark plug.
5. Screw the spark plug into the socket by hand until it stops and tighten with a wrench. Do not tighten the spark plug too much, the tightening torque of the spark plug is 31–38 N·m (3.1–3.8 kgf·m).
6. Place the tip on the spark plug and install its seal so that the lower edge of the seal is placed on the flange of the hole in the cylinder head cover.
It is recommended to replace all spark plugs after 10–15 thousand kilometers, regardless of their condition. If one spark plug fails, it is recommended to replace the entire set, regardless of the operating mileage. It is not recommended to use spark plugs of different brands on the engine at the same time. Gone are the days when the question of which spark plugs to buy was irrelevant and it was possible to purchase only domestic ones and only the same model as on the car. Now on the shelves there is a huge selection of candles from almost all foreign manufacturers. And naturally, the “self-made” people immediately began to counterfeit them. In order not to buy a fake, first of all pay attention to the packaging: the quality of printing from real manufacturers is impeccable, but from counterfeit ones the contours of the drawings often do not match. If there is no packaging at all, further inspection of the candles makes no sense - there are no branded candles without it. Then inspect the candles. The central electrode must have a clear cylindrical shape, and its surface must be absolutely smooth. If there are defects on the electrode and, moreover, it is installed crookedly, this is a fake. The side electrode of a fake spark plug is often also welded crookedly, and its edges are oblique. For branded candles, the threads are made by knurling, so they are absolutely smooth. In fake candles it is cut and has small chips. The sealing ring of a real spark plug cannot be removed. On a fake one, it is either screwed into a thread or easily removed. The insulator of a real candle is absolutely smooth and shiny. A fake candle often has visible longitudinal seams from an inaccurately joined mold. Finally, the inscription on the insulator must be clear, even and neat. We also note that real branded candles cannot be cheap. Too low a price should alert you.
Sometimes, during intense acceleration with the engine spinning up almost to maximum speed, sharp jerks appear, perceived as blows. The spark plugs are to blame, although checking with a piezo tester (“pistol”) indicates their serviceability. The reason is that over time the spark plugs lose their tightness and a spark plug that works normally at low and medium loads misfires at high pressure in the combustion chambers. It is for this reason that it is not recommended to operate spark plugs for more than 15 thousand km without replacement.
Purpose of sparking devices
They are designed to create a spark, resulting in ignition of the working mixture in the cylinders of the VAZ-2107 engine. It is cylindrical in shape with contacts at the top and bottom. A current collector is connected at the top, and a spark is created at the bottom at a certain operating time. This time is determined by the ignition.
Black candles on the “seven”. Reasons for appearance
The color of the lower tip of the ignition devices characterizes the operation of the engine.
Therefore, if you sometimes feel the engine tuning or poor starting, first of all you need to check the color on the electrodes. It is necessary to use a special key and visually determine the color of the electrodes. If solid black soot is visible, then this is evidence of malfunctioning engine operation. But why does blackness arise? This question plagues many drivers, but let’s try to figure it out together. Blackness is the main evidence of soot deposition, the causes of which are:
- The ignition is set to late, that is, combustion of the mixture in the cylinder occurs after the piston has reached top dead center and returns to the lower position. While it is known that the mixture must ignite before the piston approaches top dead center.
- Enrichment of the fuel-air mixture. The devices are flooded with a fuel mixture, resulting in black carbon deposits. Carburetor adjustment is required.
- Oil trapped in the cylinder. In most cases, it is a consequence of burnout of the piston rings, which requires a major overhaul of the engine. Oil scrapers rarely get damaged, through which oil gets in.
- Early ignition may indicate soot deposits on the electrodes. The cause of the problem is corrected by setting the correct ignition.
- The spark plugs do not meet the recommendations for this type of engine. It is necessary to purchase others, preferably Russian ones.
- A lean mixture occurs when either a large amount of fuel or air is regulated by air suction. It is necessary to set the choke to the neutral position - if the engine is cold, and to the extreme recessed position - if the engine has heated up over 80 degrees. Let's look at this in more detail below.
- The purchased devices are defective. Rarely does a marriage of all four occur, more often than not one. Eliminating the problem is purchasing new ones.
- There is no “self-cleaning” of the device electrodes. Occurs in increased gaps between the electrodes. It is necessary to set the gaps; for carburetor engines it should be 0.8 mm.
- Poor quality fuel. You cannot refuel with fuel with an octane number lower than that indicated in the VAZ-2107 technical passport. For carburetor engines of the “Seven”, you need to fill in A-92 gasoline. Impurities in the fuel settle on the electrodes and over time disrupt the spark-forming process, which leads to the appearance of soot.
- Wear of spark-producing devices. This could be a distributor and spark plugs. Parts need to be replaced.
There are many reasons for the occurrence of soot and they all must be eliminated.
How to replace
Most drivers can remove and install spark generation devices with their eyes closed. But novice drivers often turn to the Internet with requests: how to remove spark plugs on a VAZ-2107? To do this, we describe the sequence of actions: 1) Open the hood, remove the terminals from all four devices. The terminals are removed by applying light physical force. 2) Taking a special key, unscrew it and perform a visual inspection. Determine the color of the contacts; black spark plugs need to be replaced. 3) You need to tighten it tightly, but do not overdo it. A weak tightening can lead to rupture of the device, and a strong tightening can lead to sticking to the cylinder head. As you can see, the sequence is very simple and will not lead to difficulties.
Candle with soot
How does a carburetor affect spark plugs?
The same fuel-air mixture is supplied through the carburetor, which burns in the chamber. The carburetor has a damper, which is regulated by a choke lever installed in the passenger compartment of the VAZ-2107 car. Thanks to the correct position of the damper, the carburetor supplies the mixture to the combustion chamber.
Now you know the main causes of soot. Most causes can be eliminated in the early stages of car operation, and some require replacement of devices or even engine repair. Happy renovation work!
VAZ 2107 | Checking and replacing spark plugs
3.11. Checking and replacing spark plugs
| GENERAL INFORMATION |
| You will need | |
| |
After 30,000 km.
When checking and replacing spark plugs, be careful - if the engine is hot, you can get burned.
Disconnect the wire from the “—” terminal of the battery.
A17DVR, A17DVRM, FE65PR, FE65CPR. Until 1988, spark plugs of types A17DV and FE65P were installed on the VAZ-2109.
When preparing for winter use, replace the spark plugs with new ones.
We recommend replacing spark plugs every 30,000 km, even if they are still in working order: old spark plugs can increase fuel consumption.
Regularly check the reliability of the connections of the high-voltage wires with the spark plugs, coil and ignition distributor.
Dirty insulation on high-voltage wires can cause current leakage, so wipe them with a rag whenever they become dirty.
Do not over-tighten the spark plugs - the ceramic plug insulator may crack, causing poor engine performance.
| EXECUTION ORDER |
1. When removing the tip from the spark plug, do not pull on the wire. If you need to remove all the lugs, first mark the high-voltage wires.
2. Clean the spark plug niches from dirt.
3. Carefully remove the spark plug using a special wrench. If the spark plug is hard to unscrew due to carbon deposits, drop WD-40 or Unisma into the threaded hole to avoid damaging the thread.
4. Inspect the spark plug. If there are cracks on the insulator, the threads or electrodes are damaged, the spark plug must be replaced.
5. Light brown carbon deposits, which evenly cover the lower part of the spark plug with a thin layer, do not affect the operation of the ignition system and do not need to be cleaned.
6. The absence of carbon deposits on the spark plug indicates either that the engine is running on a lean mixture, or that the ignition timing is incorrectly set, or that the spark plug brand does not match the engine type.
7. Shiny black deposits, indicating that oil has entered the engine cylinder, must be cleaned.
8. Check the gap between the spark plug electrodes (with a round feeler gauge only). The gap should be 0.7-0.8 mm. Check the gap only with a round feeler gauge.
9. If the gap differs from the specified one, adjust it by bending the side electrode.
Types of ignition systems
The very first one. contact system, which was applied to the VAZ 21074. The basis of this is a mechanical ignition distributor (distributor). The formation of a spark occurs when the contact group is closed in the body of the springboard. And only after sparks are distributed on the glass does it appear on the VAZ candles. This system is obsolete due to the presence of contacts.
Bosch is famous for its high quality products
More progressive is the non-contact ignition system, which was applied to the VAZ 21074 towards the end of the last century, when the carburetor was replaced by an injector, reliable and durable. The same spreader, only instead of a contact group. Hall sensor, which reacts to the passage of a cylindrical metal plate with slots next to it.
Read
The system is controlled by a switch that amplifies the signal from the Hall sensor and feeds it to a high-voltage coil. From the coil, through a distributor with a runner, it reaches the spark plugs, sometimes spark plugs on a VAZ 2107 for a new one.
VAZ 2107 | Replacing spark plugs - 1.6 l models
1. The efficiency of the power unit largely depends on the proper functioning of the spark plugs. It is important that the spark plugs match the size of the engine installed in the car. As long as the above requirements are met and the engine is in good condition, spark plugs rarely require attention beyond routine vehicle maintenance procedures. The need to strip spark plugs also arises extremely rarely; the procedure itself should be carried out only with the use of special equipment, otherwise the risk of damage to the working parts of the electrodes is extremely high. 2. Before starting to remove the spark plugs, wait until the engine has completely cooled down. 3. To provide access to the spark plugs, remove the three screws securing the cover installed on top of the throttle body. Note that the front screw is longer than the other two. Release all hoses and wires from the clips on the underside of the cover, then remove the cover. 4. If there are no factory markings on the spark plug wires, mark the wires yourself using tape in accordance with the cylinder numbering (the first is considered to be closest to the timing belt). Try not to damage the insulation of the wires. 5. The explosive tips of the spark plug wires are equipped with metal heat-protective screens. Carefully remove the tips from the spark plug shanks (to avoid damaging the contact terminal, pull only the tip, but never the wire itself). 6. Before turning out the spark plugs, remove small debris and dirt from the spark plug niches - use a small brush, or blow out the niches with compressed air (you can use a regular bicycle pump).
7. Using a special wrench equipped with an elastic insert, remove the spark plugs. To avoid damaging the threads, try not to distort the spark plugs while turning them out.
8. The external condition of the spark plugs can provide a lot of useful information about the degree of engine wear. If the working end of the spark plug is shiny and free from plaque and deposits, it means that the air-fuel mixture is supplied to the combustion chambers too lean, or the spark plug has an excessively high heat rating (heat removal from the electrodes in a hot spark plug occurs less intensively than in a cold spark plug). 9. If the working end of the spark plug and the inner central insulator are covered with a thick layer of soot deposits, then the mixture is too rich. The black color of the working part of the spark plug in combination with traces of oil indicates internal wear of the engine, or also excessive enrichment of the mixture. 10. Golden or grayish-brown color of the working part of the spark plug is evidence of the correct composition of the air-fuel mixture and good internal condition of the engine.
High voltage wires
High voltage wires (HVW) transmit impulses from the coil to the spark plugs. Unlike other wires, they must not only withstand high voltage, but also protect other parts of the car from it. Each wire consists of a conductor with a metal tip, rubber caps on both sides and insulation. The serviceability and reliability of the insulation is of great importance, since it:
- prevents moisture from entering the conductive element;
- reduces current leakage to a minimum.
Malfunctions of high-voltage wires
The following main malfunctions are characteristic of GDP:
- breakage of the conductive element;
- voltage leakage due to poor insulation;
- excessively high wire resistance;
- unreliable contact between the GDP and the spark plugs or its absence.
If the VV is damaged, the electrical contact is lost and a discharge occurs, leading to voltage loss. In this case, the spark plug receives not the rated voltage, but an electromagnetic pulse. Faulty wires lead to improper functioning of some sensors and interruptions in the operation of the power unit. As a result, one of the cylinders stops performing useful work and runs idle. The power unit loses power and begins to detonate. In this case, they say that the engine is “troubling.”
One of the malfunctions of high-voltage wires is a break
Diagnostics of high-voltage wires
If you suspect a malfunction of the engine (engine “troits”), they must first be carefully inspected - possible insulation damage, chips, touching hot engine elements
Particular attention should be paid to the wire contacts - there should be no traces of oxidation or soot on them. If no visible damage is found, proceed to detect a possible break and measure the resistance of the GDP using a multimeter
The wire resistance should be 3–10 kOhm. If it is zero, the wire is broken. It should also be taken into account that the resistance should not deviate from the norm by more than 2–3 kOhm. Otherwise, the wire should be replaced.
Selection of high voltage wires
When purchasing new wires, you should pay attention to the car manufacturer's recommendations. On the VAZ 2107, wires of the VPPV-40 brand (blue) with distributed resistance (2550 +/-200 Ohm/m) or PVVP-8 (red) with distributed resistance (2000 +/-200 Ohm/m) are usually installed.
An important indicator of GDP is the permissible voltage. If the actual voltage values exceed the permissible values, breakdown of the cable insulating layer may occur and the wire may fail. The voltage in a non-contact SZ reaches 20 kV, and the breakdown voltage is 50 kV.
The material from which the GDPs are made is also important. Typically the wire has polyethylene insulation in a polyvinyl chloride sheath. Silicone GDPs are considered the most reliable. They do not become rough in the cold, which prevents them from loosening in their nests, and are less prone to breakdowns. Wire manufacturers include Champion, Tesla, Horse, and others.
Tesla products are considered one of the most reliable
VAZ 2107 | Replacing spark plugs
Replacing spark plugs
Replacing spark plugs (after 30,000 km for leaded gasoline and after 50,000 km for unleaded gasoline)*
To determine further intervals for this check, see the appropriate sections of the vehicle's routine maintenance schedule.
Proper functioning of the spark plugs is vital to the correct and efficient operation of the engine. It is extremely important that the correct spark plugs for the given engine are installed in the vehicle (types of spark plugs are given in the Specifications at the beginning of this Chapter). If the requirements of the Specifications are met, the spark plugs should not require special attention in the intervals between the intervals of the current change of spark plugs; occasionally, cleaning of the spark plugs may be necessary, which should not be undertaken without special equipment, since otherwise the working ends of the electrodes can easily be damaged.
Models not equipped with a direct ignition system
1. Loosen the screws and remove the inspection cover in the center of the camshaft cover. 2. If the markings on the high-voltage spark plug wires are not visible, mark wires 1 through 4 in accordance with the numbers of the cylinders they serve (cylinder numbering is based on the distribution circuit). 3. Remove the wires from the spark plugs, pulling at the tip of the wire, not the wire itself, otherwise you may damage the wire terminal. After disconnecting all the wires, remove the O-ring from the distributor side of the cylinder head and move the wires to the side.
Direct Ignition Models
1. Disconnect the wire plug from the ignition unit on the flywheel side. 2. Remove the 4 screws securing the ignition unit to the top of the cylinder head. To do this you will need a hex wrench. 3. Where available, give the bolt and release the holding clamp of the block wires. 4. Where available, remove the bolt and disconnect the ground wire. 5. Carefully lift the ignition assembly while removing it from the spark plug tips.
| 1. To prevent dirt and foreign particles from entering the cylinders, it is necessary to remove dirt from the surface adjacent to the spark plug holes using a brush, vacuum cleaner or compressed air. | |
| 2. Using a spark plug wrench, a suitable tubular wrench, or a deep socket driver and extension, remove the spark plugs. Keep the replacement head strictly parallel to the spark plug; if the head moves or tilts to the side, the ceramic body of the spark plug can easily be damaged. | |
Setting the ignition timing
The ignition system is a very sensitive unit that requires careful adjustment. Only in this case can you achieve optimal engine performance, minimum fuel consumption and maximum possible power.
Methods for setting the ignition angle
You can adjust the ignition timing in different ways.
- Aurally.
- Using a light bulb.
- By strobe light.
- By spark.
The choice of method depends primarily on the availability of the necessary equipment and available tools.
Adjusting the ignition by ear
This method is distinguished by its simplicity, but it is recommended only for experienced car enthusiasts. The work is carried out with the engine warm and running in the following sequence.
- Loosen the nut securing the distributor and begin to rotate it slowly.
- Find the position of the distributor at which the engine speed will be maximum. If the position is found correctly, then when you press the accelerator pedal, the engine will quickly and smoothly gain speed.
- Stop the engine, turn the distributor 2˚ clockwise and tighten the fastening nut.
Adjusting the ignition using a light bulb
You can adjust the ignition of the VAZ 2107 using a 12V light bulb (car “control”). This is done as follows.
- The first cylinder is installed in a position where the mark on the crankshaft pulley will coincide with the 5˚ mark on the cylinder block. To turn the crankshaft you will need a special key.
- One of the wires coming from the light bulb is connected to ground, the second to the contact of the coil “K” (low voltage circuit).
- Loosen the distributor and turn on the ignition.
- By rotating the distributor, look for the position at which the light comes on.
- Tighten the distributor fastening.
Adjusting the ignition using a strobe light
Connecting the strobe and setting the ignition timing is carried out in the following order:
- The engine is warmed up to operating temperature.
- The tube is removed from the vacuum corrector, and a plug is installed in the resulting hole.
- The power wires of the strobe are connected to the battery (red - positive, black - negative).
- The remaining wire (sensor) of the device is fixed to the high-voltage wire going to the first spark plug.
- The stroboscope is installed so that its beam hits the crankshaft pulley parallel to the mark on the timing cover.
- Start the engine and loosen the distributor.
- By rotating the distributor, ensure that the beam jumps exactly at the moment it passes the mark on the crankshaft pulley.