03.03.2022 6,253 timing belt
Author: Victor
The performance of the gas distribution mechanism is important for the proper functioning of a car engine. Thanks to the timing belt, the operation of the crankshaft and camshaft is synchronized. To ensure that its working condition is not compromised, it is necessary to monitor the integrity of all its components. From this material you can find out which timing belt is best for a Priora with 16 cl. motor and how to change it yourself.
[Hide]
Which timing belt is better to choose for a 16-valve VAZ-2112: companies and brands
In all engines of the VAZ-2112 family, equipped with a 16-valve cylinder head, the timing belt is designed to transmit rotation from the crankshaft pulley to the pump and two camshafts. And on an engine where the pistons do not have a special groove, a broken timing belt can cause a lot of trouble for the car owner, because bent valves are only a small part of what this can lead to.
Why did it happen so?
Perhaps the automatic requests do not belong to you, but to another user accessing the network from the same IP address as you. You need to enter the characters into the form once, after which we will remember you and be able to distinguish you from other users exiting from this IP. In this case, the page with the captcha will not bother you for quite a long time.
You may have add-ons installed in your browser that can make automatic search requests. In this case, we recommend that you disable them.
It is also possible that your computer is infected with a virus program that is using it to collect information. Maybe you should check your system for viruses.
If you have any problems or would like our support team, please use the feedback form.
Probably everyone who has encountered a 16-valve VAZ engine on a Priora knows about the problem of breakage. After which there will be expensive repairs - this is almost always the case, but there is a regulation according to which this unit must be changed after a certain mileage. The timing mechanism is a gas distribution mechanism responsible for operation by rotating the camshaft, intake and exhaust valves of the power unit. In Priora cars with a VAZ 21126 engine (16 valves), there are 2 such shafts. The timing drive, together with the cooling system pump, is carried out by a toothed belt. The regulations for replacing the timing belt of a Priora car must be strictly observed. Unfortunately, 16 valves - of course, the dynamics of the Lada Priora car, but also the danger of a break. When a belt breaks, sad consequences arise (a bunch of bent valves, broken pistons, damage to the cylinder head). The technical regulations say about replacing the belt every 150,000 km. But experienced mechanics insist on replacing them every 50,000 - 60,000 km. due to non-compliance with the standard, with the actual service life and operating conditions. Replacing the timing belt of a Priora car can be done in a garage, with your own hands, although we must not forget about the marks on the pulleys. For one hundred, the price for replacing engine unit 126 (16 valves) is from 3,000 rubles. It is better to choose the gates brand for the timing belt itself - a set with 2 rollers is sold, its price starts from 5,000 rubles. There are cheap analogues for Priora, but you shouldn’t skimp! Read the article to the end and make sure that in a Priora car, it’s safer to do everything on time!
How to choose a quality timing belt?
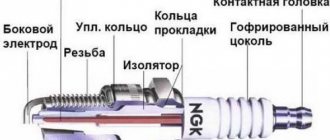
The timing belt (gas distribution mechanism - approx.) on VAZ-2112 cars has a special toothed inner surface, and the rubber itself has a reinforced structure.
Failure to promptly replace and diagnose the belt can cause failure of the pump, rollers and the engine itself. Therefore, it is worth replacing as soon as you notice damage to the belt, or the car’s mileage on one belt is equal to 50 thousand kilometers.
Belt selection (survey)
Since stores now offer a large selection of timing belts for 16-valve VAZ-2112 engines, we present to your attention those belts that are most often chosen by car owners of two-wheelers.
Lada 21126-1006040
Factory (standard) timing belt from the Volzhsky Automobile Plant. It is popular among owners only for its low cost . It is made of wear-resistant materials, which allows us to call the belt reinforced.
Lynx 137FL22
The timing belt from the Japanese manufacturer Lynx, equipped with a total of 137 teeth, with a belt width of 22 mm, showed its best performance . Due to its low cost, it has increased wear resistance.
Bosch 1987949662
Timing belt 1987949662 Bosch
Many car enthusiasts who have installed such a belt on their car have noted that the service life established by the manufacturer of the belt is completely fulfilled. There have been no complaints over the entire service life, and cases of rupture are minimal.
Contitech CT1137
Belt from Contitech.
The Contitech timing belt from the world famous Continental brand is made of high quality materials such as polyamide fabric, fiber reinforced synthetic rubber and some fiberglass parts. This composition allows the timing belt to easily work out extended service life without fear of breakage.
Optibelt ZRK1593
Belt from Optibelt.
The timing belt from the German manufacturer Optibelt is also popular among owners of twin cars. It has established itself as a reliable element that meets all the requirements placed on it. Buyers of this belt do not have to worry about the safety of this element during operation.
Gates 5631XS
Gates timing belt
The most popular of all the above timing belt models. The world leader in the production of products for mechanical engineering, Gates, makes truly high-quality products and this belt is full proof of that. High wear resistance and minimal risk of rupture during operation make it so popular among consumers.
But, it is often counterfeited, like all products of this company. A lot of fake pumps have been spotted, here are photos of fake Gates pumps.
Balakovo "OJSC BRT"
Belt from JSC "BRT".
OJSC "BRT" is one of the leading manufacturers of high-quality rubber products in Russia. High quality has made BRT products very popular in the market, and due to the lowest cost of the belt in comparison with the Gates analogue, also popular.
Alternative manufacturers
Not all vehicle owners can choose the right spare part for their car. This is due to the wide variety of products, including timing belts. The main supplier of rubber products for VAZ cars is the RTI plant in Balakovo. In addition to this, sellers can offer buyers Bosch products, which have high quality workmanship and reliability. Also on display you can see products from the companies Daiko, Kontitek, Lynx. Their cost ranges from 700 to 1500 rubles.
Replacing the timing belt on a Lada Priora - when to change it and should you focus on mileage?
Replacing the timing belt is carried out on DOHC engines, which are installed on Prioras, as a rule, performed after 60 thousand km. mileage Despite the fact that the manufacturer recommends changing the belt closer to 200 thousand.
There are those who don’t wait and change the belt every 40-50 thousand, but where is the truth and when should you actually replace it? Let's figure it out.
DOHC engines on Priors have four valves per cylinder (two for intake, two for intake). The valves are opened by the action of pushrods, which allows for an additional advantage when it comes to power.
Synchronization of the intake and exhaust processes is realized using a belt drive. The belt itself is a toothed, dense ring consisting of several layers of rubber and nylon. The specification and compatibility of the belt is indicated on its sidewall, in this case the width is 22 mm, the number of teeth is 137. When buying a timing belt, you should be attentive to the quality of the product; it should not have defects such as scuffing, roughness, cracks and irregularities.
The timing belt on a Priora combines many components, bending around drive rollers and pulleys. So this belt is related to the coolant pump pulley, the camshaft pulleys that lift the valves, has one guide roller, and the degree of tension is regulated by a special tension roller. To install the belt, you must follow certain rules and take into account special marks located on the belt, crankshaft pulley, oil pump, and camshafts. From the Priora factory, they receive sets of timing belts and rollers manufactured by Gates; there seem to be no questions about the belts, but the plastic rollers are considered the “Achilles heel” of these sets. Those who have had bitter experience of using such belts and rollers strongly recommend replacing them early and checking their condition regularly.
Replacing rollers and timing belt: step-by-step steps
If you have an air conditioner, the replacement procedure will be more complicated. To replace the belt, first perform the following operations:
- Using a 15mm wrench, remove the generator tension roller and release the generator belt.
- Using the T-30 tool, you need to unscrew the bolts (5 pcs.) on the protective casing and 2 bolts on the lower casing.
- Raise the car with a jack to lift the wheel. This is necessary to connect the camshaft marks. We combine the marks on the body and the marks on the pulleys by turning the wheel in 5th gear.
the mark on the pin coincides vertically with the mark on the body
- When aligning the marks, the gear should be switched to neutral so as not to disturb the installed marks.
- Use a screwdriver to remove the flywheel plug. The flywheel mark should line up with the cut out triangle on the left.
- By turning the wheel all the way you gain access to the crankshaft.
- While the assistant holds the brake pedal depressed in 5th gear. You need to unscrew the crankshaft bolt counterclockwise and remove the washer.
- Using a 15mm wrench, unscrew the roller bolts, then remove the timing belt itself.
- To remove the pump (if there is an additional need for this), the closed casing and camshaft pulleys are removed.
- Then the generator roller mounts are removed, as well as 6 mounting bolts.
- After the procedure, it is necessary to install the mechanisms in the reverse order.
- The tensioner roller should not be secured; it will be needed for adjustment.
- We secure the camshaft and crankshaft pulleys.
- We first put the new belt on the crankshaft pulleys, then on the pump and camshaft.
After completing the installation of the belt, be sure to move on to the next stage - adjusting the timing belt.
How to check timing belt tension
After completing the work, you should analyze the tension level of the timing belt. This is done as follows:
The tensioner roller rotates in the opposite direction to the clockwise direction.
The roller marks must be aligned, then tighten the fasteners.
The crankshaft pulley rotates 2 circles clockwise until the camshaft and crankshaft marks align.
The crankshaft tooth is parallel to the mark on the body
The mark on the camshaft pin must be parallel to the mark on the body.
Tension control is carried out by applying a force of 10 kg. In this case, the deviation error should not be more than 7 mm. For a more accurate check, use a special device - a dynamometer.
After installation and inspection, replace the protective cover. The final check is carried out with the engine running. Which should function evenly, without unnecessary noise. If there are whistling notes in the engine operation. Then the belt needs to be loosened slightly.
The timing belt replacement scheme for the Lada Priora does not have a high level of complexity. If the car enthusiast approaches this issue responsibly. And I became well acquainted with the technical documentation for the car and the sequence of all actions. Also, this process does not require special, bulky equipment used in professional auto repair shops. Therefore, you can do it yourself in a garage.
Why is this so important?
I think it’s no secret to anyone what happens when the timing belt breaks, but perhaps there are those who are not in the know. In the event of a break, the synchronization of the operation of the cylinder-piston group and valves is disrupted. The pistons begin to move towards the valves, which are no longer controlled by the belt; as a result, the pistons “meet” the valves. After such a “meeting,” the pistons are destroyed, the valves are bent, and in general you end up with a major engine overhaul. Could this have been avoided? It is possible, of course, if the manufacturer of this engine thought about this at the design stage, completely eliminating such a phenomenon. By the way, there are quite a few “plug-in” engines in the world that, after a broken belt, do not need to be “overhauled”; you just need to get to a service station and replace the timing belt. In such engines, when the valve belt breaks, the valves do not meet the pistons.
The belt and rollers must be replaced immediately if, during inspection, you find:
- Roughness on the belt (on the teeth or sides);
- Mechanical damage;
- Engine malfunctions;
- Problems starting the engine;
- Extraneous sounds indicating friction of the belt against the casing, rollers or pulleys.
Separately, I would like to note the appearance of vibration and black exhaust; such symptoms, of course, can occur under other circumstances, but this option should also be considered.
Consider solely mileage in the question: “Is it time to change the timing belt or not?” - this is mistake. Firstly, even with low mileage, problems can arise with the belt or rollers. And secondly, there are many situations when you practically or completely do not move, while the motor is running, therefore, the belt wears out. For example, if the car is used mainly in the city, the mileage may be low, but the life of the belt itself will be at its limit, since in traffic jams the engine is running, but there is practically no movement.
There are other factors that can cause a belt to fail prematurely. For example, if oil, fuel, dirt or sand gets on it. Small particles of sand eat into the surface of the belt, destroying its surface; oil and other petroleum products soften it, reducing its strength and shortening its service life.
Finally.
To summarize the above, I would like to give some practical advice that will allow you to avoid timing belt rupture and, as a consequence, major repairs.
- Buy a quality replacement belt and rollers;
- Record the mileage and date of belt replacement;
- Every 10 thousand, perform a visual inspection of the rollers and belt;
- Change the belt earlier if you mainly drive the car in the city;
- If you buy a used car, it is better to replace the belt and rollers, since it is not known when it was changed.
That's all for me, write in the comments when you prefer to replace and how you monitor the condition of the above-mentioned elements.
Why, when and which belts are best to install: timing belt and features of belt drive
Let's start right away with when to change the timing belt. The timing belt replacement interval is, on average, 60 thousand km. It is important to understand that the service life of the product is influenced by many additional factors.
In some manuals for some vehicles you can find instructions when it is proposed to replace the belt after 70-80 thousand km, while for other cars replacement is clearly prescribed already at 50-60 thousand. Based on this, in practice, motorists have long developed a rule for themselves to change belt based on average. Hence it turns out that such an indicator can be considered the mark of 50 or maximum 60 thousand km.
Let's move on. Before answering the question of which company to choose a timing belt and what is the best brand of timing belt, let's focus on the problems associated with this element and its operation. It should be remembered that not only the driving of the camshaft, but also the precise synchronization of the valve timing with the operating cycles of the internal combustion engine depends on the timing belt.
Experts identify a number of reasons why problems may arise:
- Excessive or weak timing belt tension. In the first case, the problems are associated with improper installation, and the belt itself quickly stretches. In such conditions, rollers, drive bearings of the gas distribution mechanism and other elements (for example, pumps) are also subject to increased wear.
Changing the timing belt on a Priora (photo report and video)
Our neighbor came to us to undergo scheduled maintenance on his fresh VAZ 2170, or Priora in common parlance, to replace the timing belt, oil and other little things.
Various recommendations write intervals from 80,000 to 105,000, but we change to 60,000. We check the tension every 20,000 and this is not our whim, because we all know about the quality of our spare parts. And yet, not everyone knows, but on Priorovsky engines alloy connecting rods are installed and when the timing belt breaks, not only the valves bend, but in most cases the connecting rods as well . And if they are not replaced, the car will have a decent oily appetite. Therefore, it is better to play it safe. The pump was replaced about 20,000 years ago, so we don’t touch it, we’ll just check it by twirling it by hand. For those who are interested in how to replace the pump, let’s look at the motor on the 10, they look like twin brothers.
The tools we will need are: a standard set of keys, hexagons, a set of heads and a special key for the Priora tension roller, it is slightly different in size from the usual one, the price is 100 rubles. But also the timing kit itself.
The timing belt replacement procedure will take approximately two hours with a lunch break.
Remove the protective cover, not forgetting to disconnect the absorber purge valve.
Using a 17mm wrench, unscrew the bolt of the service belt tension roller and remove the latter. It will not be possible to completely remove the belt since the engine mount passes through it and if you want to change it you will have to unscrew it. But it won’t interfere with replacing the timing belt.
Remove the upper protective cover of the timing belt by unscrewing the four hexagons.
An amazing picture appears before us.
1 – tension roller
2 – deflection roller
We mark the marks on the camshafts and on the protective cover with a clerical touch for convenience. The tension roller is slightly different in appearance from the one purchased, but this is not scary, the principle is the same.
Unscrew the bolts securing the lower timing belt protective cover.
The front right wheel does not need to be removed, but turned all the way to the right. We place stops under the front wheels, turn on fifth speed and unscrew the crankshaft pulley bolt. Turn off the speed.
Remove the pulley and the lower protective cover. Remove the metal boot.
Replacing the Lada Priora timing belt: what you need to know
The timing belt is an important element in the gas distribution mechanism drive device. Although the manufacturer recommends checking the belt every 50 thousand km and replacing the timing belt every 100 thousand km, in reality it is advisable to halve these periods.
The reason is that when the valve teeth break or are cut off, they hit the pistons. As a result, expensive engine repairs have to be performed. In this article we will look at how to check the timing belt of a Priora, how long it takes to change the timing belt on this car, and also how to replace the timing belt on a Lada Priora.
What tools are needed to replace the belt?
To properly replace the timing belt, you need a set of the following tools:
- classic pliers for removing circlips;
- wrench for 10, 13, 15, 17 mm;
- 5 mm hex key or T-30 star;
- a set of standard keys;
- The set with rollers and belt includes a special adjustment key;
- Screwdriver Set;
- roller tension device;
- office proofreader for accurate installation.
When performing these works, installing the Priora on the pit will not be necessary. All work on changing the timing belt is carried out in the engine compartment area.
Priora timing belt replacement
If you have an additional air conditioner installed, the belt itself will need to be longer. The air conditioner will also need to be unscrewed. Otherwise, it will interfere with the removal of the protective cover. It is advisable to begin work with a complete package of all necessary tools.
Lada Priora: timing belt, checking and tightening it
So, it has already been said above that if the timing belt breaks on a Priora, this leads to valve bending. It is quite obvious that it is better to check the condition of the belt often (every 40 thousand km). Let’s also add that if we consider when the timing belt is changed, this element, taking into account the features of its design and operation, should be replaced every 60 thousand km.
Let's move on. You need to check the condition of the belt, as well as its tension, on a cold engine. Heating is allowed no higher than 35 degrees Celsius.
- If the car is equipped with air conditioning, then you need to remove the drive belt and tension roller;
- Then you should install the engine mount by slightly tightening the screws securing the mount itself. Next, use a wrench to unscrew the 5 screws securing the front upper timing cover.
- The cover can now be removed. To inspect the timing belt, the crankshaft should be turned clockwise. To do this, you need to engage 5th gear and push the car forward. You can also lift the car by hanging the front wheel and rotating it clockwise.
- The surface of the belt, especially its toothed part, should not be cracked, the teeth should be intact, without creases or other defects, the rubber should be solid, without delamination to the cord, etc. Also, the belt should not show signs of friction or overheating.
- The end parts should also be carefully inspected to ensure that delamination and damage are not allowed. Also, the belt should not diverge too much along the marks. If so, then the timing belt is too stretched.
- There should also be no traces of engine oil on the timing belt. Even if the belt is visually in good condition, it is important to understand that oil corrodes the rubber. For this reason, an oily belt should be replaced.
It is also necessary to check the belt tension. To do this, you need to take into account that on a Priora car the timing marks are applied to the camshaft pulleys. To check, rotate the crankshaft clockwise until the marks on the camshaft pulleys align with the cutouts on the rear timing cover. If the pulleys were accidentally turned further than necessary, you will need to turn the crankshaft 2 turns.
If the timing belt is normally tensioned, the rectangular protrusion of the inner bushing of the tension roller coincides with the cutout of its outer race. If the belt itself is in order, and the indicated marks do not coincide slightly (more than ½ of the total width of the protrusion), then you need to adjust the timing belt tension. To solve this problem, it is necessary to locate the Priora timing tension pulley.
First, use a 15mm wrench to loosen the bolt securing the tension roller. In the case when the belt is loose, it is necessary to ensure precise alignment of the cutout of the outer race of the roller with the rectangular protrusion of the inner sleeve of the roller. Then use a 15mm wrench to tighten the tension roller bolt. The tightening torque is from 20 to 25 Newtons.
Replacing rollers and timing belt: step-by-step steps
If you have an air conditioner, the replacement procedure will be more complicated. To replace the belt, first perform the following operations:
- Using a 15mm wrench, remove the generator tension roller and release the generator belt.
- Using the T-30 tool, you need to unscrew the bolts (5 pcs.) on the protective casing and 2 bolts on the lower casing.
- Raise the car with a jack to lift the wheel. This is necessary to connect the camshaft marks. We combine the marks on the body and the marks on the pulleys by turning the wheel in 5th gear.
the mark on the pin coincides vertically with the mark on the body
- When aligning the marks, the gear should be switched to neutral so as not to disturb the installed marks.
- Use a screwdriver to remove the flywheel plug. The flywheel mark should line up with the cut out triangle on the left.
- By turning the wheel all the way you gain access to the crankshaft.
- While the assistant holds the brake pedal depressed in 5th gear. You need to unscrew the crankshaft bolt counterclockwise and remove the washer.
- Using a 15mm wrench, unscrew the roller bolts, then remove the timing belt itself.
- To remove the pump (if there is an additional need for this), the closed casing and camshaft pulleys are removed.
- Then the generator roller mounts are removed, as well as 6 mounting bolts.
- After the procedure, it is necessary to install the mechanisms in the reverse order.
- The tensioner roller should not be secured; it will be needed for adjustment.
- We secure the camshaft and crankshaft pulleys.
- We first put the new belt on the crankshaft pulleys, then on the pump and camshaft.
After completing the installation of the belt, be sure to move on to the next stage - adjusting the timing belt.
How to check timing belt tension
After completing the work, you should analyze the tension level of the timing belt. This is done as follows:
The tensioner roller rotates in the opposite direction to the clockwise direction.
The roller marks must be aligned, then tighten the fasteners.
The crankshaft pulley rotates 2 circles clockwise until the camshaft and crankshaft marks align.
The mark on the camshaft pin must be parallel to the mark on the body
Tension control is carried out by applying a force of 10 kg. In this case, the deviation error should not be more than 7 mm. For a more accurate check, use a special device - a dynamometer.
After installation and inspection, replace the protective cover. The final check is carried out with the engine running. Which should function evenly, without unnecessary noise. If there are whistling notes in the engine operation. Then the belt needs to be loosened slightly.
How to replace the Priora timing belt
So, having selected a suitable timing belt for the Priora (regardless of the manufacturer, it is important to select a 16-valve Priora timing belt), you can begin the replacement procedure. The width of the belt should be 22 mm, the number of teeth is 137.
After removing the timing cover, you must first align the timing belt itself. To do this, the crankshaft and camshafts are placed at TDC on the compression stroke of the first cylinder.
Also, to check the position of the crankshaft, you need to remove the plug from the rubber (it is located on top of the clutch housing). The mark on the flywheel should be opposite the slot in the upper cover of the clutch housing.
Then you need to fix the crankshaft. To do this, when unscrewing the bolt securing the drive pulley of the mounted units, you should invite an assistant to engage 5th gear and press the brake.
Now the pulley can be removed, and the washer is removed in parallel. To make it easier to put everything back together, the camshaft pulleys can be fixed in relation to each other before removing the belt. Pre-prepared wooden pegs are suitable for this.
It is important to ensure that after removing the belt, the crankshaft and camshafts no longer rotate, as the pistons and valves may accidentally collide!
- As for replacing the timing belt, first change the tension roller, then the support roller. The rollers are removed along with the bolt and thrust washers. At the same time, you need to check the condition of the pump. It is important that there are no leaks of antifreeze, the pump shaft should rotate easily, there should be no backlash, etc. If the pump is not in order, it also needs to be replaced.
By the way, before installing new timing belt rollers on the Priora, the threads of the mounting bolts should be coated with a special fixing sealant. Also, the support roller mounting bolt can be immediately tightened (torque 34–41 Nm), while the tension roller mounting bolt should not be fully tightened at this stage.
Next, you can proceed to installing the timing belt. Before installing it, it is important to check that the camshaft timing marks match the marks on the rear drive cover. If the accessory drive pulley is removed, in this case it is easy to determine the position of the crankshaft (the marks on the crankshaft toothed pulley must coincide with the mark on the oil pump cover).
The final stage is the installation of the drive pulley for the mounted units. After this, turn the crankshaft by the pulley mounting bolt 2 turns clockwise. Next, you should check that the marks on the crankshaft and camshafts match exactly, and that the belt itself is tensioned properly.
If deviations are noticeable, the entire adjustment and/or installation process should be repeated. If the marks coincide, you can completely tighten the tension roller bolt (torque from 34 to 41 Nm), as well as the attachment drive pulley bolt (bolt tightening torque 105 or 110 Nm).
Belt size
The performance of the gas distribution mechanism drive on any type of internal combustion engine is important. Not only the efficiency of the engine, but also its power performance depends on this. In order for them to correspond for a long time to those declared by the manufacturers, it is necessary to carefully monitor the condition of all components and assemblies of the motor. Any Priora timing engine has a toothed belt in the drive. Its length, width, and number of teeth depend on the type of power unit installed on the machine.
You can find out which part is on the car from the car’s operating instructions, or dismantle the old one and carefully study it.
If a VAZ 2108 engine is installed, then it will have 111 working teeth with a width of 19 mm.
The VAZ 21126 engine has two camshafts in the timing belt, so the length of the drive increases. The number of teeth on such a product will already be 137, and the width will increase to 22 mm.