Sometimes situations occur when a malfunction appears in the electronic control unit (or brains) of the Lada Kalina model. This can often be caused by spilled antifreeze, since the control module is located in a very unfortunate place, namely under the radiator of the heating system. Even the most careful owner of a domestic small car cannot prevent such a problem. Many people are interested in whether it is possible to transfer the ECU?
Location
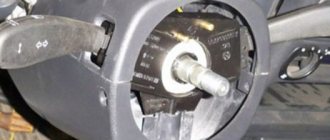
The ECU on the Lada Kalina is located under the center console of the car. You can see it by removing the side cover of the front passenger's footwell air duct. The block is attached to a bolted connection and securely fixed in its place. The connectors of the unit are also tightly inserted into their place and secured with a special lock, which prevents the connector from spontaneously disconnecting from the ECU.
It is quite difficult to call this location of the engine control unit successful, since it is located exactly under the heater radiator and if there are leaks in the heater radiator, the coolant gets directly onto the engine block, which causes irreversible consequences and, of course, a breakdown or short circuit.
In some cases, there is a coolant leak at the ECU, it can be repaired, but most often it is necessary to replace the unit.
Diagnosing the block
After dismantling the liquid-filled module, we inspect it. To do this, take a screwdriver with a star tip and unscrew the 4 small screws. Next, we slowly remove the control board, with which we also perform a thorough visual inspection.
The most common reason for device failure in such a situation is a burnt-out output key of the Lada Kalina ignition coil control circuit. Repair won't help here. After such a malfunction occurs, the engine begins to function on only two cylinders, and in some situations it is not able to start at all. This is where qualified service will come to the rescue. Specialists will dismantle the damaged component, wash and dry it.
The second common cause is burnout of the board itself. This fact is revealed quite simply. There will be a characteristic darkening of the surface of the board, which will eliminate all doubts.
Will repairing the ECU help in this case? The answer can only be heard in a specialized workshop. From experience, we note that the probability of help from repairs tends to zero. Will need replacement.
Sometimes there is a situation related to minor damage to the ECU circuit. In this case, the owner can get away with little expense. To “reanimate” the module, you will need to perform a number of repair procedures, namely:
- wipe the device with a dry cloth;
- apply repeated washing with WD-40 and blow with a stream of compressed air;
- rinse again, but with alcohol and also blow with an air stream;
- Dry (thoroughly) for at least 2 hours.
Some Lada Kalina owners believe that replacing the ECU is a faster and more cost-effective process compared to washing and drying. Experience has shown that the situation is the opposite. Here the determining role is given to the price factor. The new ECU will require considerable financial resources from the owner of LADA Kalina. The situation is aggravated by the undesirability of installing used “brains”. Often, a used version of the unit will be cheaper, but there is a likely risk of it not working.
Improvement of the Lada Kalina cooling system
Replacing the timing belt Kalina
Kalina EUR repair
What kind of ECUs are there on Kalina?
Below is a table with engine controllers that were installed on the Lada Kalina.
| Manufacturer | Model | vendor code | Engine | Throttle |
| BOSCH | 7.9.7 | 21114-1411020-40 | 1.6l, 8 cl. | Mechanical |
| BOSCH | 7.9.7 | 1183-1411020-20 | 1.6l, 8 cl. | Mechanical |
| ITELMA | January 7.2 | 11183-1411020-22 | 1.6l, 8 cl. | Mechanical |
| BOSCH | 7.9.7 | 11194-1411020-10 | 1.6l, 16 cl. | Electric |
| Avtel | January 7.2 | 11183-1411020-21 | 1.6l, 8 cl. | Electric |
| Elvar | January | 11183-1411020-52 | 1.6l, 8 cl. | Electric |
| Avtel | January M73 | 21114-1411020-41 | 1.6l, 8 cl. | Mechanical |
| ITELMA | ITELMA | 21126-1411020-08 | 1.6l, 16 cl. | Electric |
Wiring diagrams Kalina 2 hatchback (standard and norm)
| This section contains electrical equipment diagrams for the new Kalina (VAZ 2192) of the “Standard” and “Norma” trim levels. |
1 – right headlight; 2 – electric motor for washers; 3 – left headlight; 4 – starter; 5 – rechargeable battery; 6 – main fuse block; 7 – generator; 8 – sound signal; 9, 10, 11 – front wiring harness blocks to the instrument panel wiring harness blocks; 12 – air conditioning fan electric motor; 13 – electric fan of the engine cooling system; 14 – ABS hydraulic unit; 15 – right front speed sensor; 16 – left front speed sensor; 17 – front wiring harness block to rear wiring harness block; 18 – right fog lamp; 19 – left fog lamp; 20 – ambient temperature sensor; 21 – reverse lamp switch; 22 – air conditioning compressor; 23 – audible alarm signal; 24 – rear window washer electric motor.
Rear wiring diagram Kalina 2
1, 2 – rear wiring harness blocks to the instrument panel wiring harness blocks; 3 – right side direction indicator; 4 – left side direction indicator; 5 – hand brake sensor; 6 – rear wiring harness block to the tailgate wiring harness contacts; 7 – interior lighting unit; 8 – switch in the driver’s seat belt; 9 – trunk lighting; 10 – electric fuel pump module; 11 – right lamp; 12 – rear wiring harness block to the tailgate wiring harness contacts; 13 – left lamp; 14 – rear wiring harness block to rear left door wiring harness block; 15 – rear wiring harness block to rear right door wiring harness block; 16 – rear wiring harness block to the front right door wiring harness block; 17 – rear wiring harness block to the front left door wiring harness block; 18 – airbag control unit; 19 – rear wiring harness block to the front wiring harness block; 20 – block of the rear wiring harness to the block of the wiring harness of the parking system sensors; 21 – control unit and alarm unit of the safe parking system; 22 – parking system switch; 23 – speaker of the safe parking system; 24 – switch for interior lighting in the driver's door pillar; 25 – interior light switch in the right front door pillar; 26 – switch for the interior lighting in the pillar of the right rear door; 27 – interior light switch in the left rear door pillar; 28 – right seat electric heater switch; 29 – left seat electric heater switch; 30 – electric heater of the right seat; 31 – electric heater of the left seat; 32 – driver’s seat belt pretensioner; 33 – passenger seat belt pretensioner; 34 – central unit of body electronics; 35 – sensor for automatic glass cleaning system (rain sensor); 36 – rain sensor sensitivity regulator; 37 – rear wiring harness block to the instrument panel wiring harness block; 38 – right rear speed sensor; 39 – left rear speed sensor.
Why doesn't the ECU work?
ECU chip filled with antifreeze
Quite often problems occur that the engine control unit stops working; to find out the reason for the failure of the ECU, you need to inspect it:
- Check to see if the connector has come loose from the unit; this happens quite often after installing a radio, or replacing a heater radiator, etc.
- Check for ground on the block. Sometimes it happens that after some work, a person forgets to fasten the mass necessary for the operation of the unit.
- Check for signs of coolant leakage on the engine block.
If such problems are not found, it is necessary to dismantle the engine block and troubleshoot, repair or replace it.
Let's sum it up
If symptoms appear, the owner of LADA Kalina should contact service as soon as possible, because the cost of repairs can be significantly reduced. It is advisable to independently carry out the procedures we have indicated if the owner of LADA Kalina has a sufficient level of experience in dealing with automotive electronic devices. To do this, at a minimum, you need to know where the ECU is located, as well as how to remove the ECU. However, a 100% positive outcome of the event should not be expected. In case of failure, we recommend contacting the service specialists.
Replacing the ECU
Replacing the engine controller on Kalina is quite simple according to the instructions presented below.
- Remove the negative terminal from the battery;
- Unscrew the cover of the side air duct of the front passenger's feet;
- Disconnect the connectors from the controller;
- Unscrew the screw securing the ECU on the left;
- We take out the controller by pulling it towards ourselves, as if on a sled;
- Unscrew the controller from the pad;
- Installation is carried out in the reverse order;
Share link:
Similar articles
- Immobilizer APS-6.1 and electrical package control system Lada Kalina Lux. Device and operating procedure.
- Electrical circuit diagram of the Lada Granta mounting block.
- Location of relays and fuses in the Lada Granta mounting block.
- VAZ cars - electrical equipment (2002).
- Access control system Lada Vesta. Device and fault diagnosis.
- Diagram of direction indicators and hazard warning lights for Lada Largus.
- Electrical connection diagram for the wiring harness of the front left door of the Lada Granta.
- Electrical connection diagram for the rear door wiring harness of the Lada Granta.
- Electrical connection diagram for the wiring harness of the Lada Granta license plate lights.
- Diagram of the Lada Largus central locking system.
- Diagram of cleaners and washers for the windshield and tailgate glass of the Lada Largus.
- Electrical connection diagram for the Lada Granta air intake box wiring harness.
- Electrical heating diagram for the rear window of Lada Largus.
- Lada Largus sound signal connection diagram.
- Wiring diagram for rear view mirrors Lada Largus.
Installing the controller
1) For the LADA PRIORA family, attach the bracket to the controller and secure it with screws. Screw tightening torque 1.2…1.6 Nm (Phillips screwdriver, Phillips head, torque screwdriver). Install the controller on the car and secure it with nuts. The tightening torque of the nuts is 1.9…4.5 Nm (spanner 8, interchangeable head “8”, torque wrench).
For the LADA KALINA family, attach the bracket to the controller and secure it with screws. Screw tightening torque 1.2…1.6 Nm (Phillips screwdriver, Phillips head, torque screwdriver). Install the controller on the car and secure it with a screw. The tightening torque of the screw is 1.7…3.5 Nm (Phillips screwdriver, Phillips head, torque screwdriver).
For the LADA 4x4 family, install the controller on the car and secure it with nuts. The tightening torque of the nuts is 1.9…4.5 Nm (spanner “8”, interchangeable head “8”, torque wrench).
2) Connect the wiring harness connectors to the controller.
3) Install the instrument panel console screen into place (using a Phillips screwdriver). For the LADA 4x4 family, install the left front upholstery.
4) Connect the wire to the negative terminal of the battery (spanner “10”).
Removing the controller
To quickly remove the electronic control unit, follow these steps:
Location of the controller in the interior of cars of the LADA 4x4 family
- Turn off the ignition.
- Disconnect the wire from the negative terminal of the battery (spanner “10”).
- Unscrew the fastening screws and remove the right screen of the instrument panel console (using a Phillips screwdriver). For the LADA 4x4 family, remove the left front upholstery.
- Disconnect the wiring harness connectors from the controller.
- For the LADA PRIORA family, unscrew the two nuts securing the controller and remove the controller assembly with bracket from the car (wrench “8”). Unscrew the four screws and disconnect the bracket from the controller (using a Phillips screwdriver).
For the LADA KALINA family, unscrew the screw securing the controller and remove the controller assembly with bracket from the car (a Phillips screwdriver). Unscrew the four screws and disconnect the bracket from the controller (using a Phillips screwdriver).
New Lada: Juicy new product: the history of the creation of Lada Kalina - KOLESA.ru - automobile magazine
For the LADA 4x4 family, unscrew the four nuts and remove the controller (wrench “8”).
If the controller malfunctions, a “clean” controller must be used for replacement.
Functions
The electrical package control unit is designed to perform the following functions:
- Alarm. If the car's anti-theft system detects a break-in attempt, thanks to the CBKE, it will transmit information about this to the car owner's control panel.
- Windshield wiper system control. Moreover, we are talking about both manual and automatic control (if the car is equipped with an electrical package control unit marked 21900-3840080-20).
- The device performs the function of controlling the windshield and rear window heating systems. This unit also controls the heating elements of the side rear-view mirrors.
- The electrical control unit also monitors the performance of the optics, both in manual and automatic control modes. In particular, we are talking about low-beam headlamps, side lights, and DRLs.
- Separately, we should highlight the function of ensuring the functionality of the high-range lighting.
- Turning lights, as well as light signaling.
- Vehicle interior lighting.
- The device monitors the performance and energy saving of devices belonging to the category of internal lighting of the car.
- Monitoring the state of the central lock, as well as performing the functions of locking and unlocking the locks themselves from the key, from buttons installed in the car interior, as well as in the doors.
- Another option is to open the luggage compartment lid using a button installed in the cabin.
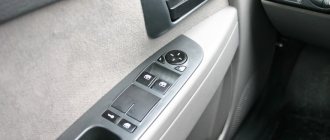
- An equally important function is the control of electric drives, in particular, we are talking about power windows, as well as side rear-view mirrors.
- Heating system for driver and passenger seats.
- Luggage compartment lighting unit (video author - Vladimir Kostyuchenkov).