Many owners of VAZ cars (and the 14th is no exception) over time encounter problems such as valve wear or burnout. When faced with it, you can go in two ways - contact a service center or do the repair yourself. We will talk about how to replace VAZ 2114 valves, as well as what is needed for this, in today’s article.
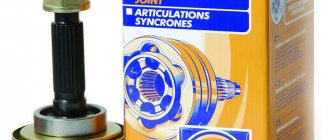
VAZ 2114 valve set
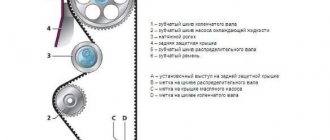
Where is the timing belt located?
Monitoring the condition of the timing belt and its serviceability is quite simple, because this part immediately catches your eye after opening the hood. Its surface is toothed, it passes through the crankshaft and camshaft, and is a connecting link for the following elements:
- pumps;
- camshaft;
- crankshaft
Since the belt performs several tasks simultaneously, it can quickly fail, so you should pay very close attention to its appearance.
If it is noticed that this element often “slips” from its main place or begins to tear, it needs to be replaced as soon as possible. A broken belt in a VAZ-2114 will be indicated by an injector in the form of a light that lights up on the dashboard, while other models may simply stall on the way, and the driver will not be able to start the car on his own. However, not only a broken belt becomes the reason for replacing the valves; quite often the valves have to be changed due to a violation of the clearance in the motor chain. If the car owner notices that the valves are not positioned as usual, then the car is under no circumstances allowed to be operated until the valve guides are completely replaced. It’s really possible to do this kind of work yourself, despite the lengthy process. Every car enthusiast can handle it if he follows the instructions provided by professionals in their field.
Step-by-step valve replacement
- First of all, you need to remove the cylinder head from the car:
- the battery is de-energized and removed;
- Coolant and engine oil are drained into separate containers;
- vacuum hoses, cylinder head gaskets, cooling systems are completely removed from the car;
- the cylinder head cover is removed, the timing belt and casing are removed;
- Using a key, the fasteners that secure the cylinder head are unscrewed.
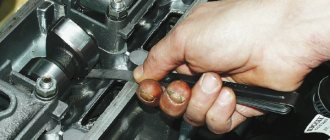
- After removing the cylinder head, you can begin replacing the valves. But before you start, you need to prepare a special tool called a puller. Of course, you can use improvised tools, for example, a chisel and a hammer, but this will complicate the work a little:
- the camshaft and gas camshaft are removed from the cylinder head;
- using a removable device or a hammer with a chisel, the studs are secured to the gas distribution shaft;
- a stand is placed under the “plate” of the valves, and the “crackers” are removed;
- the seals are removed. To make it more convenient to remove the camshaft oil seals, experts recommend using a clamp to press the oil seal, but not very hard, and carefully turn it in different directions;
- the springs and the “plate”, which is located under them, are removed.
- We remove the valves that have become unusable.
At this point, the valve replacement process can be considered complete, and assembly should be performed in the reverse order.
Grinding the valve to the head
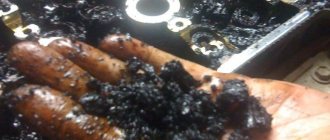
If the valve is burnt out, then the valve seat is also burnt out; usually mechanics first level the seat with a special cutter, which you don’t have; no, we can do without it (the engine has been tested and runs no worse). I’m amazed at how some motorists grind valves by hand (I’d go crazy) let an electric drill do the work for us (if you have a left-right reverse drill, it’s even better, but if not, this one will do). Spread the edge of the valve with rubbing powder, insert the valve into the head and clamp the end of the valve into the drill chuck, but not deeply, but to a depth of about 15 mm, the main thing is not to scratch the place where the valve comes into contact with the oil seal. Pull the valve up with a drill and turn it on, let the valve grind, make such movements up a little down and up again (I think you understand) if the drill is in reverse, switch the rotation. On a nine or eight, it is difficult to reach the valve with a drill; you need a very small chuck, but you can do this by taking a strong piece of reinforced rubber hose that fits very tightly onto the valve, take an 8mm pin and pull this piece of hose onto it as tightly as possible, clamp the pin into the drill and the other end hose onto the valve and also begin to grind the valve onto the head seat.
How to replace the adsorber on a VAZ 2113-VAZ 2115?
Note! A block of wires is connected to the adsorber, and you will have to work with it; dirt should not get inside the block (Watch this) as well as moisture, so in order to protect this block from a short circuit (What if water gets into it), we recommend that you first operation to remove the minus terminal from the battery, if you do not know how to do this, then in this case read the article entitled: “Replacing the battery on a VAZ”, paragraph 1 of that article says it all!
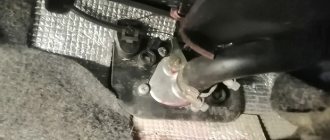
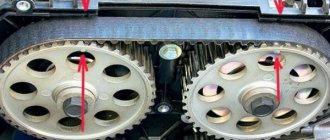
Removal: There is nothing complicated in its removal, you will only need to use a screwdriver to loosen the clamps of the hoses that go to it (There are 2 hoses in total, you can see them perfectly in the photo below, they are indicated by red arrows) and then disconnect these hoses from it when the hoses are disconnected, press the latch that holds the wire block (indicated by a blue arrow) and disconnect the block, after disconnecting it, slightly loosen the bolt that tightens the clamp, which in turn holds the adsorber in one place (you can see the clamp bolt in the small photo) , well, after which you can easily remove the adsorber and replace it with a new one.
Installation: Installing a new unit occurs in the same way as removing it, you just need to do all the operations in the reverse order of removal.
Many motorists were faced with the fact that the time had come to change the valves on the 8-valve VAZ-2114 engine. This is usually due to the fact that the latter burned out and problems appeared in the operation of the main power unit. The replacement process is quite complex and will require a large number of tools and time.
Causes of valve failure
Why does it happen that valves burn out over time and engine performance is disrupted? The main reasons are:
- Use of low quality fuel;
- Installation of spark plugs that are not suitable for the heat number in the cylinder head;
- Frequent driving at engine speed limits;
- Using a propane mixture as fuel without flashing the control unit;
- Operation with signs of engine detonation.
The root cause is always an unscrupulous attitude towards the car, if you monitor the operation of the engine in a timely manner, refuel with a high-quality fuel mixture and service all units in a timely manner, you can avoid subsequent problems.
Useful: Correct valve adjustment on a VAZ 2114
Replacing valves on a VAZ 2114 - photo report
None After this, unscrew the bolts securing the head to the block. There are 10 of them in total. Depending on the release date of the car, they will be either hexagon or TORX profile.
The bolts on one side are outside, and on the other, inside the head, so they are not visible in the photo. After all of them are unscrewed and everything that may interfere with further dismantling is disconnected, remove the cylinder head from the engine:
It is best to remove the camshaft in advance, since it is not very convenient to unscrew it with the head removed. Once it is removed, you can begin to dry out the valves.
To do this, you will need a special device called a desiccant. Again, to ensure that the cylinder head is securely fixed, you can put it back on the block and tighten it on a couple of bolts diagonally. The desiccant rail is installed and each valve is “worked out” one by one, as shown in the photo below:
Once the valve springs are removed, you can begin to remove the oil seals. The result is clearly shown in the photo below. After which you can without any problems remove the valve from its guide sleeve from the inside of the head.
The remaining valves are removed in the same order. When installing new valves, they will need to be ground in. To visually familiarize yourself with this procedure, watch the video clip where all this is shown.
What is required for replacement
After checking the condition of the cylinder head, it turned out that valve replacement is required, then you need to prepare for the process and collect all the necessary tools and spare parts:
- New set of valves;
- Saddles;
- Guide bushings;
- Valve stem seals;
- Screwdriver Set;
- Set of sockets and open-end wrenches;
- Valve desiccant;
- Oil seal remover.
You should not disassemble the engine on the street, but it is better to go into a closed room, which should be cleaned first. Dust that can get into the motor when disassembled can cause huge problems after reassembly, including major repairs.
Sectional view of the valve mechanism
Replacing valves on a VAZ-2112 includes all the actions carried out when replacing hydraulic compensators. Having removed the compensator, you can see the valve stem and the upper plane of the disc. Plate 3 is held by two crackers 2 (see diagram).
Valve mechanism design
Dismantling includes the following steps:
A “soft stop” (braided rope, etc.) is placed under the valve from below; Press down on the plate from above; The crackers are removed with tweezers or a magnetized screwdriver; Carefully move the plate upward, preventing the spring from rebounding.
Sometimes in “step 2” you have to hit the plate with a hammer, and here you need to be extremely careful. In general, there is special equipment, such as shown in the photo
Spring compression equipment
The puller works on the principle of a vice. But the force when screwing should be small, otherwise they conclude that the crackers “stick” to the plate. And in this case, take a hammer.
Articles
- 21120-1007010 – inlet valve;
- 21120-1007012 – exhaust valve;
- 21120-1007028 – cracker;
- 21120-1007025 – upper plate;
- 21120-1007300 – hydraulic compensator (about checking them here).
Dry the valve
It was easy to remove the valve, but drying the valve without a valve remover is not very easy, but you can, put a piece of iron under the valve so that it rests on it, put on the springs, place a plate of springs on the springs and put crackers in it, take a 19 or 22 open-end wrench and firmly press on the springs and let your friend insert the crackers, this is all checked, I inserted the crackers into the valves like this several times.
I hope my advice will help you and you can replace the burnt valve yourself.
Choosing oil
According to the operating manual for the VAZ 2114, for this model it is recommended to use semi-synthetic motor oil, the viscosity of which is 10W-30. This way you will be able to decide what kind of oil to fill in your VAZ 2114. Choosing oils from leading manufacturers is not a mandatory requirement. But this is a recommendation based on detailed analysis. Practice shows that it is high-quality lubricated fluids that interact best with VAZ 2114 engines.
Market analysis and a survey of owners of the “fourteenth” model show that the main demand is now for several types of oils from leading manufacturers. However, their temperature ranges are different. To determine the choice of this parameter, we offer the corresponding table for your reference.
| Minimum engine cold start temperature, °C | Viscosity grade according to SAE J 300 | Maximum ambient temperature, °C |
| below -35 | 0W-30 | 25 |
| below -35 | 0W-40 | 30 |
| -30 | 5W-30 | 25 |
| -30 | 5W-40 | 35 |
| -25 | 10W-30 | 25 |
| -25 | 10W-40 | 35 |
| -20 | 15W-40 | 45 |
| -15 | 20W-50 | above 45 |
Some installation tips
The piston of cylinder No. 1 must be placed at its dead top point before installation. The key for 17 will help with this.
The pulleys have grooves and the camshafts have spikes. Each pulley has marks and they should face up. It’s better to place the crankshaft according to the mark that is on the gearbox unit.
When dismantling, it is necessary to note at what angles the tension rollers are fixed. The key plate must be set at the correct angle and the nut must be tightened with a force of 40 N*m.
The screws and their working part must be lubricated with engine oil and tightened in the correct order.
Then you need to turn the screws 90 degrees during the second pass and 90 degrees again during the third pass.
Didn't find the information you are looking for? on our forum.
We recommend reading:
Instrument panel for VAZ 2112 europanel. Installation instructions
How to change the handbrake on a VAZ 2112 - 2110
Checking the functionality of the generator on VAZ cars
What and how to flush the cooling system of a VAZ
Clutch cable for VAZ 2112
Replacing valve stem seals without removing the head of a VAZ 2112, 16 valves, step-by-step instructions with photos
VAZ 2112, 16 valves cylinder head assembly
VAZ 2112 16 valves operating temperature
Checking the quality of work performed
You can check how tightly the valves fit, as mentioned at the beginning, using kerosene. This is the most common method. The valves are assembled, springs are installed on them, then the head block is turned over so that the combustion chambers face up. After this, the cylinder head, where the ground-in valves need to be checked, is filled with kerosene. If after 10–15 minutes no leaks have occurred, then you can proceed to grinding in the next “clients”.
Using a vacuum tester will be no less reliable. The device is connected to the holes on the side of the intake and exhaust manifolds. If the pressure gauge readings are lower than required, it means that the seal of the valves is insufficient and you need to repeat their grinding.
There is also a method using a pencil. To do this, lines are drawn on the working edge of the valve seat along the entire circumference. The next step is to install the valve in its place, press it and turn it clockwise a couple of times and back. After this, we take out the valve and look at the marks made with a pencil. Everything is fine if the lines have disappeared and the surface has been painted over evenly. If there are any irregularities, grinding should be continued.
Visual comparison of lapped and unlapped valves
Replacement process for VAZ-2114
The procedure for replacing engine oil seals on a VAZ-2114 involves removing the cylinder head for the convenience of various technical manipulations. The appearance of dark blue exhaust from the muffler will indicate that the car needs to be repaired.
Skipping the basic details, you need to start by replacing the caps, following the recommended sequence:
- Open the hood and disconnect the negative terminal of the battery.
- Remove the high-voltage wires, unscrew the spark plugs.
- Remove the timing belt (gas distribution mechanism).
- Remove the cylinder head cover (GB), the camshaft timing belt pulley, without losing the keys.
- Unscrew the rear cover fasteners without damaging the block gasket and other connections. The camshaft with end seals is removed. Only the bushing remains.
Next, the crankshaft is rotated until the piston reaches the TDC position, where the seal must be replaced.
The valve spring is compressed by the device, and the crackers are easily removed with tweezers. In common parlance, the process is called desiccation. The upper and lower plates are removed. The cap is removed from the guide sleeve. To do this, a collet is installed on it and the cap is squeezed out with a sharp blow of a hammer on the sleeve of the device. The process is repeated with the second valve.
Using a tool, dry out the valves
New oil seals, pre-lubricated from the inside with engine oil, are placed in a mandrel, pressed in, after which the springs and plates are installed. The crackers are inserted into the lower groove of the valve using a device. The crankshaft is rotated so that cylinder 2 is at TDC. The rod is removed from the spark plug hole and inserted into the next socket. The sequence of work is repeated in the order in which the parts were removed.
Using a mandrel, press in the valve seals
The camshaft supports, pusher adjustment washers, journals, and cams are lubricated with oil. Before installing the shaft support seal, it is advisable to check its technical condition. The valve clearance is adjusted if required.
In what cases is replacement necessary?
Loss of compression by a car's power unit is the main sign of improper operation of the disc parts. The combustion chamber loses sealing due to three common malfunctions - rod wear, burnout or bending of the valves after meeting the pistons.
Rod wear
The operation of the combustible mixture inlet and outlet devices involves constant movement along guides. During long-term use, on old engines, the rod of the part wears out. This leads to an increase in the gap between the walls of the bushings and the rod, which worsens the operation of the mechanism as a whole. Repair here involves not only replacing the valves themselves, but also the bushings - the guides along which they move.
Burnout
When part of the plate falls off or a crack appears on it, the combustion chambers become depressurized in any position of the camshaft. Basically, this malfunction is inherent in exhaust valves, since they are more susceptible to thermal stress.
Burnout is a consequence of such problems:
- incorrect adjustment of the thermal gap - if the block head does not have hydraulic compensators;
- the valve timing adjustment curve, which leads to early combustion and the formation of carbon deposits at the contact point - the valve is not yet pressed to the seat;
- lean fuel mixture - because of this, the temperature in the chamber rises sharply;
- the presence of detonation moments in the internal combustion engine;
- factory defects of products.
For the most part, eliminating the consequences of burnout involves replacing saddles, which is extremely difficult to do at home. This requires pressing/pressing.
Bend
A situation that arises due to a broken timing belt or jumping of chain sprockets, as well as its stretching. When this happens, the camshaft locks and the crankshaft continues to rotate. The intake/exhaust elements descend into the cylinder, striking the pistons, which at this moment rise. The speed of the pistons is higher than that of the descending poppet mechanisms, so the rod breaks or bends. The internal combustion engine stops completely - if you unknowingly start it and continue to operate it, this will provoke a more serious breakdown.
Replacement frequency. Influencing factors
First of all, changing the oil in the VAZ 2114 engine is carried out based on the mileage that the car has traveled. Each car owner decides for himself when it is time to change the oil. Recommendations from the manufacturer and dealer centers, as well as recommendations from experts, suggest that it is better to change the oil approximately every 10-15 thousand kilometers, but more often is better; it is recommended every 5 thousand kilometers.
There are a number of factors that can affect the frequency of replacement:
- Current condition of the car;
- Engine wear level;
- The quality of the previously used lubricant for the power unit;
- Conditions in which the vehicle is operated;
- Seasonality of car operation;
- Driving style.
The level of wear and tear on a car in winter is much higher than in summer. Therefore, the optimal solution is a seasonal oil change. This is confirmed by the motor oil manufacturers themselves, who offer a range of special summer and winter fluids.
If you have just purchased a used VAZ 2114, the oil should be changed immediately for two objective reasons:
- You don’t know exactly how long the car was operated with oil in the engine crankcase;
- You don't know what oil is currently being used. Mixing different lubricants is the most ridiculous mistake you can make.
Before adding new oil, it is recommended to use the so-called five-minute flushing period. This will remove carbon deposits. Do not get too carried away with such activities, since in practice it has been proven that flushing spoils the engine.
Many people believe that the less often they use their car, the longer they can go without changing the oil. Serious mistake. This is explained by the fact that when a car is left idle in a garage for a long time, condensation accumulates inside the car, eventually ending up in the engine crankcase with lubricant. This aggressive environment has a detrimental effect on the lubrication system of engine components.
Repair of injectors VAZ 2114/2115
Repairing injectors involves carrying out a number of works at once:
- cleaning;
- purging;
- replacement of rubber seals.
After the products have been removed from the fuel rail, you need to take a good look at each of the four nozzles. If there are visible signs of leakage on the body, repair will not be practical. You will have to immediately replace the nozzle with a new one. The differences in flushing and cleaning procedures for 8-valve and 16-valve engines are not significant. Therefore, you can be guided by the same scheme.
Video: the easiest way
If the body is clean and there are no deformations or cracks on it, then repair work is allowed. To do this, you will need to remove the seal from the body and the sprayer. It is recommended to leave these parts in acetone or solvent for 1.5–2 hours. While the parts are being washed, you can use a vacuum cleaner to clean the fuel rail. Next, you need to carefully clean the place where the injectors fit into the ramp using a toothpick or a needle.
After this, you can start purging the nozzle from the inside. You will need a roll of electrical tape, an aerosol can for cleaning carburetors and a syringe. An aerosol cleaning liquid is supplied through a thin syringe into the nozzle cavity. It is better to wrap the joint between the syringe and the tube of the canister for sealing with electrical tape. It is recommended to repeat washing the nozzle from the inside three times. Afterwards the product must dry. As soon as the body itself, as well as the seal and sprayer dry after washing, you can assemble the nozzle and install it on the ramp.
A cheap product will perfectly remove dirt and deposits from the nozzle
Before installation, each nozzle is tested for resistance. The tester readings should be in the range of 11–15 ohms.
There is also a simple way to clean the injectors, without dismantling the fuel rail. However, it is only appropriate in cases where the injectors have not yet exhausted their entire service life (120–150 thousand kilometers). The use of cleaning additives in gasoline is allowed. In this case, all elements of the fuel system will be cleaned, but its closed nature does not allow removing dirt and sediment from low-quality gasoline.
The liquid is poured into the gas tank and, together with fuel, cleans all elements of the system
Replacing rubber rings and seals on injectors
Usually, when washing or repairing injectors, car enthusiasts immediately change all rubber elements. This is due to high wear rates. The cost of rings and seals is very low, but after replacement you can immediately observe the stability of the motor.
Rings and seals can be removed with one movement of the hand. However, installing new ones will require care, as it is easy to damage the rubber. The plastic element is first lubricated with gasoline, and then pulled in place of the old seal.
Spare parts for VAZ injectors can be purchased at a minimal price
Almost every driver can clean or replace the injectors on VAZ 2114/2115 cars on their own. Difficulties can arise only in the process of unscrewing the fuel rail or reconnecting the wires to the injector contacts. However, if each stage of work is carefully carried out, even a beginner can independently maintain this element of the fuel system.
Basic lapping methods
Valves can be ground in using specialized equipment or auxiliary tools:
- The first option is to use an automated machine. In this case, there is not even any grinding as such: the valve and seat are simply chamfered, which ensures the most rigid alignment and mating accuracy. The result is a high-strength profile that can ensure excellent engine performance.
Automated valve grinding process on a machine
- The valves can be ground in using a manual milling machine. There are many machines, including those designed for engines of certain modifications. Here, too, everything is done quite quickly and accurately.
If you have a manual milling machine in your garage, valve grinding can be done efficiently and quickly
- Do-it-yourself valve grinding. This is a popular method, but at the same time the most labor-intensive and time-consuming. All defects and surface irregularities are removed using a special abrasive paste, and the main tool is a special T-shaped device with a hole for inserting the valve stem.
A special wrench for manually grinding valves will simplify manual work
How to replace the valve stem seals of a VAZ 2114 car with your own hands?
Tools
To work you need a set of devices and tools. All of them are familiar to any motorist and are available in almost every garage:
- Set of wrenches.
- Slotted screwdriver.
- Ratchet key.
- Tweezers, hammer and pliers (pliers).
- A rod with a diameter of about 8 mm made of soft metal.
- Mandrel for pressing seals.
- Device for removing crackers.
When preparing to replace “tired” valve stem seals on a VAZ 2114, problems may arise with the availability of a desiccant, because not every driver has one. However, having acquired this tool, the car owner will always be fully armed when repairing the cylinder head. In addition, it is advisable to have a torque wrench on hand.
Sequence of main transitions
Before getting started, you should perform a few basic operations. First of all, you need to disconnect the battery so that you don’t have to worry about choosing a battery for your car. Set the handbrake to the highest position. Further actions are performed in the following order:
- Unscrew the bolt of the clamp securing the crankcase ventilation hose using a Phillips screwdriver and remove it together with the pipe. Remove the remaining hoses in the same way.
- Unscrew the valve cover nuts and remove it.
- Using a 10mm wrench, unscrew the nuts securing the mass to the cylinder head.
- After unscrewing the screw and two nuts, remove the plug.
- Unscrew the screws of the front timing cover and remove it.
- Rotate the crankshaft until the marks coincide, remove the plug on the clutch housing and check that the marks match.
- Remove the generator pulley, loosen the roller fastening and remove the belt.
- Remove the camshaft pulley and unscrew the spark plugs.
- Set the crankshaft to the TDC position of the 1st and 4th cylinders.
- Remove the pusher with the adjusting washer from the block head socket.
- Insert a tin rod into the 1st cylinder and place it under the valve requiring replacement.
- Place the desiccant on the valve leg and compress the springs, then remove the crackers using tweezers.
- Remove the plate with the spring.
- Using pliers, remove the oil seal.
- Remove the thrust washer.
- Lubricate the new cap with oil and press it into place using a special mandrel.
- Carry out similar actions with the second valve of this cylinder.
The procedure for replacing valve stem seals on a VAZ 2114 car continues in the same way on the 4th cylinder. Next, you need to rotate the crankshaft 180 degrees and repeat the process on the second and third cylinders. Motorists familiar with installing valve seals on a Lada 2110 are familiar with the principle of operation, so completing the process will not be a particular problem for them.
On a car with a 16-valve engine, you need to remove two camshafts - this is the only difference in the repair technology with an internal combustion engine with 8 valves. When installing the camshaft in place, the nuts should be tightened with a torque wrench from the middle to the edge.
Necessary tool
Replacing intake and exhaust devices requires the availability of specialized tools:
- set of wrenches;
- heads;
- screwdrivers;
- crankshaft clamp;
- torque wrench;
- desiccant or spring remover (locking elements);
- grinding device - in order not to buy a special one, you can use a drill and a piece of hose;
- micrometer - will help to accurately measure the diameter of the rod and identify defects;
- a special key for installing the tension roller - required after a timing belt breaks, when installing a new belt and adjusting the tension.
You definitely need an oil seal remover if replacing them is not intended. Of course, the elements can be removed with ordinary pliers, but this option will damage the product, and in the future the engine will begin to consume a large amount of oil. It will also be possible to pull out the elements with a long end head, but it must correspond to the diameter of the cap.
In addition, you will need a certain amount of consumables:
- new valve stem seals - if they are meant to be replaced;
- cylinder head and valve cover gaskets;
- sealant;
- suitable quality bolts for tightening the head - should not be overextended;
- lapping paste or powder diluted with engine oil.
Replacing valve seals for VAZ 2114
Replacement of VAZ 2114 valve seals should be done in the following sequence:
1.First you need to remove the + and - terminals from the battery. and take out the candles
2.Next we remove the timing belt.
3. It is necessary to remove the toothed pulley from the camshaft.
4. We remove the wires from the first fastening, and after that you need to unscrew the nuts and the third fastening bolt.
5. Unscrew evenly the four remaining nuts that are on the front cover, then unscrew the six nuts of the rear cover.
6.Remove the front and back covers by first removing the washers.
7. We take out the camshaft.
8. It is necessary to turn the crankshaft so that the piston in the cylinder in which we want to replace the caps is at top dead center.
9.After this, you need to unscrew the spark plug and insert a tin rod into the spark plug well, between the piston bottom and the valve plate.
10.After the operation has been completed, you need to install a device for desiccating the valves.
11.Next, properly press the valve spring.
12. Using tweezers, take out the crackers. Press the spring and remove the crackers with tweezers
13.Remove the upper plate and springs.
14.Take out the top plate
15. You need to remove the valve stem seals from the guide sleeve; we do this using a previously prepared collet.
— After removing the oil seal, you need to hit the striker located on the handle, this is done so that the oil seal is compressed.
16. Carefully remove the cap from the collet using pliers.
Make sure that the valve guide has not been damaged.
— Attention!! Before installing new caps, we put the guides on the bushings that came with the caps and do not forget to remove them after the new caps are in place
17. Next you need to press the cap into the lower plate, we do this using a mandrel.
— Attention!!! After the cap is in place, put on the spring. don't forget to remove the guides
- All subsequent assembly occurs in reverse order.
- We remove the tin rod from the spark plug well.
- We replace all remaining caps in the same way.
- It is necessary to lubricate the entire work area with engine oil.
- We mount the camshaft head support.
- Be sure to coat the block head with sealant in the place where the outer support is located.
- Then we install the camshaft.
- We install the bearing housings in their places, tighten the nuts, after putting on the washers.
- The nuts must be tightened evenly.
- We install the camshaft oil seal.
At this point, all work on replacing valve seals on the VAZ 2114 can be considered completed. You have seen for yourself that all the work can be done with your own hands, everything is quite simple.
In order for the VAZ-2114 car to work properly and not let the driver down on the road, the car owner must certainly monitor the technical serviceability of the car
At the slightest change in the operation of the car, it is important for him to establish the true cause of the malfunction and eliminate it as quickly as possible
You need to constantly monitor the technical serviceability of the thermostat, injectors, manifold and even seals, because most often serious damage is caused by the failure of these elements, which can be quite easily replaced yourself.
If during operation a specific, previously unobserved knocking noise is heard, then this should be regarded as the first sign that replacing the valves on a VAZ-2114 8-valve car should be carried out as quickly as possible. After all, if this action is not carried out in the near future, the timing belt may break, which will lead to engine failure.
Experienced drivers and service station workers recommend changing the timing belt after 30-35 thousand kilometers, but these are just recommendations that do not always correspond to every car. Therefore, the car owner must independently monitor the condition of this element and promptly replace the one that has become unusable.
Replacing piston rings
The process of replacing piston rings, which most often become unusable due to mechanical damage, is carried out in the following order:
- the valve protective cover is removed;
- the ground wire is removed from the engine;
- the fixing fastener holding the cylinder head bracket is unscrewed;
- The thermostat mount is disconnected;
- the thermostat is carefully moved to the side, the clamps and connecting hoses are removed;
- the tension roller and bracket clamp is unscrewed;
- the timing belt and tension roller are removed;
- the crankshaft must be turned to such a position that the desired piston is in the “dead zone”, for convenient unscrewing of the connecting rod clamps;
- After removing the connecting rod cover, the piston is pulled out, the same process should be done with the remaining cylinders.
Next, all that remains is to remove soot and deposits from the surface, to examine the markings of the piston rings, buy similar components and install them in the reverse order.
Valve lapping video
The review was made by Evgeny Travnikov, who is known to everyone for his YouTube channel Theory of ICE:
When you have finally completed all the work, you can install all the removed parts in reverse order on the car. As for the price for a set of new valves, it is about 1,500 rubles. If you buy separately, you can easily find out the cost by dividing the amount by 8.
As is already clear from the title, we will talk about removing the cylinder head. In the previous entry I wrote that I had a blown gasket under the cylinder head. I started looking for solutions from the experts. But the price tag really upset me. Replacing the gasket (just a replacement, without grinding!) the price starts from 100 American rubles and this is not at a company service, but in the garage of Uncle Vasya (Petya, etc.) who do not provide a guarantee. After surfing the Internet, I found a good video on how to replace it yourself:
In the end, I decided to change it myself. Of course, I don’t have enough experience (before this I raised my head twice in a Volga 31029), but that didn’t stop me) Luckily I have a second car. Therefore, you can safely put one in for repairs;) Initially, I wrote it down and took photos for myself (so that later it would be easier to assemble everything and not have to look for where the “extra” spare parts came from). But I decided to put it on Drive - it might be useful to someone. So we drive the car into the garage and start removing the cylinder head. Don't consider this an instruction - I'll just write out my sequence of actions.
None 2. Take the miracle product WD-40 and generously water the nuts on the pants fastenings so that they begin to sour. The more time, the better.
3. Remove the battery (terminals with a 10 key, fastening with a 13 key)
Full sizeBattery removed
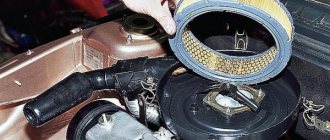
4.Remove the terminal from the sensor on the air filter:
None
Full sizeDraining antifreeze
How to quickly drain antifreeze is described in the article
6. Remove the throttle cable (unscrew the two fastening bolts and remove the clamp):
Full size Screw the bolts into place so they don’t get lost
7. Remove two plugs from the sensors near the thermostat:
Full size Sensors are marked in red
8. Disconnect the connector to the injectors:
Full size injector connector
9. Remove the clamps and disconnect the pipe to the thermostat: 10. Unscrew the mass from the engine (key 13) 11.
Unscrew the clamps and remove the pipes to the radiator and stove12. Remove the terminal under the thermostat (single):
Full size I don’t know what this terminal is responsible for, I just remove it;)
13. Remove the vacuum pipe: 14. Remove 2 plugs from the throttle:
Full size These are the plugs
15. Remove the single terminal in the area of the injectors:
Full sizeI also don’t know what it is, I’m just filming
16. Unscrew the two head mounting levers on the sides:
Full size This is on the right side, the same bar on the left
17. Unscrew the thing near the pants to make it easier to get to the bolts securing the pants:
Full size This thing lies on the left, and on the right is the head mounting rod described in the previous paragraph
18.Remove the timing case (3 bolts for 10): 19. Unscrew the timing roller with a key for 17 and remove the timing belt 20. We unscrew the pulley (with a 17 key) and remove the pulley, the main thing is not to lose the veneer (in the form of a semicircle):
Full size This is how we unscrew pulley 21. We unscrew the nut on the protection with a 10mm wrench (in the previous photo where the wrench is placed to secure the pulley from turning) and bend the protection22. We unscrew the two fuel hoses (be sure to remember where one is so as not to get confused during assembly)23. Unscrew the 2 pipes near the oil filler neck.
24. Remove the valve cover with a 10 wrench and two nuts:
Full sizeValve cover removed25. We mark the explosive wires and remove them. Continued in the second part;), because photos don't fit
- ladaautos.ru
- 24techno-guide.ru
- zarulemvaz.ru
- www.drive2.ru
Determination of malfunction and list of new parts
It is quite easy to detect a faulty part when the engine starts to overheat, just touch the lower pipe on the radiator of the cooling system, and if it turns out to be not very hot, this will mean that the thermostat valve on the VAZ 2114 has failed and requires urgent replacement.
To carry out repairs you must purchase:
- new thermostat assembly (art. 21082-1306010-83);
- upper radiator pipe (art. 21120-0-1303010-86);
- lower radiator pipe (art. 21120-0-1303010-86)
- thermostat pipe (art. 2108-1303092-R);
- expansion barrel pipe (art. 21120-0-1303010-86)
- metal pipe clamps 5 pcs.;
- new antifreeze;
- sealant for reliable fixation.
Replacing the thermostat on VAZ 2113, 2114, 2115 cars with fuel injection is carried out using some tools, namely:
- two open-end or socket wrenches 12 and 13 mm;
- Screwdriver Set;
- container for draining coolant;
- protective gloves for hands.
The price for replacing a faulty thermostat on a VAZ 2114, which will need to be paid at official Lada car repair shops, this fall is approximately 1,500 - 2,000 rubles (excluding the cost of new parts). In small private garage-type auto repair shops, this work is estimated at 1000 rubles.
The work itself is not difficult, and if you have high-quality spare parts and tools, any owner of a VAZ 2113, 2114 or 2115 will be able to carry out repairs on their own, for which you need to watch a video on replacing the thermostat on an injection model, or carefully study the stages of this process below.
Fault diagnosis
In some cases, rod bending (breakage) can be determined quickly and without tools.
- To do this, the new belt is installed according to the marks, and then the crankshaft is quietly rotated 2-5 revolutions. If it rotates with great difficulty, the elements are bent.
- Listen to the muffler and air filter. If there is a lot of hissing from the exhaust system, there is a problem with the exhaust valves. And vice versa - if the sound is from the VF, then the intake devices are faulty.
It will also be possible to identify a breakdown by measuring the compression in the cylinders - a drop in it will indicate a problem. However, the compression meter only detects the fact that the engine has lost compression. To find a specific reason, mechanics conduct a test. First measure the compression of one cylinder. Then pour a small amount of oil into it and measure the indicator again. If, after adding lubricant, the compression rate increases by 1 atmosphere, the malfunction is related to the valves. And if it’s 2-3 points, it’s already wear on the CPG or the rings are stuck.
For a more accurate diagnosis, it is recommended to use a pneumatic tester. This is a tool that detects leaks in the cylinders and shows the general condition of the mechanics in the internal combustion engine. It is connected through the oil filler hole or spark plug well.
The pneumotester makes it possible to diagnose:
- CPG condition;
- cylinder head gasket integrity;
- tightness of the above-piston space of the cylinders.
And the most important thing is the tightness of the valves.
Another way is to screw the vacuum (pressure) sensor into the hole in the oil dipstick, which is connected directly to the crankcase. The second sensor is a synchronization sensor, it must be installed on the first cylinder. Next, start the engine. When the fuel mixture ignites, gases will begin to break into the crankcase. Here you need to create a diagram of pressure changes. In the cylinder where this happens more sharply and more, something, most likely a valve, is preventing the gases from breaking through.