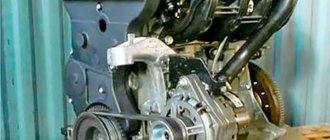
The VAZ 21126 power unit was designed for the Lada Priora; it became the base unit for this car. On the Priora, this engine has 16 valves in the cylinder head, which makes it possible to increase its fuel efficiency and power. The mechanism is driven by a toothed belt. This made it possible to reduce noise and weight of the power unit, and simplified engine maintenance. For trouble-free operation of the engine, it is necessary to change the timing belt in a timely manner. For its correct installation, there are marks on the rear casing, camshaft pulleys, and flywheel.
Why are tags needed?
The operation of a four-stroke internal combustion engine occurs in a strictly defined order of movement of the pistons, opening and closing of valves. If this order is violated, the engine will not work, and in some cases it may fail. In the process of fine-tuning the power unit, the manufacturer selected the optimal phases for opening and closing the valves. At the right moment they are activated by the camshaft cams. To correctly set the valve timing when assembling the engine or replacing the timing belt, marks are provided.
Signs of a faulty timing assembly
On the Priora, timing marks (photo shown in the material) are placed on the crankshaft and camshafts. If they suddenly go astray, the belt will slip and the valves will begin to open out of sync, with a slight delay or advance. Signs that the belt on a Priora needs to be changed:
- Extraneous sounds appear when the engine is running.
- The color of the exhaust gases changes.
- Starting the engine becomes problematic.
- Extraneous vibrations are felt.
You should not hope that if the mileage of the car is not very high, then there can be no breakdowns in the engine. There are often cases when happy owners of new cars, just purchased from a dealership, stopped on the highway because the engine seized.
Unfortunately, this also happens. As for the timing belt drive, it can wear out much earlier than expected. This usually happens due to dust and dirt getting on the belt.
Camshaft marks
The VAZ 21126 engine has 16 valves, so for their operation two camshafts are installed in the cylinder head. One of them is responsible for the operation of the intake valves, the second is the exhaust valves. The camshafts are driven by pulleys through a toothed belt. Each shaft has its own pulley, which cannot be replaced with each other. The pulley on the right side of the motor (when viewed from the radiator side) has an insert for a phase sensor. The manufacturer applies marks to each pulley for proper assembly of the timing drive.
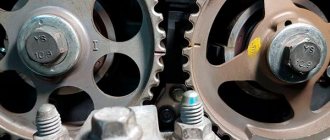
They are located on the crown of the pulley in the form of a protrusion in its lower part. These marks are called movable marks because they rotate with the camshafts. Correct installation of the pulley on the camshaft is ensured by a key. Only correctly installed Priora timing marks will ensure efficient use of its engine. The marks on the pulleys can have different shapes, depending on the manufacturer of the part. It is necessary to carefully wipe the outer part of the pulley with a rag, after which you can see the protrusion or recess as a mark.
Types of timing drive checks
In the absolute majority, the Priora is equipped with a VAZ 2170 engine. It has 16 valves. But there is a small part of these cars equipped with an 8-valve engine. For the most part, these are “Priors” for official use. Therefore, the 16-valve engine will be considered in the article. There are 3 ways to check belt tension:
- Organoleptic (manual).
- Using mechanical devices.
- Electronic sensor.
They will now be described in order of priority.
Manual way to check the tension and condition of the drive
This is the simplest method suitable for every owner. Although many repairmen often use it too. It's done like this. Using a #5 hex socket, remove the bolts securing the upper timing belt cover. There will be access to the camshaft gears and the belt section between them. Take the belt by the sides and try to turn it out with your fingers. The edge of the belt should move no more than 2-3 millimeters. If more, you need to tighten it. Carefully inspect the drive for cracking of the rubber. Make sure there is no fraying of the cord. No fraying at edges. If there is no damage, tighten the belt to normal.
It is recommended to inspect and check the condition of the timing drive at least every 3,000 km.
Mechanical testing method
For this you will need a special device. Dynamometric. This is a device with a scale that allows you to determine the deflection of the belt. It has its own instructions for various car models. There is no particular point in buying it for a private owner; it is suitable for small service stations.
Electronic verification method
This is the most accurate of all types of checking the Priora timing belt tension. But it requires a special ultrasonic indicator. The device is quite expensive, but convenient and easy to use. It is made in the form of an oblong rectangular case. Two wires come out of it at one end and are attached to the car battery terminals. They are designated “+” and “-”. In the middle, on one side, there is a digital window - a display. When connected, two “0”s are displayed there.
Crankshaft marks
Installing the camshafts correctly in the desired position does not mean that this is enough to start the engine. Lada Priora has 16 valves, so if you do not synchronize the operation of all engine mechanisms, several of them will be damaged. To prevent this from happening, they must open or close at strictly defined times. The timing mechanism parts are driven from the crankshaft. The crankshaft has a gear at the output, the rotation of which is transmitted through a toothed belt to the remaining parts of the timing mechanism.
This gear is fixed on the crankshaft with a key; it will be impossible to install it in any other position. To correctly match the position of the pistons and valves relative to each other, there is an installation mark on it. It is located on the outside of the pulley in the upper part of the crown. Usually it is found opposite the tooth in the form of a slot, notch, or conical hole. Sometimes this requires wiping the working area of the pulley with a rag. The generator set drive pulley, which is removed from the crankshaft, may interfere with visibility.
When to change: consequences of untimely change
It is recommended to replace the timing belt on a Priora after different periods of time. The manufacturer claims that it can withstand one hundred thousand mileage, but experience shows that a change may be needed much earlier.
The optimal period is every fifty thousand kilometers. Some argue that over such a short service life, rubber is simply not capable of failure. However, no one takes into account the conditions - roads, fuel quality, etc.
Also, during the operation of the mechanisms, it wears out, the rubber stretches, and therefore does not provide the correct tension of the timing belt, and slippage is possible. The teeth can wear off - because of this, traction with the gears is not ensured.
There is no exact time for a change that would suit all motorists. Some take good care of their vehicles, drive carefully, and use only high-quality fuel. Others use a more extreme type of driving, foreign liquids get on the rubber, etc.
In order not to lose your car during the repair period and not to spend a fortune on restoring the mechanics, write down or remember the date of the last timing belt change on the Priora. Next, regularly check the condition of the rubber; if worn, replace it with a new device.
Signs of possible failure
There are several characteristic signs that should alert the driver:
- When the engine is turned on, extraneous noise occurs. Sometimes drivers confuse a timing belt malfunction with a poorly functioning tension pulley.
- If the color of the exhaust gas has changed.
- The engine doesn't start well.
- An unusual vibration is felt.
Pay attention to these “symptoms”, even if the Priora’s mileage with a new timing belt has not yet reached 50 thousand km
It may fail earlier if foreign liquid gets onto the drive - oil, coolant, as well as dust or dirt.
It’s worse if it’s the coolant that gets onto the drive. Firstly, this means that the gasket that ensures the pump is sealed has failed, or there is a problem with the pump. Then the rubber is damaged and service life is reduced tenfold.
Even if the belt is new, but coolant or antifreeze gets on it, it will fail even after operating for 10 thousand miles. You will have to replace the Priora timing belt and figure out why foreign substances get on it.
How to check the serviceability of the belt yourself
If you suspect that it is time to replace the Priora timing belt, it would not hurt to check the serviceability of this rubber product. Visual diagnostics will allow you to check the serviceability and absence of scuffs on the Priora timing belt.
You should have a choice of one of the tools at hand, or two at once - a 5-point hex key, or a T-30 sprocket bit. If one doesn't work, try the second.
- Open and lift the hood.
- You will see the front panel covering the mechanism and timing belt.
- Take the key and unscrew the five bolts that hold the front panel, remove it.
- In front of you you will see a mechanism, including a tension roller.
- Place a jack on the passenger side and place the wheel in a suspended position. Engage fifth gear while it is working, look at the surface of the belt for damage, even small defects.
- If you notice cracks of any size, mechanical cuts, or threads sticking out, be sure to replace it by contacting a specialist or yourself.
- Check the pump. If any traces of coolant leakage from the pump are noticeable, then the rubber will also have to be changed, even if there is no mechanical damage.
- Check the tension roller. Auto mechanics advise changing it less often than tires. The average lifespan is approximately one hundred thousand kilometers. Change it every other time you change the belt.
- Measure the belt tension. To do this, press on the stretched rubber in the area between the gears of the two camshafts. You need to press with a force of about ten kilograms. Correct tension of the timing belt should not bend more than seven millimeters.
- Check that the rubber is not too loose. Make sure that the Priora timing marks match the original condition. The first, similar to a recess, is located on the outer race of the tension roller. The next one is located at the base of the roller. The maximum deviation is four millimeters; if the tension does not meet the standards, the product will have to be changed.
Found a discrepancy with the standards? Change the product. A belt set with rollers for the Priora 126 engine costs only five thousand rubles. This is a much smaller amount than the cost of a major repair if a component ruptures.
Marks on the flywheel
To reduce inertial masses and make it possible to start the engine with a starter, a flywheel is installed at the rear end of the crankshaft. It can only be locked in one position, so there is also an installation mark on the flywheel. Finding it is not so easy and inconvenient. The protective housing of the clutch mechanism has a rectangular cutout, which is closed with a rubber plug. It can be easily removed with pliers; putting it back will be a little more difficult. In the hole that appears after removing the rubber plug, a conical cutout on the body will be visible.
Now, rotating in any available way, the engine crankshaft is combined with this cutout, a notch on the flywheel in the form of a slot. This is usually done to set the piston of the first cylinder to top dead center. If the notches on the flywheel and its housing coincide, check whether the other reference points of the engine mechanisms match. If this does not happen, you need to turn the crankshaft one more revolution. It is worth remembering the fact that to complete a full revolution of the camshafts, the crankshaft rotates twice.
How to check if labels match
Most often, checking the alignment of the timing marks of the timing drive mechanism is performed when replacing the timing belt. Their position can only be checked when the protective plastic housing of the timing drive and the generator set pulley are removed. You can turn the crankshaft using the front wheel. To do this, lift the front of the car on the right side with a car jack. Next, you need to engage fifth gear, after which the assistant must rotate the raised wheel clockwise with his hands. This is done until the marks on the crankshaft and camshafts match.
how to set timing marks on a Priora
The Lada Priora car is equipped with durable timing belts from Gate, so the manufacturer states that the belts can be used for 100,000 km, however, the timing belt requires constant supervision. How to correctly install gears on the timing belt 1.4. The belt may wear out ahead of time due to deviations in the operation of other components with which it works together (guide or tension, due to free movement or jamming of the pump). In this article we will talk about replacing the Lada Priora timing belt, if such a need has been established. Typically, replacing the timing belt is necessary if the rubber on it is cracking, breaks, excessive wear, or teeth are pulled out. Rice. 1 Diagram of the gas distribution mechanism drive of the Lada Priora car: 1 crankshaft toothed pulley; 2 toothed belt; 3 water pump pulley; 4 tension roller; 5 exhaust camshaft pulley; 6 rear toothed belt protective cover; 7 camshaft ; 8 ring (synchronization disk) for phase sensor; 9 support roller; And the TDC mark is on the crankshaft timing pulley; B installation mark on the oil pump cover; C, F installation marks on the rear protective cover of the toothed belt; D installation mark on the exhaust camshaft pulley; E installation mark on the intake pulley The camshafts are driven into rotation from pulley 1 (Fig. 1) of the crankshaft by means of a belt drive with a toothed belt.
Under the camshaft pulleys there are two rollers: on the left is a tension roller 4, on the right is a support roller 9. For 16-valve VAZ-2112 engines, the placement of marks will be different. How to set marks if the timing pulleys turn when replacing the belt? For the support roller, the mounting hole is made in the center of the inner race; for the tension roller, it is located eccentrically (offset from the center by 6 mm). Therefore, by turning the tension roller relative to the fastening bolt, you can adjust the belt tension. Camshaft pulleys differ in that a synchronization disk 8 is welded to pulley 7 of the intake camshaft, which ensures the operation of the phase sensor. The drive is covered with plastic covers at the front and rear. To set the valve timing, there are installation marks A, D, E on the pulleys, B on the oil pump cover, and also C and F on the rear drive belt cover.
Checking and adjusting the tension of the timing belt.
If you want your belt to last long and trouble-free, it is important to maintain its tension in the correct position. To do this, periodically test the tension. Pay special attention to the first tension of the new belt. If the belt is loose, the lateral load on the teeth increases, which greatly accelerates their wear. In some cases, if the belt is very loose, there is a high probability of the belt teeth moving relative to the pulleys. This can lead, at best, to engine instability and loss of power. In the worst case, it will lead to expensive repairs. To check the tension, perform the following steps:
1. Unscrew the 5 bolts securing the protective timing cover and move the cover to the side.
2. Press the timing belt exactly in the center between the camshaft pulleys with a force of 100 Newtons (10 kgf). The belt deflection from the horizontal position should be no more than 7 millimeters. Modern tension rollers are also provided with a tension control mechanism. To check the quality of the tension, make sure that mark A on the outer part of the roller coincides with protrusion B.3. To adjust the tension, slightly unscrew the roller mounting bolt and, by rotating the roller, achieve complete alignment of the marks described above (see figure)
Replacing the timing belt on a Priora! Timing marks VAZ 2170, 2171,2172!
How to remove, disassemble and reassemble the starter on a Priora
!
Broken timing belt
Lada.
Replacing the timing belt on a 16-valve Priora is a little more complicated than on 8-valve engines, however, this procedure is accessible to almost every car enthusiast.
A belt in a car engine is one of the main parts for transmitting torque from one mechanism to another. But it is worth remembering that everything has an expiration date. We will outline the nuances of working and replacing the belt in the article below.
What kind of belt is used?
On Priora cars with a 16-valve engine 21126, a toothed rubber belt with a number of teeth of 137 pcs is used. The width of the belt is 22 mm.
The article number of this element is 137-22 HNBR
This is what the timing belt used on Priors looks like
Also, many owners speak well of Gates belts.
Why change the timing belt on a Priora
Why this belt is needed, most likely, does not need to be explained. In general, there is probably no need to explain why it should be changed, however, there are inquisitive minds who need a lot of information simply for general development. And with that, let's get started.
So, the belt drives the gas distribution mechanism, namely the camshaft. This, in turn, lifts the valves, which move towards the piston at the moment of the exhaust stroke. But they get into the saddle in time, so nothing bad happens. If the timing phases are disrupted, and it is precisely this disruption that occurs when the belt breaks, it may happen that the camshaft stands in one position when, for example, the intake valve in the first cylinder is open.
The moment the piston goes up, it will simply bend the valve. Repairing a domestic car in this case will cost about 15 thousand rubles, while for repairing a foreign car head you will have to pay from 30 thousand of our wooden ones. Therefore, it is imperative to monitor the belt, or better yet just the mileage. The factory regulates a gap of 70,000 kilometers for this unit. There are fellows who have driven more than a hundred, but the 127 engine bends the valves, just like it bends.
About the resource
Well, now we’ve come to the most interesting thing, namely the resource. You know, now I want to talk specifically about normal belts and tensioning equipment, about “PRIORS” will be a little lower.
Not all manufacturers strictly indicate how often to change the belt, but such information can still be found, even in the car’s operating books.
The average mileage recommended for replacement is 100,000 kilometers. On many foreign cars, this mileage can be much longer, about 150,000 kilometers.
Now the question may arise: what does it depend on? Guys, to be honest, the belt itself can run (as some manufacturers claim) about 200,000 km, but its service life is reduced due to tension and support rollers. They are often the culprits of the cliff!
The support roller is a kind of bearing on which the belt rests, often has a plastic housing.
The tension roller is almost the same plastic bearing, only it is located on a special mount that “tensions” the belt, that is, it keeps it in “tone” and prevents it from “sagging” and jumping onto a tooth.
Both videos must be of simply excellent quality, no, they simply must! With foreign cars this is almost always the case, these “support” and “tensioner” last a long time, and replacement is 100 - 150,000 km in advance.
As you may have guessed, not only the belt is changed, but also the tension and support rollers - THIS IS MANDATORY, REMEMBER THIS! As an indirect reason for a future replacement, there may be noise from the timing drive; when the rollers begin to “bend”, they begin to make noise.
Tools for replacing the timing belt on Lada Priora
Let's start with the fact that to replace the timing belt on a Priora 16 valves you will have to stock up on a very specific set of tools. This is definitely a set of hexagons, a set of torx bits, and a set with a small 1/4-inch ratchet will not work, we’ll tell you why later. In addition, you will need a device for tensioning the roller, but the usual one from 2114 will not work, you need a slightly wider one. If you have enough strength, you can tighten the roller simply by leaning against it with a mounting tool; many people do this.
It is also necessary to clarify whether there are 16 valves on the Priora with or without air conditioning. If yes, then the belt needs to be longer. The belt is officially supplied with a length of 1125. However, most owners say that it is better to use 1115. This is due to the following. The fact is that initially the 16-valve 21127 was designed without air conditioning. Everything was simple. The pump is driven by the timing belt, the alternator belt is no longer responsible for anything. In general, it couldn’t be simpler. Crankshaft and generator with tensioner, without rollers.
The designers were faced with an almost unimaginable task - to install an air conditioning compressor, which they accomplished. Yes, not perfect, but we did it. And therefore, two additional pulleys appeared here - a compressor and a tension roller. The problem is that previously the contact patch of the generator pulley was about 120 degrees. After the introduction of the new scheme, it is approximately 30 degrees, because the tension roller pulls the belt and does not press it against the pulleys, as was the case, for example, on Kalina. By the way, many car owners later began installing these same brackets with a tensioner in order to dismantle this circuit.
Tensioning the alternator belt in a Priora car - nuances of implementation
Any car enthusiast knows that there will definitely come a time when you need to tighten the Priora alternator belt. It is known that the belt drive of this car is quite durable, but during operation there is a slight stretching of the belt itself, as well as a decrease in the adhesion of its surface to the pulley and roller.
Literally as soon as you notice a whistling alternator belt on a Priora, you need to start tightening it at the same moment, especially since this is not difficult to do.
Before tensioning the Priora generator belt, you need to prepare an open-end or socket wrench for 19 and a special two-end tension wrench directly for the roller. This key is similar to the one used to change discs on an angle grinder.
The process of adjusting the alternator belt on the Priora is carried out as follows:
— unscrew the roller nut, while holding the clip of the roller itself with a key;
— by lightly rotating the tension wrench, we turn the eccentric cage of the tension roller, while increasing the belt tension;
— We screw the roller nut.
