Anti-lock braking system ABS: types, types
Depending on the type and type, ABS is classified into:
- One scheme of operation of the ABS system is when all the devices that make up the ABS are located in one unit. That is, the hydraulic valve block, hydraulic accumulator and pump are located in one unit.
- The second ABS scheme is when the component devices (hydraulic valve block, hydraulic accumulator and pump) are located in different places. In this type of braking system, in addition to the ABS module, there is also an ESP module and an SBC module.
Whether you can bleed the brake system yourself depends on what type of brake system is in your car.
If the car has a system of the first type, then it is easy to properly pump the ABS.
If the car has a system of the second type, then one cannot cope without a scanner; it needs to be pumped to a service center for maintenance.
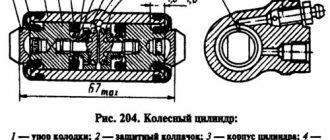
The ABS system consists of:
- Sensors (installed on the hubs). When replacing rear wheel hubs, as well as some front ones, you may notice special recesses for sensors. They are engaged in transmitting data about the speed of movement.
- Control valves (installed in the brake system). Serve to change the pressure in the system.
- The electronic unit. Receives speed information from sensors and adjusts control valves.
How to bleed brakes without an assistant
How to pump the brakes with a partner has already been described above. What to do if there is no such thing nearby, but you need to bleed the brakes? You can get out of this situation in several ways:
- You can bleed the brakes alone if you have a gas stop. The meaning is the same as when pumping with an assistant, only instead of him the gas stop will press on the pedal. Therefore, you need to press the pedal several times, keep it pressed, set the stop and begin to bleed the brake fluid. When the fluid begins to flow, the stop will begin to push the pedal to the floor to the limit.
- bleeding the brakes with a syringe. You need to hermetically embed the syringe into exactly the same lid as on the tank. Then, having first filled the syringe with brake fluid, replace the regular cap with this device, unscrew the fitting, place a container and apply pressure with the syringe.
- another method with a modified lid. You need to insert a car nipple into a cap similar to the one installed on the tank. Then put the lid with the nipple on the tank, then put one end of the hose with a connection clamp on the lid, and the other on the spare chamber, inflated to no more than 1 atmosphere. Open the fitting and bleed out the liquid with air bubbles.
Replacing brake fluid and bleeding brakes
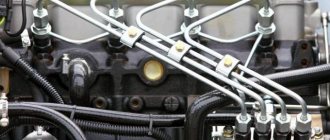
Note! To bleed the brakes, the following tools are needed, namely: A wrench size “8”, a small long transparent hose that can be put on the bleeder fitting, as well as a container with a little new brake fluid poured into it and be sure to stock up on a rag, brake fluid nevertheless, it has a negative impact on human skin and paintwork, and if you get it on something listed above, be sure to wipe the area of contact with a cloth, otherwise problems may arise in the future!
ABS bleeding sequence
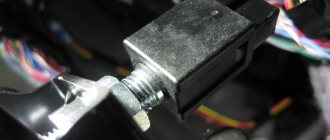
- First, we look for and remove the fuse in the fuse block that is responsible for the operation of the anti-lock braking system.
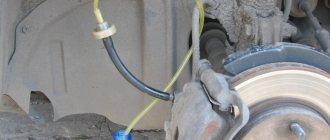
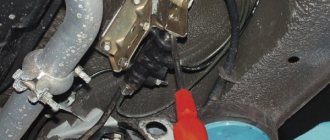
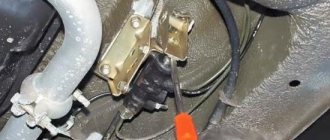
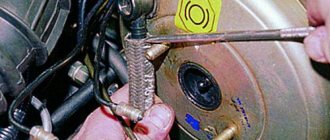
- Next, we jack up and remove one front wheel, and look for the brake wheel cylinder (BWC) fitting.
- After this, we put a hose on the fitting (from a hydraulic level, for example).
- Open the fitting one turn.
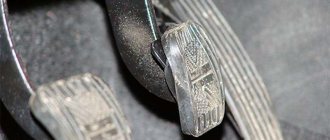
- One presses the brake pedal all the way and holds it in that position.
- Now turn the ignition key to turn on the hydraulic pump (the ABS indicator lights up on the instrument panel).
- The second person watches how air is removed through the hose and, after removing the air, tightens the fitting.
- We release the brake pedal only after tightening the fitting.
- Now, how do you know that all the air has escaped from the ABS? This shows the ABS icon on the dashboard, if it goes out after removing the air and tightening the fitting, then all the air has escaped.
Carrying out work on rear mechanisms on VAZ classic models
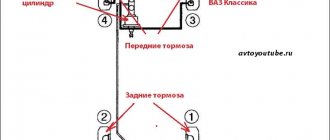
First, let's look at how to properly bleed the brakes on a Classic. To perform the operation correctly, it is necessary to take into account that on the VAZ-2106 or any other model, the brakes are dual-circuit. That is, the entire system is divided into two independent parts. This was done so that if one of the circuits depressurizes, the second remains operational and the car can stop. But it is important to understand that the separation into circuits occurs on the master cylinder, and if air enters the system due to lack of fluid, it will be in both components.
For all classic models, including the VAZ-2107 brakes, the circuits separate the front and rear wheel drives. This must be taken into account when it is necessary to bleed the brakes of a 2101 or another model.
By the way, if only one circuit is aired, then it is not necessary to bleed the second one, although it would not be superfluous to treat all mechanisms, both front and rear.
So, everything is prepared, and you can get started.
The sequence of actions is as follows:
- It is better to drive the car into a pit to make it easier to get to the fittings. At the same time, he is immobilized using a handbrake or wheel chocks;
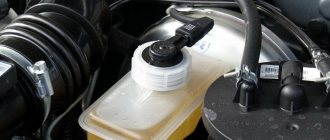
- Remove the cap from the brake fluid reservoir, check the level, and if necessary, bring it to the maximum level;
- First, we bleed the rear brakes of the VAZ, since the entire operation is done from the brake mechanism, which is as far as possible from the master cylinder, that is, from the right rear wheel;
- We put the assistant in the driver's seat. We climb under the car ourselves, put the key on the fitting, and then put the prepared tube on it, the second end of which should be lowered into a container with a small amount of liquid poured into it. It is advisable to immediately tear the fitting out of place and immediately screw it back, even before pumping. This is done so that there is no hitch in the process due to a non-unscrewing fitting;
- We ask the assistant to press the brake pedal 5-6 times. At the same time, with each press the failure will be less and less - the drive is pumped with liquid, while air moves to the mechanisms. After downloading the system, the assistant should hold down the pedal - press and hold it;
- Unscrew the fitting half a turn, working fluid will begin to flow out of it. If a transparent tube is used, air bubbles will be clearly visible in it, and the pedal being held will begin to move down until it hits the floor. In this position, the assistant must hold it, at this time the fitting must be screwed back;
- This sequence of actions should be carried out for one mechanism 4-5 times to completely remove air;
- On the “classic”, the left rear wheel is pumped next (since they are combined into one circuit). But before that, you need to check the level of the tank and bring it to the maximum level. The sequence of actions is the same: pump the brakes and hold the pedal - release the fitting to drain the fluid with air (the pedal goes down) - tighten the fitting - pump again. And so 4-5 times;
Conclusion
After carrying out repair and maintenance work on critical components of the car, before driving, you must first check the tightness of the system and the operability of the vehicle components.
ABS - Anti-lock Braking System is a system against wheel locking during heavy braking. Thanks to the fact that ABS prevents the car from skidding along the road, safety increases in emergency situations. The anti-lock braking system will operate correctly if the system is not air-filled.
Watch this helpful video. Tests show that even a working ABS system turns off at the end of the braking distance, so you still need to modify it with your foot.
The Lada brake system is responsible for the safety of the driver and passengers of the vehicle, so it needs to be checked regularly. The serviceability of the brake pads should be checked at least once a month.
Replacing brake fluid
To complete the work, you will need an assistant, as well as a rubber bulb.
1. We prepare the car and the necessary equipment to perform the work.
2. Remove the tank cover
To prevent air from entering the hydraulic drive of the brake system, when replacing the brake fluid, make sure that its level in the reservoir does not fall below the MIN mark.
3. Use a blower to remove the working fluid from the master brake cylinder reservoir.
4. Fill the tank with new fluid up to the top edge of the tank.
5. We pump the circuits of the hydraulic drive system, starting with the rear wheels of the car.
6. We pump each wheel cylinder until new (lighter) brake fluid begins to emerge from the fitting.
7. After replacing the fluid in both circuits, we check the operation of the hydraulic drive and bring the fluid level in the master brake cylinder reservoir to normal.
Braking system design Grants
Before you start adjusting and checking, you should find out what the Lada brake system is like and what its features are. The design includes the following parts:
- brake regulator;
- pipelines;
- brake pads and cylinders;
- amplifier.
To ensure efficient and safe braking, Grant has a double-circuit (diagonal) pipeline system. The tasks of the first circuit include blocking the left rear and right front wheels. The second circuit is designed to block the left front and right rear wheels. The front wheels have disc brakes, and the rear wheels have drum brakes.
The process of controlling the master cylinder on the Lada Granta is carried out using a vacuum amplifier. This device is designed to improve controllability of the brake system. To do this, you need to press the appropriate pedal. It is necessary to take into account that an anti-lock braking system may be included in the Lada Granta, or ABS will be absent. The Lada Granta system under consideration is equipped with a hand brake that blocks the rear wheels by spreading the corresponding pads in the drums. These parts are moved through levers and by moving a steel cable located inside the vehicle.
The vacuum amplifier is a diaphragm. This element shares the rarefied atmosphere of the vacuum booster with external pressure. The pressure difference helps to reduce the effort exerted on the corresponding pedals. When the brakes are released, the atmospheric and vacuum chambers are connected to each other using a special valve.
Checking and bleeding brakes
To check the brakes on the Lada Granta, you will need a jack. With its help, the rear of the car is raised. Then remove the wheels. The next step involves dismantling the drum. If the guide pins are unscrewed, you will need to loosen the handbrake cable and remove the cotter pin that holds the shoe in place. Then the lever, springs and brake pads are dismantled.
When carrying out the last processes, you need to ensure that the brake fluid does not leak. To do this, auto mechanics recommend disconnecting the special tube designed to supply this substance to the cylinder. Thus, the access of the brake mixture to the outside will be blocked. Then remove the corresponding cylinder. Installation of the dismantled parts is carried out in the reverse order. In this case, you will need to lubricate each unit with a special graphite lubricant.
The brake system of any vehicle needs bleeding. This process is carried out after each brake repair. It should be noted that it is difficult to do such work alone. Therefore, auto mechanics advise hiring an assistant to bleed the brakes. Someone must be in the vehicle pressing the appropriate pedal 5 times until it bottoms out. The second participant in the process uses a wrench to loosen the screw located near the brake disc. This unit is designed for draining liquid. When unscrewing the screw, press the brake pedal. If it rises, the screw tightens. A similar operation is performed several times.
If liquid appears at the outlet instead of air, the pumping process has been completed correctly. The main thing is that the substance comes out without air bubbles. The final stage is installing the wheels in their original places. To check operation, you will need to spin each wheel by pressing the brake pedal several times. If the drum clings slightly to the pads, it means the procedure was completed successfully. The front brakes of the Lada are adjusted using a similar scheme.
1200 rub. for the photo report
We pay for photo reports on car repairs. Earnings from 10,000 rubles/month.
Write: