How to remove a generator on a VAZ 2109
In a car, a generator is responsible for producing electrical energy to power a device such as a battery. In the absence of its normal operation, the battery is only discharged, and the car is able to function until it completely exhausts its charge.
Checking the VAZ 2109 generator
In order to prevent an extremely unpleasant situation associated with the failure of the generator at the most inopportune moment, it is advisable to regularly check its serviceability. Let's consider the algorithm for carrying out this procedure. You will need a tester (multimeter or similar device) that operates in voltmeter mode, as well as an assistant. Place the car on any flat surface and raise the handbrake, warm up the engine to operating temperature. You can start checking the generator:
1. After warming up the engine, turn on the heated rear window, high beam headlights and heater. At this time, your assistant, who is inside the car, should lightly “accelerate” in order to maintain engine speed - 3000 - 3500 rpm. 2. Measure the voltage at the battery terminals with a tester. It should be at least 13 V. When it is lower, it indicates possible malfunctions of the generator (insufficient tension of the generator drive belt, worn or oily brushes, breakdown of the voltage regulator, “break” in the electrical circuit of the generator, breakdown of the stator, rotor or diode bridge) . 3. Turn off all previously switched on electrical consumers; the engine continues to run. 4. Measure the voltage at the battery terminals; normally it should be 14.3-14.6 V.
On a VAZ 2109, a correctly operating generator should produce at least 13 V at 3000-3500 engine rpm. , and at idle 14.3 - 14.6 V. If the indicators you received during the check do not coincide with the values written above, then most likely the generator needs to be replaced.
Dismantling the VAZ 2109 generator
Let's figure out how to do this quickly and without problems. To carry out dismantling, prepare a standard set of tools, it is advisable to place the machine on an inspection hole, then follow these steps:
1.
Disconnect the battery, turning off the power to the car in a similar way.
2.
Next, remove the protective cap from terminal “30” and, unscrewing the nut, carefully remove the wires from the pin.
3.
Now disconnect the block with wires from the generator connector.
4.
Make the fastening of the generator to the adjustment bar weaker, lift it as high as possible to the cylinder block and carefully remove the belt from the pulleys.
5.
Then finally unscrew the bolt securing the adjusting bar to the cylinder block, then from the bottom of the car, unscrew the two bolts securing the lower bracket to the block and remove the generator.
Now all work on dismantling the generator is completed. Install the generator on the VAZ 2109 by performing the steps in reverse order. Be sure to check the condition of the belt; if it is unsatisfactory, change it and further adjust the tension.
By following the above recommendations, you will be able to correctly remove the generator on the VAZ 2109 and install a new, working device.
Typical malfunctions and methods for their elimination
To prevent unit failure, it is necessary to ensure its high-quality and timely maintenance. As you can see from the photo of the diagram, the unit consists of many different components, so the likelihood of it breaking due to improper maintenance is quite high.
So, in what cases is a VAZ generator repaired:
- The indicator light on the dashboard does not turn on, although the unit and all equipment are working normally. Most likely, the problem is an open circuit or burnout of the indicator itself. In some cases, the reason is poor contact of the diode with the wiring; in this case, you only need to clean the contacts of the connection connector.
- The indicator on the tidy, as well as the instruments themselves on the control panel do not work. Apparently, the reason for this is the failure of the safety element, which will need to be replaced. Also, the reason may be a break or unsoldering of the wiring.
- The warning light comes on after the engine starts, but it disappears after the driver presses the gas. The essence of the problem lies in the fact that the generator unit is not excited at low engine speeds; in most cases, this is due to the desoldering of the resistor elements in the block. Conduct their diagnostics and, if necessary, solder them again.
- Another malfunction is that the indicator continues to light when the engine is turned on, while the voltmeter needle on the dashboard is in the red zone. In this case, there may be several reasons for the problem. First of all, it could be the strap slipping - you need to check it and, if necessary, tighten it. Also, the reason may be a short circuit or breakdown in the diode elements of the winding; much less often, a malfunction occurs when the voltage regulator fails.
- Another sign is that the indicator does not light up when the engine is running, but the voltmeter needle on the dashboard is in the red zone. In this case, you first need to diagnose the presence of contact between the regulator connector and the brushes. If the contact is normal, then check the brushes (they may freeze), as well as the slip rings; for the latter, the problem of oxidation is relevant. In addition, the cause of the problem may lie in the failure of the voltage regulator; usually we are talking about a break in the wiring between the contact and ground. The same symptoms appear in the event of a short circuit on the positive valves of the rectifier element.
- When the engine is running, the voltmeter needle is located in the red zone - this symptom indicates damage to the voltage regulator. In particular, we are talking about a short circuit that can occur between ground and also contact Ш. The problem can only be solved by replacing the regulator.
- If the unit is significantly louder than usual, there may be several reasons for this. First, you should check the functionality of the bearing elements, as well as the tightness of the pulley nut. In some cases, the loud operation of the unit is due to the creaking of the brushes. The brushes themselves may be of poor quality, but it is possible that the problem is dust getting on the slip rings.
Replacing the VAZ 2109 generator
Most often, a generator is replaced in the following cases: when its windings fail, when there is a suspicion of incorrect output of current and voltage parameters, or in case of mechanical damage to the device.
Replacement is also necessary when it is necessary to install a more powerful unit based on the operational needs of the vehicle. VAZ generators are reliable and time-tested devices. Over the course of many years of work on the VAZ model range, they were constantly improved and acquired new structural properties. The parameters and technical characteristics of generators were improved, and their cost was optimized depending on market conditions.
In order to replace the generator on a VAZ 2109, you need to know the optimal indicators of a modern device, which you should focus on when purchasing it.
The main parameters required for the full operation of the power unit and electrical system of the car are:
- Electrical power that a generator can produce. Nominally it is about 700 W.
- Stable nominal voltage for charging the battery and powering the on-board network is 14 V.
- The rated rectified current indicator is not less than 52 A.
These operating parameters, which satisfy the design features of the VAZ 2109, are also applicable to the VAZ 2104, 2105, 2107, 2108, 21099.
It should be noted that modern generators have such positive qualities as:
- the quality of impregnation of the generator winding, which protects it from exposure to high temperatures;
- modern electronic balancing of the unit rotor;
- wear-resistant brushes;
- improved quality of bearings that can withstand prolonged loads;
- The voltage regulator is stabilized according to its nominal value throughout the entire service life of the device.
The website atek-avto.com presents Belarusian generators suitable for the VAZ 2109 and other models. They are characterized by all the positive properties mentioned above. Before installing a new purchased generator, you need to remove the old one.
To make a replacement, you must perform the following operations:
- install the car on an inspection hole or overpass;
- de-energize the network by removing the negative terminal from the battery;
- Remove all wires from the unit and loosen the belt tension nut.
Having completed these simple functions, we remove the generator belt, release the adjusting bar and unscrew the two nuts of its bracket. It is convenient to release them from below. Having removed the generator, you can begin to carry out the necessary work or replace the device completely.
Fastening design
The design of fastening elements for electric generators on AvtoVAZ vehicles varies. Differences in fasteners are caused by the peculiarities of the structure and location of the power unit. For cars of the VAZ classic and Niva family, with a longitudinal engine, the autogenerator is typically located longitudinally, along the block, near the first cylinder. The generator is driven through a belt from the crankshaft pulley. On front-wheel drive models with a transverse engine, the electric generator is located opposite the front right side member in the direction of travel.
The compatibility of the installation grooves on classic and front-wheel drive models differs, but depending on the specific model. The installation locations of the electric generator on classics and the first front-wheel drive cars (08, 09 and 99 families) are the same. However, to install an electric generator from a tens or Chevrolet Niva to a classic, you will need to purchase pulleys, a special strip and a mounting bolt for installing the generator. In other cases, the installation and fastening of generators from 21214 and other Nivas to rear-wheel drive VAZ models does not require additional work.
To install powerful devices from Kalina or Priora, the generator mount for other VAZ models will need to be changed. It is very important to select the appropriate components. For installation on the 08, 09 and 99 family, we select all generator mounts from VAZ (2110, etc.) for an 8-valve head, and not for a 16-valve one.
The fastener itself is a metal L-shaped structure made of durable steel. The design provides special holes for its combination with the autogenerator itself. In addition, the mounting strip is equipped with a technological cutout into which a screw is inserted to align the device relative to the cylinder block.
The lower mount of the generator is presented in the form of a special metal bracket with technological holes (in the bracket itself and in the counter part of the generator). A bolt passes through these fasteners, which rigidly connects the elements together. This is necessary in order to avoid vibrations and belt slippage during engine operation.
VAZ 2109: replacing alternator brushes on your own
In a VAZ 2109 car, replacing the alternator brushes is necessary if they are even slightly worn out. Otherwise, the generator may be damaged. And this will lead to the fact that it will be impossible to use the machine, since without a generator you can forget about normal functioning. Simply put, the car will not be able to start. And besides, the battery will discharge too quickly. If any defects are noticeable in the operation of the generator, they urgently need to be eliminated. Replacing the brushes of a VAZ 2109 generator is a simple process and anyone can handle it.
Reasons for replacement
Replacing generator brushes VAZ 2109
Generator brushes need to be changed in the following cases:
- They have worn out so much that they have ceased to perform their main function - to maintain battery charge.
- The battery drains quickly.
Note: there are many reasons why the battery discharges quickly. Therefore, this does not always signal bad brushes. But just in case, it is better to check them, since perhaps the reason is hidden precisely in them.
Checking brushes at home
Replacing generator brushes on a VAZ 2109
To check if the brushes are working correctly:
- Remove the battery so that the generator is de-energized. Otherwise, a small short circuit may occur in the system.
- Disconnect the voltage regulator.
- Visually inspect all brushes.
- If their length is less than 5 mm, they must be replaced urgently, as they no longer function as expected.
Quick brush replacement
Replacing brushes in a VAZ 2109 generator
To replace the brushes you will need the following tools:
- 8 key (or 8 socket).
- Flathead screwdriver (to remove the cover).
- Open-end wrench 13.
To replace brushes quickly and easily, do this:
- Loosen the nut and bolt that secure the generator.
- Remove the alternator belt.
- Start the engine.
Note: By the way, a bad belt can also cause alternator problems. It needs to be checked and replaced if necessary. To check, you need to bend it and see if there are any cracks on it.
- Disconnect the battery (to do this, disconnect its negative terminal). This must be done extremely carefully, since the battery contains acid that can damage the skin if it comes in contact with it. This must be done in order to avoid a possible short circuit.
- Disconnect the wires from the generator.
- Remove the front crankcase protection.
- Unscrew the lower mount of the generator.
- Use a flat-head screwdriver to block the rotor until it becomes completely stationary.
- Unscrew the pulley.
Removing the electric generator from the car
Before removing, disconnect the ground from the battery, i.e. remove the negative terminal. Then we proceed in order:
- Before removing the entire electric generator, in order to avoid unnecessary work, let's start with the charging relay, remove it from the generator body to visually determine the wear of its brushes
- The charging relay is located at the rear of its housing, and is attached to the unit with two bolts
- To unscrew them we need a Phillips screwdriver.
- Unscrew the bolts carefully so as not to drop them, otherwise they will fall behind the housing protection, then getting them out will be a big problem
- To finally remove the relay, you need to disconnect the wire with the “female” contact.
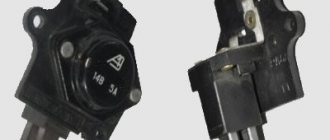
Charging relay with brushes
Instructions for checking the serviceability of the relay - voltage regulator:
- We connect a 12-volt test light to the brushes (photo below)
- We apply a voltage of 12 Volts: “+” goes to the relay terminal, and “-” is connected to the “ground” of the brush holder
- The indicator light should light up
We connect the control light with contacts to the brushes, supply 12 Volts
- We increase the voltage to 15–16 Volts - the light should go out
- If the light does not go out or does not light up at 12 Volts, it is necessary to replace the relay with brush holder
- Checking the ease of movement of the brushes in the holder and protrusion
- When the brushes protrude less than 5 millimeters, it is necessary to replace the brushes, or, more simply, the entire relay along with the brush holder
- If chips or cracks are found on the brushes, the regulator must be replaced.
Now let's move on to removing the electric generator:
- We disconnect the wires - they are usually red and divided into two groups
- The first consists of two wires and is attached with a nut to a bolt on the back cover of our unit
- The second consists of a single wire and is connected to the generator terminal, with a male-female contact, also located on the back cover
- To disconnect the generator from the engine, we need to unscrew one bolt and a couple of nuts, in this order:
- We unscrew the first nut, which is located on the generator belt tensioner bar (located in the upper part of the electric generator)
Replacing the generator on a VAZ 2108, VAZ 2109, VAZ 21099
Welcome! A generator is an integral part of any car, the generator supplies current to the on-board network, which is generated when the generator pulley rotates. Thanks to this, the battery does not have to work constantly and after starting the engine, it stops supplying current to the on-board network of the car, and only one starts supplying it. generator, but there are cases when it fails (Over time, this usually happens because sand and other types of dirt get into the generator, or the generator can simply burn out due to a short circuit) and it becomes impossible to drive a car, since One battery turns on, and when it is completely discharged, the car will stall and simply won’t go anywhere, so the generator needs to be changed when it becomes unusable or repaired (we will still touch on the topic of repairing the generator in this article).
Note! To change the generator, you don’t need a lot of time and tools, it will be enough to stock up on: Several keys, one of which should be “17” and the other about “19” and a pry bar or something like it (A stick, for example)!
Summary:
Where is the generator located? It is located between the TV and between the engine, when you open the hood you will immediately see it, but it will only be attached a little differently, not as shown in the photo, but the location will be exactly the same, for clarity it is indicated in the photo below with a red arrow.
When should the generator be replaced? 1. You can understand whether it provides charging or not at all in two ways, which one you choose is up to you, we usually recommend the first method to all those people who ask us a question about how to check the generator for serviceability, and it is as follows: You can buy a multi-meter at any auto store (It is available almost everywhere), the Chinese ones are quite cheap (About 300 rubles), You do not work at the station and are not an electrician, so this multi-meter will be quite enough (If you want, of course , you can get it for more expensive), in general, you buy this device and turn on the Voltmeter function on it, after which the leads coming from the multi-meter are connected to the battery (see photo below) and pay attention to the device (If the battery is working and charged, then it will have to give out at least 12.5 Volts, if it gives out less than 12, then it needs to be charged), now the next step is to start the car and the wires coming from the multi-meter are connected in exactly the same way as before (the function should still be turned on on the device Voltmeter) and the device is looked at again, the readings of the device will definitely increase, but if they fall, then the generator is not working properly and does not charge the battery (Also look at the charge lamp, see the small photo, if it is on and the readings of the device with the engine running gradually fall, then the generator is 100% faulty).
2. Now let’s talk about the second method, let us immediately warn you that it is free, but it can have a very bad effect on the generator, this is how it is done, start the car and the choke is pulled out (it is generally not recommended to do this on an injector), so after the choke is pulled out ( Halfway somewhere, so that the engine runs at 1500 rpm) and the car works for a while (A minute is enough, even less), the minus terminal is removed from the battery, and after removal the car will definitely have to continue its work (This indicates that the on-board network the car, and the ignition is powered from the generator and not from the battery), but if it stalls immediately, then the generator does not work (The brushes are worn out or the diode bridge is burned out), in general, such a generator will have to be removed and checked for serviceability (By the way, about how repair the generator, read the article: “Repairing the generator on a VAZ”) but there is one big minus, if the generator is not working correctly (This happens because of the brushes) but it still works, then the car will not stall and because of this, it will always the car's battery is discharged and therefore, to find out more accurately whether it provides charging and whether it gives it as it should, you can only find out with a multi-meter and by the way, if you buy this device, you will not regret it, since it will be very useful to you in the future .
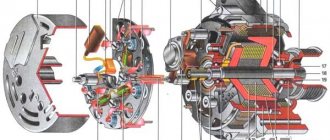
Electric generator device
The internal structure of a self-generator is very similar to a typical electric motor, but with certain differences. Moreover, differences in detail are present both external and internal. So, in the circuit of a self-oscillator there are such elements as:
- special voltage regulator;
- rectifier assembly (diode bridge).
In conventional electric motors, the above elements are rarely present, and their presence depends on the industry and the specific application of electric motors. But in autogenerators, the presence of such electronic components is simply necessary, since without them voltage surges can occur, as well as exceeding the maximum permissible voltage. Severely over or undervoltage in the on-board network negatively affects the condition of the on-board network, up to the fire of electrical appliances in the cabin (radio, subwoofer, alarm, etc.).
Repair of generator VAZ 2109
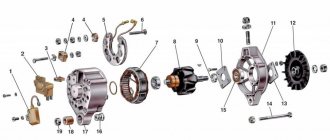
On VAZ 2109 cars there are two types of generator - the VAZ 2109 generator is a carburetor engine and an injection engine. They differ in both the fastening, the housing and the belt drive pulley. On a carburetor power system, the generator pulley is wedge-shaped, and on the injection engine of the VAZ 2109 it is poly-V-V or popularly “rivulet”. Below are images of two types of generator for the VAZ 2109.
Generator VAZ 2109 with carburetor
Device: 1 – fan impeller, 2 – generator, 3 – capacitor, 4 – voltage regulator assembly with brush holder, 5 – generator marking, 6 – bracket
Generator VAZ 2109 with injection engine
Device: 1 – pulley, 2 – washer, 3 – front cover, 4 – spacer ring, 5 – rotor; 6 – stator, 7 – back cover, 8 – casing, 9 – rectifier unit with capacitor, 10 – brush holder with voltage regulator.
VAZ 2109 generator malfunctions
The main generator malfunctions are failure of the VAZ 2109 generator brush or the regulator relay as a whole with brushes. To replace the generator regulator relay, it is not at all necessary to remove the VAZ 2109 generator, since the removal and installation of the generator brushes can be done on site. Also, in rare cases, the diode bridge flies out. If a global repair and disassembly of the VAZ 2109 generator is required, then you should know how to remove the generator.
Removing the VAZ 2109 generator
IMPORTANT: Before starting work on removing the generator, the first thing you need to do is disconnect the “-” terminal from the battery.
Disconnect the block with the wire from the generator terminal.
Slide the rubber boot, unscrew the nut and disconnect the wires from the “ZO” terminal of the generator.
Loosen the adjusting nut and the lower generator mounting nut.
Move the alternator to the engine and remove the belt.
Unscrew the bolt securing the adjusting bar.
From the bottom of the engine compartment, unscrew the two bolts securing the bracket, holding the generator.
Remove the generator from the car.
Install the generator in reverse order. When attaching the generator bracket, the longer bolt is installed closer to the generator drive! After installation, adjust the belt tension.
Checking the VAZ 2109 generator
A generator for a VAZ 2109, the price of which exceeds 1000 rubles, is worth checking before purchasing; the easiest way to check a generator for a VAZ 2109 is to turn on all possible lighting devices and remove the negative terminal from the battery for a few seconds and or, if you have a “device” tester, check current supplied to the battery. Are you trying to repair a VAZ 2109 generator before buying a new one?
Replacing the VAZ 2110 generator
Good day, dear visitors of the site zerga.ru. In this article you will find information on how to replace a VAZ 2110 generator.
This information will also be suitable for owners of the entire line of the tenth family, and will also not ignore Priora, Kalina and other new VAZ models.
Before replacing the generator, you must make sure that it is faulty, otherwise there are cases where the generator was removed, but it is working.
In order not to remove the generator once again, you need to make sure that it is faulty. To do this, I recommend reading the corresponding article “Checking the VAZ generator”.
After we are convinced that the generator is not working, we proceed to replace it.
Since the generator is directly connected to the vehicle's electrical circuit, we need to prevent an accidental short circuit from occurring. To do this, you need to disconnect the positive terminal of the battery.
Now we are not in danger of a short circuit and we can safely disconnect the electrical wires from the generator. Everything is removed simply: a chip, two or three positive wires (under a rubber cap), which are secured with a ten-spanner nut.
Next we need to remove the alternator belt. On models of the tenth family, a flat multi-ribbed alternator belt is installed and a special mechanism is used to tension it, which we need to remove.
To remove it, you need to loosen the fixing nut of the tension mechanism.
After releasing the fixing nut, you need to completely unscrew the tension bolt and pull out the tension bracket.
Using a pry bar or a suitable piece of metal rod, we move the generator towards the engine block. At this point, the alternator belt will weaken and can be removed from the pulley without much difficulty.
Diode bridge
This unit is a regular rectifier.
It contains 6 diodes. Half of them fall on the “minus” (the mass is connected to the cathode), the other, respectively, on the “plus” (anode). The bridge is checked with a tester switched to sound mode. It will be much more convenient to work here. It is necessary to ring each diode separately in different directions. But normally the signal will sound only once. If a squeak is heard in both cases, the part needs to be replaced. However, in fact, the easiest way is to install a completely new bridge - it is not that expensive.