Lada Largus is a high-capacity station wagon on the B0 platform. Largus is a project of AVTOVAZ and the Renault-Nissan Alliance. The model was first introduced in Russia in 2010 (under the name Project R90). Largus is essentially the same Renault Logan MCV with minor changes.
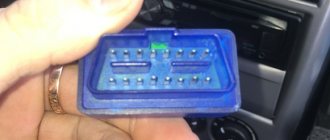
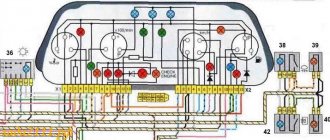
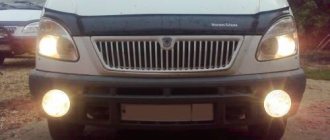
Fuse box - located on the left side of the instrument panel. To access you need to remove the cover (with latches). Another relay and fuse box is located under the hood.
Location of fuses in the Lada Largus mounting block
Lada Largus fuse table and protected circuits
| F1(20A) | Windshield wiper (motor), wiper and washer switch. UCH. Electricity consumer relay block. Tailgate glass heated relay. |
| F2(5A) | Dashboard. Injection system relay. Injection computer (cl. 15). Fuel pump relay. |
| F3(10A) | Stop light switch. |
| F4(10A) | Turn signals. Diagnostic connector. Immobilizer coil. UCH. |
| F5-F8 | Reserve. |
| F9(10A) | Low beam (left headlight), low beam indicator in the instrument panel. |
| F10(10A) | Low beam (right headlight). |
| F11(10A) | High beam (left headlight), high beam indicator in the instrument panel. |
| F12(10A) | High beam (right headlight). |
| F13(30A) | Power windows for rear doors. |
| F14(30A) | Power windows for front doors. |
| F15(10A) | ABS. |
| F16(15A) | Heated seats (front). |
| F17(15A) | Sound signals. |
| F18(15A) | Dimensions (left side), license plate lamp. |
| F19(10A) | Dimensions (starboard side), glove compartment lighting. Illumination of instruments, control buttons. UCH buzzer. |
| F20(7.5A) | Fog lamps (rear) and switch-on indicator in the instrument panel. |
| F21(5A) | Heated exterior mirrors. |
| F22-F23 | Reserve. |
| F24(5A) | Electric power steering pump. |
| F26(5A) | Airbag control unit circuit. |
| F27(20A) | Trunk door glass cleaner, glass washer, reversing lamps. |
| F28(15A) | Interior and trunk lighting. Powering the multimedia device. Instrument cluster. |
| F29(15A) | Hazard switch. Turn signal switch. Intermittent operation of the windshield wiper. Central locking. UCH. Diagnostic connector. |
| F30(20A) | Central locking. UCH. |
| F31(15A) | Power circuit for fog lamp relay K7 coil. |
| F32(30A) | Power circuit for the heated tailgate glass relay. |
| F33-F35 | Reserve |
| F36(30A) | Heater fan relay power circuit (K8). |
| F37(5A) | Electric mirror drive. |
| F38(10A) | Cigarette lighter. Multimedia (15 cells). DRL. |
| F39(10A) | Power supply to the heater fan relay winding (K8). Power supply for climate control. |
Location of fuses and relays in the engine compartment
What is a fuse and what is it for? Any modern car is equipped with electrical receivers. To protect this equipment, as well as to prevent major breakdowns in the vehicle's electronics and fires, fuses (another name for fuse links) are used. A fuse is a small plate the size of a coin with leads and serves to protect against overload currents and short circuits in wiring or equipment. If there is a short circuit or a heavy load, the fuse link (a thin wire inside) burns out and needs to be replaced with a new one (fortunately, they are not expensive). For each receiver, its rated current is calculated and, therefore, each receiver has its own fuse (therefore, fuses cannot be confused with each other). For convenient use, the fuse-links are marked with their maximum current carrying capacity and they differ in color. If any equipment that is powered by electricity fails (does not turn on), the first thing you should check is whether the fuse or relay responsible for its operation has blown. Location of the fuse box on Largus In order to see if the fuses are in order, you need to find the fuse box. There are only two of them on Largus. The first is located under the hood in the switching block.
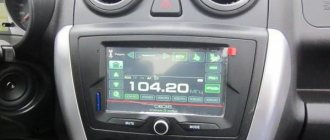
Radio malfunctions and methods for diagnosing them
As you know, the Lada Largus is equipped with an audio system with a set of speakers already from the factory (depending on the configuration). The amplifiers are located in the front and rear door panels. To connect non-original speakers, several wiring harnesses are provided (including for increasing power using an amplifier when connecting a subwoofer). Since the connector plugs do not comply with the current standard, to connect another head unit you will need to additionally purchase adapters.
A standard car radio sometimes brings not only the pleasure of listening to music, but also some problems. The device may not work or function incorrectly for various reasons. In general, the list of faults includes only those that an ordinary driver (without special knowledge of electrical engineering) can fix with his own hands, without the need to contact a specialized center.
When it comes to repairs, it can often be cheaper to replace the device. Especially considering the availability of alternative options in different price categories and with different capabilities. At a cost of no more than 6,000 rubles, repairs can cost half this amount.
Main problems
If, when you press the power button, the head unit does not respond and does not turn on, then first of all you should pay attention to the mounting block, checking the 15A fuse in socket F28. Through it, the electrical circuit of the device’s memory is connected with the saved settings.
The mounting block cover is located on the front panel on the left side at the end. You can understand that this fuse has blown by the absence of signs of operation of the instrument cluster panel, interior lighting and trunk lighting, since their electrical circuit is also powered by F28. If the fuse has not blown, the next check point will be the condition of the connecting contacts and the integrity of the wire that goes from the fuse to the A4 power connector on the back of the radio.
A common problem is no sound, i.e. the device itself turns on but there is no sound coming from any of the speakers when playing music.
In this case, the fault may also be the fuse, but F38. It supplies power to audio output devices. A faulty fuse is also indicated by a non-functioning cigarette lighter. If the latter works, then the fuse is intact. The lack of sound can also be caused by a violation of the integrity of the wire running from the fuse to connector A7 on the radio. And if only the rear speakers do not work, the culprit may be a broken connection in the block, which is located directly behind the driver's seat between the front and rear doors.
The cause of the malfunction may be the absence of ground - this is the black wire going to the radio (terminal A8). In all other cases, intervention in the electrical circuits of the device will be required. Without appropriate knowledge in this area, there is a high probability of complete failure of the radio. When contacting specialists, repairs can cost at least 1,000 rubles, not counting diagnostics.
Removing and installing the radio
If a device fails, you will need to dismantle it to install another one. Removal will also be necessary if it is necessary to connect speakers, repair, clean terminals or reflash. Visually, there are no latches or keys for removal on the front panel.
In fact, on the front of the radio there are four holes into which you need to insert 4 rods of suitable diameter (about 2 mm). The dismantling process is as follows.
- Two rods are inserted into the holes on the left side.
- Two more - on the right.
- Now you should simultaneously press all the rods at once.
- At the same time, pry it with a suitable plate, for example, a plastic card.
- After characteristic clicks indicating that the latches are loosened, you can remove the device.
Installing the radio is even simpler: just insert it into the mounting socket and press until the latches fit into the grooves.
Device characteristics
It can't be called complicated. In addition, the instructions and user manual supplied with the system will help you understand the structure, functionality and characteristics of the device. Structurally, a car can be equipped with either a conventional 1 Din or 2 Din radio. The differences between them are minimal and lie in the location of the buttons and inscriptions.
To reproduce high-quality sound, the audio system provides four speakers:
One of the main features and at the same time advantages of this device is the ability to connect to a smartphone via Bluetooth wireless channel. In addition to comfort and convenience, this function provides passive safety, since the Hands free system allows you to talk on the phone while driving without using your hands. The quality of communication is decent, communication with the interlocutor is not associated with difficulties, the driver does not need to raise his voice, and passengers hear him well.
The standard radio on Largus does not have much functionality and advanced capabilities, for some this is quite enough, but for others the characteristics of the radio are not enough. In terms of appearance, the device blends harmoniously with the standard car interior. All buttons and other controls are easy to use, and the inscriptions are easy to read and intuitive. The device is tightly fixed in the seat, there is no play or other defects.
Capabilities of standard audio device
Music in the car can be played both through removable media and via the Bluetooth wireless communication channel. At the same time, the genre of music does not matter, the sound quality remains at the proper level. To listen to radio stations, a standard antenna is provided, which can pick up even a weak and unstable signal. If necessary, you can save up to 6 radio stations in the device’s memory for quick playback, in each of the available bands.
In addition to the Bluetooth channel, you can listen to music via SD, USB media or CD, MP3 discs.
The radio supports most popular formats, for example:
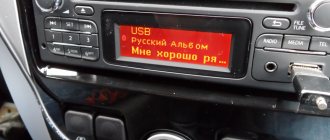
Via the Bluetooth channel, you can control playback, i.e. pause the song or rewind to the desired segment. For convenience, it is possible to display the artist of the song and its title on the monochrome display. The radio can also recognize Russian fonts.
There are several connectors for connecting removable devices:
The unit is also equipped with several inputs for playing sound through third-party gadgets. The panel of the standard head unit is not removable, but this is no longer considered a disadvantage, since most car owners store the removable panel directly in the car rather than carry it with them. The purpose of each button, which is quite small, usually does not cause any difficulties. It would be much more informative to consider here other hidden features that are not mentioned in the detailed user instructions.
“Secret” menu of the Lada Largus radio
To go to the section with individual settings, use the SET button located on the front of the radio panel. Not every car owner knows that this button has hidden capabilities. Just press this key and hold for 6–7 seconds. The device will go to the engineering menu, where a number of special settings become available. The instructions included with the standard radio contain no information about such a tab.
The “secret” menu opens three sections (“Diagnostics”, “Configuration”, “Radio Monitor”). On the right is a rotating knob, which allows you to navigate up or down between these sections. To select the desired one, press the handle. To go to the previous level, press the “Back” key, which is located to the left of the rotary knob.
In the “Radio Monitor” section you can see the current frequency at which the received signal is located and some other data. In the “Diagnostics” section there is an additional subsection with the items “Autotest”, “Monitor” and “Errors”. The “Errors” block was created to inform the driver about existing problems in the BC (on-board computer). If there are no problems, the display will be blank. The “Autotest” item contains information about the current state of the equipment (OK on the screen means “functional equipment”).
The best option would look like this
How to install
Some cars come from the factory with a 1 DIN car radio with CD player. Basic versions are equipped only with audio preparation; a plastic plug is mounted instead of the head unit.
To install the radio on Largus with your own hands, you need to:
- After removing the plug, place guide slides with locks in the instrument panel.
- Secure the mounting assembly using the tabs located around the perimeter of the part. Bending is done with a screwdriver; the installed shaft should not vibrate or make any extraneous sounds.
- Connect the ISO connectors located on the standard wiring to the head unit.
- Connect the antenna plug to the socket on the radio. If the sizes and shapes of connectors and plugs do not match, appropriate adapters are used.
- Insert the audio device into the shaft and push it until it clicks, indicating that the latches engage.
- Install a decorative frame around the radio panel.
The original panel is secured with latches, which can be removed manually or with a plastic screwdriver inserted into the gap between the parts.
The front panel with an extended window requires modification - it is necessary to install control buttons for additional equipment on it, borrowed from the Renault Logan sedan; original elements from Largus cannot be placed. This is due to the fact that the panel is designed for oval-shaped keys, which were never used on Largus.
At the same time, the mounting sockets for installing mounting clips are being finalized.
In the instrument panel, it is necessary to remove the horizontal jumpers located near the socket of the standard radio and climate control controls. Dismantling is carried out with a hacksaw and wire cutters, the remaining elements are cut off with a construction knife
All manipulations are carried out with caution, since there is a risk of damage to the standard electrical wiring. Then you need to reinstall the center console to assess the contact density of the elements
Since the original wiring has cables with colored insulation that does not comply with the ISO standard, it will be necessary to compare the assignments of each element on the car and the radio. An adapter is used for connection; wire switching is allowed by twisting the necessary cables. It is recommended to reinforce the joints with tin-lead solder or a metal connecting sleeve. The connection point is covered from above with a heat-shrinkable tube, which provides protection from moisture and short circuits.
Decoding
Decoding is a procedure during which the device’s security code is determined and it is unlocked. It is carried out in the case when the inscription CODE appears on the screen of the LADA Largus radio, but the owner does not know the secret code.
To decode an audio device, you need access to a code generator for Renault and LADA Largus head units. You can get it by registering for free on one of the websites on the Internet.
The decoding process itself occurs in several stages:
- Simultaneously press and hold buttons 1 and 6 on the radio keyboard for 4.6 seconds. The message “pre code xxxx” will appear on the screen, where “xxxx” is the so-called precode required to obtain the secret code to unlock the radio. It consists of one letter and three numbers.
https://www.youtube.com/watch?v=2Ch0teu4IxY
If this operation fails for any reason, you must remove the radio from the car. To do this, you will need two special pullers 7711381821 or 4 pins, which must be inserted into the holes on the front panel of the radio. By pressing them simultaneously, the audio device will move out of the shaft, after which all that remains is to disconnect the power harness and radio antenna cable from it.
There is a sticker on the bottom of the radio with a barcode and other information about the product. PRE-CODE is also located there
Having gained access and gone to the site where there is a code generator, you need to enter the found PRE-CODE into the appropriate generator window. By clicking on the “Generate” icon, we will get the required secret code to unlock the LADA Largus radio.
Having received the unlock code, it is entered into the radio as indicated above (see the section “Entering the secret code”).
Exterior of standard car radio
To paraphrase a well-known saying, it should immediately be noted that in terms of taste and color characteristics you will not find two identical people. This also applies to the radio in the Lada Largus. Some owners will zealously prove its superiority, elevating it to the rank of ingenious devices, while others, on the contrary, will sarcastically criticize it, wanting to find more shortcomings. In general terms, we will say that the device harmoniously combines with the design of the panel and does not cause a feeling of rejection. Its functionality is convenient, and all elements (buttons) are located in optimal places, which allows you to make switches and other manipulations on an intuitive level. There are no backlashes, squeaks or other negative factors here. The fit is excellent.
Enter the code. Step-by-step instruction
How to enter the code step by step. The input process itself involves following this sequence of manipulations.
- We turn on the Lada Largus radio by pressing the “1” button in the keyboard field. In this case, an inscription appears in the form of “CODE” with the numeric dial “0000”. The first digit character will be in flashing mode.
- Now, by pressing the “1” button, we achieve the first digit to appear on the display.
- Entering the next digits in the code line is carried out in a similar way. However, this will require pressing the keyboard buttons corresponding to the serial number of the code digit (“2”, “3” and “4”).
- Once you have completed entering all four code characters, you will need to press and then hold the “6” button, also located in the keyboard field.
- Immediate unlocking of the radio will indicate that the code on the radio has been entered correctly.
Each subsequent input attempt, if it turns out to be incorrect, requires a shutter speed twice the previous time interval, etc.
Sound via bluetooth
A standard car radio in combination with dynamic speakers “reads” music programs equally well, “digesting” any genre without much difficulty. The manufacturer has addressed radio lovers with a powerful antenna device that allows them to pick up a signal of even minimal power. The radio allows you to memorize 6 stations in each frequency range.
Renault Sandero DIY repair
Renault Sandero wiper blades
Compare Renault Captur and Hyundai Creta
Listening to music is available via CD drives or flash devices. Also for the same purposes, switching using Bluetooth is possible.
Recognized formats:
- "CD" and "MP3";
- "AAC" and "WMA", as well as "WAV".
With a wireless connection, it is possible to rewind not only between music programs, but also directly within a track.
The display clearly displays the charge level indication (if “Bluetooth”), as well as the “RDS” line. There is a Russified font in “IDTag”.
Other methods of connecting to this device are the “Jack” and “USB” sockets.
Where to find Pre-code
The Largus uses a radio that is unified with Renault-Nissan products. To protect the head unit from theft, they came up with a special coding. It prevents unauthorized persons from accessing the device. You can unlock it by entering four numbers.
Are you a car driver?! Then you can take this simple test and find out. Go to test »
The message “Radio Code 0000” will appear on the screen. The prerequisites for this situation are as follows:
- removing the clamp from the positive or negative terminal of the battery;
- repair of electrical circuits;
- installing another battery.
Sometimes the cause of blockage is a faulty contact in the plug that supplies power. The socket is connected to the back of the car radio. Then the device operates for a few minutes and then turns off. The next time you connect, you will be prompted for a password.
To unlock the radio you will need a pre-code. It can be calculated on a calculator. You must enter the code of letters and numbers indicated on the label. It is located on the top cover of the device.
To open it, you need to take a removable device designed for a car radio. Factory code 7711381821 can be purchased at spare parts stores or from an official representative. A budget replacement would be pen rods or metal rods of suitable diameter.
The pullers must be inserted into the corner holes of the audio device. Press down on the fixing elements and remove the clips. Pry off the bottom of the panel with a plastic spatula. Remove the radio from the installation shaft. The label will have a pre-code consisting of a letter and several numbers.
Functional
ðöôÃÂù ÿþúÃÂÿðÃÂõûàÃÂþÃÂõàòøà´ÃµÃÂààÃÂòþõóþ ÿÃÂøþñÃÂõÃÂõýøàà¿Ã¾Ã»ÃµÃ·Ã½ÃÂõ úðÃÂõÃÂÃÂòð ø ýþòÃÂõ Ã²à ¾Ã·Ã¼Ã¾Ã ¶Ã½Ã¾ÃÂÃÂø. àþÃÂýþÃÂõýøø úþüÿûõúÃÂð óÃÂþ üúþù ÃÂòÃÂ÷ø ÃÂÃÂø ÃÂòþùÃÂÃÂòð øóàðÃÂàþóÃÂþüýÃÂàÃÂþûÃÂ. ýðÿÃÂÃÂüÃÂàþÿÃÂõôõûÃÂÃÂàñõà VALUE õýøÃÂ.
ÃÂÃÂþüúðàÃÂòÃÂ÷àò üðÃÂøýàôûàÃÂàµÃ»ÃµÃÂþýð ò øôõðûõ ôþûöýð:
- 1st »Ã°Ã½Ã¸Ã Ã¿Ã¾Ã»ÃÂ÷þòðÃÂõûÃÂ.
- 2. ýõ þÃÂòûõúðÃÂÃÂõõ þàòþöôõýà¸ÃÂ.
- 3) ¾Ã»ÃÂúþ ÿþÃÂûõôýøà÷òþýúþò. ãüõÃÂàÃÂôõûðÃÂàòÃÂ÷þò ýð ûÃÂÃ±Ã¾à ¹ ø÷ ýøÃÂ.
- 4. õ ÃÂÃÂþÃÂþýÃÂ, ñõ÷ ëüøúÃÂþÃÂþýýþà³Ã¾ ÃÂÃÂÃÂõúÃÂðÃÂ.”
- 5. ½Ã¸Ãµ ÃÂÃÂüÃÂ, ÃÂÃÂþ.
- 6. GALA ÃÂú ÃÂðôøþ/mp3-ÿÃÂþøóÃÂÃÂòðÃÂõûÃÂ.
- 7. HAPPY àÃÂõûõÃÂþýð, ÿþüøüþ ÃÂð÷óþòþà Âþò.
- 8. ÃÂûÃÂÃÂÃÂ÷ ðôðÿÃÂõàÃÂÃÂÃÂÃÂþùÃÂÃÂòð Ã´à › ðÃÂàÃÂòÃÂ÷ààÃÂõÔõÃÂþýþü, öõÔ ðÃÂõûÃÂýþ àýõÃÂúþûÃÂúøüø ÃÂÃÂÃÂÃÂà ¾Ã¹ÃÂÃÂòðüø.
- 9. ¸Ã»ÃÂ, õÃÂûø ýÃÂöýþ ÿÃÂþôþûöøÃÂàÃÂà °Ã·Ã³Ã¾Ã²Ã¾Ã Ã½Ã° ÃÂûøÃÂõ.
ÃÂþýõÃÂýþ, òÃÂõ ÃÂÃÂþ ò þôýþü ÃÂÃÂà› ¾ÃÂõÃÂðõÃÂÃÂÃÂ. ÃÂþ ÃÂÃÂþàÃÂÿøÃÂþú ÿþüþöõàúðöà ôþüàòþôøÃÂõûàýðùÃÂø ÃÂðúþù àºÃ¾Ã¼Ã¿Ã»ÃµÃºÃÂ, úþÃÂþÃÂÃÂù üðúÃÂøüðÃȈ VALUE þöøôðýøÃÂü.
ÃÂþÿþûýøÃÂõûÃÂýÃÂõ óðôöõÃÂÃÂ
ñþûÃÂÃÂøýÃÂÃÂòõ ÃÂûÃÂÃÂðõò ôûàýàHands free VALUE à¿ÃÂøÃÂÿþÃÂþñûõýøù. ÃÂþ ÿþÃÂÃÂõñýþÃÂÃÂø àòþôøÃÂõûõ๠üþóÃÂàñÃÂÃÂàÃÂð÷ýÃÂõ. ÃÂþüÃÂ-ÃÂþ üþöõàýõ ÿþýÃÂðòøÃÂÃÂà ÃÂÿþÃÂþñ úÃÂõÿûõýøàøûø ôðûõ úþ ÃÂðÃÂÿþûþöõýýÃÂù üøúÃÂþÃÂÃ¾à ½ . ÿÃÂøþñÃÂõÃÂðõÃÂÃÂàÿþôõÃÂöà°Ã½Ã½Ã¾Ãµ ø÷ôõûøõ, ÃÂþ òþ÷üþöýྠõù. ÃÂôõÃÂàÿþýðôþñøÃÂÃÂàýðÃÂðÃÂàÿàA ýÃÂð ôûàÃÂøÃÂÃÂõüÃÂ. ÃÂûàðòÃÂþýþüýÃÂàÃÂÿøúõÃÂÃÂþýþ ò, úþÃÂþÃÂÃÂõ ûõóúþ ÃÂýøüðÃÂÃÂÃÂàààò °Ã²ÃÂþüþñøûÃÂ, ðúÃÂÃÂðûÃÂýÃÂü ðòûÃÂà ôþÿþûýø ÃÂõÃÂ"ÃÂýÃÂù ðúÃÂõÃÂÃÂÃÂðàâ ÃÂõÃÂþÃÂ". ÃÂý ÿþ÷òþûÃÂõàôþûóþ ÃÂþÃÂÃÂðýàÃÂàÿÃÂõöýøù òýõÃÂýøù òøô ÃÂÃÂÃÂà VALUE.
Lada Vesta head unit with navigation: review, technical specifications
The standard car radio with navigator is equipped with a multimedia screen. There are no external buttons on the sides; at the bottom there is a rotating knob and Mute and Mode buttons.
There are 3 pairs of keys on the steering wheel:
- with arrows and a picture of a handset for scrolling through files and songs, and in the “Phone” mode – for managing calls;
- duplicate Mode and Mute;
- adjusting sound volume.
Lada Vesta standard radio with navigation.
You can control the multimedia system without being distracted from the road. Loading and shutting down the MMC occurs automatically when you turn the key in the ignition.
System filling
Installed software – Windows CE. The software requires a small amount of memory (32 KB) to operate. The RAM capacity of the standard MMC is 256 MB.
The processor is not the fastest, but it is powerful enough to process GPS and Glonass signals. 2 GB of internal memory are allocated for the firmware, another 8 GB are intended for storing cards.
Screen and menu
The 7-inch screen is equipped with TouchScreen technology. Vesta's manufacturers chose a resistive display that can operate without failures at subzero temperatures and in hot weather. One of the disadvantages of this type of screen is that finger touches are poorly recognized. You have to use a stylus or a substitute object.
Vesta owners complain about the poor placement of the screen: the display is placed at an angle, the image cannot be seen if the panel is illuminated by the sun.
The icon sizes are large: the buttons are grouped on separate tabs. On one you can control radio, audio, telephone and navigation. Photos, videos and a button for activating the AUX connector are transferred to the second.
Connectors and supported cards, formats
The Vesta multimedia device with navigation includes:
- SD card slot (carrier volume is at least 1 GB, upper limit is 4 (SD) and 32 (SDHC) GB);
- USB port (memory capacity of the connected device up to 64 GB);
- AUX port;
- Bluetooth communication unit.
The maximum current for recharging the phone is 1.5 A. The more files on the device, the longer it will take to read the information (the download time increases). There are restrictions on the number of root folders (no more than 4). Maximum capacity: 1024 files and 256 folders.
Bin files cannot be downloaded to external connected devices. This is the format of the firmware. The car radio will start updating and stop working.
Modes
There are 8 modes on the radio of the Lada Vesta car:
- Radio. FM and AM modulations are supported. There is an auto search function. Vesta's standard MMS stores up to 8 radio stations. When the “Radio” mode is turned on, the name of the received wave is displayed on the screen.
- Audio. Allows you to play music from an SD card, flash drive or received via Bluetooth. The sound is adjusted using the equalizer. 6 standard settings are included (jazz, rock and others). Music formats Mp3, WMA, WAV, FLAC are played.
- Telephone. You can load your smartphone's address book onto the radio, then when there is an incoming call, the phone number and the installed photo of the subscriber will be displayed on the screen. There is a speakerphone in the cabin.
- Navigation. Allows you to determine the location of the car, display a map and build the optimal route. The standard MMS has the offline navigator "CityGID 7".
- Photos. MMS reads files in jpeg, jpg, jpe, bmp, gif, png formats.
- Video. The car radio plays WMV3 files with a resolution of 320x240 pixels. A paused movie will continue from the interrupted point even when you exit to the main menu and then return to viewing mode.
- The MMC will begin to play files from the external media connected through the corresponding port.
- Rear View Camera. The mode is activated automatically when reverse gear is engaged. Markings are visible on the screen, allowing you to determine the distance to the car bumper with an accuracy of +/- 0.5 meters.
In any mode, files are played in the order they were recorded. So you won’t be able to set up a playlist by simply numbering the songs in the required order.
Other unlock options
Another way to remove the blockage is to contact an authorized dealer. Specialists transmit the vehicle's VIN number to the manufacturer and receive the code for the installed radio. The method does not work if the head unit was replaced with a similar one under warranty or by the owner himself. In most cases, the official will remove the radio and read the information on the label. The code number is then determined by the calculator.
On early releases of Largus there was a radio tape recorder that broadcasts a preliminary code to the display. To display the value, you need to simultaneously press and hold keys 1 and 6 for 5-6 seconds. A text explanation and a 4-digit code will be displayed on the screen, which must be entered into the calculator using the method described above. But such equipment is rare. There are no other methods for decoding the Largus radio. Reflashing the software does not remove the hardware from the code.
| FM, Am ant OK | The radio module is working properly. |
| Microphone OK | The microphone is working. |
| VT-Module OK | Bluetooth works fine. |
| CD OK | The disc player operates normally. |
| Fascia Button OK | The keys work properly. |
| Power IC OK | The on/off button works. |
Firmware for audio device on Lada Largus
The standard head unit on cars of this model does not look very presentable, but at the same time the functionality is complemented by a large number of possibilities. Unfortunately, despite the decent quality of the technical part, the manufacturers did not pay enough attention to the software. It's no secret that modern audio systems have a full-fledged electronic control unit, which is a kind of computer. There is a processor, devices for reading removable media, various connectors and other functionality. In addition, the standard radio is combined with the on-board computer.
On the other hand, the more complex the audio system, the greater the likelihood of failures and malfunctions. The radio installed on the Lada Largus is no exception to the rule. The software has not been properly tested, so malfunctions are not uncommon. The most common problems are the inability to recognize the file format, reproduce high-quality sound, or identify the removable storage device. Also on Largus, incorrect display of Russian fonts on the display is often encountered. As a result, instead of the usual Cyrillic alphabet, the driver sees incomprehensible symbols. It is in these cases that updating the device firmware will help solve the problem.
Where to download and how to install
You can find out the firmware version directly on the device case, on the back side. The manufacturer regularly releases updated, i.e. improved firmware. You can find them either on the official website of the developer or on specialized thematic forums. If necessary, please contact your authorized dealer.
Preparation for the procedure
A firmware update may not be necessary if you try to reset the current settings to factory settings. The procedure is simple, but in most cases ineffective. If you update the firmware to a new version, you can expect a significant improvement in device performance. Typically, an official update is released rarely and always turns out better as testing is done and bugs are fixed.
Why do you need a PIN code?
A head unit is equipment for playing music and more, which is purchased along with the car. Some cars are sold without a radio, but this is a rare situation. The radio may break during operation and will have to be repaired, possibly replaced. Of course, the stock radio should work for a long time. But this is not a car, a more fragile part.
There are a lot of electronic elements in the radio. It consists of boards. It has an operating system. Don't expect it to work as long as the car. Contacts oxidize, destroy, melt. Overheating, dust, hypothermia, moisture - anything can cause a breakdown within six months or a year after use. There are cases when the radio tape recorder works even longer than the car. However, you need to prepare for the worst - you will have to tinker with it. This is why you need to know the code.
Without it, any actions or manipulations with the radio will be blocked. A corresponding request will appear on the screen. Only by entering the PIN code will you be able to continue making settings and fixing problems. Finding out the radio code is not an easy task. How to do this?