Adjusting the dimensions of the valve clearances of a VAZ 2109, 2108 car is mandatory. There is a need to perform this operation in order to ensure correct operation of the gas distribution mechanism.
There is a strictly defined procedure for performing valve adjustment work. But in some books you can find a mention that the corresponding order does not matter. Below we propose to review the process and give important recommendations regarding its implementation.
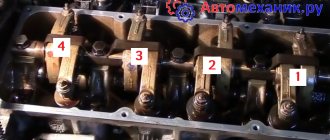
Diagram 1. Gas distribution mechanism of VAZ 2109, 2108
Diagram 2. Gas distribution mechanism of VAZ 2109, 2108
Why do you need to adjust valves?
With mileage, the metal valve stem tends to stretch and contract. The seats in the cylinder head sag, which is why the thermal gap changes. And it is physically needed of a certain value due to the design features of the engine. The consequences of untimely adjustment are not reversible. A clamped valve during operation of an eight-valve engine loses its seal, and the avalanche flow after ignition burns its edges and the cylinder head seat, which is recessed into the body of the head. This type of repair is expensive and does not come with a warranty. It is better to regulate in time, especially since the cost of tuning an 8-valve engine at 600 - 800 rubles per 30,000 km is not so significant.
With correctly adjusted clearances, the car will drive freely, without loss of traction, consuming less fuel. Under no circumstances should you adjust it to hot. Just cool the engine to 30-40 degrees. Otherwise, you can make a mistake and jam the valves.
There are times when the valves have been adjusted, but the knock remains. The reason may not be gaps. On a cold engine, piston skirts and cups and pushers in the body of the head can knock. There can be many reasons, so don’t rush to conclusions, but check everything carefully. There is a special device - a stethoscope, with which you can easily listen to engine noise.
Interaction of gas distribution mechanism parts
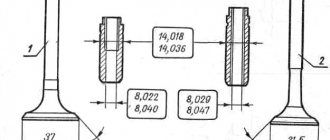
It is very important to preview the engine performance requirements. The values of its clearances and other indicators of the interaction of parts of the gas distribution mechanism of VAZ 2109, 2108.
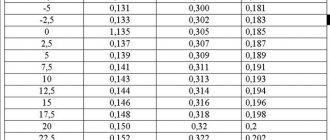
On a cold engine, specific clearance values are set between the pusher and the camshaft. The indicator is 0.20 millimeters (a deviation of 0.05 millimeters in different directions is allowed), which is relevant for intake valves . For exhaust valves, the gap value is set within 0.35 millimeters with the same tolerance. Here you need a specific set of feeler gauges that can measure gaps within 0.30-0.40 millimeters.
If the maximum probe fits into the hole, it means that you will need to select an appropriate washer that is slightly thicker in size, and then replace it.
In the same case, when the gap value is smaller, the valve can easily close on a preheated engine. In fact, this is very dangerous, because such a value can lead to the valve and seats burning out. Consequently, there is a sharp loss of pressure, the occurrence of compression and a drop in power level.
Ultimately, this necessarily leads to the need to perform a complete cylinder head repair, which will be too expensive. This can be diagnosed without problems. Indeed, in the case when the gap is increased, a corresponding knock in the engine is noted.
As numerous masters say, this indicates that there is a situation with increased wear on the camshaft. It is exposed to unnecessary shock loads. This in itself is not a pleasant moment. It is in this case that it is important to promptly complete the process of adjusting the gaps at a strictly defined time.
This solution will be especially relevant in the case when the vehicle runs on gas, thereby causing increased wear of the washers. Consequently, the size of the gap will constantly change.
Gap calculation
In order to find out the size of the washers, there is an adjustment formula:
H = B + (A - C)
H – thickness of the new washer;
B – thickness of the washer that was removed;
A – existing gap;
C – nominal clearance (0.2 or 0.35)
We check the gaps with a feeler gauge. It is advisable to have several of them in increments of 0.02 - 0.03 mm.
Correct valve adjustment guarantees a long engine life.
From theory to practice. We adjust the VAZ 2108 valves with our own hands
To correctly calibrate the gaps you only need to know a few basic points. The most important is the recommended range of normal values, measured in millimeters:
- for the exhaust valve it ranges from a minimum of 25 mm, and the maximum distance from the washer to the camshaft cam is limited to 35 mm;
- for the intake valve the range is similar, but the gap sizes themselves are somewhat different. The minimum is 15 mm, and the maximum is 25.
Clearance table
We also do not forget that this distance on VAZ 2108 injection engines tends to decrease over time. Therefore, we recommend adjusting the valves taking this nuance into account, approaching the maximum distance to the cam. On the classics, the effect is exactly the opposite, for this reason, with increasing gaps the problem is much easier to localize. However, drivers who at one time switched from classics to more modern domestic cars like the V8 run the risk of being hostage to an erroneous idea about setting the valves of the power unit, as a result of which the seat burns out and further wear of the “head” parts occurs.
How to understand valve adjustment
To better understand the process of adjusting the 2108 valves, it is necessary to briefly consider the design of the timing valve mechanism of this engine. So, to open the intake or exhaust valve, the camshaft cams are used, which, when the shaft is turned, press on the rod of one or another valve, according to the valve timing, and open it.
This is interesting: Tuning HARLEY DAVIDSON
The valve is closed by the valve return spring. The cam does not directly act on the valve stem and engines have additional elements in the valve drive. So these can be rocker arms (ZAZ, AZLK, BMW, etc.) of a rocker (classic VAZ) or pushers (glasses) with adjusting washers embedded in them, as in our case under consideration with the VAZ 2108 car and its modifications.
There are special recesses in the block head, round in shape, where a valve with a spring is mounted. A pusher is placed on top of the valve. The pusher has a flange to hold the shim. The washer for adjustment is inserted into this recess in the pusher. The camshaft cam presses on this washer, the washer transmits force to the pusher, and it, in turn, to the valve stem, forcing it to open at the right moment.
Between the camshaft cams and the adjustment washer, it is necessary to maintain a certain gap, designed for thermal expansion of the parts. It turns out that the higher the height of the adjusting washer (its thickness), the smaller the gap between it and the camshaft cam and vice versa.
Each washer has its nominal value in the form of numbers, say 3.15 or 3.80, etc., which is necessary when selecting an adjusting washer by setting the required gap. If for some reason the inscription is erased, then the thickness of the washer is measured with a micrometer. The factory provides a set of adjusting washers from 2.5 to 5.0 mm or more and in increments of 0.05 mm, say 2.5, 3.0, 3.05, 3.10, 3.15, etc. This makes it possible to very accurately select the size in any case - about 122 of the most popular sizes.
In addition, today there are intermediate sizes, such as 3.27; 3.52; 3.78 and others, which further increases the accuracy of adjustment. This is especially true after a major overhaul of the engine with the cylinder head, when the valves were ground in or replaced.
Washer replacement algorithm
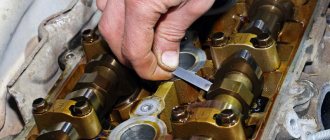
- We insert a pry bar or mounting blade between the camshaft cam and the washer, resting on the camshaft, recess the washer along with the pusher
- We insert a clamp between the camshaft and the pusher (not the washer!). This can be either a special device or some kind of piece of iron, suitable in thickness, to fix the pusher in its original position, which does not interfere with the release of the washer
- We remove the pry bar from under the camshaft, the pusher along with the washer should remain recessed
- We take out the washer; it can be easily grabbed with long-nose pliers or tweezers.
After you have taken out the washer, you need to find out its thickness; it should be indicated on the washer. But it happens that the thickness of the washer does not coincide with that indicated on it; it is better to measure it with a micrometer tool or at least a caliper. After this, knowing the initial gap and the gap that we need to obtain, we select a new washer.
We do the same with all valves that have the wrong clearance.
What is needed for adjustment
As already noted above, you can adjust the thermal clearances of the valves on the vase with your own hands. To do this you need a set of washers, some fixtures and tools. You can make a homemade rail, but it is more cost-effective to buy a ready-made fork for setting gaps at the car market.
Heels for adjustment will be needed in the range from 3.40 to 4.05 mm if the guides in the cylinder head have not been changed. If, however, repairs were carried out, or the car runs on gas, you will have to purchase washers in the range of 2.50 mm for the exhaust valves. Intake valves, as a rule, remain at the same clearance; the seats on them do not flush.
Thus, in this article we briefly examined the procedure for adjusting valves on VAZ cars with front-wheel drive. The consequences of untimely tuning and driving on gas were also touched upon.
To adjust the valve clearances of VAZ 2109, 2108 you will need:
- Availability of a special set of probes, values 0.10-0.50 millimeters.
- A tool designed to perform work on replacing a set of washers.
- Directly the set of replacement washers itself, in accordance with the engine configuration, regulated by the passport data.
Initially, it should be noted that the engine of the car model has 8 valves . According to the vehicle operating regulations, the operation is performed every 20,000-30,000 kilometers.
Everything is done extremely simply, you just need to:
- Set a special TDC or make marks.
- Check the position of the first cylinder , which is done by turning the camshaft 90 degrees clockwise.
- In the future, it is necessary to similarly check the third cylinder , after the fourth and finally the second .
Valve adjustment consists of the following steps
First of all, you must remove the timing belt cover, which serves as a protection. You can find the cover to the left of the engine, then you just need to unscrew three screws by 10. At the next stage, adjusting the valves on a VAZ 2109 with your own hands involves removing all the pipes from the valve cover. You also need to unscrew the bracket that secures the choke and throttle cables. Unscrew the two 10mm nuts and get rid of the valve cover. You may be forced to remove the carburetor pan directly, but you will only need to perform these steps if you cannot remove the cover otherwise. Unscrew all spark plugs
It is recommended to take into account the following small tip - first you need to turn the spark plugs halfway and remove all dirt around so that it does not get into the cylinders. Use a regular medical syringe to remove the oil head from the top of the block so that the washers can be seen while retracting the tappets. Align the mark with the timing mark on the camshaft pulley. This mark is located on the back of the timing belt cover. Check whether the mark on the triangular flywheel, which is located on the engine block, has successfully aligned
This can be checked quite easily using the inspection window on the gearbox housing. At the next stage, adjusting the valves involves using a regular sheet of paper, from which you need to cut a square with dimensions of eight by eight centimeters. Make a hole in the center of the square so that the paper can easily fit onto the bolt, which serves as a part for fastening the camshaft pulley. One of the corners of the paper square must be placed with the front side facing the camshaft pulley mark. Use a marker to mark the marks on the camshaft pulley. The risks, in turn, should be located opposite the other three corners of the paper square. As a result, you should make four marks. Next, adjusting the engine valves involves turning the camshaft a couple of teeth clockwise. This rotation should fully correspond to the rotation of the crankshaft by forty to fifty degrees. At this stage, it is recommended to pay attention to one more small tip - you can turn it with a seventeen key, while simultaneously grasping the camshaft bolt; at the same time, many people prefer to slightly jack the front wheel and spin it in fourth gear. Also, adjusting the valves involves measuring the gap of the third and first valves, that is, you need to determine the distance between the camshaft cam and the adjusting washer. Next step, work on another set of valves if the clearances are ok. Turn the camshaft clockwise to the next marker mark, then turn it two or three teeth. If the gaps are different from each other, follow these steps. Install the tool onto the valve cover mounting studs. This tool will help you recess the valve lifters, then tighten the tool using nuts. Rotate the pusher so that the slot in it is facing you. If you do this, the shim will be easier to remove. Write down the clearance on a piece of paper along with the valve number. Push the valve down using the tool, then secure it using the clamp. Use a screwdriver to pry the adjusting washer through the slot, then remove it. On the back of the washer you will find the size, record the thickness of the washer on paper to adjust the valves. Place the washer in place with the numbers facing down. Push in the pusher and then check to see if the washer is seated correctly. It should rotate freely in the saddle. Measure another group of valves. Rotate the camshaft 90 degrees to the next mark and tighten it another set of teeth.
Check the clearances and calculate the thickness of the new washer. After making all the calculations, check whether the washers from other valves are suitable, where the washers also need to be replaced. Next, go to the store to buy washers. Don't forget to purchase a valve cover gasket and sealant, which will need to be applied if oil leaks from under the cap. Don't forget to purchase a valve cover gasket and sealant, which will need to be applied if oil leaks from under the cap. Don't forget to check the valve adjustment dipstick. If everything else is normal, install a new gasket and return the valve cover to its place.
It is worth noting that the procedure for replacing the clutch on a VAZ 2109 and replacing the valve stem seals can also be carried out independently.
Adjusting valve clearances on a VAZ 2108 engine: procedure
block The nominal value of the “thermal compensator” determined by the manufacturer on a cold engine for the intake valves is 0.2 mm, exhaust valves – 0.35 mm.
Permissible deviations from the nominal value are also specified - 0.05 mm in both directions. A good example: when adjusting the intake valve, the 0.15 probe enters without hindrance, the 0.2 probe enters with slight interference, and the 0.25 probe does not enter at all. This is interesting: Replacing the gasket under the valve cover on a VAZ 2101-2107
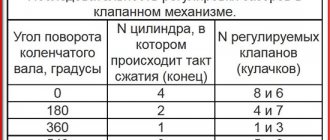
Checking and adjusting the valve mechanism is carried out in pairs in 4 approaches. Each approach is performed at a different camshaft position. Before the first approach, align the marks on the camshaft pulley and the timing belt housing by turning the pulley clockwise with a spanner.
The procedure for checking the actual gap using the first approach as an example is as follows:
- rotate the camshaft 40-50 degrees clockwise (2-3 teeth);
- remove the actual values of the gaps at 1 (exhaust) and 3 (intake) valves using feeler gauges (counted from the timing belt).
The steps for checking the gaps in the remaining pairs of VAZ 2108 valves are carried out by turning the camshaft at intervals of 180 degrees:
- 220-230: 5 (inlet), 2 (exhaust);
- 400-410: 8 (inlet), 6 (exhaust);
- 580-590: 4 (inlet), 7 (exhaust).
The valve adjustment process is carried out in the presence of unacceptable deviations from the norm. The sequence of actions is as follows:
- install the adjustment device on the studs of the bearing housings located at the ends;
- insert a curved lever between one of the valve tappets under study and the cam (the handle of the device should be facing the front bumper of the car);
- by pressing the handle, recess the pusher and install a lock between the edge of the end of the pusher and the camshaft to prevent the part from returning to its original position;
- remove the lever of the device and move it to the side;
- remove the washer using tweezers;
- install a new washer of the calculated thickness with the marking down;
- remove the lock;
- measure the resulting gap.
The selection of a new washer is made based on the following considerations:
- the thickness of the removed washer is determined (if the inscription is erased, the operation is carried out using a micrometer);
- the required thickness is calculated based on the previously made measurement in the format: size of the new washer = thickness of the old part + (measured - nominal clearances).
Here is a detailed diagram of valve adjustment for VAZ 2108, 2109, 2114, 2115
- First you need to cool the engine. You can use an additional cooling fan from any VAZ car. Place it on top so that the airflow is towards the internal combustion engine and turn on the 12 V power supply;
- When adjusting 8 valve engines (11186, 11113 oka, 1118, 1111) with a mechanical throttle assembly, unscrew the throttle cable from the intake manifold receiver;
- Disassemble the valve cover, timing belt side casing. Disconnect the large and small breather hose going to the throttle body pipe;
- Pump out the oil near the valve cups using a syringe or bulb. It is most convenient to use a regular medical syringe with a white silicone hose at the end;
- Install a device for adjustment - a rack for pressing the valve, also called a ruler;
- Set the first adjustment position. Turn the camshaft clockwise to the mark and tighten 2-3 teeth. For cars with a lightweight piston group (Granta, Kalina 2, Priora), turn strictly by the crankshaft. If you turn the camshaft, the timing belt may slip, and if this is not noticed and the engine is driven, the valves may bend;
- Adjust in the following sequence: 1 outlet and 3 inlet valves;
- Rotate the camshaft 90 degrees. Adjust 5 outlet and 2 inlet valves;
- Rotate 90 degrees. Adjust 8 exhaust and 6 inlet ports;
- We make the last turn by 90 degrees and adjust the 4th exhaust and 7th inlet valves;
- Reassemble in reverse order. We install a new gasket under the valve cover to prevent oil from leaking out.
- On carburetor engines, everything is done in a similar order. First you need to unscrew the filter housing and the suction cable. The frequency is the same as on the injector 30,000 km.
Initial stage: opening access to the camshaft
The proper conditions under which the valve assembly is adjusted are formed after dismantling the cylinder head cover. You can easily remove the upper cylinder head housing with gasket after performing the following procedures:
- loosen the cable by rotating the two nuts to “13” near the bracket and remove it, after first removing the return spring on the plastic sector of the damper drive;
- Using a 10mm wrench, unscrew the two nuts securing the throttle cable bracket and remove it;
- Loosen the fastening clamps with a screwdriver and remove the inlet (located on the front side near the oil filler neck) and two outlet pipes for the crankcase ventilation (attached to the back of the valve cover);
- Unscrew the two nuts securing the housing to the cylinder head (use a “10” wrench);
- remove two rubber plugs located under the nuts already removed in the previous transition.
This is interesting: Where is the coolant temperature sensor installed on the Passat B3?
At the end of the preparation stage for adjusting the valve clearances of the VAZ 2108 engine, an operation is carried out to remove the gas distribution mechanism cover, which is secured with three “10” bolts. A set of necessary accessories is also formed:
- device for recessing the pusher;
- a special clamp that secures the pusher in the lower position;
- tweezers;
- valve tappet retainer;
- set of measuring probes;
- set of adjusting washers.
It is also worth preparing a new cylinder head gasket and sealant.
If there is no valve adjuster
The functions of special equipment can be assigned to two powerful flat-head screwdrivers with a flat working surface width of at least 10 mm. In this case, setting the clearances of certain valves on the VAZ 2108 is carried out as follows:
- press the pusher down, leaning on the cam;
- install the edge of a screwdriver between the camshaft and the pusher;
- remove the first screwdriver;
- remove the washer with tweezers;
- install a new part;
- remove the second screwdriver, which acts as a lock.
The process of adjusting the valve mechanism is carried out every 20-30 thousand km and is carried out with the cylinder head cover removed. At a certain angle of rotation of the camshaft, the gap between two pairs of valve tappets and cams is checked with a feeler gauge.
Adjustment of the gaps should be resorted to in case of significant deviations from the norm: 0.15...0.25 mm for intake and 0.30...0.40 mm for exhaust. Using a special device or two screwdrivers, the pusher is bent and fixed, the old washer is removed, a washer of a new thickness is installed, the lock is removed and the resulting gap is checked.
How to adjust valves on a VAZ 21099
- If the car has been driven, leave it to cool with the hood open for 2-3 hours;
- Disconnect the throttle cable and its support from the throttle;
- Disconnect all connected pipes from the valve cover;
- Unscrew the two nuts securing the valve cover and remove the cover;
- Jack up the front right wheel;
- We engage fifth gear at the gearbox;
- We turn the engine until the first cylinder is installed at TDC;
- We attach a device for adjusting the valves to the valve cover bolts;
- We adjust the thermal clearances of the valves by turning the engine by the raised wheel;
- After adjusting the valves, we assemble everything in the reverse order.
We adjust the wheel alignment with our own hands, step-by-step instructions.
For details of the entire procedure for adjusting the valve clearances of the VAZ 21099, see the photo report.
1
Let's start adjusting the thermal clearances of the valves. Before us is a regular VAZ engine with a volume of 1.5 liters.
2
The first thing we will do is remove the throttle cable. Unscrew the two bolts securing the bolt bracket, using a 10 mm wrench.
3
Use a screwdriver to pry up the cable fixing bracket and remove it.
4
We twist the cable and pull out the cable end from its seat on the throttle.
5
Having removed the cable, we will disconnect all pipes from the valve cover. Unscrew the clamps indicated by the arrows.
6
And from the front of the engine we remove the crankcase gas pipe.
7
Now we just have to unscrew the two nuts securing the valve cover. For this we use a 10 mm wrench.
8
And remove the cover from the engine.
9
Jack up the front right wheel and engage fifth gear at the gearbox. This way we can crank the engine by spinning the wheel. It is recommended to turn clockwise, as the engine itself works.
10
To adjust the valves we need a special device. We screw it to the valve cover mounting studs, as shown in the photo.
11
Using a syringe with a hose, we remove all the oil in the wells between the valves so that it does not interfere with us adjusting the valves.
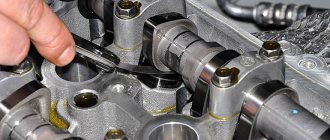
12
In order not to remove the timing case and not bother with the procedure for adjusting the valves, we will adjust the valves in the cylinder where the camshaft cams point up. The engine cycle is cylinders 1, 3, 4, 2, so we adjust the valves in that order. At the moment, our cams are raised on the second cylinder, and here we check what gap is between the valve and the camshaft. If the clearances are in order, then turn the engine clockwise until the camshaft cams on the first cylinder rise up and measure the clearances.
13
If the gap is not correct, we will have to change the adjusting washer to a washer with the required size. We rotate the valve cup so that the slot indicated by the arrow is facing us. Using the previously screwed device, we press the valve, pressing the lever.
14
Included with the device for adjusting the valves is a clamp necessary to fix the valve in the pressed position.
15
We install the retainer between the valves, as shown in the photo.
16
We remove the lever that was used to press the valve, and we see how the latch, resting against the camshaft, holds the valve pressed by the edge of the cup.
17
Using tweezers, pry the washer out of the cup through a special hole.
18
And we pull it out from under the camshaft with the same tweezers.
19
Find the size on the washer. Usually, if the washer was installed correctly, the size is always indicated.
20
We calculate what size washer we need. The calculation is not difficult to make if the exact gap was measured before removal and the size was indicated on the removed washer. We take a new washer of a larger or smaller size, for the number of units that does not correspond to the required valve clearance.
21
If the size is not indicated on the washer, then we need a micrometer to help. It is necessary to measure the washer in the center.
22
Install a washer with the required size. The inscription with the size on the washer must be installed downward so that it is not erased by the camshaft and it is easier to adjust the valves next time. After installing the washer, you need to measure the gap again. If the gap still does not match, then the calculation procedure must be repeated.
23
After checking and adjusting all the thermal clearances of the valves, you can remove the device and begin assembly.
24
We wipe and degrease the seat under the valve cover.
25
Clean, degrease and install a new gasket on the valve cover.
26
We install the cover and new rubber seals under the valve cover fastenings.
27
We finish the work by connecting everything that was removed and disconnected earlier.
Actions with the crankshaft when adjusting the valves of VAZ 2109, 2108
Work on the crankshaft to adjust the valves of VAZ 2109, 2108 is carried out without problems. To make it convenient to work, you need to unscrew the spark plugs. This will make it easier to manipulate the shafts and other mechanisms involved in the process. Use the figure below to understand the essence of the process.
And the sequence is:
- The crankshaft must be rotated so that the mark on the camshaft pulley coincides with the mark on the gear shaft cover. Other marks must be placed strictly in their places. You need to focus on the fact that the piston of cylinder No. 1 should be in the top dead center position.
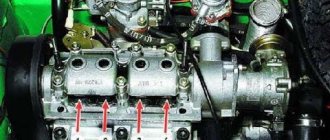
- After this, the crankshaft is rotated 40-50 degrees to move the cams away from the pushers. The technician measures the gaps in 1, 2, 3, 5 valves. The gaps on valve 2 and 3 should be 0.2+-0.05 mm. And on valves 1 and 5 is 0.35+-0.05 mm, respectively If the gaps do not meet the required values, they must be adjusted.
- After this, the crankshaft is rotated 360 degrees, and similar clearance values are checked, only in relation to 4, 6, 7, 8 valves. In the event that there are deviations in the gaps, they also need to be adjusted using a replaceable set of washers.
Valve adjustment diagram for VAZ 2109, 2108
Adjusting valves on a VAZ-2109 carburetor, injector step by step instructions
The Zhiguli model 2109, which was the first to be produced, was equipped with a chain drive of the camshaft. This design was considered reliable, and some believe it was better than the modern one. However, due to increased noise and the need to regularly change the chain tension due to its wear, the car was equipped with a camshaft belt drive. Thanks to this, the noise level has significantly decreased, and the need to adjust the tensioner has also disappeared.
At the same time, another problem arose - due to the low service life of the drive belts, as well as failure to comply with the maintenance period, it became the cause of belt breaks. This provoked significant disturbances in the operation of the engine, and could also completely destroy it by the oncoming movement of valves and pistons. To solve this problem, it was necessary to change the shape of the piston, namely its upper part, and use a recess for each valve. When repairing a car engine, you should distinguish between the structural features of old and new-style engines.
When to adjust valves
Usually, owners of VAZ-2109 cars adjust the valves when a characteristic sound is detected or after a complete engine repair. Experts insist on the need to carry out adjustments after the car travels 30 thousand km. This type of work can be carried out at a service center, but many car owners prefer to do everything themselves.
Why do you need to adjust valves?
To compensate for thermal expansion of the valves, they must have a gap of 0.2 mm for the intake valves and 0.35 mm for the exhaust valves. The error allowed is no more than 0.05 mm. If there are no gaps or if they are insufficient, the valve will not be able to close the cylinder.
This will cause a decrease in compression or even burnout. If the gap is too large, the engine will lose power.
Preparing for regulation
Allow the engine to cool before starting repair work. The temperature for adjusting the valves should be no more than 20 degrees.
To work you will need the following tools:
- set of wrenches;
- screwdriver;
- tweezers;
- puller;
- measuring probe;
- adjusting washers;
- gaskets for 8 valves.
Set the car to the handbrake, lift one of the front wheels with a jack - this will allow you to turn the crankshaft, and then engage 5th gear.
After this, follow the sequence of actions:
- Disconnect the pipes from the valve covers and remove the air cleaner. Then disconnect the throttle drive cables from the carburetor.
- Unscrew the two nuts, remove the cover and remove any remaining oil. Remove the timing belt cover.
- Place the piston of cylinder No. 1 at TDC on the compression stroke.
Bottom line
As practice shows, there is no need to carry out repairs yourself. In this case, this can lead to the fact that even with savings, there is no likelihood that installing washers will lead to a positive result. A significant amount of effort and time will be spent.
Service center specialists will perform all work promptly. This will save you time and resources, and provide you with ideal conditions for operating the vehicle.
IMPORTANT! Be sure to keep in mind that the equipment is first diagnosed, after which the need to adjust the gaps is determined. Take advantage of this offer, which will guarantee you the best working conditions.