VAZ starter brushes
It’s quite a common situation - the car won’t start after half a turn. Now, instead of the usual roar of the engine, only plaintive creaks and squeals of the starter are heard from under the hood. It is necessary, regardless of your desire, to begin diagnosing the starter. Our instructions will help with this. You should not immediately remove and disassemble the starter itself. There may be a break in the electrical circuit or a broken contact, so check the circuit elements and the ignition switch, as well as the battery charge. If the wiring is good and the battery is normal, only then remove the starter. Perhaps replacing the VAZ 2109 starter brushes will solve the problem, so start with them and do not rush to completely disassemble the starter. It is important to know how to identify a malfunction, so everything is in order.
Starter repair for VAZ 2108, VAZ 2109, VAZ 21099
A starter is an integral part in a car that allows the car to start.
Otherwise, you would have to constantly push the car to start it. Unfortunately, like any other part, the starter sooner or later fails. Someone immediately runs to a car store and buys a new one, but often this is a waste of money, because... The starter does not always wear out completely, but partially. For example, most of the problems are with the solenoid relay, which can be easily replaced and will save you money. There is even a free option for repairing the relay; you will need some sandpaper and a screwdriver. You disassemble the relay, clean the nickels, reassemble and put back. This method helps with oxidation - you have cleaned them and allowed the current to flow normally without interruption. In today's article we will look in detail at the procedure for disassembling and assembling the starter, talk about checking, and we will definitely look into cleaning the contacts and preventing burning. Note! The following tools will help you make repairs: sockets, wrench (extension), screwdrivers, a set of wrenches, fine-grained sandpaper.
Summary:
Starter location
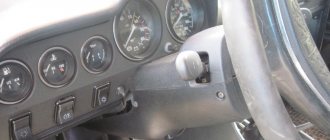
On most Russian front-wheel drive cars, the starter is located in the same way - inserted into the clutch housing and engaged with the flywheel. The crankcase is located at the bottom of the car along with its component - the gearbox. Below is a photo (top view of the car), the arrow indicates the starter - pay attention to the color.
When does the starter need repair?
If you have problems starting the car:
- when you turn the key you hear only clicks, nothing else happens - the car does not start;
- the engine is reluctant to start (the key is turned, the engine spins and spins and after 5-10 seconds the car starts)
- You can hear a knocking sound in the car engine when you turn the key, which means the bushings on the starter are worn out and the shaft is slightly skewed; the shaft does not fit into the flywheel normally, but hits.
In this case, we do not recommend that you operate the car: the starter is killed and the flywheel crown wears out.
Note! To check, you will need wires (one for the plus and one for the minus) and a battery (one installed on the car will do). Watch the video at the link below:
If the starter is in good condition as a result of the check, pay attention to the battery (be sure to charge it), to the ignition switch, or rather the contact group of the lock (for details about removal and testing, read the article: “Replacing the ignition switch on a VAZ”), Do not ignore the power relay starter (do not confuse it with the retractor relay). ,Read about checking and replacement in the manual: “Replacing the starter switch relay on a car”). We have listed the main components of the starter mechanism.
Typical faults
It is better to start diagnosing the starter even before you remove it.
After dismantling, some signs of failure, by which the source of the problems can be determined, can no longer be determined.
Signs of a faulty element include:
- An unusual noise occurs when the engine starts;
- Complete absence or slow rotation of the starter;
- Rotation occurs, but there is no gear engagement with the Bendix ring;
- The unit rotates with the bendix, but then the clutch breaks;
- Turning the key in the ignition, there is silence.
Checking the dismantled unit
Before blaming the starter for everything, take the time to look under the hood and check the condition of the terminal contacts and connectors. Also pay attention to whether everything is ok with the battery. Only after this can you start working on the starter.
Starter mechanism malfunctions
If any difficulties arise with starting the car, this unit is the first to be suspected, but now, knowing the design of the VAZ 2109 starter, you will quickly figure out where to look. Various sounds similar to metal grinding should also alert you; it is quite possible that your VAZ 2109 will need to disassemble the starter. The reason may lie in the flywheel, and its crown will need to be replaced. In this case, the car will most likely start, just not right away.
But if the car does not start and there are no alarming sounds, then you may have to replace the clutch. Disassemble the starter and dismantle it, try turning it in both directions. If it rotates freely, then calmly throw away the failed part. You can understand that it is necessary to remove and replace worn starter brushes installed on a VAZ 2109 by a characteristic click, after which the expected engine start will not take place.
Determining the cause of the malfunction
Do not rush to completely disassemble the VAZ 2109 starter; as always, it is first important to correctly identify the fault. Therefore, you should start by checking:
We disconnect the wiring from the terminal and connect it to the “plus” directly. If the engine is running, this means that the power relay is faulty. If the motor is silent, then the likely reason is wear of the brushes. A simple method will help you identify misalignment or wear of the brushes. Remove the unit from the machine, and we check it, start it, removed from the car. When we check the starter separately from the car, you should pay attention to the functioning of its engine. It often happens that the engine works perfectly in only one position. You just need to turn it to one side, and the contact will immediately disappear. Such a strange phenomenon is easy understandable: When the brushes of the starter have a normal length, they are pressed tightly, by means of the springs of the brush holder. When the brushes wear out heavily, the force of the springs may not be enough, then the brush is pressed only by its own weight. Therefore, when the position of the unit changes, the contact disappears. A similar phenomenon is observed when the brushes “hang”, having a normal length, or when the brushes are skewed
Replacing brushes
Replacing starter brushes on a VAZ 2109 is a simple procedure. Any novice auto mechanic or car enthusiast can replace brushes on their own
All you need to do is follow simple steps to complete this task:
- We take the unit removed from the car
- From the starter terminal, disconnect the cable, remove the screws connecting the shaft and commutator covers
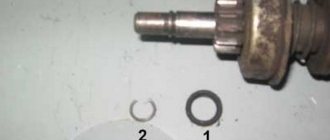
- Remove the sealing ring, cover, gasket, then the ring clamp and the second sealing ring located behind it
After unscrewing the screws, remove the cover, gasket, clamp and all o-rings
After this, we proceed to removing the rear cover of the starter by unscrewing the nuts from the tie rods
Remove the nuts from the tie rods
Removing the brush holder assembly
We take out the brush holder assembly
- After this, the brushes will fall out under the action of springs, but will be held in place by wires
- After disassembly, we proceed to inspection and, if necessary, replacement of brushes
- When disassembling the starter, do not forget to carefully arrange the parts in the sequence of their removal, so as not to get confused during assembly.
- The appearance of “extra” parts means that you forgot to screw something on
- We inspect and, if necessary, replace the VAZ 2109 starter brushes or the entire assembly
- Before assembling, we carry out its maintenance - we clean all its elements
- We place the brush plates on the commutator, center them, and then put on the springs and brush holders
- We install the brush holder assembly on the commutator armature, and insert the sealing sleeve into the cutout on the body
- We put the manifold cover on the armature, then the o-ring with gaskets
- After this, install the gaskets, o-ring, ring clamp, put the shaft cover on the manifold cover, tighten the bolts
- Connect the power cable to the electromagnetic starter and tighten the nut
- All that remains is to screw the unit to the engine and connect the wires to it
Now replacing the VAZ 2109 starter brush is a breeze for you, you are convinced that the operation is simple and accessible to everyone, in addition you can always watch a training video.
How to find out if starter brushes are worn out
Replacing the brush in the VAZ 2110 starter
There is no need to immediately start disassembling the starter; first you need to dismantle it and check it by starting it separately from the car. Its condition, that is, its functioning, should be determined. In such a situation, the wire is detached from the terminal and connected directly to the “plus”. If the motor runs, then most likely the problem is a faulty power relay. If the engine does not start, you should pay attention to the condition of the brushes.
Note. You can identify wear or warping of brushes using simple experiment. When checking the starter separately, it is recommended to evaluate its performance. In some cases, the starter works well in one position, but when turned to one side, contact is lost. This phenomenon can be easily argued. Starter brushes with normal length are pressed against the commutator so that there is a small gap between the brush holder and the spring.
Replacing brushes on the VAZ 2110 starter
When they wear out, the spring rests tightly against this brush holder, and contact will be ensured due to the influence of weight. If the position of the motor changes slightly, the contact immediately disappears. This phenomenon can also occur when the brushes become warped and become stuck in the brush holder.
Note! To remove the starter on a VAZ “tenth” model, you need to use an overpass, an inspection pit or a lift.
- The starter is fixed to the gearbox using two nuts, one of which is located under the engine compartment. For safe repair work, you must first disconnect the wire from the “-” terminal of the battery.
Replacing starter brushes for VAZ 2110
- After this, the crankcase protection is removed. In the engine compartment, you can unscrew the top nut to secure it. The wire leading out the traction relay is detached under the machine. Using a 15-size wrench, unscrew the bottom nut and remove the starter (see Repairing the VAZ 2110 starter - we do it all ourselves).
- When the starter is dismantled, it becomes possible to check it further. The device should be installed on a level place and the battery should be connected to it.
Note. The body is rotated on the surface; if the work stops or continues jerkily, this may indicate a malfunction of the brushes. Due to such vibrations, they can fall out of the brush holders, touching the commutator, and the parts will not be long enough to ensure normal operation. Then you cannot do without disassembling the starter.
- The body of the device with two covers is fastened together using two tie rods. Therefore, you first need to unscrew a couple of nuts on these studs and remove the front cover with the gearbox. Next, remove the back cover with the brush holder on which the brushes are placed. Since the brush holder is fixed to the rear cover with 2 bolts, they need to be unscrewed. Use a screwdriver to dismantle the brush retainer with pressure springs, only after that they can be easily removed from the brush holder itself.
- Replacing worn starter elements is relatively easy, you just need to act carefully. New parts are mounted in the grooves, the repaired brush holder is placed on the commutator. The springs are inserted into place and fixed. In such a case, the brushes should not be allowed to warp; they should be pressed evenly.
Note! The brushes do not need to be installed tightly; when properly positioned, they are held loosely in the grooves of the brush holder.
- The documentation for the machine does not indicate the exact length of these parts, so you can use brushes from other models. Despite this situation, it must be taken into account that the distance from the outlet of the element to the functioning edge can be no less than 0.35 centimeters. A lower value indicates a mismatch between the brushes.
- The exact length of the elements is not fixed because the collector wears out over time. If the wear is small, then when replacing the brush it should be cleaned well with sandpaper. With a larger parameter, it can be processed in a workshop on a specialized machine.
Note! The length of the brushes will depend on the diameter of the commutator ring.
Since the price of brushes is affordable, experts recommend replacing the brush holder as a complete assembly. In such a situation, you can get rid of the difficult procedure of fixing and balancing the brushes separately, while the repair process itself will go much faster. On the other hand, if spare parts are already available, it is advisable to use them.
Note! Copper-graphite or graphite brushes can be smoothed with a file, and the length will be selected through practice.
Finding these spare parts for a domestic car is not difficult in every auto repair shop. The price of starter brushes is approximately 50 rubles for the entire set. As for the complete brush block, it will cost about 100 rubles. Thus, we can conclude that the overpayment will be insignificant.
Self-change brushes
VAZ 2110 starter brush
Even a novice auto mechanic can replace the brushes on the starter. To do this, you need to carry out a series of simple sequential manipulations. So:
- The cable is detached from the starter terminal; the screws securing the covers of both the shaft and the collector are dismantled.
- The cover and seal ring, retaining ring, gasket and other seal ring are removed.
- The bolts that connect the manifold cover to the body are removed, and the cover is dismantled.
- The brush holder assembly is removed. The brushes are pushed out by springs, but are still held in place by several wires.
Removing the starter
Before removing the starter, you need to prepare two keys, 10 and 13, they will be needed in order to remove the terminal from the battery. To avoid short circuit, first remove the negative terminal. If your car has an injector, you will have to remove the air filter located above the starter.
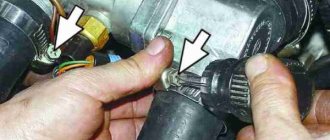
The VAZ-2109 starter can be dismantled in two ways: through the top or through the bottom. If the second option is chosen, then you need to temporarily remove the crankcase protection so that it does not interfere. Next, you need to disconnect the solenoid relay from the two wires. First, we disconnect the power (thick) wire through which voltage is supplied to the starter, then the thin wire needed to power the relay winding.
The thin wire can simply be pulled out by hand. To turn off the power, you need to use a 13 key to unscrew the nut from the contact of the solenoid relay. After disconnecting the wires, move them aside.
Next, you need to unscrew the three nuts securing the starter to the clutch block. To do this, use the key number 13.
After unscrewing the nuts, you need to pull the body to the right and move it away from the studs. Now you can pull the starter out through the top or bottom and start repairing it.
Place the dismantled starter on a workbench and remove all dirt from it. Disconnect the solenoid relay, which is secured by two screwdriver-head bolts. Next, remove the anchor from the metal bendix plates. Take a 10mm wrench and unscrew the rear starter cover. After removing the cover, you will have a view of the starter axis, from which you need to remove the locking ring. It can be removed using a flathead screwdriver.
The starter housing on the “nine” consists of three parts, which is held in place by three studs that tighten it. In the process of unscrewing the nuts on the studs, all parts of the unit are disconnected, so disassembling the starter will not be accompanied by difficulties. There are two types of starters: with and without a planetary gearbox, the collectors of which are slightly different.
If a planetary gearbox is installed in the VAZ-2109 starter, its brushes will be located parallel to the body, in the second option - perpendicular to the starter axis. The old bushing is securely pressed into the starter housing, so you will have to try hard to remove it. To get rid of the old bushing, take a hammer, a piece of pipe of suitable diameter, or
mandrel. Place it against the bushing and use sharp, short blows of a hammer to knock it out of its seat. The main thing is not to overdo it in the process, since the starter cover can burst at any moment, and there will be nothing to replace it with.
To avoid having to look for a similar starter from which you can remove the cover, be extremely careful. Before pressing in a new bushing, it is advisable to go over the installation site with fine-grained sandpaper. To press in a new bushing, it is best to use the old one, since it is made of soft metal and will soften the impact force during installation, this will prevent cracks from appearing on the cover body. While the starter is disassembled, inspect the brushes; they may need to be replaced. Reassembling the starter is done in reverse order.
To check the starter's operation, connect it to the battery. Smooth, quiet operation will confirm that the process of replacing the bushings and assembling the starter was completed correctly. Then you can install it in its place.
How to Replace Brushes on a Starter
Beginner Brush: DIY Replacement
Starting a modern car is ensured by a starter. This is an electromechanical device based on a conventional battery-powered electric motor. Its design is quite conventional and relatively reliable, but also requires timely maintenance and repair.
One of the most common starter defects is wear on the electronic brushes, which causes it to lose its ability to function properly and eventually stop working. Fortunately for car lovers, this breakdown is not critical, unless, of course, it is suitable for diagnosis and repair. In this article we will look at how to replace starter brushes with your own hands in VAZ-2109, 2110 cars.
VAZ starter principle
First, let's look at the mechanism of operation of the starting device. As already mentioned, the starter. This is an electric motor that draws direct current from the battery. VAZ-2109 and 2110 cars are equipped with four-pole starting devices with a brush with electromagnetic relays. Externally, they differ in size and type of fastening. From the point of view of the operating mechanism, starters “nine” and “ten” are similar.
The switching circuit of the device is as follows: when the ignition key is turned on, voltage is applied to the retractor windings of the retractor and the brush, as a result of which its drive is closed with the flywheel. The motor starts immediately. Its shaft begins to rotate the flywheel through Bendix. special gear design that ensures reliable grip. When the crankshaft speed begins to exceed the starter armature speed, the crankcase is switched off using a return spring.
Brushes and brush holder
Structurally, the starting brush is a graphite or parallelepiped copper-graphite parallelepiped with dimensions of 14.5 x 13 x 6.2 mm. A stranded copper wire with a duralumin fastening at the end is pulled up and pressed against it.
Considering that the VAZ-2109 and 2110 drives are four-pole, four brushes are required to ensure their operation. Two of them are connected to the ground of the device, and two. to the positive wire coming from the battery.
Someone brush the starter is fixed in a separate cell in a special block. brush holders. It is made of dielectric material and is designed not only to securely fix, but also to press them against the working surface of the valve, providing the so-called sliding contact.
Main fault
In most cases, the starter brush fails due to wear. It simply erases and stops contacting the commutator plates. Wear and tear may not affect performance at first. rheostat , but over time it will definitely make itself known. This is also the case when the VAZ-2109, 2110 drive brush is destroyed due to mechanical damage, for example, due to a faulty commutator, manufacturing defects, defects in bearings, shaft support sleeve and the like. As far as everyday wear and tear is concerned, this fault is inevitable but can simply be repaired manually.
Wearing signs
Worn VAZ-2110 or VAZ-2109 starting brushes may exhibit the following features:
- when trying to start the engine, only clicks of the starter relay are heard;
- unusual sound of the working starter (creaking, crackling);
- heating of the appliance cabinet, the appearance of a corresponding burnt aroma.
Brushes for beginners and how to put them back in place if they jump out of their holders.
If the channel brings you real benefit, then support the project! The quantity doesn't matter! CARD (SBERBANK).
Replacing starter brushes
Self-replacing brush abstract starter
from AGS professionals. www.agscenter.ru.
If such faults are detected, it is not recommended to start the car using the starter. This will make the situation much worse.
diagnostics
How do you know that the prerequisites for completing the task are the starting brushes of Models 2109, 2110 VAZ are worn out? First you need to make sure that the electronic circuit of the device is not open. Check grounded wires. If they are ok, take an insulated wire and connect the positive terminal of the starter to the positive terminal of the battery. Be sure to turn the transmission and ignition to neutral before doing this. If there is a problem with the publication, the rheostat on and start the engine.
If this does not work, the starter will have to be disassembled for future diagnosis.
Removing the starter
We begin dismantling the starter device by disconnecting the ground wire from the battery. For convenience, it is best to place the car on the inspection hole and remove the engine protection. It's easier to remove the device from below.
Next, find the starter and disconnect the power cable from the traction relay. Then unscrew the nut that secures the positive wire (key to “13”). Using the “15” wrench, unscrew the two (for “nine” three) screws that secure the starter to the clutch housing. Disassemble the launcher. You see, the process is quite simple and does not require any special abilities.
additional verification
Before you start disassembling the starter, you can check it again. To do this, connect the device to ground using the appropriate terminal and the positive terminal of the battery. If there are no signs of life in it, try turning it over. Typically, if one starter brush or several of them are worn out, they will sink and lose contact with the commutator, and when flipped over, everything will fall into place and the motor can run as if nothing happened.
Disassemble the launcher
First step. Remove the two screws that secure the shaft cover to the rear of the starter using a screwdriver. Remove the cover, O-ring and gasket. We then loosen the two tie rod nuts and disassemble the brush holder assembly. In this case, the brushes will fall from their places under the action of springs, but will be held on the contact wires.
Next, look at the owner of the brush. If there are any traces of mechanical damage, they must be replaced . This may be the cause of the malfunction. to the collector device. All of its copper plates must be in place. If they show signs of wear (chips, cracks, traces of a short circuit), the armature must be replaced.
Replacing the VAZ starting brush
The brush replacement process takes no more than 20 minutes. All you need to do is unscrew the contact darts of each item on the brush holder and connect new ones in the same way.
Next, the starting brush 2110 or 2109 is in its place above the clamping spring. Once this is done, the brush assembly should be placed on the commutator. To do this, the brushes alternately dig into the cell, and the armature is rotated in one direction. After this, we assemble the starter using the reverse algorithm. Before installing the rheostat , check this as described above. If the starter works, it means you did everything right.
Which brushes to choose
A few words about the brushes themselves. If you decide to replace them, then you need to change not four, but all four. Otherwise, you will have to go back to this procedure again after a while, and uneven wear will not do you any good.
For convenience, use the following catalog numbers:
By indicating them to the seller, you were definitely not mistaken.
Some useful tips
To keep your trigger brushes working as long as possible, follow these tips:
- When replacing, you don't have to buy them from the first available tray at the car market. It is better to go to a specialized store and buy certified spare parts. There is also no need to adjust the brushes of another manufacturer or car model, returning them to the correct size.
- When starting the engine, do not force the starting device to operate for more than 5-7 seconds. Thus, you can burn not only the brushes and commutators, but also the motor windings and the wiring that provides its power. Also, do not deliberately try to drain the battery.
- Do not allow the starter to operate while the engine is running, and if such situations occur involuntarily, immediately contact a car service center.
- Keep the device body clean. Dirt and oil deposits can cause a short circuit.
- Pay attention to the starter. If you know the battery is charged and the starter is not turning the crankshaft enough to start, there is likely a short in the housing, a clogged brush assembly, or a broken winding. In this case, it is also better to immediately contact a service station.
- Rapid brush wear can also cause bearing or shaft support bushing failure. In this case, the anchor bends and “eats” them on one side. It is difficult to detect such a malfunction without disassembling the starter, so pay attention to the sound the device makes during operation.
What is a starter and its features
The unit is a simple electric motor producing direct current. It has four poles and a similar number of brushes, its drive is connected to the gear rim of the flywheel. Sometimes you may need to repair the starter (photo below) and in this case, you need to know its structure.
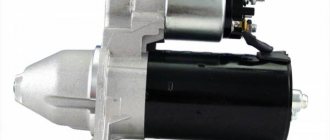
Starter VAZ 2109
So:
- On VAZ 2109 models, units 5712.3708, or 29.3708 or 423.3708 are installed
- All these models are DC electric motors with an electromagnetic two-winding traction relay and mixed excitation
- They also have the same installation dimensions and differ only in the features of the drive device or collector unit
- For example, unit 29.3708 has an end-type manifold, and unit 423.3708 has a cylindrical type; in other parts both units are almost identical
- The starter 5712.3708 has a planetary gearbox in the drive
- The main difference between the listed models of units that are used on other cars is the absence of a shaft end support in the drive cover
- Instead of supporting the tip of the shaft, a bushing is used, pressed into the clutch housing (see VAZ 2109: clutch repair at home)
- The starter housing directly contains four fixed poles
- All of them have excitation windings
- Moreover, three windings are mass-produced, and the last winding is a shunt winding
- We also recommend that you take a close look at the body and covers.
- They are tightened with two pins, and the armature has a cylindrical collector
- The rear end of the anchor shaft rotates inside the sintered bushing
- This sleeve is pressed into the cover
- And the front end of the anchor shaft is placed in a sleeve pressed into the clutch housing
- We strongly recommend that you remember the connection diagram for the starter and the connection of its parts, as this may be useful to you if you decide to repair it yourself
- On the model analyzed in our example, the unit begins to function through its traction relay
- This part is attached to the housing and has a special protective shield, which is needed to prevent any contact of the relay with the exhaust pipe and protect it from temperature effects
- The dimensions and weight of the starter are very small, and its main purpose is to rotate the engine flywheel
- And, therefore, it serves to drive the entire crank mechanism of the engine
- Taking into account the significant loads that affect its structure, the unit of the model we are considering is capable of working properly for about six years
- To increase the life of the starter to the maximum possible, turn it on when starting the engine for no more than ten seconds
- It’s better to turn it on again if suddenly the engine did not start in ten seconds
- In addition, be sure to keep in mind that the intervals between repeated attempts must be at least thirty seconds in order for the battery to restore its functionality.
- Otherwise, you risk draining the battery, then starting the engine will become impossible without recharging or replacing the battery
- If the starter of your car does not work, perhaps you did not spend enough time on its prevention and then problems can unexpectedly take you by surprise, such is the price of negligence
VAZ 2109 starter repair
Before starting repairs and identifying a malfunction of the VAZ 2109 starter, it must be removed from the car, how to remove the starter:
IMPORTANT: Before removing the starter on the VAZ 2109, disconnect the ground from the battery. Disconnect the block with the wire from the starter traction relay terminal.
Unscrew the fastening nut with a 13mm wrench and remove the wire from the contact bolt of the starter solenoid relay.
Unscrew the mounting bolts and remove the crankcase protection.
From the bottom of the engine compartment, unscrew the two starter mounting nuts using a 13mm wrench.
Unscrew the third nut with a size 13 wrench that secures the starter on top of the engine compartment.
Remove the VAZ 2109 starter from the clutch housing.
Once the starter is in your hands, you can begin troubleshooting. The main malfunctions of the VAZ 2022 starter are failure of the solenoid relay or wear of the starter bushings; in rare cases, the brushes wear out, since they cannot be repaired; replacement of the VAZ 2109 starter brushes is required.
Causes and methods for determining starter malfunction on VAZ 21142115
Before moving on to determining the cause of the starter malfunction, you need to know that this design operates in a system with other electrical parts of the car, such as the battery, starter control mechanism, etc.
Before starting to check the functionality of the starter on a VAZ 2114/2115 car, make sure that the car’s battery is fully charged, the battery contacts are reliable and well secured, the wires from the solenoid relay terminal and from the battery to the starter are not damaged and have good contact.
If there is a clear click from the traction relay, but the starter does not turn the engine, or turns it slowly, not powerful enough to start, or works jerkily, then, with a high degree of probability, we can say that contact is lost between the commutator and the brushes. The reasons for this may be:
- the brushes are worn out or do not fit tightly to the commutator;
- the traction relay has failed;
- The armature commutator is worn out.
Typical starter faults
All breakdowns of starter mechanisms are divided into two types: mechanical and electrical. If the working elements of the Bendix gears, flywheel fail (their wear or damage to the teeth), the drive lever, overrunning clutch, or return spring malfunction, the cause of the failure is mechanical, but the starter is repairable. A worn part must be replaced.
Violations of the operating mode in the starter electrics are more complex: a burnt-out commutator or armature winding, a broken gearbox, and worn brushes cannot be restored; in this case, the entire mechanism assembly is replaced with a new one. The only part in the electrical circuit that can be replaced without consequences is the solenoid relay. Electrical failures often occur as a result of moisture and contamination, which can lead to a drop in power, short circuits and oxidation of contacts. This kind of malfunction is eliminated by cleaning the electrical elements followed by treatment with a special anti-corrosion compound.
Typical signs of a starter malfunction:
- When you turn on the ignition (supplying current from the battery), the starter does not turn, a click is heard, the engine does not start: a possible reason is a relay failure, a gearbox failure, jamming of the gears of the Bendix transmission units or flywheel, short circuit of the brushes.
- The starter starts slowly with a loss of shaft speed and extraneous grinding noise - mechanical damage to the transmission links, breakage of the winding in the commutator or armature, contamination of internal components.
- After starting the engine, the starter continues to work - failure of the retractor relay, breakdown of the return spring or overrunning clutch.
- The ignition does not fire, or fires with a delay and subsequent loss of power, insufficient to turn the crankshaft - disturbances in the electrical circuit, oxidation of the terminals, breaks in the armature winding.
- The starter does not respond to turning the key in the ignition switch - no current is supplied from the battery: the contacts on the battery terminals are broken, or it is discharged.
Diagnosis of the electrical causes of malfunctions can be made without removing the starter, using special equipment (micrometer or tester) by measuring the power and current indicators on the armature, solenoid relay contacts and return clutch. The first sign of electrical failure is a drop in voltage during startup. A deviation of 1-2 Volts when the ignition is turned on is considered the norm; large deviations (possibly twice) are a sure sign that the brushes, windings, or bushings are faulty. If everything is in order with the electrics and the indicators are normal, then to determine the mechanical cause of the breakdown, the starter is dismantled and disassembled, identifying possible damage visually.
The service life of the starter depends on the number of complete starts of the ignition system and operating conditions. At low temperatures, its wear occurs faster: the oil in the engine becomes viscous, so the electrical circuit, gearbox and moving components experience increased load. Frequent starting with an insufficient charge of the car battery can also lead to malfunction of the relay, premature wear of the commutator winding, armature and brush assembly.
The most important problem with brushes
The most common sign of brush failure is wear. The brush simply wears out over time, due to which it ceases to contact the collector interceptors. The operation of the brushes at first does not affect the functionality of the starting device in any way - the engine starts as before. However, over time, this gradually begins to make itself felt.
It also happens that brushes deteriorate due to mechanical damage. This refers to initial defects, bearing failure, problems with the manifold, etc.
Standard wear and tear is normal. You can easily fix it with your own hands; you don’t have to go to a specialist for service.
So, first you need to determine whether it is actually wear and tear. As a rule, worn out brushes manifest themselves with symptoms of the following properties:
- When the starter is operating, an unusual crackling noise is heard;
- The starter housing heats up quickly, and a burning smell is clearly felt;
- Clicking noises are heard when starting the engine.
In these three cases, it is prohibited to continue trying to start the engine. Thus, the problem gets even worse.
In addition to detecting signs, an experienced motorist will also conduct additional diagnostics to accurately determine the malfunction. It is not necessary to remove the starter at all.
Actions usually boil down to the following:
- You need to make sure that there is no break in the circuit by checking the integrity of the cable connections;
- Next, if everything is in order with the connections, take an insulated wire, which is placed with one end to the positive of the starter, and the other to the positive terminal of the battery.
If the problem was in the wires, the starter will easily start the engine. It is also recommended to listen to the device and respond to all unnecessary sounds and crackles that indicate internal malfunctions.
Sequential disassembly of the starter
The whole process occurs in several stages, and at each stage a potential malfunction can be identified.
The first stage involves inspecting the brushes after removing them. This is generally the most common problem that prevents the starter from working properly. To do this, do the following:
- Unscrew the two screws that secure the protection cover. It comes off very easily.
- Using a screwdriver, remove the retaining ring and adjusting washers from the shaft.
- The next step is to remove the two tie rod nuts and the cover can be removed from the manifold side.
- Now, using a screwdriver, you can press the springs and pull the brushes out of their seats.
To measure the height of the brushes, use a ruler or caliper. If the element height is less than 12 mm, then they should be replaced. If there are chips and cracks on the surface, this is also a reason to update them with new parts.
How to replace parts and assemble a starter
So:
- It is necessary to make a visual inspection and, if necessary, replace the brushes or brush holder assembly. Immediately before assembling the starter, it is recommended to carry out its maintenance, that is, cleaning all elements.
- The plates of the elements to be replaced are installed on the commutator, and they must be centered by putting on the springs and brush holder.
- The assembly is mounted on the commutator armature, the sealing sleeve is inserted into the section of the housing.
- A manifold cover and a seal ring with a gasket are put on the armature; The collector cover is mounted and the fixing bolts are inserted.
- Gaskets, ring clamps, and sealing rings are installed in their places; A shaft cover is placed on the manifold cover and tightened with bolts.
- At the final stage, the power cable is connected to the electromagnetic starter, and the nuts are tightened.
Any malfunction of the VAZ 2110 car can be repaired in a car repair shop, but why overpay if with the help of videos and photos you can do everything yourself. If you repeatedly replace brushes, you will not need detailed instructions, since the actions are already performed automatically. In such a situation, you can save a lot by buying only consumables, the price of which cannot but surprise. You can also find out about replacing the Bendix starter on our website.
Geared vs conventional: which starter should you prefer?
A conventional starter does not have a gearbox; the rotational motion is transmitted directly to the crankshaft. Therefore, its design is simple and allows you to carry out repairs at home. Due to the fact that the electric current supplied to the device instantly engages the flywheel crown and gear, the engine starts, which is called “half-turn”. Classic units, due to their simple design, are reliable devices that can withstand electrical influences, but can fail when exposed to low temperatures.
The principle of operation of the gear unit is the same as that of the classic unit - the conversion of electrical energy into mechanical energy.
The difference is in the design - a gearbox is included, which is located between the armature and the bendix. In addition, the windings are equipped with permanent magnets, which increased the reliability of the mechanism. Geared devices are increasingly conquering the car market. In order to figure out which starter is better, you should find out the advantages and disadvantages of each of them.
Advantages of the classic version:
- simplicity of design;
- high maintainability;
- availability of spare parts;
- low cost.
The disadvantages include the following:
- the need for high starting current;
- rapid wear of parts;
- unstable operation at low temperatures;
- large weight and dimensions.
In general, an ordinary unit can be assessed as a reliable device when used correctly.
The gear unit has the following advantages:
- light weight and small size;
- can operate in a wide temperature range;
- long service life;
- economical energy consumption (40% less than usual).
Thanks to the presence of a gearbox, starting reliability at low temperatures has increased. Since a small current is required to start the power unit, the likelihood of a successful start increases in winter.
The disadvantages are the following:
- lack of spare parts;
- complex repairs;
- low quality gearbox.
The reliability of a device depends on the quality of its components. Therefore, a mechanism with high-quality components will last a long time without repair.