Comments: one Published: 12/10/2015
Rating:
Tags:Chevrolet LacettiBumper repair
It's hard to imagine a car without bumpers. It doesn’t matter what kind of car we are talking about: a slender sedan or a powerful crossover. This part of automotive design is present in absolutely any car. Both the front and rear bumpers of the car are, of course, the very parts that absorb all the damage. In fact, this is what it is needed for, its purpose is to prevent more serious damage to the car body, in particular its parts such as the front fender, hood, as well as injuries to the driver and passengers. This is why the bumper often fails, cracks appear, and with more severe damage you may simply lose part of this important part. And it doesn’t matter whether you are replacing the product or repairing it, you will have to remove it one way or another. Also, there is no way to do without dismantling when it is necessary to replace or install fog lights or parking sensors.
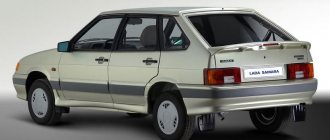
Chevrolet Lacetti
In general, the ability to remove the front bumper will certainly be useful to you, so let's figure out how to do this on our car. This instruction is intended for the Chevrolet Lacetti sedan form factor, but it is also suitable for hatchback and station wagon cars.
You can also familiarize yourself with information like the rear bumper of the Chevrolet Lacetti.
Sequencing
In order to perform dismantling efficiently and not break anything, it is important to strictly adhere to a certain sequence of work. Removing the driver's door trim of the Lacetti step by step:
- Without using tools, remove the decorative corner on the door, which is attached to it with two latches, by hand.
- Remove the window regulator handle if it is mechanical and not electric. To do this, insert a screwdriver into the special groove of the handle, with which it moves away from the thrust ring. Then, using a thin screwdriver, disassemble the stopper that holds the handle.
- Unscrew the screw and remove the door handle.
- If the window regulator is electric, then before removing the handle, disconnect the electrical wire block.
- Unscrew the two screws that are located at the bottom - one on the left, the other on the right.
- Using a screwdriver, pre-wrapped with a rag or tape to prevent scratches, unclip the 5 latches that hold the casing around the perimeter. To do this, slide a screwdriver under each latch and slightly pull the panel away from the door.
- Remove the door handle trim. To do this, you need to bend the trim a little, stick one hand in, and bend the ears of the lining. With the other hand, use a screwdriver to pull out the cover from the outside.
- Remove the trim by first moving it up a little.
After dismantling, you can begin replacing or repairing the lock or door lock drive, window lift mechanism, installing speakers, etc.
In most cases, drivers disassemble, reupholster or tune the door card. Tools, materials necessary for self-repair:
- a stationery or construction knife with a sharp blade;
- sharp scissors;
- roller for smoothing the material;
- pencil for outlining a layout made from a new material;
- glue of different brands, depending on the material;
- sanding paper or brush to clean the casing from old material;
- household or construction hair dryer;
- degreaser.
The materials are: velor, Alcantara, artificial suede, leather substitute, genuine leather. It is recommended to use foam rubber with a thickness of three to six millimeters as a backing. Work algorithm for reupholstering door trim:
- Cleaning the surface of old material. To do this, use sanding paper or a stiff brush.
- The surface is wiped with a cloth and degreaser.
- Preparation of new material. The new material is superimposed on the removed old one, outlined and cut according to the old pattern. In this case, it is necessary to leave a margin of 2-3 centimeters at the edges. The same is done with the foam rubber backing.
- Bonding new material to the door card. The surface on which the new material will be glued and the underside of the new material are first cleaned with fine sandpaper for better adhesion.
- Applying glue to the cleaned surface, you need to let it dry slightly for better adhesion.
- Heating the surfaces to be glued with a hairdryer, they need to be applied to each other and carefully smoothed with your hand or a roller.
If the foam backing is changed, it is cut out and glued to the door card. At the final stage, the necessary standard holes are cut in the door card for mounting the speaker of the speaker system, handles, and armrests.
HOOD
REPAIR PROCEDURE
- Remove the relevant parts.
- Remove the hood.
Prepare a new hood.
Apply paint. CAUTION When applying paints, provide ventilation. Most paints and varnishes contain substances that are harmful if inhaled or swallowed. Read the label before opening a container of paint material. Avoid contact with skin
When painting, use an approved respirator, gloves, eye protection and appropriate clothing. Paint and varnish materials are flammable. Store them in a safe place, away from sparks and fire, and do not smoke.
Pre-install the hood.
- Fully tighten the fasteners.
- Install the appropriate parts.
- Check and adjustment.
- Check clearances and level differences.
- Check the opening and closing of the hood latch.
Bumper Features
Manufacturers have placed the main emphasis on decorating the car with a bumper; it is an independent and quite expressive detail. Made from various plastics. Their diversity is provided by different additives, which allows you to make a large number of different shapes and match the sports style. The rear element also has a rather stylish look. You can find out how to remove the Camry v50 rear bumper later in the article.
As a result of the use of plastic, creation is easier, but the protective role is practically absent. To protect against chips and preserve paint, the bumpers of Toyota V40 and 50 are equipped with a special protective tape made of rubber and shaped like a skirt. The protective strips are located at the bottom.
The bumper has edges curved towards the top, which increases the aerodynamics of the car; the stiffening ribs present have an important property of a spoiler. Since the latest versions of Toyota, all efforts have been aimed at increasing aerodynamics, as well as design
Let's figure out how to remove the front bumper of Camry 40 and 50.
Removing and installing the rear body kit
Removing the Renault Duster rear bumper is carried out in the following order:
- The license plate light bulb and rear lights are removed. The car is first de-energized by disconnecting the terminal from the battery.
- Remove the four screws located at the top of the buffer. To access them, you need to open the trunk lid.
- In each fender liner, the screws that secure the body kit are removed, and the mudguards are dismantled using this action.
- Next you have to remove the body kit from the car body. The process begins with the left and right sidewalls, since there the latches have the least resistance.
- Unclip the body kit fasteners in the center and finally remove the bumper. Using a flat-tip screwdriver, unclip the clips and remove the pins.
- Installation of the body part is carried out in the reverse order of removal.
Replacing a Renault Duster body kit is an operation that can be performed by any driver. To implement this, you will need to stock up on a set of Topx wrench heads, screwdrivers, and WD40 solution. It is recommended to carry out the work together with a partner, this way you can carefully and quickly dismantle and install the body kit.
We recommend: Volume of oils and fuel fluids Renault Sandero
Dismantling process
Removing the front buffer on a Lacetti requires time, a set of tools and another pair of hands (although you can do the process yourself). So, when everything is assembled, you can start working:
- It is recommended to disconnect the terminal from the battery, especially for cars with fog lights.
- We move on to the fender liners, the fastening of which must be unscrewed.
- It is also necessary to remove the lower plastic protection to the bumper.
- Having gained access to the inside of the bumper, you can unscrew the fastening screws.
- Next you need to remove the radiator grille.
- You will need to remove the headlights.
- Remove the buffer from the side latches.
- If there are fog lights in the buffer, they need to be removed.
- Take the bumper in the center from below and pull it first up and then towards you. If the process is done according to the instructions, then the protective buffer should be removed without problems.
- Assembly is carried out in reverse order.
Chevrolet Lacetti 5D RHCP MLGA › Logbook › Installing an absorbent element in the front bumper.
The front bumper had a "drop lip". The previous owner had an accident and broke the right headlight; the bumper was glued together, but they either forgot to put in the absorbent element (which is most likely) or it shattered into complete dust (which is unlikely).
Unfortunately, I didn’t take a photo as it was, but the gap was noticeable to the naked eye even when inspecting the car: I told the owner, she immediately confessed - yes, she touched it with her face, on the right side, the headlight needed to be replaced, the bumper was glued.
I really wanted to insert it there, because an empty bumper is guaranteed to shatter into trash, and, in fact, the bumper absorber is needed for this purpose, to absorb the impact energy by deformation.
I looked at what is issued in the EPC, p/n 96545495. There are some misunderstandings there, because according to the VIN for the hatch, the picture shows a bumper for the sedan, the question naturally arises as to whether the remaining spare parts are correct or not. I dealt with this issue here (About the front bumper and absorber. Three questions for experts). There are pictures there too.
1100 rubles for a piece of polystyrene foam seemed too much. I looked at drom.ru, but the prices for used ones from disassembly were even more expensive (and this does not include delivery). I even found a used bumper absorber in the glorious city of Arzamas for a ridiculous 400 rubles, but delivery from there cost 700 rubles, which was what it was, and “if it turns out to be that, maybe that’s what it is.” It was a concrete fact. The green toad sympathetically unclenched his fingers and left to ferment amid a sudden attack of depression.
I had to order the original. How long or short, he arrived.
It feels more slippery to the touch, most likely stamped polyethylene foam. It is difficult to do this on your own.
And since today was extremely (I still hope!) warm (+13), and also a day off, it was decided not to postpone it until winter.
I took few photographs. The phone was very discharged. We do the steps according to any Murzilka, I had “The Third Rome” at hand, which I periodically peeked at, but I modernized a few things to speed up the process:
I may have some mistakes because the service people were messing around here, and these guys like to use creativity at the “assemble in reverse order” stage. Non-original fasteners? “Well, he’s holding it!”
0. We will need to remove one of the fender liners, no matter which one - the access is the same. It is better to set the steering wheel to the middle position.1. Loosen the nuts on the selected wheel. From this side we will install the absorbing element.2. Let's jack up the front part. We hang up the wheels. loosen the wheel and reset it.3. We unscrew 4 screws (cross PH2) and remove the decorative radiator grille by pulling towards ourselves. 4. Remove and move the headlights to the side (3 bolts by 10). Both. Because there are clips under the headlights that hold the bumper. They both need to be weakened. By the way, it is quite easy to break the clips.5. And since everything is accessible, remove the connector from the PTF.6 headlight. On the selected side, remove the mudguard, in my case, three long hex screws (or M8 or M10)7. On the chosen (Choosen One) side we begin to pull off the locker. Bolts-screws with a press washer on M7 and nuts on M10 (I don’t understand at this point the designers who, for some bullshit, force the use of different tools for dismantling. Between the bolt-screw and the nut is huge, I would even say , generic difference, they cannot be confused). The fender liner is held in a large number of places and they all need to be turned out. Including underneath the bumper.
By the way, if you have the opportunity to knock off the dirt with some kind of Karcher, do it. Life will become easier, life will become more fun.
7. For these two screws, I would say a special “thank you” to the Lacetti designers.
I removed the front bumper on a Hyundai avante(elantra) XD - no problems at all. Somehow everything happened quickly. Mitsubishi. their school. However, these are lyrics.
second of attention: 8. Pistons or screws from the bottom of the amplifier.
Changing the bumper on a sedan or station wagon: detailed instructions
Due to design features, the rear bumper on the Lacetti sedan and station wagon is fixed in an identical way. Removing the part will take about an hour and will require a set of wrenches, a set of screwdrivers and a jack. The removal procedure is as follows:
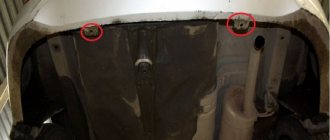
- First, we unscrew 5 screws on each side of the bumper, then use a wrench to unscrew the bolts securing the mudguards and fender liners, and remove the components;
- Next, you need to unscrew 1 screw at the corners of the bumpers above the fender liner, and also unscrew the screws located at the bottom of the rubber seal;
- Now we remove the plastic trim between the bumper and the trunk: the part is attached to 2 plastic pistons on the sides and 4 latches around the perimeter - we unclip all the latches with a slotted screwdriver;
- Then we remove the boots of the car and remove the bumper. The part is also pulled out by moving towards you in a straight plane;
- After dismantling, unscrew the reinforcing beam.
Assembling or installing a new spare part is carried out in the reverse order. During assembly, it is necessary to correctly place the bumper in the body grooves - otherwise dust and moisture will enter the structure through the gaps, which will lead to rapid corrosion of the body.
https://youtube.com/watch?v=J23GpaBWTh4
When dismantling bumpers, regardless of body type or arrangement design, it is recommended to glue all components along the edges with masking tape. This will prevent accidental damage and scratches during repairs.
How to remove the front bumper of a Chevrolet Lacetti
Required tool:
10 and 7 socket wrench, Phillips screwdriver, masking tape; if necessary, dismantle the “energy absorber” you will need a 14 socket wrench.
- We climb under the hood. We remove the “minus” from our battery;
- Remove the mudguards and screws that secure the front bumper to the fender liners;
- We remove the headlights: disconnect them from the blocks, remove the fastenings;
- Let's move on to the rear fastenings: bend the fender liner and unscrew the fastening bolts;
- At the front, our product and the wing are connected using bolts, which we also need to unscrew. The fastenings are located both on the left and on the right;
- We remove the fastenings of the lining of our part along the edges, left and right: unscrew the stopper with a Phillips screwdriver and take out the fasteners;
- In the same way, two central fasteners and four fasteners from below are removed;
- If you have fog lights installed, then they need to be disconnected from the wire block;
- Carefully pull the part towards you. Ready! The Chevrolet Lacetti bumper has been dismantled and you can proceed with further planned actions with it.
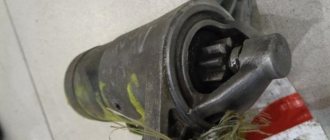
The energy absorber of the Chevrolet Lacetti sedan is dismantled in the classic way: using a 14 wrench, unscrew the two nuts and one bolt that secure the part to the body. After dismantling the energy absorber, you can also remove the impact bar - you just need to unscrew the two bolts that secure it to the body.
Dismantling process
Removing the front buffer on a Lacetti requires time, a set of tools and another pair of hands (although you can do the process yourself). So, when everything is assembled, you can start working:
- It is recommended to disconnect the terminal from the battery, especially for cars with fog lights.
- We move on to the fender liners, the fastening of which must be unscrewed.
- It is also necessary to remove the lower plastic protection to the bumper.
- Having gained access to the inside of the bumper, you can unscrew the fastening screws.
- Next you need to remove the radiator grille.
- You will need to remove the headlights.
- Remove the buffer from the side latches.
- If there are fog lights in the buffer, they need to be removed.
- Take the bumper in the center from below and pull it first up and then towards you. If the process is done according to the instructions, then the protective buffer should be removed without problems.
- Assembly is carried out in reverse order.
How to remove the rear bumper if your Chevrolet Lacetti is a sedan
Step No. 1 – Remove the wheels, remove the mudguards and unscrew the screws behind the lining.
Remove the trunk lining. You can simply bend it to get to the bolts we need to secure the part. Unscrew the fastening bolts.
Also, our rear bumper is held on by four screws (near the rubber seal, one screw near each of the headlights, two in the center). Unscrew them using a Phillips screwdriver.
Step No. 3 – Unscrew the screws near the rubber seal
Ready! The part can be removed from your Chevrolet Lacetti sedan by gently pulling it towards you. If you have not covered the fenders of your car with masking tape, be careful, scratches on the fenders remain very easily!
Tuning
There are two categories of people - those who approve of changing the appearance of the car and those who do not approve. The latter are usually in the minority. The rear bumper of the Chevrolet Lacetti station wagon has several main types of tuning. Conventionally, let's divide them like this:
- protective;
- practical;
- sports;
- change of style.
Now let's look at the tuning options in more detail.
Protective
This includes special linings that are installed on the rear bumper itself. They have only one function - to protect the bumper from mechanical damage and scratches received during constant use of the trunk and transportation of goods. The second task is to increase impact resistance. For example, if something is dropped on it. It will not save you from road accident damage.
The overlays are attached to a special sketch. We can say that in the event of an excessively strong impact, the bumper will burst, but the linings, most likely, will not be damaged. The fact is that they are made of high quality metal.
How much do overlays cost? Approximately, a little less than half the price that is asked for the bumper. But their use will increase the service life and protect the appearance from damage, scratches, and abrasions. Is it worth it? According to car service specialists, yes.
Practical
Practical auto tuning involves converting a Chevrolet Lacetti station wagon into a more adapted car. As a rule, it is complex and rapids. What does this give? Changing the parameters of the chassis and, in particular, the tires. It becomes possible not only to use a different wheel height, their profile, but also to adjust the ground clearance. This move is needed not only for visual effect, but also has a practical purpose.
What does ride height provide? It directly affects:
- controllability;
- aerodynamics;
- permeability;
- sustainability.
To drive at serious speeds, a minimum level is required. Downforce creates better traction, increased agility and stability. If the ground clearance is high enough, it helps to avoid damage when driving on dirt roads and in rural areas.
It turns out to be a kind of mini-jeep. We also need to take into account the running gear. While the body itself may not touch the road surface during pit jumps, other components may well. Therefore, you should take the car’s height settings seriously and count on the conditions in which the Chevrolet Lacetti station wagon and its capabilities will be used. After all, the car was originally created for city driving.
Sports
Sports modification is not only about appearance. Here's what happens when you create a real sports car:
- replacement and strengthening of power units;
- lightening the weight of the car;
- body reinforcement;
- increasing security measures;
- changing the chassis;
- improvement of aerodynamic characteristics.
Changing the style
Many drivers want to stand out from others. When there is not enough money for a complete tuning, they limit themselves to a simple alteration of the appearance. This gives the car a sporty design. In fact, this does not affect the car's performance in any way. The rear bumper is no less important than the front or hood. The station wagon becomes much more aggressive and original in appearance. The cost, compared to the factory model, is slightly higher. But real sports options are quite expensive.
Change style
The rear bumper, like the front bumper, is the very first part of the car to absorb impacts and damage impulses. Security and safety. his destiny. However, that's not all.
Frequent reasons for replacing the Chevrolet Lacetti rear bumper are the following:
- damage as a result of an accident;
- damage to transported goods;
- damage caused by frequent use of the chest;
- change the style of the car.
Many drivers want to stand out from others. When there is not enough money for complete customization, they are limited to simply changing the appearance. This gives the car a sporty design. It doesn't really affect the car's performance. The rear bumper is no less important than the front or hood.
The rear bumper, like the front, is the very first part of the car that takes impacts and absorbs impulses. Protection and safety are its purpose. However, that's not all.
Frequent reasons for replacing the rear bumper of a Chevrolet Lacetti station wagon are as follows:
- damage due to an accident;
- damage caused by transported cargo;
- damage resulting from frequent use of the trunk;
- changing the style of the car.
We repair the car ourselves (remove the rear bumper of a Chevrolet Lacetti) | avtoremont13.ru
Removing the rear bumper on a Chevrolet Lacetti
Dismantling the rear bumper of a Chevrolet Lacetti sedan If you want to remove the beam from the bumper, unscrew the 4 pistons with a Phillips screwdriver. Some people do this after an accident, and some do it like this from the factory... Therefore, you may not need to unscrew these two bolts if the bumper is already in your hands. If you removed the bumper to repair it, then read the article Repairing and gluing the bumper On this that’s all, but since we’ve already done such a job, it would be a sin not to do some maintenance on the body of a small Chevrolet Lacetti sedan, remove the rear bumper.
This measure will prevent scratches or chips of paint on the wings as a result of dismantling.
First, we get rid of the mats, then remove the plastic cover that covers the bracket in the lock area. Similarly, we pull the part towards ourselves, safely freeing it from the grooves and fastenings. How to remove the rear bumper on a Chevrolet Lacetti hatchback and station wagon The procedure is performed similarly to a Chevrolet Lacetti sedan, but in this case, if you have a hatchback or station wagon, it is not necessary to remove the rear wheels.
Chevrolet Lacetti 2010, 109 l. With. — self-repair
As a result, it quickly loses its original appearance: How to remove the rear bumper on a Chevrolet Lacetti The need to dismantle it may arise for various reasons. It is necessary to remove it for replacement, repair, repainting, installation of parking sensors, and it is not always physically or financially possible to go to a salon.
In this article, we will figure out how to independently dismantle, and then reinstall, the rear bumper on a Chevrolet Lacetti of any form factor: This measure will allow you to avoid scratches or paint chips on the wings as a result of dismantling.
Rear bumper sticker for Chevrolet Lacetti sedan
If you are not sure that the procedure described below is within your capabilities, we recommend contacting a service center or asking someone experienced in these matters for help. Recommended literature on repair and maintenance of Chevrolet Lacetti: You can simply bend it to get to the bolts we need to secure the part.
Unscrew them using a Phillips screwdriver.
AVTOTRUE.RU
- Home
- Auto garage
- How to Remove the Front Bumper on a Chevrolet Lacetti
How to remove the front bumper on a Chevrolet Lacetti
It's hard to imagine a car without bumpers. It doesn’t matter what kind of car we’re talking about: a slender car or a powerful crossover. This part of auto design is completely found in every car. Both the front and rear bumpers of the car are, of course, the very parts that absorb all the damage. In reality, you need it for this purpose, its purpose is to prevent more severe damage to the car body, specifically its parts such as the front fender, hood, and also injuries to the driver and passengers. This is why the bumper often breaks, cracks appear, and with more severe damage it is possible to simply lose part of this important part. And it doesn’t matter if you change the product or repair it, you will have to remove it, to put it another way. Also, there is no way to do without dismantling when you need to change or install fog lights or parking sensors.
Then, you will definitely need the ability to remove the bumper, so you need to figure out how to do this on a car. This abstract was created for the Chevrolet Lacetti car form factor, but it is suitable for hatchback and station wagon cars.
You can also find out everything about the rear bumper of the Chevrolet Lacetti.
Some Title Here
The part can be removed from your Chevrolet Lacetti sedan by gently pulling it towards you. If you have not covered the fenders of your car with masking tape, be careful, scratches on the fenders remain very easily! How to remove the rear bumper on a Chevrolet Lacetti hatchback and station wagon The procedure is performed similarly to a Chevrolet Lacetti sedan, but in this case, if you have a hatchback or station wagon, it is not necessary to remove the rear wheels.
It is necessary to remove its lining; the bolts we need to dismantle the part are located just under it. We remove the lining and unscrew these bolts.
Similarly, we pull the part towards ourselves, safely freeing it from the grooves and fastenings. There are many reasons to remove the rear bumper.
But let’s not dwell on this, but let’s get straight to the point. I’ll say right away that despite a lot of body movements, removing the rear bumper of the Lacetti hatchback is not at all difficult.
To begin dismantling the bumper, you need to remove the trunk trim. This is done quickly, and the entire short process is outlined in the article How to remove the trunk trim of a Lacetti After removing the trunk trim, we will need the following tools: For these purposes, it is convenient to remove the wheel, which is what I did.
I don’t unscrew the mudguards, because I don’t see the point in suffering in an awkward position, but I remove them along with the bumper. Then, if necessary, they can be unscrewed in convenient conditions.
To reduce the risk of damage to the holder and upholstery, it is better to use a special device. Remove the upholstery of the left and right rear fenders.
Using a 10 mm wrench, unscrew the bolt of the side fastening of the rear bumper trim on the right side and similarly on the left side. Using the same key, we unscrew the two rear nuts of the side fastening of the rear bumper trim on the right side and similarly on the left side.
Using a 13 mm wrench, unscrew the bolt securing the rear bumper amplifier on the right side and similarly on the left side. Carefully, trying not to damage the paint, remove the rear bumper and the rear bumper trim assembly with the amplifier.
Product selection
Unlike the front bumper, there are no analogues for the rear protective part. Therefore, we are looking for the original catalog number - 96545554 , manufactured by Chevrolet. The average cost is 25,000 rubles.
Reasons for removing the bumper
There are not many reasons for removing the rear bumper. So, this is usually done to carry out repair and restoration work after damage. Let's consider the main reasons for dismantling the rear buffer:
Replacing the rear bumper of a Chevrolet Lacetti is done by yourself. This does not require special knowledge of automotive design, but only to know where the fasteners are located. There is no particular need to choose a bumper, since only the original part exists, and there are no analogues.
Articles
Here are the part designations for first generation machines:
- 622230010R or 622231300R or 622236764R – mounting bracket, left side;
- 622220011R or 622229216R or 622223926R – the same, right side;
- 8200597650 or 6001549321 – right PTF holder;
- 8200597649 or 6001549322 – left PTF holder;
- 620220030R – bumper “under PTF”;
- 620220025R – bumper without PTF holes;
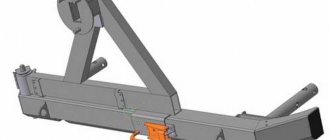
- 620931777R – absorber (plastic liner).
We recommend: Modification of the heater air duct on the Duster
Of course, each of these parts has branded analogues:
- 620220025R – Api DC6000000-0000; Breckner BK71303; NPA NP513-07211;
- 620220030R – Api DC6000000-1000; NPA NP513-07212;
- 622230010R – ASAM 80133; NPA NP513-07235;
- 622220011R – ASAM 80132; NPA NP513-07236;
- 620931777R – Body Parts RNDUS10-240 (Taiwan).
ASAM is a supplier to Dacia. Well, Breckner and NPA are well-known brands from Germany.
Clarifications for restyling
We will talk about the second generation of crossovers. The designations will be as follows:
- 620224960R – bumper;
- 622229960R – right bracket;
- 622239404R – left bracket;
- 620931777R – absorber (inherited from generation I);
- 622542036R – lower grille.
It is difficult to find analogues, since we are talking about a new product. There are a couple more items:
623103564R or 623827948R – radiator grille assembly (generation II).
The last node has analogues, but they differ from the original (tuning).
How to remove the front bumper of a Chevrolet Lacetti
Mironov Vitaly Aleksandrovich Moscow Automobile and Highway State University, Are you sure you want to leave the page?
Please wait a moment and reload the page. Check your Internet connection. Some data may be lost.
You will be able to withdraw money after successful verification of the application form and photo documents. Be careful when filling out the fields. Only publications with an average read time of at least 40 seconds are taken into account. You will no longer see posts from this source in your feed.
No matter what kind of car we are talking about: This part of automotive design is present in absolutely any car
The work is shown on a car with a hatchback body.
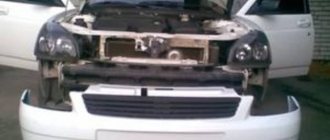
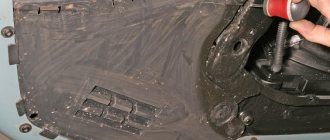
Remove the engine compartment mudguards and radiator trim. We remove the headlights and fender liners. Disconnect the wiring harness connectors from the fog lights. Using a socket with an extension, unscrew the two self-tapping screws securing the bumper trim to the front fender.
Using a Phillips screwdriver, unscrew the piston retainer securing the front bumper trim to the bracket of the energy-absorbing beam of the Chevrolet Lacetti bumper. We perform similar operations on the other side of the car.
From the bottom of the car, use a Phillips screwdriver to unscrew the fasteners of the four pistons securing the bumper trim to the energy-absorbing bumper beam. We take out the caps and crop them from the sides. Using a Phillips screwdriver, unscrew the clamps of the two pistons securing the bumper trim to the energy-absorbing beam of the bumper and remove the pistons.
Front bumper installation
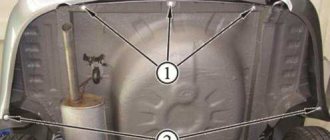
We remove the Chevrolet Lacetti bumper trim along with the foam insert and fog lights. Attachment points for the Chevrolet Lacetti front bumper trim 1 - to the fender; 2 - to the energy-absorbing beam; 3 - to the fender liner The foam insert from the bumper can be removed freely.
To remove the energy-absorbing beam, use a socket to unscrew the bolt and two nuts securing the beam bracket to the body. We perform similar operations on the other side of the Chevrolet Lacetti. You can remove the front bumper trim along with its energy-absorbing beam.
To do this, disconnect the bumper lining from the wings and wheel arch liners, disconnect the energy-absorbing beam from the body, and do not remove the pistons connecting the lining and the beam. We install the front bumper elements in the reverse order and check the reliability of its fastening. Removing the rear bumper of a Chevrolet Lacetti The operation is shown on a Chevrolet Lacetti with a hatchback body. We unscrew one self-tapping screw from the bottom and four self-tapping screws located on the flange of the fastening of the rear right mudguard to the bumper.
Similarly, we dismantle the shield on the other side of the car.
Remove the right and left luggage compartment upholstery. Using a Phillips screwdriver, unscrew the four screws of the upper fastening of the rear bumper trim to the Chevrolet Lacetti body.
Removing the front bumper on a Chevrolet Lacetti
We unscrew two nuts and one bolt securing the bumper to the body on the right side of the luggage compartment. Use a socket to unscrew the bolt securing the right bumper bracket to the body.
We unscrew the same bolt on the left. Remove the bumper from the car. Attachment points for the rear bumper of the Chevrolet Lacetti 1 - to the fender; 2 - to the rear panel; 3 - to the rear spar; 4 - to the dirt shield To remove the energy-absorbing beam, unscrew the piston lock on the upper bracket and remove the piston. After performing the same operations on the other side of the bumper, remove the energy-absorbing beam.
We install the elements of the rear bumper in the reverse order and check the reliability of its fastening.