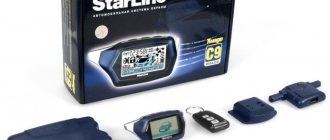
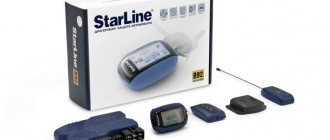
Twage a6
Page 3
- Image
- Text
3
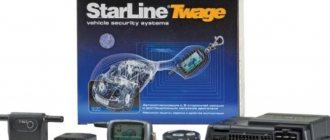
Twage A6
Content
Car alarm operating instructions Components included in the car alarm kit……………………………. 4 Technical characteristics of car alarms ……………………………………………………… 4 Car alarm capabilities ……………………………………………………… 5 Car alarm control key fobs … ……………………………………………………………… 7 Car alarm management ……………………………………………………….. 16 Protective functions of car alarms … ……………………………………………… 22 Service functions of car alarms …………………………………………….. 26 LED indication of car alarm status ……… ………………… 32 Personal code for emergency deactivation of car alarms ……………… 33 Programming functions and operating parameters of car alarms …….. 34 Recording key fob codes ………………………………………… ……………………………. 36
Instructions for installing a car alarm Recommendations for the placement and installation of components……………………….. 37 Recommendations for laying and connecting wires………………………… 38 Car alarm connection diagrams……………………… …………………………. 45 Warranty obligations……………………………………………………………….. 46
Revision No. 2 dated 01/01/2003
How to install an alarm?
Installation Guide:
- First, the central unit is installed. It is necessary to choose the most secretive installation location possible. The unit cannot be placed in the engine compartment, since high temperatures prevail under the hood, especially if the engine is running and warm. The unit cannot be placed in the trunk, since the driver must have access to the device when he is sitting in his seat. Some installers go the extra mile and install the unit under the door trim, but this should not be done because moisture can accumulate in such places. The optimal location would be the free space behind the dashboard. To install, unscrew the screws that secure the steering column trim, remove the control panel and disconnect all plugs with wires from it. Mount the block and securely fix it with self-tapping screws. Make sure that there is no play where the device touches the surface, otherwise the device will vibrate.
- The next step will be installing the siren. The device is placed under the hood. The siren should not be placed in close proximity to the cylinder block; elevated temperatures will damage it. Find the least dirty and hidden place in the engine compartment, secure the siren to the body using self-tapping screws. It is advisable to direct the horn of the device to the side or down.
- To enable the option of autostarting the engine based on temperature, a temperature controller is installed in the engine compartment. The sensor should be embedded into one of the cooling system lines. Secure the device tightly in the pipe so that it is not washed away by the flow of antifreeze. The wires to connect the device must be routed outside.
- Then the transceiver is installed. The antenna adapter is mounted inside the car; you need to choose a place as high as possible. The transceiver is installed in the area of the windshield; there should be no metal objects near the installation site, since their presence will cause interference during signal transmission. The alarm may not go off when you press the key fob button. Install the adapter and secure it with double-sided tape or a special sticker, which may be included in the kit.
- The engine blocking relay is mounted under the ignition switch trim. The device is connected in accordance with the diagram to the motor starting circuit.
- The Valet service mode button is being installed. The installation must be carried out in a hidden place, since by gaining access to the button, the criminal will be able to quickly turn off the siren and steal the car.
- When all the components of the security complex are installed, they are connected to the central unit. To do this, you need to lay the wires and connect all the elements with electrical circuits. The wiring is laid under the lining of the car interior. There should be no moving mechanisms where the wires pass. Devices are connected according to the diagram included in the kit.
Twage a6 car alarm capabilities
Page 5
- Image
- Text
5
Twage A6
Car alarm capabilities
Protected areas of the car and methods of protecting them
· Engine – from starting (locking relay) · Doors, hood, trunk – from opening (push-button switches) · Body, wheels, windows – from shocks and shocks (two-level shock sensor) · Ignition – from switching on
Car alarm security
· Dynamic control code, protected from selection and interception · Limitation of the number of alarm cycles · Interruption of alarms without disabling the security mode · Memorizing the state when the power is turned off and returning to the same state
when power is restored Personal emergency shutdown code
Protective functions of car alarms
· Turn on sound and light alarms when sensors are triggered
in security mode · Submission of alarm signals to the key fob with LCD display · Remote activation of the "panic" mode · Immobilizer mode · Anti-robbery mode, activated remotely by the key fob · Anti-robbery mode, activated by a special button · Engine blocking and its preservation when dismantling the alarm
Self-diagnosis and indication of operating modes
· Indication of alarm status by LED and on the key fob display · Indication of the reason for the last alarm activation for 6 security zones · Indication of a faulty zone when the security mode is turned on · Sound indication of the fact that the alarm was triggered · Automatic control of security sensors with disabling of faulty ones
and a message about it · Indication of open doors when the security mode is turned off · LED indication of the serviceability of limit switches when
ignition on
Advantages and disadvantages
The Starline Twage A6 alarm system has the following advantages:
- Availability of autorun option. This allows for remote starting of the machine engine, which is especially important for the winter season. The power unit is started by a command sent from the key fob, provided that the remote control is within the system’s coverage area. The launch can be performed by a timer, after a certain time period, or by temperature. The function allows you to save time and warm up the car in advance if the driver is in a hurry.
- Easy to install. With minimal knowledge and skills, any car enthusiast can install the system. Moreover, if you use the instructions that we will consider below. The alarm should be connected in accordance with the diagram included in the kit.
- Low cost. Today, alarm systems of A6 models have been discontinued and finding them on sale is problematic, but still possible. The cost of the security complex is about 2,700 rubles.
- High range of the key fob. Thanks to this, the car owner, even being far from the car, will be able to find out about its condition.
- The presence of two engine locks allows you to block the operation of the power unit when attempting to unauthorized start the internal combustion engine.
The signal does not have any particular disadvantages. In some cases, false alarms of the siren are possible, but this is usually due to incorrect settings of the sensitivity sensor.
Car alarm service functions
Page 6
- Image
- Text
6
Operating and installation instructions
Car alarm service functions
· Silent security mode · Security mode with the engine running · Activation of the security mode without a key fob · Automatic return to the security mode in case of accidental switching off (switching on) · Automatic activation of the security mode · Delay in turning on the security mode for the time the interior light goes out · Self-diagnosis when turning the mode on/off security · Silent activation of the security mode with the shock sensor disabled · Remote shutdown / activation of the shock sensor by levels
in security mode · Silent deactivation of the security mode · Remote control of the central locking · Control of the central locking from the ignition switch · Two-step unlocking of door locks · Two-pulse unlocking of door locks · Possibility of implementing the "comfort" function · Valet service mode · Emergency disabling of the security mode with a personal code · 4 additional channels for controlling vehicle devices · Control of car interior lighting · Car search mode · Remote programming mode for new key fobs and erasing lost ones · Possibility of resetting the values of programmable functions to factory presets · Call mode from the car · Indication of temperature in the car interior · Time display, timer, alarm clock · Battery discharge control of the main key fob via LCD display · Fluorescent backlight of the main key fob display
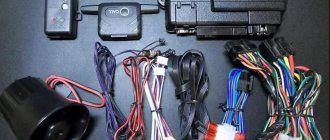
Equipment
What elements will be included in the feedback system kit:
- a user manual with which the car owner can install and connect to the on-board network;
- main control unit with elements for installation and fixation;
- remote control equipped with a screen;
- additional keychain;
- sensitivity controller, belonging to the category of two-level sensors;
- transceiver;
- diode indicator to determine the operating mode of the complex;
- key to switch to emergency or service mode;
- Anti-HighJack mode activation key;
- a special device for implementing the remote engine start function;
- two holding elements equipped with 30 ampere safety devices;
- limit switch for mounting on the tailgate or hood.
Twage a6, Control keys
Page 7
- Image
- Text
7
Twage A6
Control key fobs
The car alarm performs its intended functions either automatically or
or by signals from the key fob when pressing buttons. Part of the provided functions
and some system operating parameters can be changed by
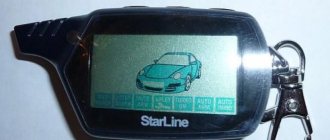
programming. The StarLine Twage car alarm has a 3-button control key fob with
liquid crystal display. Purpose of button 1 of the key fob
programmable. The purpose of button 2 is quickly selected by moving
cursor on the key fob display using button 3. When pressing the key fob buttons
The fluorescent backlight of the display turns on for a few seconds. When the alarm executes a command from the key fob, the relevant information
appears on the display and a melodic sound signal sounds. When the alarm performs any actions automatically
the relevant information is also displayed on the key fob display and
accompanied by sound signals or vibration. If more than one key fob is used to control the alarm, then
the status of the car and car alarm will only be displayed on
display of the key fob from which the last command was issued. In case of malfunction or loss of the main double-sided key fob
communication and LCD display, the system comes complete with
additional 4-button control key fob. Most functions and
alarm operating modes can be activated from this key fob as well,
but below the operating instructions are written for the use case
main key fob with LCD display.
Dealing with blocking
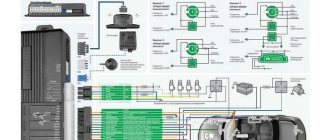
It is known that the Starline Twage A6 signaling can block one of the following lines - the starter or ignition power circuit. The point is that the “02-12” module is connected to the break in the starter line, so you will have to get rid of the first type of blocking. It is implemented according to one scheme:
The wire that comes from pin 50 must be connected to the black and yellow cord of the autostart module. Here we were talking about a “thin” cord coming out of a 6-pin connector. And the “thick” wire of the same color will go to the starter.
The relay is removed from the structure. The signal control wire shown in the diagram is disconnected.
Now let's look at blocking the ignition circuit. If we talk about the Starline A6 model, it can be implemented according to the following scheme:
In this case, one thing is required - to make a T-shaped outlet from the power cable (marked in red). The tap is then connected to the yellow wire coming from the terminal block of the autostart module. Nothing complicated.
Let's consider the third case - the blocking relay is not connected to the alarm system. Then you need to implement blocking according to the second scheme. It is given in the basic instructions, and there can be no problems here. Remember that the alarm itself in this case is programmed:
- Function 11 is left at value 1 if the power wires are connected to pins 30 and 87a (as in the diagram);
- If it is decided to use normally open contacts (30 and 87), the functions are given a new value - 2, 3 or 4.
Twage a6, Purpose of additional key fob buttons
Page 9
- Image
- Text
9
Twage A6
Button 1 • On/off security with confirmation sounds Button 2 • Search mode (0.5 sec) • Panic mode (3 sec) Button 3 • Channel 3 (0.5 sec) • Trunk unlocking (3 sec) Button 4 • On/off silent security (0.5 sec) • Channel 2 (3 sec) Buttons 1+3 • Disabling the sensor by levels Buttons 1+4 • Valet service mode Buttons 3+4 • Anti-robbery mode (ignition on) • Recording key fob in programming mode
The four-button open-loop key fob uses a lithium cell
power supply CR2032, 3B. Battery operating time depends on frequency
use of the key fob and the type of battery installed. To replace the battery, unscrew the screw on the back of the key fob and open the cover.
Remove the old battery and install a new one in its place, observing the polarity.
Then close the key fob cover and tighten the fixing screw.
Replacing the main key fob battery is performed in the following order: 1. Open the cover on the back of the key fob and remove the old battery. 2. Briefly press button 1 of the key fob. 3. Install the new battery, observing the correct polarity, and close the cover.
(The correct position of the battery is indicated on the key fob body under the cover). 4. After replacing the battery, adjust the clock and alarm readings.
Re-programming of button 1 of the key fob is not required.
Purpose of the additional key fob buttons
Button 1
Button 2
Button 3
Button 4
Connection and programming
It is clear that the alarm itself will control the autostart module. Use one control output - yellow-red signal cord:
Connecting the module “02-12”
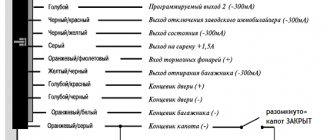
The main connector of the module in question will have six wires:
- Red – connect this wire to the 30th contact of the lock;
- Yellow - connect to the ignition line tap (see above);
- Green - in a car with two ignition lines, the cord is connected to terminal 15/2;
- Blue - if necessary, this wire is connected to the “ACC” lock contact;
- Black and yellow (thin) - connect to lock terminal 50 (discussed above);
- Black and yellow (thick) is the starter power supply (see above).
During operation, this is what happens: the “+12” potential appears at terminal 50, and the relay built into the module supplies power to the starter. That is, the built-in relay closes the 30th and 50th contacts. In general, this happens in two cases:
- When the autorun command is given;
- When the black and yellow cord (thin) receives positive potential.
The ignition switch wiring is shown below.
As stated in the instructions, it is impossible to connect the module without breaking the starter circuit in any case. But the module is controlled by both the alarm and the potential at terminal 50. This means that the owner will not be left without the ability to start the engine with the key.
Now let’s look at how to connect the “low-current” connector:
- Black wire – “minus” of the module’s power supply;
- Gray-black – engine operation control input (to the tachometer or to the battery charge lamp);
- Orange-violet – to the handbrake limit switch (see diagram);
- Pink – connected to the alarm control output;
- Black and red is the output to the “crawler”, which is triggered only during the autostart process;
- Orange-gray – no need to connect;
- Yellow-black – output that is triggered when the ignition is on and the starter is not working.
During “normal” operation of the car, “output 5” does not work. And the car will not be stolen by rolling the lock. The connection method discussed above is given in the basic instructions. That is, there are no contradictions here.
When connecting to a Starline A2 or A4 alarm, a 3-pin connector is used. But, unfortunately, this connector is not compatible with the Starline Twage A6 model. And you have to use the control input (wire 4). What has already been discussed.
Opening the plastic cover reveals a set of switches. Each toggle switch is set to one position:
- Starter operating time: OFF – 0.8 seconds, ON – 1.8;
- Engine control method: OFF – by tachometer, ON – by contact receiving potential “+12” after starting;
- Algorithm for turning on the power at terminal 15/2: OFF – when the starter is running, the power remains, ON – the power is turned off (a common option);
- Transmission type: OFF – automatic transmission, and this option should be left;
- Ignition hold time before start: OFF – less than a second, ON – several seconds;
- A service switch that is left in the OFF position.
Usually, during operation, auto switching is not done. So, you need to configure everything correctly right away.
Let's say control by a tachometer is used. This means that the gray-black cable is connected to the high-voltage input of the tachometer, and toggle switch 2 is set to the OFF position.
Be sure to run the test:
- Switch 6 is temporarily set to ON;
- You need to press the START button located under the module cover for a second;
- The engine will start, the LED should start flashing;
- If startup does not occur or the diode does not blink, the control wire was connected incorrectly.
For further operation, do not forget to return toggle switch 6 to the OFF position.
In practice, voltage control can also be used. In this case, the gray-black cord is not connected, and selector 2 is turned to the ON position. This method is the least reliable of all.
Additional alarm setup
As mentioned above, the alarm will control the external module through programmable output 3. Using a key fob with 4 buttons, it will be possible to launch. A three-button key fob, which is equipped with a display, will allow you to do the same thing and in addition it shows the temperature.
To display the temperature, press keys 1 and 2 simultaneously. Press for 0.5 seconds.
In the signaling itself, if we talk about the Starline A6 model, you need to correctly set three parameters:
- Function 11 – type of connection of the blocking relay (normally closed or open contacts);
- Feature 1 – set it to 2 if you want to use autorun, or set it to 1 to disable this option;
- Function 8 – setting the temperature scale (Celsius or Fahrenheit).
All these functions are indicated in the instructions:
Let's look at how to enter programming mode now. You will need one keychain, main or additional.
- The programming order will be as follows:
- The ignition is turned on with the key;
- The service button connected to the main module is pressed 6 times;
- The ignition is turned off, followed by 6 siren beeps and 6 headlight flashes;
- The service button is pressed 1, 8 or 11 times;
- Taking the key fob, press key 1 or 2 within 10 seconds (see table);
- Siren signals should confirm that the value has changed.
The Starline Twage A6 system switches options cyclically: after the 11th, the first will go, then the second, etc. That is, in the “seventh step” you can continue pressing the service button. To exit the setup mode, just turn on the ignition.
The Starline 02 module initiates a launch if the duration of the control signal exceeds a second. This means that by assigning function 1 the value 4, during operation you can cause a “cyclic start”. Which is unacceptable, although this warning is not given in the standard instructions.
Opinions of car owners about the work of Starline A6
| Easy to install. |
| Low resistance to radio interference. The small number of channels through which the signal is transmitted may not be able to cope with high-quality transmission in a large city. |
| Availability of two-way communication. |
| Lack of online monitoring and control from a mobile phone. |
| Quite a large range of the key fob. |
| Lack of connection to the car's digital buses. It is more convenient and reliable to connect modern alarm systems via digital CAN or LIN buses, which is not available in the A6 functionality. |
| Dialogue code. |
| Positive | Negative |
| Reliable, time-tested alarm system. Working properly since 2009. There were no glitches in the process. The keychain, of course, has lost its appearance a little, but after so many years this is not surprising. | Of course, it brings some benefit, but it is unlikely to save you from serious robbers. It is very easy to intercept the signal of such a “security”; even a student can handle it. My friend’s car was recently cleaned out; Starline was also there. The Singal woman didn't even make a sound. They are not very reliable. |
| StarLine TWAGE A6 is inexpensive and good protection for a car. I installed it myself, fortunately the instructions are quite clear and made for people. The entire installation of the car alarm took half a day (my brother and I did it together). We connected the door locks so that they could be opened from the remote control as expected, and the trunk locks. |
User manual
What you need to know about the purpose of the buttons to use the signaling:
- Key 1 is programmable and can be configured to perform any function. Initially, the button is intended to activate and disable the protective mode with confirmation sounds.
- Key 2 can be used to program a function that corresponds to the current cursor location on the remote control screen. Initially, it is intended to open the trunk; to do this, it must be pressed for three seconds.
- Simultaneously pressing keys number 1 and 2 for three seconds will activate the search function. The vehicle lights will begin to blink. If you press these buttons simultaneously quickly, for half a second, the security system will perform a procedure for monitoring the condition of the car and the temperature inside the car.
- Briefly pressing key 3 will allow you to control the position of the cursor on the screen. If the remote control starts emitting warning signals, one click of the button will turn them off. By holding the key for three seconds, the car owner can go to the alarm, timer and clock settings menu. Long pressing the key for six seconds will allow programming of the first button.
- If you hold down buttons 3 and 1 for half a second, the key fob will go to the device notification menu.
User Yaroslav540 briefly spoke about the functions and capabilities of the A6 security complex.
If the pager breaks or is lost, it is possible to activate the security mode, but to do this you will have to use the service button:
- Insert the key into the ignition and find the emergency button, press it four times.
- Turn off the ignition. If everything is done correctly, the system will emit one beep and the turn lights will blink once.
- Within twenty seconds you must leave the car and close the door locks with the key. As a result, one sound signal should be heard first, as well as one melodic signal on the key fob.
20 seconds after the ignition is deactivated, the security complex starts the security mode regardless of whether the doors are closed or not.
The turning lights should blink once. The diode light will blink, this indicates that the protection mode is activated. When the security function is activated in this way, if one of the protection zones is triggered, the alarm light will blink four times, and the siren will also emit four beeps. If you do not disable the protective mode, then after 20 seconds the alarm cycle will be activated.
Deactivating the security mode without a remote control is carried out as follows:
- The car door locks are unlocked with a key. The alarm will turn on the siren, and the indicator in the form of an open lock will light up on the remote control screen.
- The ignition is activated; there is no need to start the engine.
- To disable it, the car owner must know the personal password. First, the service key is pressed the number of times that corresponds to the first digit of the code.
- The ignition turns off and turns on again.
- Manipulations are performed with the service button. Now the second digit of the password is entered.
- After turning off the ignition, the alarm signal should stop. The security mode will be deactivated.