The instructions for the Starline A9 alarm system include all the main points for setup and installation. Therefore, before operating the anti-theft system, it is imperative to read the service manual.
Mandatory safety precautions when using the di...
Attention
- Image
- Text
ATTENTION !
Mandatory safety precautions for use
functions of remote or automatic engine starting.
It must be remembered that a car is a vehicle of increased danger. Section 12.8. The traffic rules state: “The driver may leave his seat or leave the vehicle if he has taken the necessary measures to prevent the vehicle from moving spontaneously or being used in the absence of the driver.”
Before operating the STARLINE Twage A9 car alarm, carefully read the safety precautions for using the remote or automatic engine start function outlined below. 1. Always park your vehicle in an open, well-ventilated area. 2. Always put the car on the parking brake, which must be in good condition and prevent the car from moving. 3. When leaving the vehicle, be sure to place the automatic transmission control lever in the “PARK” position and the manual transmission shift lever in the neutral position. 4. If your car uses a manual transmission, then before turning on the remote or automatic engine start function, be sure to follow the “soft neutral” procedure for preparing to start the engine. 5. Never start the car engine without the driver present or if anyone is in front of or behind the car. 6. Never give car alarm control key fobs to children or other persons without first reading these instructions. 7. On cars with a manual transmission, it is not recommended to start the engine remotely or automatically if the car is out of sight and the car alarm user is not able to control the engine starting process. 8.
Before you enable the remote or automatic
To start the engine, you must: — make sure that the car is in good condition; — make sure there is a sufficient amount of fuel, oil, coolant, etc.; — set the operating parameters of the interior heater (air conditioner), glass heating and other accessories to the required levels; — set the interior airflow regulator to air circulation, which will allow you to more effectively heat or cool the air in the car.
Alarm programming
The process begins after connecting all elements of the device.
- The first step is to turn on the vehicle's ignition.
- Next, press the Valet service key six times.
- Turn off the ignition again and wait for six siren signals and six blinks of the dashboard LEDs, which will mark the system’s readiness to begin programming.
- All functions are selected through the service button - the number of clicks on it is equal to the number of the desired function. All numbers can be found in the manual table. For each successful press, the siren and LED are activated. The fifth press is indicated by a prolonged siren beep.
- Within ten seconds, press the first or second buttons on the key fob, depending on the programmable function. Each successful press is indicated by a light and sound alarm.
- The values of all functions are recorded sequentially - they proceed to programming the next one only after setting the previous one.
In order for the firmware to remember all the settings, you need to exit the service mode and restart the program. Why turn off the ignition, after which the system exits it automatically after a minute of inactivity. If the exit is successful, the alarm will flash five times.
Returning to neutral is possible by resetting all settings to factory settings.
Operating and Installation Instructions Thank you for your…
Page 2
- Image
- Text
2
Operating and installation instructions
Thank you for choosing car alarm
StarLine model range with two-way communication
and remote engine start.
Its appearance became possible thanks to the collective
creativity of Russian development engineers,
American specialists in the field of microelectronics
and Taiwanese high-tech manufacturers
automobile security systems.
So that the car alarm system can most effectively
perform their security and service functions,
We recommend that you trust it to be installed on your car.
professional installers.
We hope that the system will not disappoint your expectations,
will give you confidence in the safety of your car
and will significantly increase its comfort
through a variety of service functions.
Revision No. 1 dated 08/01/2004
Replacing Starline A9 with A93
A replacement is only relevant if the first one has stopped working correctly. Especially when it comes to sensors - the fact is that the A9 is no longer produced, so not all parts can be found on sale and most of those on sale have already been used. Replacing with the A93 allows you to acquire one of the newest models in the line, which at the same time retains the best features of its predecessor.
Contents Car alarm operating instructions Comp…
Page 3
- Image
- Text
3
Twage A9
Content
Car alarm operating instructions
Components included in the car alarm kit ……………………………… 4
Technical characteristics of car alarms…………………………………….. 4
Car alarm capabilities …………………………………………………………….. 5
Car alarm control key fobs ………………………………………………….. 7
Car alarm management………………………………………………………………. 16
Protective functions of car alarms ………………………………………………….. 23
Service functions of car alarms …………………………………………………. 27
Starting the engine……………………………………………………………………………….. 35
Recording key fob codes……………………………………………………………………… 41
Programming functions and parameters of car alarm operation………. 42
Instructions for installing car alarms
Recommendations for placement and installation of components …………………………. 45
Recommendations for laying and connecting wires ………………………….. 46
Car alarm connection diagrams ………………………………………………… 50
Timing diagrams of system operation during remote
starting the engine ……………………………………………………………………………… 58
Warranty obligations………………………………………………………………. 59
Specifications
The radio transmitter has an operating frequency of 433.92 MHz.
The communication key fob (equipped with a display) can operate within a radius of 600 m.
The pager receives signals at a distance of 1200 m from the head unit.
The auxiliary control panel has a range of up to 15 m.
A piezoelectric element is used as a type of shock sensor.
The device is intended for active use in the temperature range from -40 to +85°C.
In standby mode, the current consumption is 25 mA.
The power supply voltage at the terminals can be 9-18 V.
The range of the antenna adapter and the main key fob may not be the same. This indicator is influenced by several components:
- building density in the city;
- pager installation location;
- the location of the transmitter and receiver relative to each other;
- car battery voltage indicator;
- presence of power lines;
- weather;
- voltage level of the batteries installed on the switched-on communicator.
Twage a9
Page 7
- Image
- Text
7
Twage A9
Control key fobs
The car alarm performs its functions either automatically or by signals from the key fob when buttons are pressed. Some of the provided functions and some system operating parameters can be changed by programming. The StarLine Twage car alarm has a 3-button control key fob with a liquid crystal display. The purpose of button 1 of the key fob is programmable. The purpose of button 2 of the key fob is selected quickly by moving the cursor on the key fob display using button 3. When executing commands that require reading information from the key fob display, the fluorescent backlight of the display is turned on for a few seconds. When the car alarm executes a key fob command, the corresponding information is displayed on the key fob display and a melodic sound signal is emitted. When the car alarm performs any action, the corresponding information is automatically displayed on the key fob display and is accompanied by sound signals or vibration. If more than one key fob is used to control a car alarm, then the status of the car and the car alarm will be displayed only on the display of the key fob from which the last command was issued. In case of inoperability or loss of the main key fob with two-way communication and LCD display, the system includes an additional 4-button control key fob without feedback. Most of the functions and operating modes of the car alarm can also be activated from this key fob, but further operating instructions are written for the case of using the main key fob with a liquid crystal display.
Advantages and disadvantages
The advantages that consumers of the A9 alarm system highlight:
- Value for money. All elements of the anti-theft system are made in durable housings, which eliminates the possibility of physical damage.
- Availability of a temperature controller in the cabin. This allows the consumer, using a key fob equipped with a screen, to find out about the temperature level in the car.
- Availability of additional channels. Thanks to them, the user has the opportunity to install and configure auxiliary equipment. For example, electric window or sunroof closers.
- Detailed guide to installing and configuring the system. With its help, the consumer has the opportunity to independently install the security system and adjust the basic parameters.
- Availability of display. Using the screen on the communicator allows you to simplify the procedure for setting up and operating the security system.
Disadvantages specific to this model:
- The timer option does not work correctly. Because of this, consumers may have difficulty starting the car engine after a certain period of time.
- Low range of the communicator when operating in urban environments. This disadvantage is especially evident in large cities. The range of operation of the pager is affected by interference from power plants and other equipment, which is more than sufficient in megacities. Despite the manufacturer's statements, the communication channel is not reliably protected from external factors.
- Some consumers note such a disadvantage as the lack of dialog code. Older models of security systems do not have this function, as a result of which they can easily be hacked with a code grabber. According to the manufacturer, this is almost impossible to do, but in fact the alarm system is susceptible to hacking.
- The keys on the key fob become stuck after several years of use. Over time, the buttons begin to jam, resulting in inconvenience when arming and disabling the protection.
Purpose of the main key fob buttons
Page 8
- Image
- Text
8
Operating and installation instructions
Button 1
• Programmable command (0.5 sec)
• Remote start and stop of the engine (3 sec) • Activation of the security mode when the engine is running (3 sec) Button 2
• Command corresponding
current cursor position
on the key fob display (0.5 sec) • Unlocking the trunk (3 sec) Button 3
• Controlling the cursor position on the key fob display (0.5 sec)
• Interruption of key fob alert signals (0.5 sec)
• Setting the clock, alarm clock, timer, energy saving mode (3 sec) • Programming button 1 (6 sec) Buttons 1 + 2
• Search mode (0.5 sec) • Panic mode (3 sec)
Buttons 3 + 1
• Select key fob alert mode (0.5 sec)
Buttons 3 + 2
• Quickly set the key fob timer (0.5 sec)
The key fob with LCD display uses an “AAA” 1.5V battery. The operating time of the battery depends on the frequency of use of the key fob, on the frequency of operation of the pager, on the selected alert mode, and on the type of installed battery. The capacities of commercially available batteries may differ several times. Accordingly, the average operating time of one key fob battery can be from 3 to 6 months. When the battery is low, the icon appears on the display
BAT
, which speaks about
need to replace the key fob battery. Replacing the key fob battery should be done in the following order: 1. Open the cover on the back of the key fob and remove the old battery. 2. Briefly press button 1 of the key fob. 3. Install the new battery, observing the correct polarity, and close the cover.
(The correct position of the battery is indicated on the key fob body under the cover). 4. After replacing the battery, adjust the clock and alarm readings. Re-programming of button 1 of the key fob is not required.
Purpose of the main key fob buttons
Button 1 Button 2 Button 3
How to install?
After studying the Starline A9 instructions, you can install the anti-theft system yourself. But to do this you will need to understand the card that comes with the kit.
If errors are made during installation of Starline A9 and during connection, the security system will not work correctly and may turn off randomly, which will reduce the safety of the car.
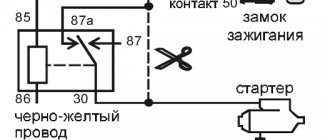
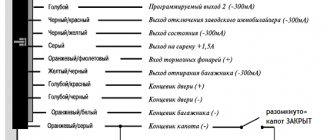
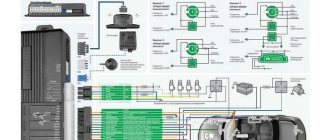
Connection diagram
General connection diagram for the Starline A9 alarm system.
Step-by-step instruction
Anti-theft system installation guide:
- The procedure involves disconnecting the terminals from the battery. To do this, use a wrench to loosen the clamp on the battery outlet.
- The microprocessor module in which the board is located is installed in a hidden place; it is best to place it under the control panel. This will ensure the minimum length of cables when connecting. To prevent moisture from getting inside the microprocessor module, it is recommended to install it with the connector facing down. It is necessary to properly fix the block on a flat surface to eliminate the negative impact of vibrations. The device must be secured using self-tapping screws or double-sided tape.
- The antenna unit is installed inside the passenger compartment on the surface of the windshield. It must be placed so that the distance from the device to the metal on the body is at least 5 cm. This will prevent the negative impact of interference that affects the range of the communicator.
- Before installing the antenna, the surface of the windshield must be cleaned and degreased. Since there is a temperature controller inside the device, it is not recommended to place the adapter near a stove or other heat sources. It is advisable that it is not exposed to sunlight. Otherwise, the readings given by the temperature sensor will differ from the actual ones.
- An external controller is installed on the power unit under the hood. Its fixation is carried out on the cylinder block body under one of the existing M6 screws. It is important to ensure good contact of the temperature sensor with the engine body.
- The siren is installed in the engine compartment. Its location should be away from sources of moisture and heat. The device is placed with the horn down, thanks to this, water will not accumulate in it. During installation, you need to make sure that from under the bottom there is no access to the siren, as well as the conductors through which it is connected.
- The shock regulator is installed inside the car. It is recommended to place it in the central part of the body so that it can effectively determine impacts on the car from any direction. During installation, it is necessary to ensure unobstructed access to the controller adjustment elements.
- The diode indicator is fixed in a visible place on the control panel. The cables are routed under the dashboard.
- The Valet service key is mounted in a hidden place. The same principle must be followed when installing an anti-robbery button. But the consumer should have direct access to these elements if necessary.
- Push-button switches are installed on the tailgate and under the hood. They must be installed so that there is no access to the devices when the locks are closed. After installation, diagnostics are carried out to determine whether they are functioning correctly. If errors are made when installing limit switches, this will lead to false alarms.
- All wires are laid under the interior plastic trim, in particular under the thresholds. The cables must go from the alarm elements to the microprocessor module and be connected in accordance with the diagram.
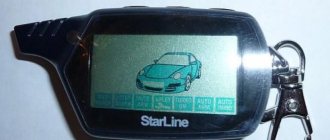
Designation of indicators on the pager screen
Description of the icons on the communicator display:
- 1 — icon of a low battery in the device;
- 2 — inclusion of the second additional channel;
- 3 — the automatic start mode of the internal combustion engine is started in accordance with the temperature of the unit;
- 4 — the car engine is started;
- 5 — the luggage compartment door is open;
- 6 - door locks are not locked;
- 7 — indicator of the function of notifying the car owner about events via vibration;
- 8 — symbol of the enabled Valet service mode;
- 9 — icon for automatic reactivation of the protective function;
- 10 - this indicator indicates that the silent security mode is on;
- 11 — security function with sound is launched;
- 12 — indicator of an open car engine compartment;
- 13 - sensitivity regulator activation symbol, indicates activation of the first or second level of the shock controller;
- 14 — the car’s handbrake is disabled;
- 15 — an indicator in the form of a locked lock indicates that the car doors are closed;
- 16 - if the same symbol changes to open, then the car door products are not locked;
- 17 - standby indicator; when activated, the alarm indicates that only the communicator receiver is functioning;
- 18 — icon for transmitting pulse data by pager;
- 19 — symbol of calling the car owner from the car;
- 20 - this indicator indicates the activation of the communicator’s energy saving mode;
- 21 — ignition on;
- 22 — alarm activation;
- 23 - symbol of the morning time of day;
- 24 is also a daily indicator, only in the afternoon;
- 25 - icon for the daily start of the internal combustion engine or its start in accordance with the alarm clock;
- 26 - symbol of time, temperature, as well as remote start modes of the power unit;
- 27 — temperature scale indication;
- 28 - indicator of a timer device.
Setting up the key fob
Designation of elements on the body
To program the communicator, you need to bind its first button. The value of this key is customizable and can be changed if necessary. The car owner can reprogram the button an unlimited number of times. To ensure more convenient use of the security system, it is recommended to configure the key to activate and disable the security mode.
Programming Guide:
- Button 3 of the communicator is clicked two or more times so that the cursor on the device screen moves clockwise or counterclockwise. To change the direction of movement, you need to pause for two seconds between clicks.
- The key must be set to the position that corresponds to the required command. For example, this could be the activation of a protective mode and its disabling with sound accompaniment.
- Button number 3 is pressed and held in this position for six seconds. You must wait until the key fob makes two and then three beeps.
- To program the first key, you need to briefly click it until the desired option is enabled.
Subsequently, when operating the security system, one click on this button will facilitate the execution of a specific command. In this example, this is activating and disabling the protective mode. When you press a key, the indicators on the display that correspond to the specific option will turn on. If you need to reconfigure the button, the described procedure is repeated again to change the purpose of the element.
Setting the clock
Adjustment of time indications is carried out as follows:
- The third key of the communicator is pressed and held in this position for several seconds. You must wait until the key fob emits two short beeps. The clock symbol on the pager screen will blink.
- To increase the values, you need to press the first key, to decrease - the second. To increase or decrease the indicators more quickly, the buttons are pressed.
- Once the hours are set, the minutes need to be adjusted. To do this, click the third button on the communicator. The procedure for increasing readings is carried out in the same way - using the first or second key. To speed up this process, the buttons can be pressed.
- To leave the time settings menu, hold down the third button on the key fob until the device beeps. You can take no action, and after a few seconds the communicator will do it automatically.
Channel “Crossover 159” talked about the features of adjusting time parameters in the Starline pager.
Setting an alarm
Programming process:
- The setup procedure is performed by pressing the third key on the key fob until the device emits two short beeps.
- The same button is clicked sequentially, an icon in the form of a clock will appear on the communicator screen. This will cause the alarm symbol to blink.
- To increase temporary values, use key 1, and to decrease, use the second button. To quickly adjust the parameters, you need to hold down these elements.
- After setting the clock, you need to set the minutes; to do this, click the third key on the pager.
- Then the same button is pressed to go to the menu for activating or disabling the function. To enable the option, click the first button, to disable it, click the second. The corresponding symbol (ON or OFF) will light up after the selected action.
- To leave the parameter setting mode, press the third button until the key fob beeps. You don't have to do this, but you will have to wait a few seconds for the device to exit the menu automatically. When the alarm is turned on, a clock icon lights up on the communicator screen. When activated, you can press the third button to turn it off.
How to set a timer?
Timer programming algorithm:
- To enter the menu for setting this parameter, also hold down key number 3 until two short-term sound pulses are heard.
- This button is clicked sequentially, the cursor on the communicator screen will go to the timer menu. This is an hourglass icon.
- The procedure for adjusting parameters is the same as in the case of an alarm clock.
- The maximum value that can be set on the timer is 19 hours 59 minutes.
- When the function is activated, the current status will be displayed on the communicator screen, as well as a flashing hourglass indicator. When the option is activated, eight beeps will sound and the timer symbol will disappear. To interrupt the pulses, click on the third key.
- To quickly activate the function, you must simultaneously hold down buttons number 2 and 3. This will cause the hourglass indicator on the screen to blink, and the timer time will also be displayed. The third and second keys are used to adjust timing parameters. For quick setup, the steps are 10 and 30 minutes.
- When the option is enabled, the device screen displays its current status and a blinking hourglass icon.
The channel “Best Choice - Bems” talked about the nuances of setting up the Starline A9 communicator.
Modes
During a short stop, the car owner may need to turn on the alarm with the engine running.
The activation procedure is performed as follows:
- While the power unit is running, you need to pull the parking brake lever.
- Then the first button is clicked and held until the vehicle's side lights blink three times. The communicator should emit a melodic signal. A symbol in the form of smoke from a muffler will appear on the pager screen, and the operating time of the power unit will be displayed. The LED light will remain on continuously. If the time parameter for the operation of the machine's engine is not configured, the r99 indicator will appear on the display.
- Then the key is removed from the ignition switch and you need to leave the car. The motor will remain in working order.
- The car doors, luggage compartment and hood are closed.
- The first button on the communicator is clicked. To confirm that this function is enabled, the siren will sound once and the side lights will blink once. When the protection is turned on in this way, the sensitivity controller does not work, as does the protection zone of the ignition system. If the door locks are connected to an anti-theft system, they will also lock.
- In confirmation, the communicator will emit one short beep. Indicators in the form of a closed lock, a switched-on siren and smoke from the muffler will light up on its screen. The current time will also be displayed. If the engine stops, the protection mode will remain on. The protection of the ignition zone and the shock controller will be activated.
User Michael MNS spoke about setting up modes and service options.
The emergency activation mode of the protection system without a communicator will be useful in the event of a breakdown of the latter.
Enabling and configuring is done as follows:
- The ignition is activated; there is no need to start the power unit.
- The Valet service key is pressed eight times.
- The ignition system is turned off. The vehicle's parking lights will blink once and the siren will sound a beep.
- Over the next twenty seconds, you must leave the vehicle interior and close all door locks with the key. The siren will beep and the communicator should sound once.
- 20 seconds after this, the alarm protection mode will be activated. The side lights should blink again. The security system status LED will flash, indicating that the security mode is enabled.
If the handbrake lever has not been activated, four sound pulses will be heard after the function is activated. The car's headlights will blink the same number of times.
To disable this mode, do the following:
- The driver's door of the car is opened using the key. The anti-theft system will work and the siren will play alarm signals.
- The key is installed in the lock and the ignition is activated. The power unit does not need to be started when performing this task.
- Within twenty seconds, you need to click on the Valet service key four times.
- The ignition is deactivated. The siren should emit two beeps and the vehicle's side lights will blink twice. The protective mode will be deactivated.
User Alexander Shkurevskikh spoke about setting the parameters of the Starline signaling using a key fob.
Setting up autorun
Before activating this option, you must prepare the vehicle's power unit if the vehicle is equipped with an automatic transmission.
The engine preparation is performed as follows:
- The car stops; there is no need to turn off its engine.
- The gear lever is set to neutral position. The parking brake is activated to lock the car in place.
- The ignition is turned off, the key can be removed from the switch. The power unit must remain in working order.
- You must get out of the car within thirty seconds. All door locks are locked and the security mode is activated. To do this, click the first key of the communicator. The car's power unit will stop immediately or continue to function until the turbo timer mode is turned off.
There are two options for remotely starting a car’s power unit by command:
- On the communicator display, you need to move the cursor to the icon labeled “Start”. Below it is a symbol in the form of an asterisk. Then the second key of the communicator is clicked.
- You can also press the first button on the control panel and hold it for three seconds. This will start the internal combustion engine on command.
User VAVAN 176 demonstrated the procedure for remotely turning on a car engine using a key fob.
The start of the power unit can be performed daily at a certain time. This option is especially useful in the morning, since it allows the driver to get into an already warmed-up car. To activate the function, you need to move the cursor on the communicator display to the icon labeled “Start”. Then the second pager key is clicked.
If the function is configured, the siren will play a signal, the communicator will do the same, and the side lights of the car will blink once. An indicator in the form of a check mark will appear on the pager screen. The status LED will flash in series of two flashes.
You can adjust the basic parameters in accordance with the temperature regime; for this, a sensor installed on the engine is used.
It is allowed to start the internal combustion engine at:
- -5 degrees;
- -10 degrees;
- -15 degrees;
- -20 degrees.
The duration of warming up the internal combustion engine, as well as the start function, can be adjusted. The largest number of automatic engine starts in accordance with the temperature in one day is 12, the interval between attempts will be 1 hour.
To activate the function, you need to move the cursor on the communicator display to the symbol with the inscription “Start” and the key icon. Then the second pager key is clicked. The siren will emit one beep and the car's side lights will blink once. The communicator itself should work, an indicator with a key icon will appear on its screen, as well as the temperature value at which the start will occur. The LED status light will blink in a series of three flashes.
User Nyur Gun showed what problem a consumer may encounter when setting up the automatic start option.
How to attach a new key fob to Starline A9?
The alarm allows you to enter up to four communicators into memory. Each new key fob enters information about itself into the microprocessor module. But at the same time, data about other communicators is deleted from it. Therefore, if you need to reflash one pager, you will have to re-enter information about other devices into memory.
The procedure is performed with the protection mode disabled:
- The ignition is activated.
- The Jack service key is clicked and held until the siren emits four beeps.
- To enter information about the communicator into memory, you need to simultaneously click on the first and second buttons. If a pager without a display, a spare one, is programmed, then buttons number 3 and 4 are pressed. One siren sound will indicate the successful entry of information about the remote control into the memory of the microprocessor module.
- The previous point is repeated for all communicators. The time between recording each subsequent device must be no more than five seconds, otherwise the security system will leave the binding mode.
- Then the ignition is turned off. The vehicle's parking lights should flash five times.
Twage a9, Purpose of additional key fob buttons
Page 9
- Image
- Text
9
Twage A9
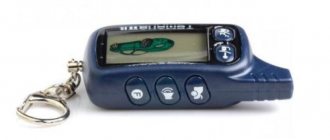
Purpose of the additional key fob buttons
Button 1
• Turning the security mode on and off (0.5 sec)
• Control channel No. 3 (3 sec) Button 2
• Starting and stopping the engine (0.5 sec)
• Extending the engine operating time (3 sec) • Activating the security mode when the engine is running (3 sec) Button 3
• Search mode (0.5 sec)
• Unlocking the trunk - channel No. 1 (3 sec) Button 4
• Silent switching on and off
security mode (0.5 sec) • Control channel No. 2 (3 sec) Buttons 1 + 2
• Panic mode (0.5 sec)
Buttons 1 + 3
• Disable shock sensor (0.5 or 3 sec)
Buttons 1 + 4
• Activate service mode (0.5 or 3 sec)
Buttons 2 + 3
• Activate trigger mode temperature (0.5 or 3 sec)
Buttons 2 + 4
• Activate the daily automatic start mode (0.5 or 3 sec)
Buttons 3 + 4
• Activate the anti-theft mode (0.5 or 3 sec)
• Recording a key fob in programming mode (3 sec)
The four-button key fob without feedback uses a CR2032, 3V lithium battery. The operating time of one battery depends on the frequency of use of the key fob and the type of element installed. When the battery is discharged, it must be replaced. Replacing the battery should be done in the following order: 1. Unscrew the screw on the bottom cover of the key fob and open the cover. 2. Remove the old battery and install a new one in its place, observing the polarity. 3. Close the key fob cover and tighten the fastening screw.
2
4
3
1
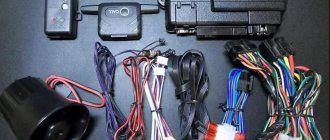
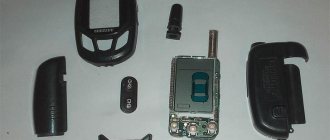
Photo gallery
Photos of the elements of the Starline A9 anti-theft system are given in this section.
Communicator for signaling control
Microprocessor module Starline A9
Siren of the security complex
Signal antenna adapter