03/02/2022 1,913 Alarms
Author: Victor
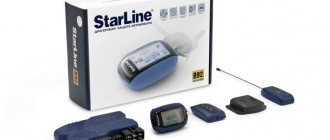
This Russian alarm system has the entire list of functions characteristic of advanced devices of this type, and also meets the latest requirements for ease of use. According to the instructions, Starline B6 can be installed on vehicles whose electrical voltage is between 9 and 24 volts; it cannot be installed on motorcycles.
[Hide]
Thank you for choosing the Sta…
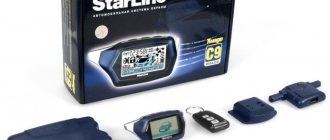
Car alarms StarLine
- Image
- Text
- Content
Thank you for choosing car alarm
StarLine model range with two-way communication.
Its appearance became possible thanks to the collective
creativity of Russian development engineers,
American specialists in the field of microelectronics
and Taiwanese high-tech manufacturers
automobile security systems.
So that the car alarm system can most effectively
perform their security and service functions,
We recommend that you trust it to be installed on your car.
professional installers.
We hope that the system will not disappoint your expectations,
will give you confidence in the safety of your car
and will significantly increase its comfort
through a variety of service functions.
Country of origin: Taiwan
Revision No. 1 July 2009
- Press button 1 on the key fob
- Press button 1 on the key fob twice
- Set the parking brake
- Within 30 seconds, remove the key, exit the car and close all doors.
- Press button 2 on the key fob
- After eliminating the cause of the alarm
- Press button 2 on the key fob
- 30 seconds expire after opening the door
- Press the service button once and turn on the ignition 7
Further configuration of the module
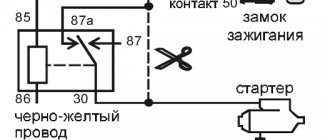
The instructions state that when connecting the control wire to the tachometer, it is necessary to “train” the system to perform its functions in order for the Starline B6 system to successfully implement the “autostart” function. This is done as follows:
- After opening the module cover, you need to activate the 6th switch;
- Then you need to hold down the START button for 2 seconds (it is located under the cover);
- After this, the engine should start and the module LED should start blinking;
- Finally, it is important to remember to turn off the switch.
If all instructions have been successfully completed, but the engine does not start, then you should find another connection point. With the same level of reliability, you can use “lamp” control.
Operating instructions Signal specifications…
Page 2
- Image
- Text
2
User manual
Technical characteristics of the alarm system……………………………………………. 3
Components included in the alarm kit…………………………………….. 4
List of security and service alarm functions ………………………….. 6
Alarm control key fobs………………………………………………………….. 8
Purpose of key fob buttons………………………………………………………………………………….. 10
Setting up key fob functions ……………………………………………………………………. 14
Turning on/off alarm operating modes
using the cursor method…………………………………………….. 16
Alarm management
Enabling the security mode……………………………………………………………… 18
Turning off the security mode……………………………………………………………… 28
Alarm self-diagnosis …………………………………………………………….. 35
Security alarm functions……………………………………………………….. 37
Anti-theft alarm functions …………………………………………………. 40
Alarm service functions………………………………………………………. 48
Recording key fob codes……………………………………………………………………….. 56
Personal emergency shutdown code…………………………………………… 57
Programming security and service alarm functions ………….. 58
Summary table of commands executed by the key fob …………………………………… 60
Warranty obligations………………………………………………………………………………64
Revision No. 1 July 2009
Content
Nuances of programming
To activate the first channel, you must first hold down button No. 1 and then No. 3 for a while. To use the second channel, button No. 1 is replaced by button No. 2.
This diagram clearly shows the algorithm for enabling autorun. A control wire can be integrated with any of the two outputs, through which a potential ground will be obtained. However, despite the external simplicity of the scheme, we will consider in detail the nuances of system programming.
Specifications
Page 3
- Image
- Text
3
Frequency range of the radio control signal…… from 433.075 to 434.79 MHz Number of operating frequency control channels……………….. 8 Maximum range of the key fob in transmitter mode………. 800 m* Maximum range of the key fob in pager mode…………. 2000 m* Maximum range of additional key fob …………….. 15 m* Shock sensor type ……………………………………………………. piezoelectric Operating temperature …………………………………………………………… from –40 to +85 °C DC supply voltage …………………………………………………………… .. 9-18V Current consumed by the alarm in security mode…………………. less than 15mA Maximum permissible current at the outputs:
•
siren connection circuits……………………………………………………………… 2A
•
side light connection circuits …………………………………………. 2x 7.5A
•
control circuits for electric door lock drives …………………………. 15A
•
Engine blocking circuits……………………………………………………….. 25/30A
•
circuits of additional control channels ………………………………… 300 mA
Power supply for the main key fob ……………………… 1.5V (1 AAA battery) Power supply for the additional key fob ………… 3V (1 battery type CR2450)
* The range of the key fob and pager may be reduced depending on the location of the transceiver, the location of the vehicle and the user, radio frequency interference, weather conditions, vehicle battery voltage and key fob battery voltage.
StarLine car alarms are approved for use on the territory of the Russian Federation and comply with all requirements of regulatory documents of the Russian Federation. The service life of StarLine car alarms, established by the manufacturer, is 5 years, provided that they are installed and operated in strict accordance with the installation and operating instructions.
Specifications
Key fob compatibility.
Key fob compatibility
| Keychain model (patient) | Keychain model (donor) | Note |
| E60.1, E90.1, E61.1, E91.1, E63, E93 | AX3 | Can be prescribed to a donor and vice versa, but only to these patients |
| E60, B64, D64 | E60, B64, D64 | Interchangeable with each other |
| E90, B94, D94 | E90, B94, D94 | Interchangeable with each other |
| A2 | A4 | Can be prescribed to a donor and vice versa, but only to these patients |
| B6 | B9 | You can register to the donor and vice versa, but only one-sided key fobs! |
| Old versions of the B series (black LCD key fob and block) | New versions (blue LCD key fob and block) | Can be registered in the donor and vice versa |
| B6 Dialog | A61 | Can be prescribed to a donor and vice versa, but only to these patients |
| B9 Dialog | A91 | Can be prescribed to a donor and vice versa, but only to these patients |
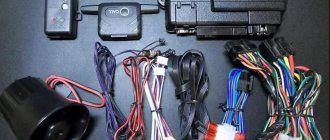
Components included in the alarm kit
Page 4
- Image
- Text
4
User manual
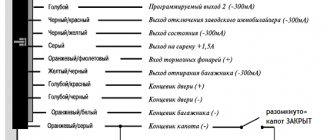
1, 2 - installation and operating instructions; 3 — remote control key fob with feedback from a liquid crystal (LCD) display; 4 — battery for key fob with LCD display; 5 — remote control key fob with feedback without LCD display; 6 - central processing unit; 7 — transceiver module with antenna; 8 — two-level shock sensor; 9 — double-sided tape for securing the transceiver; 10 — cover for key fob with LCD display; 11 — transceiver cable; 12 — shock sensor cable; 13 — hood button; 14 — service button; 15 - LED indicator; 16 - main cable with 16-pin connector; 17 — central locking cable with 6-pin connector; 18, 19 — power cables of the built-in blocking circuit;
Components included in the kit
alarm
What malfunctions are most typical for B6? How to eliminate them yourself
1. The pager does not work . The cause of the malfunction may be moisture getting inside. The device must be disassembled and dried. It is not recommended to use a hairdryer or a hot radiator for this. After drying, the keychain is cleaned with cotton wool soaked in an alcohol solution and put back together.
2. The alarm system does not work properly . Incorrect operation may be due to damage to the electrical networks. Old wires wear out and lose their insulating layer. To find the damaged area, you need to use a tester. The large connector of the central unit is disconnected and each wire is “ringed” by the device. Non-functional elements should be replaced. You can carry out such repairs on Starline b6 either independently or with the help of a professional electrician.
3. Signal loss. Poor communication and periodic loss of signal may indicate improper installation or failure of the antenna module. Mounting the antenna near metal parts leads to poor communication, so it is better to install it near plastic elements of the interior. If the module breaks down, you can find and resolder the damaged contacts yourself. If faults cannot be identified visually, you must contact a service point.
Related link:
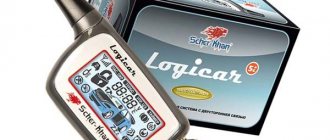
Car alarm Scher Khan Magicar 7.
Alarm control key fobs
Page 8
- Image
- Text
8
User manual
Keychain with LCD display Keychain without LCD display
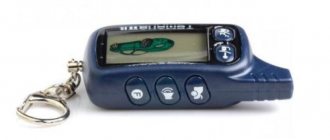
The alarm performs its functions either automatically or by signals from the key fob when buttons are pressed. Some of the provided functions and some alarm operating parameters can be changed by programming. The alarm system is equipped with a 3-button control key fob with feedback and a liquid crystal indicator (LCD) and a 2-button control key fob without feedback with LED indication (LED). The dynamic control code of the key fobs is protected from selection and interception. When the alarm executes commands transmitted from any key fob, changes the parameters and operating modes of the alarm and triggers an alarm, information about the state of the vehicle is transmitted to key fobs with feedback and an LCD display. At the same time, the key fob indicators display the current alarm status, sound and vibration signals are turned on, and the display backlight is on. The key fob with feedback uses an original cursor method for selecting some control commands, in which different commands have their own icon, displayed on the key fob indicator. In addition, information about the current time, alarm clock, and temperature inside the car is displayed on the feedback key fob indicator.
Button 1 Button 2 Button 3
Button 1
Button 2
Alarm control key fobs
Error protection - built-in
Let’s say the service mode was activated, you were convinced of this, but then you couldn’t write anything into the alarm memory. Then, the set of key fobs, the information about which the alarm “remembers,” will remain the same. It will not “reset to zero”, as many people think. Well, otherwise, the inept actions of the operator would lead to the loss of any connection with the car.
The service mode, which is activated by pressing the Valet button 7 times, also allows you to record digital relay codes.
Digital relay blocking the engine
Actually, for the first 5 seconds the signaling “does not know” what exactly will be registered: new key fobs or relays. And the 5-second interval itself is critical - when it expires, the system returns to normal mode. From here, by the way, we can conclude: when repeating step “3” (see “Sequence of actions ...”), you do not need to wait too long.
Starline's error protection is maximum. In addition to the service mode, there is also a programming mode. But you can only use it intentionally: press Valet 5 times and turn on the ignition. The number “5” is different from “7”, so any unforeseen consequences are excluded.
Additional recommendations for using key fobs Basic...
Page 9
- Image
- Text
9
Additional recommendations for using key fobs
The main key fob for controlling your alarm is a key fob with feedback and a liquid crystal indicator, which has an original dialog control code protected by a special algorithm. It is this algorithm that is guaranteed to prevent attempts to intercept the key fob code and its subsequent use to disable the alarm mode. The 2-button key fob with feedback without a display uses the same dialog control code as the main key fob with an LCD display. The pager functions are not implemented in a key fob without a display and it is intended only to control the security mode of the alarm. In order to make the most of the functionality provided by the security system, we recommend using a key fob with feedback and an LCD display as the main control tool. If the car is used by two or more owners, we recommend purchasing additional key fobs with LCD displays. The 2-button key fob, despite its high security, we recommend using as an additional one, if it is not possible to work with the main key fob with an LCD display.
Video
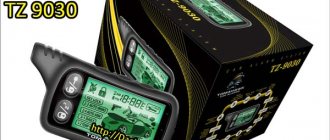
The channel “Gadgets, reviews, metal detecting” talked about replacing the failed Starline B6 anti-theft installation.
Do you have any questions? Specialists and readers of the AUTODVIG website will help you ask a question
Was this article helpful?
Thank you for your opinion!
The article was useful. Please share the information with your friends.
Yes (100.00%)
No
X
Please write what is wrong and leave recommendations on the article
Cancel reply
Rate this article: ( 3 votes, average: 5.00 out of 5)
Discuss the article:
Purpose of key fob buttons with LCD display
Page 10
- Image
- Text
10
User manual
Button 1
• Activating the security mode with sound confirmation (single press) • Activating the security mode without sound confirmation (sequential
pressing) • Disabling / enabling the shock sensor by levels (double pressing) • Locking the door locks with the ignition on (single pressing) Button 2
• Turning off the security mode with sound confirmation (single
pressing) • Turning off the security mode without sound confirmation (sequential
press) • Disable/enable the additional sensor by levels (double press) • Unlock the doors when the ignition is on (single press) • Turn off the anti-theft mode (two single presses) • Interrupt alarm signals (single press) Button 3
• Monitoring the alarm status and temperature inside the car
(single press) • Activate the “search” mode (double press) • Activate additional channel No. 3 (sequential press) • Activate the cursor selection of the following functions: anti-robbery mode,
2-step engine blocking mode, silent mode
security, service mode, turbo timer mode, automatic
turning on the security mode, immobilizer mode (long press) • Turning on the mode for setting the current time, alarm clock readings, and
timer. Buttons 1 + 2 simultaneously
• Enabling the “panic” mode (long press with the ignition off) • Enabling the anti-robbery mode (long press with the ignition on
ignition) Button 1 + 3 simultaneously
• Turning on the key fob button lock (single press)
Buttons 2 + 3 simultaneously
• Turning off the key fob button lock (single press)
Purpose of key fob buttons
with LCD display
Comments
Select → I found instructions for my car alarm here! #manualza
- Click →
An instruction is a paper that is usually read in two cases: 1. When there is nothing to read. 2. When everything is already broken.
Manualza!manualza.ru
Still not with us?
StarLine B6 – reliability and ease of use
The B6 alarm system provides enough opportunities for high-quality protection of the car from illegal actions. The protected areas of the car include not only the doors, windows, hood and trunk, but also the engine, which is blocked using a relay. This makes car theft physically difficult, and the dialogue signal code prevents intelligent hacking. On the other hand, the absence of a tilt sensor makes it possible to steal it using a tow truck, which is sometimes practiced in large cities.
As for ease of use, many owners note the convenient and understandable remote control menu, simple signal circuit, stable operation of the device with a small number of software glitches.
Drawing conclusions, we can say that the Starline B6 security system provides reliable security, but is not the most effective in combating all types of theft. This alarm system is suitable for mid-priced cars that are not particularly valuable to intruders.
Models of Starline security systems with auto start
For the current year (2018), the following Starline alarm models are sold: A63, B94 , D94 (Starline D94) , A9, A93, E91 , A6, A8, B6, E90, A94, A61, B9, A91. For convenience, we have highlighted models with auto start in bold.
Starline car alarms with auto engine start function are indicated by the number “9” in the index. The second number is the device generation. The fifth generation is designated as A95, B95 and so on.
Compared to earlier models, they have the following advantages:
- current consumption of 15 milliamps, which ensured battery life of more than 5 months;
- increased range of the head unit, which uses the new W84R02 transceiver;
- the range of the standard key fob has been increased;
- improved Slave function , in which control does not occur from the main key fob;
- new , less vulnerable, control channel encryption protocol;
- transmission of signals in the form of block sending, increasing the processing speed and noise immunity of the packet.
The index letters indicate the following:
- E - budget model;
- A - a device with additional options and the ability to change the configuration to suit the characteristics of automotive systems;
- B - an advanced model with the ability to connect GPS-GLONASS and GSM units and tracking via CAM bus;
- D - top security and telematics systems.