The generator drive pulley changes in the same way on cars of the “tenth series” (VAZ 2110, 2111 and 2112), the “Samara” series (VAZ 2113, 2114 and 2115), as well as the “new” models of Lada Kalina, Priora and Grant.
The generator drive pulley is located on the “toe” of the engine crankshaft on the side of the first cylinder (right wheel) and drives the generator and, if equipped, air conditioning and power steering using a belt.
The main reasons for replacing a pulley are damage to the ring gear or delamination of the pulley itself.
Damage to the ring gear leads to unstable operation of the motor. If the teeth are broken, the car may not start because the crankshaft sensor (CSS) cannot determine the top dead center (TDC) for the ignition count.
Delamination occurs on damper pulleys (not cast iron). The fact is that on these pulleys the outer part is attached to the central part through a rubber spacer. It acts as a vibration damper (anti-resonance) on the engine crankshaft. It happens that the outer race rotates a little. Then the toothed pulley moves relative to the dead center and, as a result, the car becomes “sluggish” during acceleration, and the idle speed becomes unstable. If the pulley is too misaligned, the car cannot be started. Also, the car will not start with the upper race completely peeled off from the central part of the pulley.
Such damage is easily diagnosed by the lack of rotation of the alternator belt.
In rare cases, the seat key on the shaft breaks, and the pulley begins to vibrate and rotate. If the movements are small, then the ECU does not display an error on the instrument panel, but at the same time the engine at idle is unstable and “troits.”
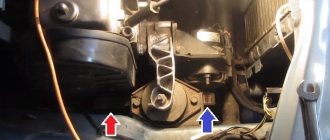
Checking the condition of the pulley is quite easy. To do this, you need to inspect the condition of the ring gear for chips and cracks. The ring gear is located on the outer race closer to the engine (indicated by an arrow) and is clearly visible from above:
After this, you need to set the first cylinder to TDC. To do this, in an 8-valve engine, remove the rubber plug on the gearbox and ensure that the mark on the flywheel aligns with the slot on the plate:
You can check by the mark on the camshaft. To get to the mark, you need to unscrew the plastic protective cover. Fasten with three “10” bolts (two are shown in the photo, the bottom one under the hose from the end of the casing):
After unscrewing the casing, pull it up. There is a mark on the camshaft pulley (right arrow). We combine it with the protrusion of the metal plate (left arrow).
It is more convenient to turn the engine by placing the car in 4th or 5th gear and pushing in one direction. You can turn it using the bolt on the crankshaft pulley, but then you will have to remove the plastic mudguard behind the wheel.
In a 16-valve engine, it is necessary to remove the plastic protective timing cover. It is secured with 5 screws using a 5mm hex key. The article describes in detail the replacement of the phase sensor on Lada Kalina, Priora and Granta cars (16 valves).
Align the marks on the camshaft pulleys with the marks on the casing.
We make sure that the DKV looks at the beginning of the 20th tooth from the two missing ones. Often the teeth become misaligned due to the timing belt jumping. This can only be checked by aligning the marks on the flywheel with the marks on the camshaft or aligning the mark on the timing sprocket on the crankshaft (you will have to remove the pulley).
However, in a 16-valve engine, assessing the position of the mark through the box window is extremely inconvenient. It is much more convenient to unscrew the spark plug of the first cylinder and lower a depth gauge or a long screwdriver into the window. Using the depth gauge, set TDC (accuracy of about 10 degrees) and check the coincidence with the marks on the camshaft. If the marks coincide, and the DKV is not looking at the 20th tooth, then the problem is in the pulley. If not, then the belt has jumped or a key on the crankshaft has been cut off. In any case, the generator drive pulley must be removed to check or further align the timing belt.
Replacing the VAZ 2110 generator pulley yourself
VAZ 2110 generator pulley
Very often the generator breaks down because its pulley does not function normally. Therefore, the operation of the car will become unavailable, because due to a faulty generator it will not even start. This means that replacing the VAZ 2110 generator pulley is simply necessary if any problems are observed during its operation. It can either be replaced or repaired. If this is not done in time, then in two or three months you will have to repair not only the pulley, but also other parts of the machine. The VAZ 2110 generator pulley is easy to replace with your own hands.
Functions
VAZ 2110 pulley unscrewed in the generator
A faulty pulley leads to various generator malfunctions, since it performs the following important functions:
- Firstly, it is a kind of generator protection. While the car is moving, the crankshaft is also in constant motion. This leads to small fluctuations being formed. Acting on the generator, such vibrations would lead to its breakdown. Fortunately, the pulley carefully protects him from this.
VAZ 2110 generator pulley
Note: this element is completely stationary. Despite this, it affects all components of the generator.
- In particular, thanks to it, even the belt stops oscillating with the previous force.
- The belt stretches less, so it will function longer. Therefore, if the pulley is not replaced in time, the belt may break.
- The belt drive is much quieter.
- The pulley is capable of unloading the generator at high speeds. In this case, less load will be placed on the engine.
- By using a good pulley, the battery will not drain too quickly. Therefore, the car will work longer.
- By changing the generator pulley, the gear ratio will also change. As a result, at idle the generator will spin much slower, so it will not produce anything, and gasoline consumption, among other things, will be significantly less.
Causes of breakdowns
VAZ 2110 generator drive pulley
The generator pulley breaks quite often, so in order to protect your car from such a nuisance, you should know the main reasons why this happens:
- The generator pulley, as well as its inner ring, are not hardened during the manufacturing process. Therefore, they are very fragile parts, which is why they can be damaged even with minor impacts.
Note: You must comply with all requirements for its operation. It is very important that it is well attached, since a slight play can also lead to its destruction.
- Usually there are shallow scratches on its surface (often they appear at the production stage). In fact, they do not affect its operation in any way. However, if these scratches “grow,” the pulley will have to be replaced.
Fastening the generator pulley VAZ 2110
- When installing it in place, you need to remember that the tightening torque of the product to the generator must be within 80 Nm. If this is neglected, the pulley will wobble.
Note: Tightening must also occur in a specific direction.
Replacement with generator removal
Alternator pulley play VAZ 2110
You need to know that there are two types of pulleys on sale (new and old models). You need to take the old model, since only this one is suitable for tens. The new pulleys are manufactured in different sizes. The pulley is replaced as follows:
- Open the hood.
- Remove the battery terminal.
- Remove the alternator belt.
- Remove the generator.
- Remove the damaged pulley. It is usually not easy to remove as it oxidizes and is securely attached to the generator.
Note: for this purpose, a special tool was created for removing the pulley. It is called a fine-slot profile.
- Not everyone can afford to purchase such a device. Therefore, many people use methods from “grandfather’s chest”. To do this, you should take some corrosive substance (for example, brake fluid). Drop several times onto the boiled part.
Note: precautions must be taken as brake fluid will corrode the skin if it comes into contact with it.
- Before installing a new pulley, you need to make a small hole (about 2 mm) on the inside of it. To do this, you need to heat it thoroughly and saw through it with a gentle movement. As a result, it will sit better on the generator.
- Everything needs to be collected in a certain sequence. First you need to insert the washer, then the impeller.
- Then the pulley itself is put in place.
- The entire structure is secured with three nuts of different sizes.
- The grower is inserted.
- Now you need to screw in another nut for a more secure fastening.
Note: this nut can be screwed in using a 14 mm wrench.
Pulley repair
If the pulley failure is not significant, it can be repaired. You can get rid of such troubles:
- A small play (precisely small, since if the pulley is loose, then it is already 100% damaged). To eliminate this, tighten the mounting bolts to the generator tighter.
- A small crack that can be soldered.
- The protective cover has expired. Typically a protective cover is included with the pulley. It can be installed quite simply, but it cannot be used more than once, since it is not of high quality that would allow repeated use.
- In this case, under no circumstances should the pulley be used without a cover, as it performs a protective function. This will cause it to break.
- Imbalance of pulley and coupling. This problem can only be dealt with if it is minor.
Note: The pulley can only be removed or replaced using a special tool called a fine spline profile.
You can replace the pulley with your own hands, since such work is not difficult to do even at home. However, the cost of repairs may vary. After all, it is often necessary to change not only the pulley, but also other parts of the generator, since its damage leads to failure of other components. Of course, before starting repairs, it is worth reviewing photos and videos on this topic. Instructions wouldn't hurt either. In addition, you can use the questions/answers section on many Internet sites.
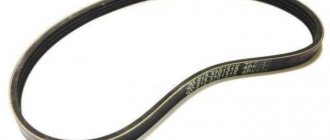
The need to replace the belt
Initially, it is important to note that the generator and its drive on a VAZ 2107 car, both injection and carburetor, are absolutely similar. The only difference between an injector and a carburetor is that the injector is equipped with a crankshaft position sensor. When it is necessary to replace the alternator belt on an injection-type VAZ 2107, this sensor must be removed
When it is necessary to replace the alternator belt on an injection-type VAZ 2107, this sensor must be removed.
During the operation of the VAZ-2107 car, the part in question wears out. The need to replace an element can be determined by the following signs:
- the appearance of cracks;
- whistling when starting the engine, or when sharply pressing the gas pedal, or after driving through a puddle;
- disheveled;
- sagging.
The device in question, unless of course it is a defect, has a certain resource during normal operation of the vehicle. This resource is usually 50-60 thousand kilometers, after which the belt should in any case be changed. How to do this not only correctly, but also quickly, we will consider in the material.
Instructions for replacing the alternator belt
You must initially purchase a new item. Which belt is better to install on a VAZ 2107 depends on the amount of finances available to the owner of the “Seven”
Experts recommend not saving on such an important element and purchasing a Bosch brand part. Products of this brand are of good quality, which is actually necessary to achieve a long service life of the main components of the car. At the next stage, you will need to make sure that you have the necessary list of materials: open-end wrenches for “17” and “19”, a pry bar and a screwdriver
Only after this we begin to replace the product:
At the next stage, you will need to make sure that you have the necessary list of materials: open-end wrenches for “17” and “19”, a pry bar and a screwdriver. Only after this we begin to replace the product:
- First, loosen the nut that secures the generator itself to the adjustment bar.
- After this, you need to use a pry bar to press the generator to the motor. On injection "sevens" it is necessary to remove the crankshaft sensor.
- Now we remove the old element and put a new one in its place.
- To tighten the belt, you will need to use a pry bar to move the generator. After the device is in place, you can fix the nut.
- If you tighten the belt, then accelerated wear of the pump bearings and the generator itself will begin, which will have a bad effect on the service life of these devices. Also, the belt itself can break very quickly.
After completing the replacement procedure, it is imperative to tension the alternator belt. We will learn further how to tighten the alternator belt on a VAZ 2107 car.
In order to perform tension, you will need to check as follows:
- To begin, take a screwdriver in your hand and then press on the gap between the pulleys, as shown in the figure above.
- After this you will need to pick up a ruler. If the deflection does not go beyond the limits, then the work can be considered completed. How to tighten the belt if necessary?
- To do this, you need to unscrew the nut securing the generator, and then move it in one direction or the other, depending on what you need to do: tighten or loosen the tension. We tighten or loosen the device, after which the tensioner nut is fixed.
Changing the strap on the “seven” is not particularly difficult. In this case, there is no need to contact specialists at a service station, because the work can be done independently.
If the size of the element in question meets the standards, then it is possible not to replace it until its service life has come. Only with timely replacement of the product can unforeseen consequences in the form of element breakage on the road be avoided.
Renault Megane › Logbook › Replacing generator bearings and installing generator pulley 2110
AHTUNG! IT IS NOT RECOMMENDED TO REPLACE THE ORIGINAL PULLEY WITH A VAZ PULLEY! (except to wait 100 km before the service) DUE TO THE ABSENCE OF AN OVERAGGING CLUTCH, THE BELT WILL OCCUR AND BE DESTROYED, WITH THE SUBSEQUENT TIGHTENING OF THE FRAGMENTS UNDER THE TIMING DRIVE STAR
This means that the rustling noise from under the hood completely bothered me, I even began to suspect the release valve... However, the smell of burnt rubber in traffic jams convinced me to turn my attention to the generator, its bearings and pulley. I took off the belt of the additional equipment and pronounced the verdict - generator bearings. It was lunch time, I removed the generator, brought it to the workshop and began to disassemble it. I’ll say right away, the generator is BOSCH.
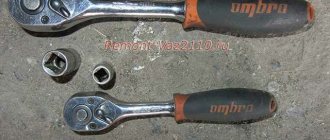
The first obstacle was removing the pulley from the generator shaft. During creative searches, the following device was invented:
A 27mm nut is inserted inside the nut, then a 8mm hexagon is inserted into the shaft, the hexagon is held with a wrench or socket, and the nut is turned counterclockwise and unscrewed in this way. In this case, the generator must be gently clamped in a vice (and not as in my picture). The nut is unscrewed and the pulley is removed. During this procedure, I realized that I had also hit the pulley. Because it had a lot of play in the radial plane, and touched the generator housing, even rubbing small grooves from below.
Next comes the disassembly of the generator, unscrew everything that can be unscrewed from below (or behind) - positive contacts, cover, diode bridge, relay regulator with brushes, removed and placed nearby. Although actually it is not a relay as such, but a circuit with 3 transistors, but for brevity, let it be the old-fashioned relay regulator.
Next, the 4 bolts holding the generator halves together are unscrewed, and the lower (rear) part with the diode bridge is removed from the rotor. You can help yourself a little with a screwdriver, there is some force there, but not much.
Next you need to unscrew the 4 countersunk screws from the pulley side. They secure the front bearing thrust plate. After this, we take a three-legged puller of a suitable size, grab it under the front cover with its paws, rest against the shaft, and pull the cover off the bearing.
After this we will have a picture like this
Connection diagram
The connection diagram for the VAZ 2107 generator is shown in the photo:
Wiring diagram for VAZ 2107 generator circuits
On the generator connection diagram 37.3701: 1 – battery, 2,3,5 – rectifier diodes, 4 – generator assembly, 6 – stator winding, 7 – charge relay, 8 – rotor winding, 9 – capacitor, 10 – fuses, 11 - indicator lamp, 12 - voltage meter, 13 - relay, 14 - lock.
How to change the alternator on a “ten” yourself, without resorting to the services of a car service.
- How to remove the generator from a car:
- Reinstallation procedure when replacing the generator on a VAZ-2110 and tensioning the drive belt:
- Alternator drive belt tension:
The generator is an important element of the car's power supply.
Technical malfunctions that arise from incorrect operation can cause damage to electrical equipment elements and completely disable them. Insufficient battery charging will increase the load and lead to its inevitable replacement. If there is a lack of charge, there will not be enough power to power all the electrical equipment of the car. Also, cold starting the engine will become very difficult.
In this article we will look at the features of replacing a generator on a VAZ 2110.
How to remove the generator from a car:
- Be sure to disconnect the terminals from the battery;
- turn the car wheels to the right;
- remove the engine crankcase protection (if there is one);
- loosen the fastening nuts;
- loosen the screw on the tension bracket;
- by moving the generator towards the engine, loosen the belt tension;
- remove the drive belt from the generator;
- remove the wire coming from terminal “D”;
- unscrew the nut securing the second wire “B+”, having first removed the rubber cap from it;
- unscrew the tension screw;
- unscrew the nut of the upper mounting of the generator and remove the tension bar;
- unscrew the lower fastening nut and, holding the generator with your hand, remove the bolt and bushing;
- take out the generator;
Reinstallation procedure when replacing the generator on a VAZ-2110 and tensioning the drive belt:
- take a new generator, attach it to the lower mount and insert a bolt with a spacer sleeve and tighten the nut;
- screw the tension bar to the upper mount of the generator, through the tension bracket;
- screw in the tension screw;
- install the wiring on the terminals corresponding to the markings;
Now, let’s move on to an equally important part of the work, when replacing the generator on a VAZ-2110, tensioning the belt. Incorrect belt tension can lead to a number of undesirable consequences.
Insufficient drive belt tension will result in insufficient or complete lack of battery charging. A poorly tensioned belt can jump off the pulleys and cause damage to engine parts and components.
An overtightened belt puts a large load on the bearings, which will lead to their rapid failure. A belt that is too tight will wear out faster and eventually stretch and break. Therefore, it is imperative to ensure the correct tension of the generator drive belt.
Under ideal conditions, when measured between the alternator pulley and the crankshaft, the drive belt should deflect by 10-15 mm with a force of 10 kg/cm.
Alternator drive belt tension:
- put the drive belt on the crankshaft and generator pulleys;
- screw in the tension screw until the belt is tensioned, checking it by hand;
- tighten all fastening nuts;
- the belt should not sag, but there is no need for excessive tension;
As you can see, the procedure for removing and installing the device is not so complicated. Any car enthusiast can do it. But to facilitate the work, it is better to perform it in a pit or overpass (if it is necessary to remove the crankcase protection and ease of access to the lower mount of the generator).
Proper operation of the generator ensures uninterrupted operation of the vehicle's electrical equipment. Monitor the operation of the device using indicator lamps. If the red battery charging lamp lights up, you must immediately eliminate the cause of the malfunction.
Timely detection of problems in the power supply system significantly extends the life of your vehicle's electrical equipment
And here we have a video on the topic:
Varieties of design
Classic pulleys are secured to the shafts with keys. However, this type of fastening is practically unsuitable for frequently changing and alternating loads - the key is cut off or the seating groove is broken, backlash appears, so the generator pulley is put on the shaft without tension, Morse tapers and keys, and is pressed with a nut.
Fastening the pulley with a clamping nut
This method ensures no spinning even at maximum speed, taking into account that the shaft diameter is 17 mm, the nut thread is M16, and the steel/steel friction coefficient is 0.15 units.
The nut must be tightened with a force of 40 - 50 Nm in two stages - up to 20 Nm, then tightened to an angle of 70 degrees.
The problems are completely solved by the inertial pulley of the generator - an overrunning clutch of the following design:
- the outer race copies the pulley, has grooves for V-belt or poly-V-belt transmission, the same outer diameter as a regular pulley;
- the inner race is a bushing that fits onto the generator shaft;
- A damper rubber layer, a spring and a roller bearing of a special design are installed between the clips.
Overrunning clutch design
This scheme makes it possible to smooth out the crankshaft rotation pulses due to the inconsistent coupling of the races with each other. During sharp acceleration, the outer race smoothly catches up with the inner sleeve. When braking, on the contrary, the inner race equalizes the angular velocity relative to the outer pulley.
How to remove the crankshaft pulley
When carrying out repair work on the engine and engine-related parts, it is necessary to remove the pulley from the crankshaft, for example, to replace the pulley or to replace sealing seals in case of engine oil leakage. It would seem a simple task, but removing the pulley from the crankshaft poses difficulties and it is not so easy to remove it. Therefore, in this article we will look at how this can be done quickly.
Why is it difficult to remove the pulley?
No. 1. Depending on the engine design, make and model of the car, the difficulty of removing the pulley varies. Some machines have a lot of space to comfortably carry out repair work, while others have very little free space. The pulley design elements cover the pulley.
The structure of pulleys is also different, there are 2 types:
- ordinary;
- damper
Damper pulleys have an additional outer ring with an elastic band in their design, which absorbs vibrations and micro-vibrations.
Before you start removing the pulley, you need to loosen the tension nuts and bolts, remove the generator and power steering belt.
No. 2. In the factory assembly, the pulley is seated on the engine crankshaft, pressed with a bolt or nut and tightened with high compression force. Thus, the factory assembly is very strong. Therefore, if you have never removed the pulley, it will be more difficult to dismantle it the first time.
In addition to tightening with the maximum permissible force with a special torque wrench, during operation, the engine becomes very hot, the threaded connection is tightened even more and sticks. And external factors influence the outside, due to which the threaded connection may be subject to corrosion.
Some engine models cannot be repaired; they are disposable. These are, for example: 1AZ-FSE, 3UZ-FSE. Each power unit was examined in detail.
No. 3. If you disengage the clutch, the engine crankshaft can be freely turned with a wrench. Therefore, in order to unscrew the crankshaft pulley nut, you need to stop the shaft from turning. If, when you press the clutch, the speeds do not change, then it is not working. Air may have entered the system. In this case, you need to bleed the clutch.
Classic methods
Essentially, standard dismantling methods involve two main methods.
You will need:
- jack to remove the wheel
- tool kit
- hydraulic jack to lift the engine, or replacing it with a “stump”
First way
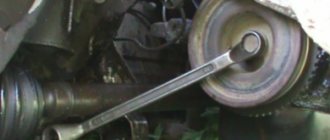
In the first case, we will have to make significant physical efforts, therefore, you need to clearly focus on your own strength. We are talking about the need to put stones or special stops under the wheels that would not allow them to move during operation. The gearbox should, if possible, be set to maximum gear. The higher it is, the easier it will be for you to cope with the task. In third and lower gears, it will be almost impossible to turn by hand. But everything is unscrewed by hand. To make this task easier for yourself, it is appropriate to use a lever that will reduce the necessary effort. In some cases, the length of the lever can reach one and a half meters.
Getting to the bolt is not always easy
Second way
As for the second method, it involves placing the vehicle in neutral gear. Next, you need to install a suitable sized head on the bolt with a piece of pipe, which, in turn, rests on asphalt or concrete. Ordinary soil will not be able to hold it. But the bolt itself is already loosened by the starter.
Be careful not to lose the pulley key
But, in any case, the threads in this nut are correct, so you need to unscrew it counterclockwise, with some exceptions, which we will now look at.
How to unscrew the VAZ 2110 generator pulley
Removing the generator, replacing the pulley and reinstalling it
The article describes in detail the procedure for removing and installing a car generator, as well as replacing the pulley.
A car generator is used to convert mechanical energy into electricity when the vehicle is moving. This current serves as a spark exciter at the spark plugs to ignite the fuel in the engine cylinders, it recharges the car's battery while it is moving, and also allows all electrical equipment in the car to operate.
As you can see, this is a very important mechanism for the electrical equipment of the entire iron “friend”. In case of the slightest malfunction, the generator should be repaired immediately, and to do this, it must first be removed, and then reinstalled - installation, which we will show how this is done correctly using the example of a VAZ 2110 car. On other VAZ models, the procedure is similar and not difficult. To repair this mechanism, you will definitely need a diagram of a car generator, it is presented there for the VAZ 2106 and 2110, as well as the principle of operation.
Removing and installing the generator - step-by-step procedure:
1. As always, first of all, remove the wire from the “–” terminal from the battery.
3. Disconnect the plug with wires from the connector on the generator marked “D”.
4. Next, you need to move the rubber cap, unscrew the nut and remove the wires with the terminal from the contact bolt (marked “B+”).
5. Remove the tension bolt securing the electric generator from the front.
6. Completely remove the nut that is attached to the top.
7. Remove the threaded tension sleeve.
8. Now proceed to the lower mounting of the generator - completely unscrew the nut with a wrench.
9. Now you can remove the spacer sleeve.
10. Next, carefully holding the electrical equipment with one hand and with the other, remove the last mounting bolt and remove the car generator.
Replacing the generator pulley
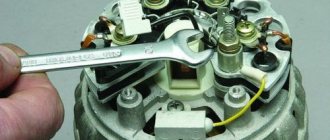
1. While holding the rotor shaft well from turning with a hexagon, unscrew the nut that secures the generator pulley. For these purposes, a hexagonal hole is made at the very end of the shaft.
2. Install the head on the nut and insert the hexagon through its hole into the shaft hole. While holding the shaft from spinning, unscrew the fastening nut and remove the spring washer with the pulley.
3. Now all that remains is to install the new generator pulley in reverse order, just keep in mind that the spring washer must be placed with the convex side facing the nut. The nut should be tightened to a torque of 39–62 N•m (3.9–6.2 kgf•m).
4. After replacing the generator pulley, reinstall it back into the vehicle in the reverse order of removal. Then be sure to adjust the generator drive belt.
How to unscrew the VAZ 2110 generator pulley
- Registration
- Entrance
- To the beginning of the forum
- Forum Rules
- Old design
- FAQ
- Search
- Users
And the actual question for the audience is: is there any other way to get out of this situation? Maybe there is some clever way to remove the belt without removing the generator drive pulley? And is a bolt hole really that bad?
you insert the head with the knob, hold it, or press it against the floor. The assistant turns on the starter without turning on the ignition, applying plus to the retractor, and turns away with a bang!
warm it up with a gas burner
the bolt is also coated with anaerobic glue,
Wow
no one ever smears or smears anything. The Tama bolt with a special coating is screwed in and just that, but no Tama anaerobes are smeared or smeared.
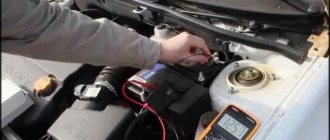
Measurements with the engine running
This method is more common as it is quite simple. But it has one drawback - it does not detect problems with the generator. If you are only interested in battery voltage, then it is completely justified.
It is necessary to measure the indicator using the terminals. To do this, multimeter probes are placed on them - the circuit is closed. The device screen should show a reading between 12.5-14 V. This is normal voltage, sufficient for further operation of the car. If the indicator is below this threshold, then undercharging occurs. As a result, problems with starting the car may occur.
This method is the simplest and most effective, because it reflects the current state of the battery. If the voltage level is sufficient, then it returns to its place and connects to the car. Otherwise, it is necessary to determine the cause of this condition.
When the car engine is running, the indicators increase slightly. Typically, the battery voltage ranges between 13.5-14.0 volts. If the charge level is too low, the readings will increase as the generator operates in boost mode.
Although it was stated above what the battery voltage should be when the engine is running, it may be slightly higher for 10-15 minutes after starting. If it does not recover within this time, then there is a problem with the generator or electrical equipment.
How to unscrew and remove the crankshaft pulley of a VAZ 2110
From the very first release in June 1995, the VAZ 2110, or “ten” in common parlance, won the love of middle-class people. This model was produced for 12 years. Not difficult to maintain and easy to break down, as well as replacing some parts is easy to do yourself, without resorting to the services of a car service. This will save not only time, because the wait for the service center to take on the car can vary depending on the workload of the technicians, but also money. Engine VAZ 2110 8-valve injector, volume – 1.5 liters, front-wheel drive, M5 gearbox. Engine power 56 kW, torque 118 Nm. A huge plus is low fuel consumption.
The maximum speed is 170 kilometers per hour, while acceleration is 14 seconds. Very well suited for urban heavy traffic. Starts even at -25 degrees below zero. The chassis is made of high quality, excellent for holes and potholes. The suspension is strong. Power steering can be installed, but to order. The components are not expensive, even original ones can be purchased by a middle-class car enthusiast.
The interior is not very roomy, but it has a trunk capacity of 450 liters. The rear backrest reclines, the middle one reclines completely, and the side ones have a smaller deviation. Long loads can be easily transported. An internal combustion engine equipped with a belt drive, sensors and an electrical engine control unit control the operation of the systems. The most common breakdown for VAZ 2110 8 valves is engine friction.
The reason may be:
- Poor quality fuel; as a result, one of the fuel system parts became clogged. In this case, you will have to study the fuel supply circuit and fix the problem. Doing this on your own is difficult and can take a lot of time. In this case, it is better to contact a car service.
- Damage to spark plugs and wires. You need to visually inspect everything and check the fragments with a tester.
- Malfunction of the electronic control unit and sensors. Home renovation enthusiasts cannot solve this problem. You will have to turn to craftsmen who have experience and special equipment.
VAZ 2110 8 valve injector has high technical characteristics. But, like all cars, over time some parts tend to wear out. The main breakdowns that car enthusiasts can fix themselves are replacing the Kalevala pulley of the VAZ 2110 8 valves. The gear or pulley of the VAZ 2110 crankshaft is one of the most frequently replaced parts. Their good service life is on average 3 years. Car owners will not find it difficult to replace it themselves as the process is simple. Having understood how to change the crankshaft gear, the driver will gain experience in repair work in the manual drive system of the gas distribution mechanism, but will also be able to further adjust the valve or make modifications.
Purpose and role of the crankshaft pulley
Purpose and role of the crankshaft pulley
Each drive of this car brand has 2 types of pulley:
- Block type.
- With a disconnected system with a bushing - a damper (acts as a shock absorber under heavy loads on the crankshaft).
At the very beginning of VAZ production, the pulley was one-piece and was fastened with one bolt. But with the advent of the injector, a damper was also mounted on the hub.
How to remove the damper
- It is necessary to disconnect the wire that connects the negative terminal of the electrical element to the body of the product from the battery.
- Remove the fan and coupling.
- Lightly undermine the choke pulley rod and remove the belt.
- Carefully, so as not to damage the heat exchanger, remove the gear from the fan.
- The approach to the damper opens. Then tighten the bolts slightly and remove it.
- When the hub is removed, it must be secured against rotation.
All engines consist of several systems and operate using a source of mechanized energy - the crankshaft. Some part of the tacking moment is redirected from it and driven into action by the shafts, generator, pump, etc.
The crankshaft pulley 2110 is one of the engine parts of the gas distribution mechanism and additional components. Located in the front half of the crankshaft.
• Monitors angular velocity and shaft position. • Reduces noise. • Reduces the swing of the crankshaft.
The pulley is one of the most important parts of a typical engine.
Reason for changing the crankshaft pulley
The crankshaft pulley of the VAZ 2110 is a reliable car part, but it can become faulty.
If you observe at least one item with the ones listed below, it’s time to change it:
- If oil leaks from the shaft.
- Feeling of increasing resonance.
- A crack in the damper seat (mechanism for reducing or preventing vibrations). Needs replacement along with the crankshaft gear.
- Hub rotation.
- If the crankshaft is removed for any repair work.
How to unscrew the crankshaft pulley of a VAZ 2110
For a good overview and access to the car pulley, it is best to use an inspection hole or overpass. It would be a good idea to take an assistant because it is difficult to cope with some processes alone.
If there is no inspection hole, lift the car using a jack and you can begin dismantling, which consists of the following steps:
- To avoid breaking the bolt while unscrewing it, you need to treat it with some means (for example, WD-40) for better scrolling, since it can become rusty under the influence of temperature and other factors. As a result, it is very difficult to twist.
- Unscrew the bolt and carefully remove the right wheel, since the engine is located transversely, you will have to remove it to access the pulley.
- Remove the air filter present there.
- Unscrew the screws and remove the shield to protect the engine from dirt. [BR]• Remove the alternator belt, as well as all mechanisms that complicate access.
- Open the plug on the clutch box and insert a pry bar into the opened space to jam the gear teeth.
- Place a wrench with an extension on the bolt and turn it. Carefully remove using a special puller.
- We mount the new one, making sure that the notch on the pulley coincides with the tooth.
Often, beginners, when repairing their car on their own, are faced with not knowing how to remove the crankshaft gear.
The crankshaft gear is a part that powers the mechanisms in the drive. It has the shape of a gear with teeth; a chain or belt can be put on them. Typically, timing gears and oil pump drives are attached to the crankshaft. The gears are placed with a tight fit and secured with a connecting rod with threaded fasteners.
Causes of crankshaft gear failure
The condition of the roads leaves much to be desired, so flickering and high speed lead to complications in the operation of gears, and abrasion of the teeth meshing occurs, which is common to all parts.- Connecting rod defect
A few words about electrolyte
One of the main indicators by which you can judge the health of a battery is the electrolyte level. The voltage of the power supply depends on it under different operating modes.
In the process of discharging the battery, acid is consumed, the share of which in the total volume of liquid is a third (35-36%).
The result is a decrease in the density of the liquid. When the battery is charged, the reverse process occurs.
In such a situation, water is consumed, and acid, on the contrary, is formed. As a result, the density of the electrolyte increases.
In the normal state, when the battery voltage is 12.7 V, the density is 1.27 g/cc. Moreover, all parameters directly depend on each other.