How to tension the alternator belt
There are times when when the car gets into a puddle, or simply when there is high humidity, the alternator belt begins to whistle. Often the reason lies precisely in insufficient tension. Of course, to fix this problem, you just need to tighten the belt to the desired level.
The tool you will need to solve this problem:
- head for 10 and 13 mm;
- ratchet handle.
So, depending on the VAZ 2110-2112 model and the installed engines, the design of the alternator belt tensioner may differ slightly. But in essence, there is not much difference and everything is done by analogy.
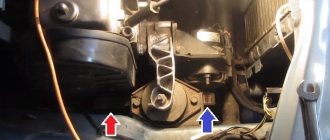
- So, open the hood of the car and look towards where the generator is located.
- Loosen the top nut securing the generator and use the adjusting bolt to tighten it.
Pay attention to the fact that if it is necessary to tighten the belt, the bolt must be tightened on the rod clockwise. If, on the contrary, you decide to loosen the tension, then unscrew the adjusting bolt counterclockwise.
How to replace the Grant alternator belt
The replacement process is not simple and depends on the equipment of the car: whether there is a tensioner, air conditioning. In the latter case, you cannot do without a lift and dismantling the engine mount due to the air conditioning compressor clutch pulley.
For a Granta with air conditioning, for installation you will need to hang the wheel and remove one engine mount.
How to change a belt on a Grant 8 and 16 valve without air conditioning and tensioner
What you will need for work:
- a knife, if you just need to cut off an old part;
- crank or ratchet with head 13;
- long strong wire;
- flat screwdriver;
- partner – you can replace it yourself, but it’s easier with an assistant.
Step 1. Dismantling
The car is on a flat surface, neutral is engaged without the handbrake. Battery is disconnected.
If the old belt is not needed, we cut it in an accessible place and take it out.
If you need to save the old one, do everything up to step 3.
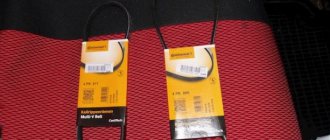
A replacement is needed with a length of 8223mm, six-wedge. Called 6RK 823. PHOTO: www.zr.ru
Step 2. Remove the generator mount
We approach the generator mount with head 13:
- we remove the lower bolt by 2-3 turns;
- Use it to completely unscrew the top bolt.
In this situation, we proceed to installation. PHOTO: www.zr.ru
Step 3. Raise the part
Scroll the generator up. The top mount becomes higher than the bracket to which it is screwed.
We press the part to the engine. We fix it with strong wire. For example, we hang it from the cylinder head bolt.
In this situation, we proceed to installation. PHOTO: www.zr.ru
Step 4. Install a new one
We pull the new one onto the pulleys.
The installation takes place in the position of the generator when it is pressed against the engine. PHOTO: www.zr.ru
We engage fifth gear, push the car back, pressing the belt against pulley 1 in the picture. This is where a helper will come in handy.
As soon as we put it on, we work in reverse order:
- unplug the generator;
- press it into working position;
- return the upper mounting bolt and tighten the lower one.
Replacing the alternator belt on a Grant with air conditioning
It's more difficult here. Step by step:
- we drive the car onto a lift or overpass;
- remove the tensioner;
- take off the front right wheel;
- we support the internal combustion engine and dismantle the pillow;
- change the required part.
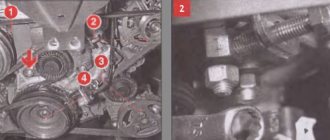
The whole problem is in points 5 (air conditioning compressor clutch) and 7 (right engine mount) - our belt passes through them (number 6). The rest: 1-drive of auxiliary devices, 2/3-tensioner, 4-generator. PHOTO: www.zr.ru
What you need
- new belt marked 6РК 995;
- spanners 8, 19;
- socket wrenches 8, 10;
- Torx keys T20, T27;
- ratchet with extension and heads E14, 17.
Step 1. Tensioner
The car is on a lift or overpass.
Open the hood. Remove the terminals from the battery.
We find the tensioner, take out the spanners 19 and 8:
- 19 we put on the lead screw;
- 8 hold the locknut;
- we touch;
- Turn the lead screw clockwise to loosen the tension.
We remove the lock nut and loosen the tension. PHOTO taken from: www.zr.ru
We need keys 8, 10. Remove:
- central shield (numbers 1, 5, 7);
- right shield (number 2).
Step 3. Wheel
Remove the front right wheel. Using keys 8, Torx t20, t27, we dismantle the fender liner according to the diagram.
To work with the fender liner you need three different keys. Having removed it, we gain access to the engine support. PHOTO: www.zr.ru
Step 4: Engine Mount
Getting ready to remove the engine mount.
Using a wrench or ratchet with an E14 head, unscrew the screws securing the support to the engine.
Use head 17 to unscrew the screws securing the support to the body.
We remove the support. Make sure the weight of the engine is securely resting on the crankcase support. PHOTO: www.zr.ru
Step 5. Dismantling and installation
We remove the belt from the pulleys and rollers and pull it out.
We install the new one in the reverse order.
The final tension can be adjusted by adjusting the tensioner.
Video instructions for tensioning or loosening the alternator belt on a VAZ 2110-2112
To show everything clearly and clarify the picture, I decided to record a short video that contains instructions in an accessible form:
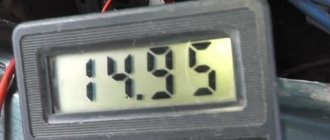
First, make a few turns and try to tighten the belt, perhaps this will be enough to prevent it from squealing. And it's quite easy to check. Start the car with the lights and other electrical devices turned on as much as possible (high beams, heated rear window, heater, etc.) If at this time the whistle is not heard, then the belt is properly tensioned.
But you shouldn’t forget about the constriction, and this shouldn’t be allowed. If you hear that a strange hum suddenly begins to appear from the side of the generator, most likely due to a tightened belt, the bearing is humming, then you urgently need to loosen the tension a little until the sound goes away.
Source
Reasons for whistling
Let's look at the main reasons why the V-belt connection whistles. They boil down to this:
- The belt has low tension. At the same time, he slips, which is especially noticeable at night, when he whistles with special “zeal.” This is due to the fact that at night the generator is forced to work in increased mode, providing the car with light;
- The destruction has begun. It dries out and literally begins to fall apart. First, cracks appear, then pieces fall off. At the same time, it also whistles due to the fact that the bullies catch the pulley, contributing to slipping. It needs to be changed urgently;
- Moisture ingress occurs quite rarely, and it evaporates during operation. But if at the same time the V-belt connection whistles, this indicates that it is necessary to apply tension;
- Wedge of the generator itself.
Do-it-yourself tensioning and replacement of the alternator belt on a VAZ 2110
It is not uncommon for a VAZ 2110 car to experience a whistle in the V-belt connection of the generator. For this reason, it needs to be tightened or completely replaced. Today we will talk in detail about the tightening procedure, and also tell you how it changes.
Why does the whistle occur?
There are several reasons why the characteristic whistle-like sound occurs.
- Weak tension. The element slips, and this happens most actively at night. The increased intensity of the whistle at night is explained by the fact that the generator additionally works for lighting.
- Gradually the component is destroyed. The belt can dry out, causing its structure to be disrupted and it literally crumbles into pieces. The first signs are cracks, and then whole pieces break off. When moving, the pulley hits and slipping begins. Only replacement is required here.
- Although moisture gets on the belt very rarely and evaporates almost immediately, the connection can still whistle. In this situation, tension is required.
- The generator itself jams.
Dimensions
The sizes are different, and they are individual for each VAZ model.
If we talk specifically about the “ten”, then adhere to the following rules for choosing a belt size:
- In the absence of air conditioning and power steering, 742 millimeters is suitable;
- If the car is equipped with a hydraulic booster, then the size will be 1115 millimeters;
- If an air conditioner is also present, then the optimal size is 1125 millimeters.
Some craftsmen regularly use original belts from other AvtoVAZ models - Priora and Kalina - to replace them when repairing their "ten".
Performing tension
If there is no wear on the V-belt drive, but there is a whistle, first of all, check the tension level. We will not use complex terminology, but will simply advise you to press with some force on the belt in the middle.
The problem is not the whistling. Due to weak tension, the battery does not charge effectively, and the drive itself begins to wear out faster. Excessive tension can lead to damage to the alternator bearings and stretching of the belt.
Correct tension of the VAZ 2110 generator belt is performed as follows:
- Loosen the generator from the bottom and top. A nut is used for this;
- Turn the adjusting bolt and adjust the belt;
- If you want to increase the tension, the bolt is turned to the right. Thus, you move the generator away from the cylinder block;
- To loosen the tension, move in the opposite direction - to the left;
- Use a wrench to grab the fastening bolt and turn the crankshaft a couple of turns, then check the tension;
- If all is well, the tension is correct, the nut can be tightened back.
Replacement
We have already figured out how to tighten the alternator belt. But such measures are not always relevant. If the element is cracked, overstretched and no longer tensioned, then there is nothing left to do but replace it with a new one.
Right size
Another reason why the connection whistles may be an incorrectly selected belt size. But this, as a rule, becomes clear immediately after installation. Therefore, you need to know the size before going to the car market or store. In fact, there are quite a lot of sizes, as if the designers selected the length individually for each model.
Timing belt Contitech VAZ 2110 (16kl.)
Here are the main sizes that should fit the “ten”:
- If there is no power steering and air conditioning, take the size 742 mm;
- The VAZ 2110 generator belt with power steering is 1115 mm long;
- With air conditioning, even more – 1125 mm.
It is also possible that the size of Kalina or Priora will suit you.
Belt Contitech VAZ - 1119 Lada Kalina
Tension adjustment
If you discover that the V-belt drive is not yet worn out, but is whistling, you must first check its tension. According to the book, its deflection with a force of 10 kg/cm2 (100 N) should be 10 - 15 mm. To put it simply, you just need to press it approximately in the middle with some force.
If the tension is correct, then the deflection will be 6 - 8 millimeters. If it is more, it needs to be tightened, if less, it needs to be loosened. And it's not just that he whistles. If the tension is weak, then the battery charges less well, and the drive wears out faster. If the tension is too strong, there is a risk of failure of the generator bearings and the belt stretches.
We carry out the necessary adjustments as follows:
- Loosen the generator mounting nuts from the bottom and top;
- By turning the adjusting bolt, we make the adjustment: - To increase the tension, turn the bolt to the right - this moves the generator away from the cylinder block; — To loosen, turn the bolt to the left - bringing the generator closer;
- Having hooked the key onto the mounting bolt, turn the crankshaft two turns and check the tension again;
- If everything is fine, tighten the fastening nuts.
Replacing the alternator belt, replacing and lubricating the alternator belt tensioner roller VAZ 2110, 2111, 2112
Replacing the alternator belt without power steering VAZ 2112
I began to notice that often, when the engine was started for the first time, the alternator belt began to whistle. I started watching the battery light on the dash, but it didn’t come on. I consoled myself that the humidity might have weakened the strap a little... A week passed when suddenly the power steering seemed to turn off for a couple of seconds. At first I thought the car had stalled, but no. I stopped, opened the hood and went straight to the alternator belt... And there were threads sticking out of it and one side was completely worn out. Apparently, the idiots from the service department who changed the timing belt “for free” replaced the alternator belt; one track did not fit into place. And they probably thought that he would drop by later. And this very path was eaten by the rollers.
I went to the car market, bought a new strap for 600 rubles (I didn’t know the prices and don’t know now, but I didn’t want to waste time looking for a cheap one or alternatives, and I wasn’t in the mood). I approached the seller: “alternator belt for two cars, 1.6 liter engine, 16 valves with power steering.” – 620 rubles. - Let's.
I looked online for instructions on how to replace the belt on 12s with power steering. I heard that there are some nuances, that it is necessary to remove the engine from the mount. I ran through the forums, printed out the main points and headed to the garage. Now after last night I say: “This is 3.14... if you don’t know, then don’t write your advice on the forum. If you have an 8th grade, then you don’t have to say that on a 16-valve with power steering everything is the same as on an 8th, you just need to remove it from the pillow.” Yes, everything is written clearly: here are the instructions that I found and to which it was signed “you just need to remove the engine from the mount.”
Bullshit, comrades!
We removed the adsorber and the reservoir with power steering fluid from their mounts so as not to interfere.
We unscrewed the lock nut with a 13mm wrench.
(photo from the Internet, a lock nut with a shackle where the hose from the reservoir with power steering fluid is attached to a clamp)
They started looking for the tension bolt, but there wasn’t one! Maybe someone has a VAZ-21124, but we searched all around without success. Moreover, on one of the forums, one of those discussing it also unsuccessfully tried to find this bolt, and another participant, foaming at the mouth, proved that the bolt was 100% there.
I will not dwell on the discussion of the forums and will continue to explain how we changed the strap.
So, 1) Using a 13mm wrench, loosen the nut securing the generator to the mounting plate. Now the generator can be pushed towards the engine, loosening the belt tension.
2) Then, having examined the rollers, one turned out to be very similar to the tension one, they tried to loosen it and that’s it! Loosen the TENSION ROLLER.
Now the strap has loosened even more and should come off the rollers with ease.
3) Now you need to remove the engine from the support. To do this, you need to unscrew 2 bolts.
4) Now we raise the engine. We lifted it with a regular hydraulic jack, sliding it under the crankcase. The engine mount will rise and the belt can be pulled out.
5) Now we insert a new strap under the engine support. And we begin the reassembly.
6) We clamped the tension roller in its extreme position (corresponding to the minimum belt tension).
7) The generator was also moved to the most extreme position (as close as possible to the engine).
Now the hard part is getting the new belt onto the rollers... The main thing is to wrap it tightly around all the rollers before pulling it onto the last one (we pulled it onto the tension roller). We lubricated it a little with WD40 to make it climb more confidently. Using 4 hands, using a hammer, a pry bar and a board, they threw the strap onto the tension roller. We suffered for 20-30 minutes.
It turns out that there is a special key that is used to adjust timing belts and generators. This is probably him:
I think it will greatly facilitate the process, but we didn’t have it and I learned about its existence later.
9) When the strap is on rollers, you can start tightening.
We did this: using the handle of a hammer, I pulled the tension roller with force and fixed it in this position. Then they tightened the bolt with the locknut, which was loosened and the generator was in its extreme position (closer to the engine).
In theory, it probably should have been done differently... Pull the generator as far as possible from the engine (tensioning the belt a little) and fix it first, and then work with the tension roller.
When starting the engine and releasing the gas (gas - throwing gas), the strap should oscillate and flop around a little. If at the same time it still does not whistle, then the tension can be left as is.
10) Next, we collect the remains: we put in place the adsorber, the reservoir with power steering fluid, screw the clamp to the bolt with a lock nut, and do not forget to put the chip on the adsorber in place.
So, conclusions and features of replacing the alternator belt on a VAZ with power steering
: 1) It is necessary to lift the engine from the support and remove/install the strap under the pillow. 2) The belt tension was adjusted (in my case) using a tension roller. NO tension bolt! 3) The main thing is not to overdo it with belt tension. 4) I saw disputes about the size (length) of the belt. I installed this one on my VAZ 21124 with power steering:
Replacing the alternator belt without power steering VAZ 2112
I was driving a couple of days ago for no apparent reason, a whistle coming from under the hood, I stopped, I opened the hood, everything was fine, I know that there cannot be a global breakdown, the car is technically sound and the timing belt was changed two weeks before this incident. I decided to turn off the engine after a couple of minutes, I started the car normally, it was running quietly as before, I wondered what it could be, when I arrived home, I looked at everything carefully, it turned out that the Alternator belt was slipping, the next day I went to the auto store and bought a new Belt for 250 rubles. Arriving home, the first thing I did was prepare the necessary tools: a wrench for “13”, a wrench for “10” and the belt itself. Everything is very simple: 1. Using a “13” wrench, loosen the generator mounting nut. 2. We turn the adjusting bolt with a wrench to “10”; it loosens the tension of the generator drive belt. Now we try if the generator moves towards the cylinder block (move towards the engine), then remove the old belt and tighten the new one, and rotate the adjusting bolt in the reverse order. 3. And if the tension of the generator drive belt has not weakened, as in my case, then there is another bolt under the generator that prevents the generator from moving. We unscrew it with a key to “10” and move the generator towards the engine. The belt is now well loosened and can easily come off the rollers. One of the most difficult parts is tensioning the belt while getting into the rollers, so that after a couple of weeks it doesn’t start to creep. Once you are on the rollers, you can begin to tighten the belt and pull the generator as far away from the engine as possible. 1. Tighten the adjusting bolt with a wrench to “10”; it will secure the tension of the generator drive belt. 2. Use a key set to “13” to secure the generator mounting nut. Now we start the engine and start degassing; this requires gas, for example, 3000-4000 thousand revolutions, releasing the gas to 500-1500 thousand revolutions, and so on for a couple of minutes. Then we turned off the engine, got out and looked at how our new belt is in the rollers and whether it is sitting too loosely (there should be no whistling) if it whistles, it means the generator is loosely tensioned. 3. Don’t forget to tighten the last bolt, which is located under the generator.
That's all, the alternator belt has been replaced with a “Dvenashka 1.5 16-valve without Gear”! It will take you about 30-40 minutes.
3. Replacing the generator belt tensioner roller and lubricating the tensioner roller on the VAZ 2110
Recently the generator belt tension roller began to rustle, and without thinking twice I went to the store to buy a new one.
Having removed the old video and twirled it in my hands, I was unpleasantly surprised. As it turned out, it spun much better than the new one, but it did it quite loudly.
After installing the new video, I decided not to throw away the old one, but to try to revive it.
First you need to remove the plugs; this can easily be done with a knife.
Then the roller was thoroughly washed to remove dirt and old grease. For washing, gasoline or “646” solvent will do.
Shit instead of lube
Clean bearing
After washing, the roller was filled with new grease. It is better to use a specialized lubricant, but I used Litol.
Theoretically, Litol is quite suitable; it is designed to work in bearings and has an operating temperature from -40 to 120 degrees. The main thing is not to use “Solidol”, its operating temperature is up to 90 degrees, and it will simply melt and leak out. The restored bearing rotates smoothly and quietly, it will be in reserve.
https://www.drive2.ru/l/4750927/
https://www.drive2.ru/l/288230376151764640/, https://www.drive2.ru/l/1441926/
next article:
Replacing the cylinder head gasket for VAZ 2110, 2111, 2112
Contents of the article: Milling and homemade desiccant from improvised means Homemade tripod for
Rating 0.00 [0 Vote(s)]
Replacement
To change the belt, it is better to remove the front right wheel, hang the front part, remove the crankcase protection (standard or installed independently), then:
- Loosen the nuts securing the generator;
- Unscrew the adjusting bolt as much as possible;
- We move the generator as close to the cylinder block as possible;
- We remove the old belt and put on a new one.
Next, we adjust the tension and tighten everything. At this point the repair can be considered complete.
Source
VAZ 2110 generator belt - design and adjustment
Every driver knows that in order to move a car, in addition to fuel, electrical energy is also needed. The device that provides electricity in vehicles with internal combustion engines is called a generator. The generator works because it is rotated by a belt that comes from the crankshaft. If the VAZ 2110 generator belt breaks, the generator stops working and the battery supplies electricity. But, unfortunately, the generator’s energy will not last long.
The generator shaft pulley is connected to a pulley at the end of the engine crankshaft by a belt, which drives the generator. In order for the belt drive to be constant and efficient, the generator belt is tensioned to a certain extent. The required degree of tension of the alternator belt is provided by vehicle manufacturers.
The manufacturers of the VAZ 2110 car made one of the most reliable designs without additional rollers. The tension of the generator belt on this car model is carried out by moving the generator away from the engine using a tension bolt and a special bracket. The procedure for tensioning the belt on a VAZ 2110 car in itself does not pose any problems even for novice drivers. It is very important to have the skill of correctly tensioning the belt, because if a whistle occurs, it can only be eliminated in this way. A whistle may appear when you are at a great distance from the service center.
Adjusting the VAZ 2110 alternator belt
To adjust the alternator belt on a VAZ 2110, perform the following steps:
- disconnect the battery ground or completely remove the terminals;
- loosen the nuts of the lower and upper mounting of the generator using wrenches;
- turn the tension bolt clockwise until we obtain the required tension (when pressing the belt between the pulleys, its deflection should be no more than 10-15 millimeters);
- tighten the generator mounting nuts.
There is a possibility that the adjustment will have to be done again. To do this, you need to rotate the engine crankshaft 2-3 turns and check the belt tension. If it has not changed, then everything is fine, but if it has changed, then the adjustment will have to be repeated again.
Replacing the alternator belt
During its operation, the generator belt receives significant mechanical loads. There is nothing strange in the fact that on a VAZ 2110 car, after some time, the belt becomes unusable or breaks.
In most cases, the belt breaks due to the fact that its service life is exceeded. The belt on a VAZ 2110 car should be changed every 50-60 thousand kilometers.
Even if the time has come to replace the belt, but it is visually in good condition, it should be replaced. The cost of an alternator belt may seem high, but if it breaks at the worst possible moment, the damage could be more significant.
Replacing the alternator belt on a VAZ 2110 is not difficult even for novice drivers. To change the belt, you need to have several wrenches and a new belt.
To replace the alternator belt, you need to do the following:
- be sure to disconnect the battery ground or remove the terminals;
- loosen the generator mounting nuts;
- press the generator to the engine block; to do this, you need to turn the tension bolt;
- remove the old alternator belt and install a new one;
- Tension the alternator belt and tighten the fastening nuts.
It should be taken into account that the supplied alternator belt will stretch slightly during operation. So you need to drive a VAZ 2110 and check the belt tension after a while.
How to replace the Grant alternator belt
The replacement process is not simple and depends on the equipment of the car: whether there is a tensioner, air conditioning. In the latter case, you cannot do without a lift and dismantling the engine mount due to the air conditioning compressor clutch pulley.
For a Granta with air conditioning, for installation you will need to hang the wheel and remove one engine mount.
How to change a belt on a Grant 8 and 16 valve without air conditioning and tensioner
What you will need for work:
- a knife, if you just need to cut off an old part;
- crank or ratchet with head 13;
- long strong wire;
- flat screwdriver;
- partner – you can replace it yourself, but it’s easier with an assistant.
Step 1. Dismantling
The car is on a flat surface, neutral is engaged without the handbrake. Battery is disconnected.
If the old belt is not needed, we cut it in an accessible place and take it out.
If you need to save the old one, do everything up to step 3.
Step 2. Remove the generator mount
We approach the generator mount with head 13:
- we remove the lower bolt by 2-3 turns;
- Use it to completely unscrew the top bolt.
In this situation, we proceed to installation. PHOTO: www.zr.ru
Step 3. Raise the part
Scroll the generator up. The top mount becomes higher than the bracket to which it is screwed.
We press the part to the engine. We fix it with strong wire. For example, we hang it from the cylinder head bolt.
Step 4. Install a new one
We pull the new one onto the pulleys.
The installation takes place in the position of the generator when it is pressed against the engine. PHOTO: www.zr.ru
We engage fifth gear, push the car back, pressing the belt against pulley 1 in the picture. This is where a helper will come in handy.
As soon as we put it on, we work in reverse order:
- unplug the generator;
- press it into working position;
- return the upper mounting bolt and tighten the lower one.
Replacing the alternator belt on a Grant with air conditioning
It's more difficult here. Step by step:
- we drive the car onto a lift or overpass;
- remove the tensioner;
- take off the front right wheel;
- we support the internal combustion engine and dismantle the pillow;
- change the required part.
What you need
- new belt marked 6РК 995;
- spanners 8, 19;
- socket wrenches 8, 10;
- Torx keys T20, T27;
- ratchet with extension and heads E14, 17.
Step 1. Tensioner
The car is on a lift or overpass.
Open the hood. Remove the terminals from the battery.
We find the tensioner, take out the spanners 19 and 8:
- 19 we put on the lead screw;
- 8 hold the locknut;
- we touch;
- Turn the lead screw clockwise to loosen the tension.
We remove the lock nut and loosen the tension. PHOTO taken from: www.zr.ru
We need keys 8, 10. Remove:
- central shield (numbers 1, 5, 7);
- right shield (number 2).
Remove the front right wheel. Using keys 8, Torx t20, t27, we dismantle the fender liner according to the diagram.
Step 4: Engine Mount
Getting ready to remove the engine mount.
Using a wrench or ratchet with an E14 head, unscrew the screws securing the support to the engine.
Use head 17 to unscrew the screws securing the support to the body.
We remove the support. Make sure the weight of the engine is securely resting on the crankcase support. PHOTO: www.zr.ru
Step 5. Dismantling and installation
We remove the belt from the pulleys and rollers and pull it out.
We install the new one in the reverse order.
The final tension can be adjusted by adjusting the tensioner.
How to tension the alternator belt
There are times when when the car gets into a puddle, or simply when there is high humidity, the alternator belt begins to whistle. Often the reason lies precisely in insufficient tension. Of course, to fix this problem, you just need to tighten the belt to the desired level.
The tool you will need to solve this problem:
- Head for 10 and 13 mm
- Ratchet handle
So, depending on the VAZ 2110-2112 model and the installed engines, the design of the alternator belt tensioner may differ slightly. But in essence, there is not much difference and everything is done by analogy.
- So, open the hood of the car and look towards where the generator is located.
- Loosen the top nut securing the generator and use the adjusting bolt to tighten it
Pay attention to the fact that if it is necessary to tighten the belt, the bolt must be tightened on the rod clockwise. If, on the contrary, you decide to loosen the tension, then unscrew the adjusting bolt counterclockwise.
Alternator belt replacement process
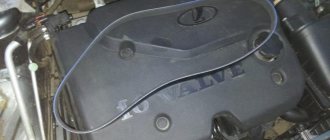
Alternator belt location
Before starting the replacement process, it must be said that the belt drives the generator, which in turn maintains a stable on-board network and also charges the battery.
So, let's get straight to the process itself:
- We dismantle the “minus terminal” from the battery.
Remove the negative terminal from the battery
Removing the power steering reservoir
After unscrewing the fixing bolt, let the generator run
Remove the lower engine mount to pull out the belt.
Pull the alternator belt through the slot
Product selection
Also, it is necessary to immediately determine the quality of the product, since the work and service life will depend on this.
Original catalog number for a 16-valve engine
Original alternator belt produced by AvtoVAZ
2110-1041020 – original catalog number of the alternator belt for the 2110-2112 family of cars with a 16-valve engine. This part is produced at the AvtoVAZ plant. The average cost is 700 rubles.
Video instructions for tensioning or loosening the alternator belt on a VAZ 2110-2112
To show everything clearly and clarify the picture, I decided to record a short video that contains instructions in an accessible form:
First, make a few turns and try to tighten the belt, perhaps this will be enough to prevent it from squealing. And it's quite easy to check. Start the car with the lights and other electrical devices turned on as much as possible (high beams, heated rear window, heater, etc.) If at this time the whistle is not heard, then the belt is properly tensioned.
But you shouldn’t forget about the constriction, and this shouldn’t be allowed. If you hear that a strange hum suddenly begins to appear from the side of the generator, most likely due to a tightened belt, the bearing is humming, then you urgently need to loosen the tension a little until the sound goes away.