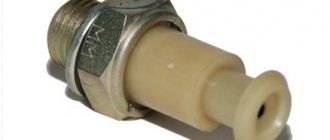
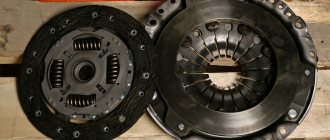
Clutch pedal position sensor 1118-3720015 (E-GAS) Lada Kalina, Granta, Priora
The clutch pedal position sensor is installed on VAZ cars with an electronic gas pedal; it is installed on the clutch pedal bracket; in order to see it, you just need to look under the steering column. The VAZ clutch pedal position sensor facilitates the process of starting movement, helps to eliminate speed dips and jerking of the car when switching a manual gearbox. The clutch pedal position sensor helps reduce fuel consumption. Its normal position is open, that is, it turns on only when the clutch pedal is pressed.
Manufacturer: Avers LLC, Togliatti
Contents: Switch 1118-3720015 — 1 pc. Protective casing 1118-3720024-10 — 1 pc. Fastening screw 1-0076690-01 — 2 pcs. Spring 1118-1602179-00 1 pc.
Applicability: Lada Priora 2170, 2171, 2172 Lada Kalina 1117, 1118, 1119 Lada Granta 2190, 2191
When ordering, in the “Order Comments” line, indicate the model and year of manufacture of your car.
The clutch pedal sensor is installed on vehicles with an e-gas system, providing a signal to the electronic control unit to inform about the open position of the propeller shaft and drive. It provides a normally open limit switch, allowing pedal input control and providing the following benefits:
- increased flexibility in controlling engine operating modes (no jerks or drops in speed);
- simplifying the start of movement;
- reducing fuel consumption by turning off its supply at the moment of pressing;
- possibility of adjusting ignition timing.
Symptoms of device malfunction
The following symptoms indicate problems with the clutch pedal position sensor:
- a sharp change in engine speed (drop or increase) when pressing the clutch pedal;
- “pecking” of the car while changing gears.
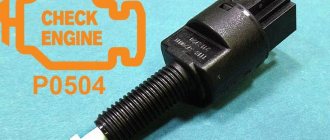
Malfunction of the clutch pedal sensor 1118-3720015 (e-gas) Lada Kalina, Granta, Priora is automatically detected by the electronic control unit. The CheckEngine indicator lights up immediately, indicating an error. Please note that a problem with the clutch pedal sensor may be associated not only with its failure, but also with the following problems:
- open circuit or short circuit;
- Incorrect clutch pedal height.
If an error appears indicating problems with the clutch pedal sensor, or the symptoms listed above occur, then you first need to eliminate the last two points. This will allow you to get by with a little blood if necessary. At the same time, if the problem still lies in the clutch pedal sensor, then you need to purchase a new device. It is inexpensive and will not break a serious hole in the budget even with unscheduled repairs.
The popular Priora was designed in the spirit of the times, so the computer even controls such a unit as the clutch. The electronics do not control the process of turning the clutch on and off, but the clutch sensor on the Priora, installed under the clutch pedal, collects information about the position of the pedal. This data enters the electronic engine control unit and is used to optimize engine operation depending on the driving mode, and also makes it possible to use cruise control on the car.
How does the electronic engine management system work?
The electronic engine control unit controls most of the vehicle's components, excluding the steering and suspension. ECU programs include presets (tables), according to which optimal operating modes are calculated. Many sensors installed on the car read information about speed, movement, engine speed, activated mechanisms and units. Based on the tables, the ECU changes the ignition mode, turns on additional functions and regulates the composition and amount of the air-fuel mixture entering the cylinders.
Functions of the Priora clutch sensor
Data about the current mode of the clutch mechanism is important for engine control. If the clutch is open, it is necessary to reduce the fuel supply and reduce engine speed. It is optimal to do this in accordance with the current speed of the vehicle, without switching to idle mode. A driver, especially an inexperienced one, may make mistakes, which leads to increased load on the engine and clutch. The on-board computer, based on the readings of the clutch sensor, adjusts the engine operating mode, setting the optimal speed. Also, the clutch sensor on the Priora, in combination with the speed sensor, allows the computer to evaluate the performance of the unit and signal problems.
Installing a clutch sensor on a Priora allowed:
- reduce fuel consumption;
- make driving easier and more enjoyable;
- control the serviceability of the coupling;
- extend clutch life.
Therefore, the serviceability of the sensor affects the service life of the units, fuel consumption and is extremely important for the correct operation of the ECU.
Operating principle of the Priora clutch sensor
What is a Priora clutch sensor? The operating principle of the device is no different from a simple limit switch. When the pedal is not pressed and the clutch is engaged, the sensor contacts are open. When you press the clutch drive, the limit switch closes, sending a signal to the computer to separate the clutch disc and basket.
The clutch sensor is installed on the pedal mounting assembly so that the tip of the pedal touches the limit switch.
The sensor design is simple and reliable, but this does not exclude the possibility of breakdowns and malfunctions in its operation.
Clutch position sensor in Priora, Kalina
Home › Service
12.02.2020
Well, the widespread computerization of cars has reached such a unit as the clutch. No, the electronic unit does not yet control the process itself, but it already controls this process. To do this, a sensor is installed under the clutch pedal to monitor the progress of the clutch.
Operating principle of the electronic engine control system (ECM)
In a modern car, all process control, except for the rotation of the steering wheel, and even then, is entrusted to the computer, or Electronic Control Unit (ECU). It contains a program with many different tables.
In general, the ECU receives data about the state of the car, speed, revolutions, and activated mechanisms from a large number of sensors.
Based on the results of these observations, the ECU, using these tables, includes certain ignition modes, fuel supply and other executive functions.
The role of the clutch sensor
It would seem, what does the clutch have to do with it? And here's what it has to do with it. When the clutch engages, the most sensible thing to do is to reduce the engine speed. But not to idle, but according to the speed of the car. This is not always available to the driver, especially a beginner. And here the computer will come to the rescue. Reacting to the signal from the clutch sensor, it can independently adjust the engine speed.
Summarizing the above, we can say that the presence of a sensor on the clutch allows:
- saves fuel;
- make driving easier;
- monitor the serviceability of the coupling;
- increase its service life.
Therefore, its serviceability is an important factor in the Priora control system.
Design and location of the Priora clutch sensor
In principle, this is the simplest switch. In the position when the clutch is disengaged and the pedal is not pressed, the sensor circuit is open. If you press the clutch drive, the limit switch of the sensor closes and the signal “clutch is on” is sent to the ECU.
It is located on the clutch pedal mounting assembly, where the very tip of this pedal is located opposite the sensor end switch.
Symptoms of this part being faulty
Since this element is connected to the ECU, it reacts to its failure first of all. That is, it gives peculiar signals that are reflected on the instrument panel and are noticeable in the behavior of the Priora when driving.
- turning on the “Check Anger” light;
- twitching when starting to move;
- a sharp drop or, conversely, an increase in speed when the clutch is engaged.
There can be three malfunctions in total: a breakdown of the sensor itself, a break or short circuit in its circuit, and incorrect adjustment of the position of the limit switch on the pedal.
In general, the “Check” warning lamp lights up in cases where the ECU has not received a signal within 2 seconds when starting from a stop or during four shifts on the move without a signal. Accordingly, the signs mentioned above appear.
Debugg
Alas, as practice shows, at the moment this sensor is not always on sale. But you need to remember that the most common malfunction is the separation of the wire from the limit switch contacts. And they are easy to solder. In general, first you need to visually make sure that the pedal pusher presses properly on the limit switch. Visually check the condition of the wires. And only after that remove it. This is a simple procedure. The clutch sensor is attached with only two self-tapping bolts, and it is not difficult to remove it with a short, shaped screwdriver. Well, then, on the spot, decide whether to start going to retail outlets in search of a new unit, or try to restore the old part. Well, put it in its place. After finishing work on the Priora, do not forget to reset the ECU error memory.
Signs of a malfunction of the Priora clutch sensor
This sensor is connected to the car’s ECU; accordingly, the first sign of a breakdown is the reaction of the control unit in the form of the appearance of a corresponding signal on the dashboard. The nature of movement and operation of the car engine also changes. Symptoms of malfunction are as follows:
- The “Check Engine” light is on;
- when starting to move the car jerks;
- When you press the clutch pedal, the engine speed rises or falls sharply.
The warning lamp on the instrument panel lights up if the computer does not receive a signal from the clutch sensor within 2 seconds from the moment the vehicle starts moving or within 4 seconds when changing speed while the vehicle is moving.
The sensor has a very simple design, so there are few reasons for failure:
- faulty sensor contacts;
- break or short circuit of the wires going to the sensor;
- Incorrect installation of the sensor near the pedal.
Important: the clutch sensor is installed only on Priora models equipped with an electronic throttle. If the car is equipped with a regular throttle cable, there is no clutch sensor. Also, when replacing a sensor, you should focus on its model. Sensors from all-wheel drive VAZ and Priora sensors are not interchangeable.
What is it needed for
The clutch pedal sensor is used on Priora cars with an electronic gas pedal. The sensor serves to determine the appearance of load on the engine, thus this sensor helps when the car starts to move from a standstill, increasing engine speed at the moment the clutch is released.
Driving without this sensor or with its malfunction is possible, but this significantly affects the operation of the entire internal combustion engine as a whole, since the engine control unit will not be able to determine the load torque on the internal combustion engine.
Location
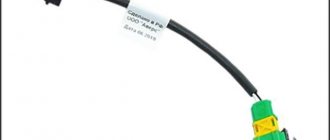
The clutch sensor on a Priora car is located on the pedal assembly, you can see it by looking under the panel on the driver's side; wires go to the sensor from the green connector on the pedal assembly.
Access to replace or repair the sensor is only possible after removing the frill, since it is impossible to remove the sensor without removing the wipers and frill.
Price
Clutch sensor kit
The price of the sensor does not exceed 600 rubles, but most often the problem lies in finding the part, since many do not know about the existence of this part in the car.
Symptoms of a problem
When the clutch sensor on a Priora fails, the following malfunctions are observed:
- The car drives jerkily at constant speeds;
- A spontaneous increase in speed to the cutoff is possible when the clutch is depressed;
If such signs appear on your car, you need to inspect the clutch pedal sensor.
Possible breakdowns
Since the sensor is a kind of limit switch that works on/off, there are two options: the pedal is depressed and the pedal is released. There is a special spring plastic inside the sensor, which can burst over time and then the return mechanism of the sensor will not work, which will lead to a constant closure of the contact and the ECU will receive a signal that the clutch pedal is constantly depressed.
Also, the sensor control circuit is connected to it using soldering; quite often the wires break off together with the soldering, breaking the circuit. Upon inspection, this problem is quite easy to identify.
Replacement
Replacement is quite simple, but you can’t do it without a special tool, namely a small Phillips screwdriver or ratchet attachment.
Replacement process:
- We remove the wipers;
- We remove the frill by unscrewing all the screws;
- We remove the expansion tank to the side without unscrewing the hoses;
- Bend the rubber cover of the clutch pedal;
- Unscrew the clutch pedal sensor (attached with two screws for a Phillips screwdriver);
- Remove the return spring;
- Disconnect the sensor connector and remove it;
- We assemble in the reverse order;
Repair of the Priora clutch sensor
Often, sensor malfunctions can be easily resolved without replacing it.
First you need to check whether the sensor end reaches the clutch pedal pusher. If the pusher does not press on the limit switch, it is necessary to adjust the position of the sensor relative to the pedal.
Another common failure is a break in the wires going to the sensor contacts. This malfunction can be easily detected by checking that the wires are securely fixed with your fingers. To fix this problem, you need a soldering iron, solder and rosin. When the sensor is removed from the car, soldering wires to its contacts is not difficult.
If the sensor wires are not broken and the limit switch reaches the pusher, the problem may be a faulty sensor contact or a broken limit switch. They may oxidize, become deformed or break. The functionality of the contacts can be checked using a multimeter. To do this, you need to connect the device to the sensor terminals and check the change in resistance between them when you press the limit switch.
Oxidized contacts can be cleaned, restoring the functionality of the sensor. If this does not work, it should be replaced. The price of this part is low, and you can buy it at most auto stores.
Depending on the position of the clutch pedal and the brake signal switch, the controller is able to distinguish the position of the pedals. In this article, special attention will be paid to the Kalina brake pedal sensor, as well as the clutch sensor.
Where is the clutch sensor located on the Priora? Clutch sensor replacement
Hi all. I warn you right away, “too many letters.” I am writing so that it would be clear to everyone, that’s why it’s so long and so detailed. Actually, the desire to blog about various cases at a service station (of which I am an employee) arose spontaneously. Today I’ll tell you about replacing the sensor on the clutch pedal. Its number is 3720015, if anyone is interested.
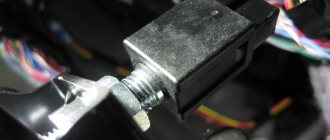
sensor assembly
So, I stopped by the Priora service today, I have the only free lift, the boss comes up to me and explains my task. As he said, this is rare, so this is the first time we have encountered this, and he instructed me to deal with this sensor.
Remembering the design of the clutch pedal from the inside, a smile appeared on my face and the anticipation of a quick cup of coffee and a cigarette, but that was not the case.
Having seen that the sensor is screwed on with two small screws, I armed myself with a Phillips screwdriver and reached into the space under the steering wheel, taking a pose number I don’t know what, a view of the whole ins and outs opened up in front of me, so to speak, I disconnected the chip to the sensor, picked out the clip that fastens the wire and began to look for those treasured two cog. to my disappointment I did not find them.
Well, I thought, hello internet, and started looking through the relevant literature. To my disappointment, there wasn’t much literature, I found a recording on the drive and realized that no matter how much I wanted to, I would have to disassemble the floor of the car to change this damn sensor.
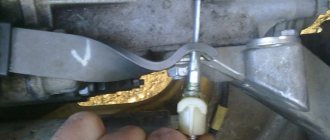
There they told me that it is necessary to remove the expansion tank, remove the wipers and the plastic underneath, we will see a humpbacked rubber covering the top of the clutch pedal, it can be removed easily and simply, you just need to pull it up from the passenger side, and on the driver’s side there is a metal plate that presses it It should be unscrewed, it is quite inconvenient to unscrew it, so I just bent it with a screwdriver and removed the casing. This is the sensor.
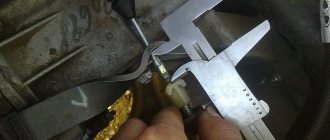
These are the two sensor mounting screws
then the most interesting thing begins, because of my natural laziness, I attempted to unscrew it as is, fortunately I had plenty of tools, I thought, after spending almost two hours, my attempts were in vain. it was decided to disassemble the car further.
The next number was the vacuum brake booster. I didn’t want to unscrew all the GTZ pipes, so with a 13-inch head we unscrew the two bolts securing the GTZ to the vacuum reservoir, remove the pipe from the vacuum reservoir, move the GTZ as far as the pipes allow (I completely disconnected the expansion tank, tied up the pipes and took it out so that it didn't bother me). We return to the space under the steering wheel, find there 4 nuts for 13 fastenings of the vacuum cleaner, unscrew them and remove the vacuum cleaner from under the hood by carefully moving the wiring harness lying on it, without bending the trapezoid of the wipers, and without losing the rod from the inside of the vacuum cleaner. Well, then the actual work begins, easy and simple, since we now have plenty of space,
there's so much space
Using a regular screwdriver, we unscrew those two unfortunate screws, push the sensor into the cabin, unhooking the spring from the paw that is located on the clutch pedal. I’ll immediately draw ATTENTION to the fact that remember how the sensor was installed before, so that you don’t have to rack your brain over how to install a new one. For those who missed this moment, I’ll explain.
We put the bracket with two holes in the place where the sensor is attached and the other two holes should be directed downwards, then we put the sensor itself on two keys and make sure that the microscopic button (which actually acts as a limit switch) is looking up, then we need to put it in this way so that the movable paw on top of the clutch pedal is above this button, screw the sensor back, attach the spring to the movable paw and the other end to the hole that looks into the ground (it’s most convenient to do this with pliers or tweezers since the spring is weak) that’s actually The replacement of the sensor is completed, then everything is done in the reverse order, we press that metal plate on the rubber casing back with our fingers when the casing is put on, it gives in easily. We also pay attention to the installation of the rod in the vacuum chamber, first we insert it into the GTZ and only then we put the GTZ on the vacuum chamber. Having put everything back together, be sure to pump up the brakes until the pedal becomes tight, check whether the wipers are set correctly, with the engine running, check for leaks of antifreeze (antifreeze) on the clamps, and check whether you forgot to connect the brake pedal position sensor. Bottom line. In order to do all this I needed. Flashlight, Phillips screwdriver (3 pieces), small clock screwdriver bent at an angle of 90 degrees, two Phillips bits, small wrench, small ratchet, cardan, three extension cords of different lengths, knife, 13mm wrench, large extension cord, large ratchet, 13mm socket , a head for 8, 4 cups of coffee, several kilograms of nerve endings, a pack of cigarettes, 6 hours of free time, a large vocabulary and 4 hands (thanks to the client who also expressed a desire to help), and the sensor itself. In fact, we will need a large ratchet, a large extension, a 13 socket, a 13 wrench (we only need it to unscrew the nut securing the vacuum amplifier which is located behind the EPG, a 8 socket (unscrew the clamps on the expander), and a Phillips screwdriver to unscrew the sensor itself. I also recommend that before screwing in a new sensor, first screw the screws into place when the sensor is on the table and then unscrew them (this will make it easier to screw them in place). After replacing the sensor, the Jackie Chan will burn until until we, with the help of BC or a diagnostician, reset the error in our brains. I wrote this in order to alleviate the suffering of those who decide to change this sensor themselves, since the service center will ask you for at least 1,500 thousand rubles to replace this sensor + the cost of the sensor is 390 rubles, personally, I think that shelling out 2000 for a sensor is somehow not serious. Thank you for your attention. Learn from the mistakes of others.
Depending on the position of the clutch pedal and the brake signal switch, the controller is able to distinguish the position of the pedals. In this article, special attention will be paid to the Kalina brake pedal sensor, as well as the clutch sensor.
Replacing the “Prior” clutch sensor
To dismantle the Priora clutch sensor, you just need to unscrew the two screws holding it to the clutch pedal. But to get to them, you need to do a lot of operations. Removing the Priora clutch sensor is done as follows:
After removing the sensor, you can replace it with a new one or repair it.
The sensor is installed like this:
Mass air flow sensor for Lada Granta
This element is located near the air filter; its main task is to estimate the amount of air entering the engine. Based on the information received from the mass air flow sensor, the ECU determines the fuel volume that is necessary to maintain the stoichiometric ratio between fuel and air for the engine to operate within the specified parameters.
New Lada: Description of the design of the Lada Granta engine management system
The mass air flow sensor on the Lada Granta is located next to the air filter, right between it and the air falling sleeve. It should also be noted that this sensor is no longer installed on modern VAZ engines. The catalog number of the described element on Grants is 11180-1130010-00.
If the mass air flow sensor breaks down, the system stores the error code in its memory, after which the “Check Engine” lights up. Then the controller replaces the readings of the broken device with fixed temperature values. Signs of failure of this element are different, the most common include:
- increased fuel consumption;
- problems when starting the engine;
- disappearance of cravings;
- instability of speed.
Malfunctions: symptoms, diagnostics, elimination
| Malfunctions | Diagnostics | Elimination |
| When changing gears the car “stops” | Disconnecting the block with wires, checking for changes after disconnecting the DS | Replacing the DS with a new one, since the structure cannot be repaired |
| Uncharacteristic increase/decrease in engine speed when the clutch is disengaged | Connecting a new, working DS | Replacing the DS with a new one |
| P0830 "Check Engine" - clutch sensor error on the dashboard | Connecting a new, working DS | Replacing the DS with a new one |
Oil pressure sensor for Lada Granta
The oil pressure sensor should indicate the level of oil pressure in the engine. In the event of a drop in oil pressure, the sensor reports the incident to the BC, after which this data will be reflected on the BC or on the dashboard screen.
The principle of operation of this part is simple - the measuring membrane located inside it bends depending on the oil pressure, thereby closing or opening the contacts.
A drop in the oil level in the engine causes the contacts to open, after which the warning lamp lights up.
The DDM includes three components: a housing, a measuring membrane and a transmitting element. The sensor is located behind the cylinder head, next to the timing belt guard.
If you suspect a malfunction of the oil pressure sensor on the Grant, you need to check the circuit going from it to the warning lamp. The test involves disconnecting the sensor terminal, which must then be placed against the engine. If everything is normal with the circuit, the lamp will stop lighting; if this does not happen, it means there has been a break or the circuit has been damaged.
Description of the brake pedal sensor
Below we will find out how it works and how to replace it.
Purpose, location and operating principle
The essence of the system is that when you press on the brake, the piston in the cylinder begins to move. After this manipulation, fluid enters the brake system from the intake valve. It passes through the pipelines towards the main wheel mechanism, thus creating a suitable situation for the pads to move towards the wheel discs and drums. As a result, contact and subsequent braking occur. The controller itself turns on the brake lights.
Brake end piece
Typical malfunctions and methods for their elimination
When “communicating” with a car, you can encounter various problems, but there is the most common and annoying problem. This problem is called error P0504, or otherwise “Brake pedal sensor mismatch.”
Instructions for replacing the brake controller
- Pump out the liquid.
- Place the vehicle on a support stand and remove the wheel.
- Use a wrench to unscrew the two wheel pins.
- Remove the brake drum.
- Then, using a screwdriver, pull out the hook of the upper tension spring and remove the part. Perform the same manipulation with the lower tension spring.
- Then remove the front pad and spacer bar, while disconnecting the pressure spring and lower the pad.
- Remove the shoe lever from the parking brake hole, straighten the cotter pin and remove it from the parking brake drive.
- Remove the washer and lever.
- Install a new block and assemble the part in the reverse order.
Rear disc brakes on Lada Kalina
Description of the clutch pedal sensor
What kind of device is this and how to replace it is below.
Purpose, location and operating principle
The clutch sensor is installed directly on the clutch pedal. It influences engine control with an electronic gas pedal and provides a convenient and flexible control scheme for machine modes. On its own, it looks like a nondescript switch that has on and off modes.
Typical malfunctions and methods for their elimination
If the controller does not detect signals from the clutch, then there is a risk of error 0830. The occurrence of this problem is usually a malfunction of the clutch sensor or a short circuit or open circuit. To correct this state of affairs, it is necessary to identify the reasons. That is, inspect the contacts for breaks or corrosion.
Device for replacing Lada Kalina
Repair and service
Details Category: Repair Published 02/11/2015
On the latest models of VAZ cars equipped with an electronic gas pedal, a clutch pedal position sensor . Let's consider why it is needed, the principle of operation and possible malfunctions.
Where is the clutch sensor installed on VAZs?
The clutch pedal position sensor on VAZ is installed directly on the clutch pedal bracket; it can be seen by looking under the steering column.
What is a clutch sensor used for?
The clutch pedal position sensor is one of the elements of the engine management system with an electronic gas pedal. This sensor provides a more flexible control scheme for engine modes. It simplifies the process of starting to move, eliminates “drops” and jerks of the car when changing gears in the manual transmission, and also allows for a reduction in fuel consumption.
By providing information to the engine controller about the moment the clutch is engaged and disengaged, the clutch pedal position sensor allows it to reduce or increase engine speed at the right moment, as well as adjust the ignition timing.
Working principle of the clutch sensor
- The clutch pedal position sensor is an ordinary limit switch with two positions - “on” and “off”.
- Its normal position is open, that is, it turns on only when the clutch pedal is pressed.
Clutch position sensor malfunctions
The following symptoms may indicate a malfunction of the clutch pedal position sensor
- car "pecks" when changing gears
- a sharp increase or decrease in engine speed when the clutch is disengaged
Also, if a malfunction occurs in the clutch pedal position sensor , error 0830 “Clutch pedal sensor error” is recorded in the engine controller and the “Check Engine” light in the instrument cluster turns on.
Error 0830 is detected if the engine controller does not receive a signal from the clutch sensor:
- within 2 seconds after changing gear while driving
- after four gear changes at speeds above 10 km/h and engine speeds above 1000 rpm
The main reasons for error 0830:
- malfunction of the clutch sensor itself
- short circuit or open circuit
- Incorrect clutch pedal height
We encountered error 0830 while preparing the material “How to get there without a clutch?” We recorded video instructions on how to change gears without a clutch. After several gear changes without disengaging the clutch, the “Check Engine” light came on on the panel, which went out only after several dozen gear changes in normal mode.
Clutch sensor price
On many VAZ cars with an electronic gas pedal there is a connector for this sensor, but there is no sensor itself. It is not clear whether they forget to install it at the factory, or whether careless dealers remove it. The second option is also quite possible, since this sensor is still in great short supply. It costs an average of 350 rubles, but finding it on sale is almost impossible.
of clutch pedal position sensors for VAZ cars:
- 21214-3720020-02 for Lada 4×4 cars with electronic gas pedal
- 1118-3720015 for Kalina, Grant and Priora cars with an electronic gas pedal.
They are not interchangeable with each other. It would seem like a simple sensor, but how much it can complicate the life of an ordinary car owner.