Welcome to fast-walker.ru! In your spare time you sometimes have to do repairs to your car. It's time to change the timing chain and gears. What would seem special here?
For former owners of classics, this operation does not present any difficulties. But the Chevrolet Niva is not exactly a classic... After the repair, I encountered a problem that caused me a shock, to put it mildly. After 10-15 km, the Niva broke first the original factory crankshaft pulley, then a new one, bought in a store as a replacement...
Signs of malfunction and replacement of the crankshaft position sensor on a VAZ 2114
First, let's look at what a crankshaft position sensor is. The crankshaft position sensor of the VAZ 2114, like many other VAZ models, is an electromagnetic device that transmits information about the position of the crankshaft to the electronic “brains” of engine control. This sensor is very important; the correct operation of the fuel injectors and the ignition system depends on it. It doesn't break down often. But if you are going on a long trip, it is advisable to have a spare one.
Crankshaft position sensor VAZ 2114
Which timing belt to choose for Priora 16 valves
Which timing belt is better?
The range of different timing belts is quite wide. Depending on the brand, it differs in both price and quality. But the best belt is considered. More details
Timing kit (belt + rollers)
| Manufacturer | vendor code | price, rub. |
| CONTITECH | CT1137K1 | 2976 |
| INA | 530053610 | 3044 |
| GATES | K015631XS | 3478 |
| BOSCH | 1987948286 | 3567 |
Necessary tools when replacing the timing belt on Priora 1.6 16 cl
- Wheel key;
- Jack or lift;
- Drive wrench with extensions and sockets for 10 mm, 13 mm, 15 mm and 17 mm ;
- 5 mm hexagon ;
- Stationery proofreader;
- Curved retaining ring puller (for tensioning the timing roller).
Sensor types
Sensors differ in operating principle and design features.
- inductive type. Inside there is a metal rod with a magnet at the outer end. It is designed to magnetize the rod. A winding of copper wire is wound around this rod, the ends of which are brought out in the form of connectors for connecting wires. The operating principle of the inductive type crankshaft position sensor: when a steel object is located next to the rod, a signal appears at the terminals.
- The operating principle of the next type of crankshaft sensor is slightly different. It has a hall sensor inside. When a metal object is brought close to it, its state changes (from logical zero to one and vice versa).
- frequency Let's look at how this type of crankshaft sensor works. The engine control unit generates pulses of a certain frequency. They are fed to the sensor and when a metal object is brought to the sensor, the generation frequency changes. By changing the frequency, the controller determines the presence of an object near the sensor. The sensor reacts to the metal of the crankshaft ring teeth (on some cars it is located on the flywheel).
WE OPEN ACCESS TO THE TIMING BELT
- To get to the gas distribution mechanism drive, we need to unscrew the five bolts of the upper timing cover using a hexagon.
The location of these bolts is shown in the photo below:
FIG 6. Upper timing cover bolts
- Then use the same key to unscrew the two bolts of the lower timing cover and remove the cover.
FIG 7. Bolts of the lower timing cover
- Using a 17-point head, we turn the crankshaft toothed pulley until the marks are firmly in place according to Figure 4. You also need to check the alignment of the marks on the flywheel so that they are located as shown in Figure 3. The crankshaft must be turned clockwise.
And one more important point! It is the crankshaft that needs to rotate the entire timing mechanism. This cannot be done using the camshaft pulleys...
To ensure that the camshaft marks do not get lost during operation, they must be secured to each other. This is done in different ways. I once saw a mechanic insert a socket head between the teeth of a pulley. You can also take a pin and two thick plates with holes. We put plates on the stud, nuts on both sides and insert this structure between the pulleys so that the plates rest against the teeth of the pulleys and tighten the nuts.
It looks something like this! Here, however, is an engine from another car:
FIG 8. Device for fixing camshafts
We have completed the preparatory work and it is time to proceed directly to replacing the Priora timing belt.
- To remove the Priora timing belt, you first need to loosen its tension. To do this, use a 15mm wrench to unscrew the tension roller nut; the support roller must also be removed. Because when the timing belt is replaced, both rollers are also changed.
Then remove the timing belt and inspect it carefully. First of all, we pay attention to the presence of cracks, fraying of the edges of the belt, and, of course, we look at the condition of the teeth. There should be 137 of them, they should be round in shape. If you find at least one of these defects or the time has come for mileage in kilometers, then the Priora timing belt must be replaced with a new one. Next, you need to pay attention to the condition of the pump. Holding the toothed pulley of the pump, you need to tug it; if there is play in the pulley, then the pump must be replaced.
REPLACING THE PRIORA PUMP
- In order to replace the pump, we will have to drain the coolant. Using a 15 wrench, unscrew the nuts, remove the camshaft toothed pulleys and the rear timing drive cover.
It should be borne in mind that the camshaft pulleys cannot be mixed up; the exhaust and intake pulleys are placed exactly in their places...
To remove the back cover, you need to use a 10mm socket and unscrew the six bolts securing this cover.
The location of these bolts is shown in the following figure:
FIGURE 9. Bolts of the rear timing cover of the Priora
- This figure also shows the bolts for securing the Priora pump. These bolts are unscrewed with a 5mm hexagon. After unscrewing the bolts, you need to pry the edge of the pump with a flat screwdriver and remove it from its seat.
- Before installing a new Priora pump, you need to clean the surface to which it is adjacent. It is advisable to degrease it and cover it with a thin layer of sealant. The new pump should also be coated with sealant, the place where the gasket is installed. When installing the pump, pay attention to the inspection hole; it should be located at the bottom.
- We tighten the three bolts securing this unit and now you can install and secure the rear cover of the gas distribution mechanism.
INSTALLING THE PRIORA TIMING BELT
- Before installing the Priora timing belt, we put the camshaft toothed pulleys in place, making sure that the marks are strictly in place. We must install the exhaust and intake camshaft pulleys in their proper places. This was mentioned above! Do not forget that you need to install a phase sensor ring under the intake camshaft pulley.
- After checking the position of the marks on the camshafts and crankshaft, we put the rollers in their places. Tension on the left, just bait. The support located on the right is “parasitic”; it can be immediately secured until it stops.
- We start with the crankshaft, put the timing belt on its toothed pulley, from bottom to top. Then, holding it with your hands on both sides, first place the belt on the pump pulley, then simultaneously place the belt on the rollers with the reverse side. Next, while holding the belt tension, pull it up and to the sides and put it on the camshaft pulleys. In this case, you must carefully monitor the position of the marks; they must remain strictly in their places.
- It's time to tighten the timing belt. To do this, use a special key to turn the tension roller counterclockwise until the protrusion and the cutout coincide, as shown in the photo below. After this, you can completely tighten the tension roller bolt.
FIG 10. Priora timing belt tensioner roller
After installing the Priora timing belt, you need to check the operation of the entire mechanism. To do this, you need to manually turn the crankshaft, making at least two revolutions. The marks after each revolution must be strictly in their places, according to Figure 4. If the marks do not coincide by at least 1 tooth, then the belt installation procedure must be repeated again. Otherwise, deformation of the valves cannot be avoided, and then you will have to remove the cylinder head and replace the valves.
- Then you can replace the lower and upper timing covers, tighten the bolts and begin installing the alternator serpentine belt.
INSTALLING THE ACCESSORY DRIVE BELT
- First, we put the accessory drive pulley in place. Then we unscrew the nut securing the right engine mount, which we removed earlier, to remove the Lada generator belt. After this, we need to jack up the engine until there is a gap through which we will insert the belt, then lower the engine and tighten the support mounting nut.
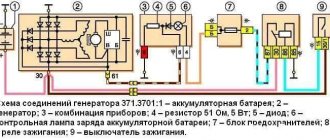
- We put the tension roller of the generator belt in place, but only tighten its bolt. Next, we place the belt on the drive pulleys of the units, generator, air conditioning compressor, and on the tension roller. We do it as shown in Figure 2.
- Using a special wrench, which we used to tension the timing belt, we turn the generator belt tension roller counterclockwise to the required force.
Holding the belt with your fingers, between the tension roller and the generator pulley, we try to turn it across. A correctly tensioned belt should rotate no more than 90°.
We put the wheel in place, remove the car from the jack and try to start the engine...
If there is no extraneous noise and the generator provides the required level of battery charge, this means that the job was done correctly. Finally, I want to say that I did the work myself. The other day a friend called me about replacing the timing belt on a Priora. He asked me to help him in this matter. In fact, he himself is ignorant in this matter. I had to dig around on the Internet myself and ask knowledgeable people. Find out what's what. In general, I did the work, and he helped. After this, I share my experience with you by writing the article “Replacing the timing belt on a Priora 16 valves.”
Symptoms of a problem
Signs of a malfunction of the DPKV can be different. Often, dirt adheres to the end of the sensor itself, which can interfere with reading. Also, symptoms of a faulty crankshaft sensor may be as follows:
- The idle mode is unstable;
- Engine speed rises or falls spontaneously;
- Power drops;
- During acceleration, a “failure” is felt;
- The car doesn't start well.
In these cases, for the most part, the VAZ 2114 crankshaft position sensor is replaced.
In addition, the VAZ 2114 crankshaft sensor may well be in good working order. And on the “tidy” the DPKV error will appear (0335 or 0336). The reason for this may be a broken wire near the connector. This is easily determined visually; then it is enough to replace the connector without replacing the sensor itself.
If the owner notices signs of a malfunction of the crankshaft sensor on his car, then this is a “signal” about the need for diagnostics.
It is not difficult to guess where the crankshaft sensor is located on a VAZ 2114. Like many other VAZ models, it is attached to the engine, and more specifically to the oil pump, near the generator drive pulley, on its cover. The sensor is attached with one bolt, which is typical for many models of this family.
Here is the crankshaft sensor on the VAZ 2114
Typical causes of failure:
- Physical damage to the case;
- The interturn closure of the winding turns entails a change in the generation frequency transmitted to the control unit (frequency type sensors);
- Emergency wear or loss of pulley teeth.
Folk tricks
Let's look at a few folk car tricks that have helped more than one driver.
- Each threaded connection, by the way, not only on the part of the car, can be unscrewed by first lubricating it with a special oil, for example: HP, sunflower oil, vinegar, brake fluid.
- In rare cases, lightly tapping the edges of the bolt and nut with a hammer or wrench helps.
- Removing a bolt or nut does not mean removing the pulley. How to unscrew the crankshaft pulley without a special key? The pulley sits very firmly on the shaft; it can be removed using a pry bar or a screwdriver and carefully pry it off in several places.
Functionality check
If you decide to check the serviceability of the sensor yourself, treat this procedure responsibly and carry it out correctly. On a VAZ 2114 car, the crankshaft sensor is checked in several ways.
- Using a multimeter. The serviceability of the induction sensor can be assessed by the resistance of its coil. In a working product it is 500-700 Ohms.
- On the multimeter, set the measurement limit to 200 millivolts, connect the probes to the terminals (where the standard wires are connected). Pass a steel object several times in front of the core. The working sensor will “see” the metal and there will be voltage spikes on the multimeter display. If there are none, replace the part.
- But the most accurate results when checking are provided by an oscilloscope. When using this device, one hundred percent results can be guaranteed; it reads all the information from the sensor while the engine is running. It can be observed on the device screen. The engine, during tests, should operate at different speeds. They start with eight hundred revolutions, then two thousand, and raise it to six thousand. If the lines (on the device screen) are of different lengths, you need to look for the cause of the malfunction. Remove dirt, check the pulley for defects, and so on.
Remove from the engine
The malfunction has been identified. Let's start eliminating it. Let's look at this operation using the VAZ 2114 as an example.
Turn off the car ignition. We open the hood, fix it firmly, and visually determine where the VAZ 2114 crankshaft sensor is located. Before removal, it is advisable to remove all contaminants in the area where it is located. Next, carefully remove the block with wires from the connector.
Connector DPKV VAZ 2114
Using a “10” wrench, unscrew the fastening bolt.
Removing the crankshaft sensor on a VAZ 2114
Removing the DPKV VAZ 2114
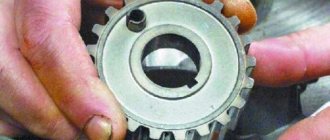
After dismantling the sensor, it is advisable to check the generator drive toothed pulley for defects. Since its damage can introduce errors into the operation of the entire system.
After we are convinced that there are no defects of any kind, we proceed to assembly. The seat must be clean. We install the new part in place and fasten it with a bolt (the tightening torque should not exceed 8-12 Newton meters). In this case we use adjusting washers. They are sold complete with a new sensor. Thus, using a special probe, we ensure that the gap between the pulley and the sensor core is one millimeter. The permissible error is 0.41 millimeters in the larger direction.
The gap between the pulley and the crankshaft sensor core on a VAZ 2114
Unscrew the pulley nut
The nut that holds the pulley at the end of the crankshaft indicates that we are working with a classic version of the engine, namely a VAZ-type car. So, before starting work, you need to prepare the necessary tool, namely a socket or socket wrench for “36” or “38”, you also need to prepare a piece of pipe about 30 cm (later you will find out why). It is better to do the work above the inspection hole. If this is not possible, then it is better to use a jack and definitely a tree stump (better to be safe).
We set the gearbox lever to the fourth gear position and turn on the parking brake mode (handbrake). We try to unscrew the nut using a wrench with a long lever while being under the car. If the attempt fails, you need to use another option.
Set the gearbox lever to the neutral position and remove the spark plugs. We install the key so that it rests (in the case when the length of the key is not enough, a pipe is used) against the floor or the rear spar in the direction of movement of the crankshaft. When the requirements are met, it is necessary to turn the ignition key to give short-term pulses. Sometimes the nut fits so tightly that you can’t get it off the first time. Mostly it is released on the third or fourth try. Once the nut is stripped, it can be tightened with a wrench.
We connect the block with wires into place.
After installation and checking the gap, we try to start the engine. With a confident start and stable operation of the engine, we can say that the repair was carried out successfully.
Despite the fact that the breakdown of the synchronizing sensor is not frequent, knowledge of its symptoms and consequences, as well as methods of elimination, will be useful to the car enthusiast.
New sensors are available in almost any auto parts store. The price of DPKV can vary between 200-400 rubles. How much a VAZ 2114 crankshaft sensor costs depends on your region, the location of large spare parts stores nearby (usually cheaper there) and the greed of the seller. Can be ordered in the online store. When purchasing, take the old one with you so as not to make a mistake in choosing a model. To avoid defects and repeated purchases, it is advisable to purchase from well-established sellers.
FakeHeader
Comments 25
Hello everyone, the pulley has finally arrived, I ordered a used one. I loosened the generator belt, but it turned out that it was not necessary to loosen the pump and power supply pump belts. I installed the pulley and everything went away, now it doesn’t move, it spins smoothly. When examining the old pulley, it was discovered that the rubber gasket had worn out. The breakdown is solved! Thanks everyone for the advice.
The problem is most likely in the crankshaft gear (the key is licking, the gear is not clamped well, and the pulley is screwed to the gear). Unscrew the gear and look at the gear key and the crankshaft. My first motor had something similar (it licked a key). I bought a new gear and welded on a few mm of keys, since the socket for the key was broken on the crankshaft. I put it back together and everything is ok. Good luck!
The pulley needs to be replaced, the damper can be left. The vibration is apparently due to the fact that the pulley begins to turn little by little, the key is licked off, and the bump from the licked key lifts the pulley - as a result, vibration. Change the pulley before it's too late. When you pick it up, LOOK carefully at the key, I once came across one with a crack under the key (it was cast). It would be nice to order a bolt and use thread adhesive when installing it. Good luck.
You can just sharpen it)
My advice is to remove the belts and shake the pulley, the problem may be that the bolt that screws the timing gear to the crankshaft has come loose and the key has been cut off; this happened to me on my ACE, regarding advice and advisors, the block of the 2.0 is the same for all models! so take off the belts, check the play, if you don’t understand where it comes from, unscrew the pulley yourself and check if the timing gear is loose, here is the gear number 25158, and I think the pulley itself is fine, you didn’t hit the pulley or bend it, where could the play come from? I think it's a gear issue.
Replacing the crankshaft position sensor VAZ 2114
One of the most common problems of the VAZ-2114 car is the failure of the DPKV crankshaft position sensor. The fragility and unreliability of the sensor design forces motorists to either shell out considerable sums for repairs at a car service center, or learn the basics of repairs on their own, and, in our economically unstable life, the second option is best. Next, we will teach you how to replace the DPKV with your own hands. So, let's go!
Crankshaft position sensor: principle of operation, types
DPKV is a small electronic device located near the pulley under the hood, which performs a critical function: by transmitting an impulse of the crankshaft position to the engine, the sensor coordinates the movement of the injectors, which directly affects the fuel supply, which, in turn, determines the operation of the ignition system. You need to monitor the condition of the sensor regularly, especially if you have planned a long trip.
Sensors are divided into two types, each of which has its own operating principle:
- Inductive. It consists of a magnet and a metal rod wrapped with copper wire. The inductive sensor gives a signal by reacting to the approach of a steel object, that is, the crankshaft.
- Impulsive. The sensor consists of a hall, which changes its position when a metal object approaches it. Due to this, impulses arise, which are then sent to the power unit and determine the operation of the ignition system.
Signs of breakdown
You can determine that the sensor has failed by the following signs:
- Idling malfunctions, instability in engine operation is observed;
- The engine loses power;
- The engine accelerates chaotically or, conversely, slows down;
- Heavy plant;
- During high-speed movement and, especially during acceleration, dips are observed.
The main malfunctions may be the following:
- Mechanical deformation;
- Broken wires or shorted wires (this problem is especially common in used cars);
- Wear of the pulley and other parts.
Repairing the sensor is difficult and almost impossible at home. But replacement is not difficult, and it is not that expensive. Let's now find out how to replace the sensor on a VAZ-2014.
Step-by-step instructions for replacing the sensor
If you strictly follow the instructions, the replacement procedure usually does not take much time.
- First of all, to make further work safe, turn off the ignition and raise the hood.
- We find the device and, if it is covered with dust and dirt, which is observed quite often in the practice of motorists, be sure to use a rag to clean both the sensor and its installation location, so that when installing a new device, there is no short circuit in the wires.
- Now we have access to the device. A positive point is the ease of removing the sensor, which cannot be said about other parts. But here it is very important to observe the subordination of actions: first, by bending the fasteners, remove the block and wires, then, after unscrewing the bolt, carefully, slowly, remove the DPKV
- Just in case, it is worth diagnosing the condition of the pulley; toothed parts are often deformed, which also causes a disruption in the fuel supply system and leads to errors in the data transmitted by the sensor, which can already be dangerous.
- We check that the installation site of the new part is clean.
- We mount the sensor.
Installation is carried out in the reverse order of dismantling: tighten the bolt, fasten the block, start the engine, check the sensor data.
An important point during installation is to maintain the required gap, which should not exceed 1 mm. If the gap is too large, you should select a device of the appropriate size: do not try to fix the DPKV of the wrong type, as this connivance can lead to negative consequences.
How to check for sensor malfunction with the device?
Despite the fact that a sensor malfunction is usually determined by the above symptoms, this may not be enough for a correct diagnosis, since different types of breakdowns have the same symptoms. Dips during acceleration can also occur when other parts are deformed, such as the ignition system or braking system, and this also occurs when the engine itself malfunctions.
You can definitely check the sensor using the following method:
We buy a voltmeter (it’s easy to find in any car store) or a multimeter, which is even better. On the multimeter we turn on the voltmeter function, measuring 200 mV. Now we connect the probes to the sensor. And then the most interesting thing: take any screwdriver (necessarily with a metal rod) and hold the screwdriver close to the sensor. The data on the voltmeter will change, monitor its data: if the device shows 0.3 V, then the device is working properly; If the readings fluctuate, replace the sensor without a doubt.
Didn't find the information you are looking for? on our forum.
Replacing the timing belt
According to the maintenance regulations, the condition of the timing belt should be checked after 105 thousand km, and the belt replaced after 200 thousand km. It is necessary to take into account that failure of the timing belt (breakage or shearing of teeth) can lead to valves sticking into the pistons due to mismatch of the rotation angles of the crankshaft and camshafts and, as a result, to expensive engine repairs. Therefore, we recommend checking the condition of the belt more often - every 45 thousand km. The surface of the toothed part of the belt should not have folds, cracks, undercuts of teeth and separation of fabric from rubber. The reverse side of the belt should not have wear, exposing the cord threads, or signs of burning. There should be no delamination or fraying on the end surfaces of the belt. The belt also needs to be replaced if traces of oil are found on it (before replacing the belt, the cause of its oiling should be eliminated) or when replacing a failed tensioner/support roller of the timing drive and coolant pump.
Use a 5mm hex to unscrew the five screws securing the front upper timing cover...
...and remove it. Remove the right mudguard of the engine compartment (see “Removing the mudguards of the engine compartment”).
Using the “17” head, turn the crankshaft clockwise by the bolt securing the generator drive pulley... ...and inspect the belt for damage. To replace the belt...
...using a 5mm hexagon, unscrew the two screws securing the front lower timing cover...
...and remove the cover. Remove the generator drive belt (see “Replacing the generator drive belt”). Before removing the timing belt, in order not to disturb the valve timing, it is necessary to set the crankshaft and camshafts to the TDC (top dead center) position of the compression stroke of the 1st cylinder. To do this, turn the crankshaft clockwise by the bolt securing the generator drive pulley...
...until the marks on the camshaft toothed pulleys align with the marks on the rear timing cover. To check the position of the crankshaft...
…we remove the rubber plug in the upper part of the clutch housing (for clarity, the cooling system hose and the wire blocks from the coolant temperature gauge sensor and the ECM coolant temperature sensor are disconnected)…
...and make sure that the mark on the flywheel 1 is located opposite the slot 2 of the upper cover of the clutch housing. In order not to disturb the valve timing when unscrewing the bolt securing the generator drive pulley, an assistant fixes the flywheel by inserting a large slotted screwdriver through the hole in the clutch housing between the flywheel teeth. Having unscrewed the bolt securing the generator drive pulley...
...and its support washer.
Using a spanner wrench or a 15mm socket, loosen the bolt securing the belt tension roller. At the same time, the tension roller will rotate and the belt tension will weaken.
Remove the belt from the camshaft pulleys of the tension and support rollers. After removing the belt from the coolant pump and crankshaft pulleys, remove the belt from the engine compartment.
After removing the timing belt, the crankshaft and camshafts must not be turned at large angles to avoid the valves sticking into the pistons. When replacing the timing belt, we also change the tensioner and support rollers of the belt. Unscrew the bolt securing the tension roller and remove the roller.