Many modern cars are equipped with power steering (power steering). Russian cars were also equipped with such systems, but not in such quantities as we would like. Power steering for VAZ 2110
installed on rare configurations, for example, VAZ 21124. In this article, we will show how you can
repair the power steering pump yourself
.
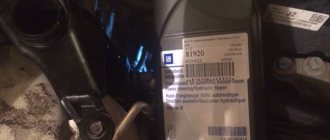
The price of a new pump is more than 3 thousand rubles. Any part can be repaired, and the power steering pump is no exception. The power steering pump for cars of the tenth family was installed by the ZF brand (ZFLS 7691 955 339). It is also suitable for VAZ 2170 and 2123, as well as Audi A6, Wolksvagen Passat or Transporter. The whole difficulty lies in the fact that this pump model is not dismountable, that is, there are no retaining rings or covers. However, restore the functionality of the power steering pump
It's still possible.
We remove and disassemble the power steering pump (instructions). Then we thoroughly clean it from dirt and visually inspect it to determine the causes of the breakdown. One of them may be a groove on the inner wall of the pump casing in the form of a step. You can remove the step using a drill attachment.
Another cause of power steering pump failure
It could be a worn bearing in a closed housing (450 RUR) or an old oil seal (50 RUR).
When installing the oil seal, you may need to sharpen the shaft a little on a lathe. There are two ways to secure a new bearing in the pump housing: Make a recess with a lathe on the outside of the bearing. Drill threaded holes in the pump wall. Insert a new bearing and secure it with sharpened bolts, which are then sawed off. Or secure the bearing inside the pump using the curved edges of the housing. We assemble the power steering pump in reverse order. Unlike Saginaw pumps, the ZF pump's vanes do not flip over. To put a flange on a shaft, you need a heated flange on the shaft. After a sharp cooling it will sit firmly. If the power steering pump hums
after assembly, then do not be alarmed, this is the grinding in of parts, after 300-500 km the hum will go away. Don't forget to change the power steering fluid afterwards. It is worth noting that the design and repair of electric power steering is much simpler than power steering.
A power steering kit turned up the other day. I immediately went to install it. There is nothing complicated if you have everything you need for installation, namely, all the fasteners, hoses, rack, pump, tank. Now in order:
0:624 1:1129 2:1634
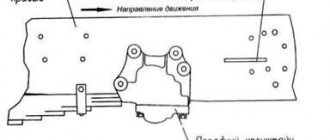
We place the mount under the stud of the tension roller of the generator belt
2:1755
We remove everything unnecessary, namely, the generator along with all the fasteners
2:1884 3:2389
make a hole in the timing cover for the roller stud
3:92 4:597 4:776
timing cover, old rack
4:824 5:1329
unscrew the engine mounting cushion and insert the alternator belt, by the way you need to buy a new one longer than the original one and screw the cushion into place and screw on the upper alternator mount
5:1694
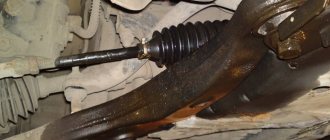
steering shaft, cardan
5:1739 6:2244
install the generator and tighten the belt
6:68 7:573
Next, we put the new rail in place, having first unscrewed the metal casing around the hole in the passenger compartment so that the new rail can fit through. We screw everything in the reverse order. We install a short cardan and we are almost done. You also need to run hoses from the pump to the rack and from the rack back to the tank. The tank is placed on the absorber mounting studs. That's all. Next, we fill in the oil (I filled in Dextron red. And we start. We make sure that there are no leaks anywhere. We drive out and enjoy the light steering. My feelings simply cannot be expressed in words - the steering wheel can be turned with a finger, it responds more clearly on the highway, bumps are now almost not felt, in the chest gives nothing away.
7:1746
8:2251
This text is dedicated to replacing power steering with electric steering on a VAZ 21124. And so, I have long wanted to change power steering with electric steering, because... I think this solution from AvtoVAZ is not the most successful, at least because of the need to unscrew the engine mount and lift it to replace the drive belt.
8:521
And so, it was purchased: 1. A rack from Viburnum Sport 2. EUR with and a shaft from disassembly from a Priora 2009 onwards. 3. Lower generator bracket 4. Upper generator bracket assembly 5. Generator belt
8:846
Well, let's get started. I did the following: 1. Remove the steering wheel, remove the steering column cover 2. Unscrew the universal joint from the steering rack, unscrew the steering column, pull out the steering column 3. We climb under the hood, drain the oil from the power steering, pull out the power steering reservoir, unscrew the steering wheel from the rack 4. We unscrew the tie rods from the racks 5. We unscrew the rack, we try to pull it out, but I didn’t succeed 6. We unscrew the tie rods from the rack itself, having first pulled out the plate that secures the bolts from unwinding. It’s more convenient to do this before unscrewing the rack 7. Unscrew the steering rack protection from the exhaust manifold 8. We try to pull the rack out again, again it didn’t work 9. Due to the fact that the rack with power steering is thick at the entrance to the cabin and, accordingly, , the length that the rack fits into compared to a regular one is much longer; I couldn’t pull out the rack without disassembling the mechanism that is located in the cabin. Only by removing the mechanism was it possible to pull out the rack.
8:2637 9:504
10. Next we install the EUR. By the way, the shaft connecting the rack and steering column on the 21124 with the power steering has the required length for installation with the power steering, i.e. the shaft from Priora and the fork from 2131 are equal in length to the shaft from 21124 with power steering. 11. Thread the power wires. By the way, I don’t know about everyone else, but my wiring under the hood goes in the center at the bottom of the engine shield, although for some reason I thought that the wiring goes through the left fender. 12.Remove the instrument panel and begin splicing the wires. I connected the tachometer, speed sensor, and plus when turning on the ignition. In my block, there was no wire for the EUUR indication, I will then wire it additionally. By the way, after installing the EUR, there was very little space left in the steering column casing, and considering that there were still wires and plugs for connecting the ignition switch, I had to tinker, and ultimately saw off the lower part of the casing from below, and move the diagnostic connector a little lower.
9:2119 10:504
13. We put everything back together that has not yet been assembled around the cabin. 14. We remove the power steering pump along with the bracket, install the bracket for the generator, upper and lower, install the generator. I removed the pump through the bottom, unscrewing the protection
10:886 10:1078
All this took me 13 hours of continuous work. The impressions are pleasant. The force on the steering wheel weakens after 40-50, but the steering wheel is a bit tight at speed until I get used to it. Consumption decreased by about 0.3-0.5 liters per 100, subjectively it became more fun to drive.
10:1489
Oh yes, I forgot. Due to the fact that the rack with power steering is larger, a large hole is left in the interior when installing a regular one. Theoretically, you can change this window where the rail is inserted, and everything will be beautiful, but... I didn’t have this window, I sealed it with several layers of STP vibration insulation, and an accent on top. It turned out pretty quiet.
10:2087
11:504
Removed power steering
11:527 12:1032 13:1588
I decided to look into the power steering reservoir today and was surprised - there was not enough oil and the color was some kind of brown. After reading the forums, it was decided to change the oil completely. At the same time, the pump noise began to appear. After shopping around, I found the best option for myself, because the oil that is poured from the factory is nowhere to be found. I bought Mobil ATF 220, red. I came home and started replacing. I will describe everything in detail. You can't do it without an assistant.
13:2320
1. We pump out the liquid from the tank 2. We remove the return hose from the tank and turn it off, for example, with another hose with a pinched end (I completely removed the tank and washed it. - (on the barrel fittings, arrows indicate the oil inlet and outlet. 3. We put on the return another hose and take it under the car into a previously prepared container 4. Fill the reservoir with liquid to the maximum level, the assistant starts the engine (as soon as the liquid is gone, the assistant turns off the engine at your signal. 5. Fill the liquid again to about and repeat the procedure until until clean liquid flows into the prepared container; 6. Put the return hose back on and add power steering fluid to the required level. The advantage of the method is that it turns out to change the power steering oil completely, without the remains of the old one. Disadvantage - you will need 2 times more oil than during a normal replacement, it took me two liters. The pump noise disappeared, which I am happy about, and now I know what kind of oil I have filled in..
13:1699
14:2204
15:504
The power steering for the VAZ 2110 is simply a miracle part that will allow you to get the greatest driving comfort. If the modification of the VAZ 2110 has such a power steering, as this part is called briefly, then this is great. In this article we will learn how to replace a VAZ 2110 hydraulic hose or other power steering repairs.
Detailed guide to installing electric power steering on a “Ten”
The amplifier installation procedure is as follows:
- First you need to take the purchased wires and remove the standard terminal from the connector, and then install it into the connector on the harness.
- The terminal connected to the connector is mounted where the wire was connected to the standard block. This must be done so that you have the opportunity to pass a standard cable between the bundles. It is also necessary to take into account that the wire from the blocks carries 50 amperes; accordingly, it is necessary to install the same safety element.
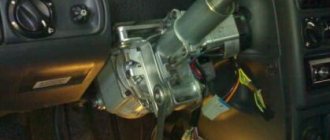
- The next step will be to remove the steering column trim, ignition switch, and all switches located under the steering wheel. At this stage, you need to do everything carefully, since the lining itself is fragile and can crack.
- Then the screw securing the rail is unscrewed, after which it is removed. Next, you will need to compare the length of the old and new intermediate shafts, since adjustments will need to be made to the plates and the shaft itself. The further fitting procedure is carried out by turning - it is best to perform it on a machine, this will allow you to obtain the most accurate result. We recommend that you contact specialists for this task. As for the dimensions of the plate, they are adjusted by re-drilling some holes to a greater depth. In addition, you may also need to trim the corners of the plate a little with a grinder, after which you will need to install spacers between it and the car body.
- Install the amplifier along with the rail and plate - it is possible that a standard screw will not fit for fixation, so you will have to install a shorter bolt instead. In turn, this may lead to the need to install a limiter to prevent arbitrary rotation of the shaft.
- Next, the central part of the switches is installed.
- After this, two wires are laid from the vehicle interior to the battery; it is advisable to lay the wiring through the left fender. The expansion tank of the washer system is being dismantled. You need to find a long copper wire, with its help you will push the wiring. Then open the mounting block with the safety elements and find the wires that go into the engine compartment, you will need to push the wire through the same hole. Be careful not to damage the wiring. Once the wire comes out through the left fender, attach the amplifier wires to it and push them into the engine compartment.
- Then the control panel is dismantled, having done this, you need to find the red connector. Next, the wiring from the amplifier is pushed into the space under the shield. It is necessary to disconnect the orange cable from the red connector; a block from the set of wires for the electric power steering is installed on it. This wire should be connected to the orange wiring of the installed system, and the remaining end with the terminal is mounted instead of the standard cable in the connector.
- Similar actions are carried out with the gray wire; it is also installed in the red connector. The cables routed into the engine compartment must be connected as follows: the black wire is connected to the negative, the pink wire to the positive. Actually, at this point the installation procedure can be considered complete. Now you only need to reinstall the cover and steering wheel.
Lada 2111 › Logbook › Power steering for 2110 8 cells. Part 1
The topic is old and hackneyed, but I still want to share my experience.
I would like to immediately answer frequently asked questions: Why power steering? After all, the EUR is better/simpler/more reliable/doesn’t take power away from the engine
1. Because the power steering rack has 2.7 turns from lock to lock, and all other 2110/Priora/Kalina racks have 4.2 turns. The only exception is the viburnum sprat rack with 3.1 2. I like it when the steering becomes stronger at speed 3. IMHO the hydraulic rack dampens impacts on the wheels better and allows you not to feel a slip during acceleration. Again, these are just my feelings 4. In principle, I like the idea of a hydraulic booster better. This can be considered religious beliefs
How expensive?
Within 10-12 sput
How difficult and how long does it take to install?
1 full day, nothing complicated, a minimum set of tools required
Components
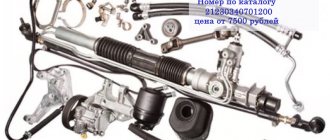
This is what the most complete set of power steering looks like:
If you remove the set of priors with your own hands, then you will not have any problems, you will be able to get everything and see how it stands, but if you assemble it in parts... Particularly difficult to find is the boot installed in the engine shield, at the entry point of the steering slats in the interior:
Catalog 2110-3401165-20. Even his image is difficult to find
And also its pressure plate:
It's easier to find. Catalog 2110-3401208-20
All other parts are either on sale or can be obtained from disassembly.
Special attention should be paid to high pressure hoses. They come in old and new designs. The old ones differ in that their rubber hose can be directly detached from the steel tube, which is screwed with a hollow bolt onto the spool mechanism of the rack. This is more convenient because it allows you to replace a leaking hose without removing the rack.
Marked where it disconnects. Catalogs 2110-3408018-01 and 2110-3408100-01 for two halves
The new model is solid, the hose used in them is from Continental. Replacement requires dismantling the rack. I don't know the benefits.
Catalogs 2110-3408018-20 and 2110-3408100-20
However, there is one big, no, huge problem with the new hoses! They sell fakes everywhere! In my city, I couldn’t find real ones in any store! You can read how to distinguish them in this article. With a fake hose, when turning the steering wheel, at some moments you will feel vibration in the steering mechanism and a hum. In general, everything is described in the article.
Next are the brackets. I installed everything according to the standard scheme and used standard brackets. The power steering pump is mounted on its bracket with three bolts at the front and an additional plate at the rear. If you buy a bracket separately, pay attention to its availability:
The generator moves upstairs, like in 16th grade. engines. Here you need to pay attention to the fact that there are generator brackets for the power steering and for the air conditioner. They are very different in appearance:
Bracket for air conditioner
I chose the power steering one; it is attached at three widely spaced points and generally inspires more confidence.
I can’t say for sure, but it may be necessary to install a new type of engine support bracket, without the ear on top:
The fact is that the power steering bracket of the generator has a casting on top that, as it were, hugs the engine support bracket from above. It will not fit on an old-style bracket without modifications with a file; it is necessary to sharpen about a centimeter of the casting. But besides this, I got the impression that the generator bracket still rests on top of some protrusions and turns out to be turned a little clockwise (within the limits of the bolt stroke). That. The generator itself is not strictly coaxial with the rest of the pulleys. I came to this conclusion after the outer part of the roller was eaten away by a belt. Now I've installed a new sample, and it seems like he's not eating anything anymore.
And lastly, the steering cardan. When installing power steering, it needs to be replaced because the part of the steering rack that extends into the cabin is significantly longer:
I can’t say for sure the difference in length, but something around 35 cm for the long one and 27 cm for the short one. The cardan shafts are solid, like on the 2110, and detachable, like on the Priors. I chose the second option because... much easier to install.
It allows you to separately attach the parts to the column and rail, and then simply screw them together without having to aim anywhere. According to the factory, the long half is attached to the rail, and the short half to the column, but I secured it the other way around because... in this case, access to the bolt connecting them is much more convenient.
This concludes the first part. In the next one I’ll talk about the practical aspects of installation and non-standard parts.
Read further: Power steering for 2110 8 cells. Part 2
Replacing hoses and oil
Power steering hoses are an important part of it. Therefore, they need an eye and an eye. But what if they still need to be replaced? Should you take your car to a service station? Of course, there is no need, because you can do all this yourself. Usually, hoses are replaced simultaneously with the power steering oil change. And it would be opportune to present joint instructions.
- First you need to lift both front wheels of the car (they should be in the air);
- We find the power steering reservoir from which the oil should be pumped out;
- Pump out the oil;
- Turn the steering wheel all the way in any direction (after this oil will appear in the tank again, which needs to be pumped out again);
- Now turn the steering wheel in the other direction and pump out the oil again;
- We remove the hose, which is the oil conductor (through it, the oil comes from the passenger compartment and enters the tank);
- Turn the steering wheel from side to side (oil should come out again);
Replacing power steering oil
- We take new power steering oil (usually about 800 ml);
- Fill it into the tank to the maximum level;
- Again, turn the steering wheel from side to side (all the way);
- We start the engine for a few seconds, turn it off;
- We turn the steering wheel again;
- Add oil;
- We pump and remove air from the system by turning the steering wheel with the car turned off ten times in each direction (we do the same number of times with the engine running).
When changing the oil, be sure to look at all hoses and pipes. If oil is leaking, this is a sign of a torn or faulty hose that will need to be replaced. Hoses are replaced only after the oil has been completely pumped out. You will need to unscrew the clamps and remove the hoses from the pump. As for installation, new hoses and pipes should be tightened with clamps and not overdo it (hoses easily burst, if anything happens).
Results
As you can see, the work is quite simple and does not require special knowledge and skills. The main thing is to remember the instructions for carrying out the work and use them in the required sequence. If you do this kind of work yourself once, then there will be no hassle with it in the future. If you neglect your car, it is fraught with consequences. The car will require constant care. To do this, he needs to periodically carry out technical inspections, on the basis of which he can make sure that certain components are in good working order.
Installation of EUR
Required Tools
Let's say you purchased an EUR kit - it could be from a VAZ 2110 or from another model, for example, from a Priora. Prepare the following tools:
- Drill together with a metal drill.
- Set of screwdrivers, grinder.
- Long ruler.
All is ready? Let's move on to installation.
Step-by-step instruction
- You need to remove the standard terminal from the block and place it in the block on the harness. We find the standard drive, which is attached to the block. A free terminal must be installed in its place. Now the wire can be placed between the fasteners.
Adjustment
After assembly, you will need to straighten the steering wheel if it is installed crooked. Separately install the sensor that came with the EUR. If the column casing is cracked, it is better to immediately replace it with a good one. There may be gaps between the front panel and the casing - they must be removed.
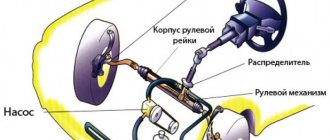
Operating principle of EUR and power steering
Power steering VAZ 2110 is a system consisting of many elements. The power steering pump in this case is driven by the crankshaft - it pumps oil, as a result of which, through pressure, it allows rotation of the steering wheel.
The electric power steering is a modular design that is built into the steering column; the module itself consists of:
- synchronous type electric motor;
- torsion bar;
- several sensors;
- control module.
EUR device for a VAZ car
The principle of operation is as follows - the torsion bar is twisted, the sensor reads the torque, and the electric motor transmits a small force to the output shaft.
Differences between EUR and power steering
These are completely different units. To understand the main differences, it is enough to study the hydraulic booster. Its main component is a pump driven by the crankshaft, it is integrated with other parts. The operating principle of the hydraulic booster is based on hydraulics.
As for the electric power steering, it is driven by an electric motor. Its design also includes an electronic control unit, a steering shaft with a torsion element and sensors. The EUR works according to a different scheme:
- When the steering wheel rotates, the torsion shaft twists;
- Special sensors record changes in the position of the shaft and send data to the electronic control unit;
- After analyzing the information, the unit sends commands to the electric motor;
- As a result, the unit creates the necessary force or facilitates turning the steering wheel.
Car enthusiasts often argue which option is preferable for the “ten”. In fact, power steering is an obsolete unit that is being actively removed from modern passenger cars. The electric booster works even when the engine is turned off and weighs less than the power steering. The main advantage over “hydraulics” is reliability - the electric unit requires virtually no maintenance. There is less load on the engine, and as a result, less fuel is also needed. The EUR is also good for our conditions because it functions well at low temperatures.
But the electric booster also has its drawbacks. Its design is more complex than that of “hydraulics”, hence the high price. Sometimes the electronic control unit sends incorrect commands, this was especially felt by the owners of the first generation Kalina. If you drive for a long time on a poor-quality road surface (or lack thereof), the EUR may turn off for several minutes due to overheating.
Varieties
All power steering can be divided into two types:
- Electrical. The system is represented by an electric motor, a control mechanism and a mechanical transmission. The peculiarity of this type of device is the creation of additional force when turning the steering wheel using a special electric drive. Provides perfect handling at all speeds and during sharp turns. If a malfunction occurs in the control units, the electrical device may suddenly turn off.
- Electrohydraulic. The hydraulic pump is started by an electric motor, which is powered by a generating device. In terms of fuel economy, the electro-hydraulic booster is more preferable. The spare part is efficient and informative.
You can pick up the spare part at the place of purchase:
- At the car market.
- In the auto parts store for VAZ cars.
- At the transport dismantling point.
- In the online store.
- According to the advertisement.
Is repair possible?
The VAZ 2110 steering rack with power steering is a fairly reliable unit, but even it can fail if the car is used incorrectly.
Repairing the steering mechanism may involve the following steps:
- Repair of power steering rack. In this case, the repair procedure consists of replacing parts from the repair kit. This kit includes sealing elements for the piston and shaft, oil seals, bushings, as well as inserts for pressing the shaft. During this task, the surface of the shaft may be machined.
- Switchgear repair. This procedure involves replacing the upper and inner oil seals, sealing elements and grinding the shaft. If the distributor shows signs of ring wear, the housing will also need to be lined.
- Repair of the rack with restoration of the shaft. In this case, all the steps described above are performed, but in addition to this, you will also need to restore the shaft by building up the babbitt. You will also need to coat it with chrome and grind it.
- If we are talking about a major overhaul, then you will need to perform all the steps described above, as well as completely replace the transverse shaft, its (side) clamp, along with the nuts and distributor. In addition, it may be necessary to replace the high-pressure lines along with the steering rods.
Price issue
The cost of a new EUR today is about 13-18 thousand rubles. On the secondary market you can buy a set for 2-6 thousand. The price for a complete set of power steering is on average about 20 thousand rubles.
Pricing factors
The cost of power steering varies significantly at different points of sale. The explanation for this is that sellers take into account various factors when setting prices. For example, the cost of a given auto part depends on:
- Varieties.
- Qualities.
- Originality.
- Brenda.
- Generations of cars.
- States.
- Places of purchase.
- The need to order delivery and the price of such a service.
- Reputation of the selling company.
Nuances of installing power steering
Every car owner who installs a hydraulic booster must follow the instructions, otherwise the installation of the system may be carried out with errors. And this, in turn, will lead to incorrect operation of the power steering.
So, how to install power steering on the “Ten”:
- First, the timing case is removed and the bracket is installed with three screws. There are corresponding holes in the interior, so there is no need to drill anything additional. Next, the stud is installed, on which the roller will subsequently be mounted. There are no holes for the stud, so you will have to drill them. After installing the roller, the bracket is installed and fixed.
- The generator unit, as well as both of its clamps, must be dismantled; similar actions are performed with the column. The shaft will need to be trimmed a little, about 3.5 cm. If you have an angle grinder with a welding machine, then you can do this step yourself; if not, contact a specialist.
- Then part of the bracket is sawed off, after which it will be possible to securely attach the pump to it and close it with a pillow. The resulting structure is mounted on the power unit, or rather, in the place where the generator unit bracket was installed.
- Now you need to find the adsorber and install a bracket for the expansion tank under it. To do this, unscrew the screw securing the engine mount, and then lift the engine. The power steering strap is installed in the resulting hole; it should be securely fastened to the roller.
- Now all you have to do is replace the standard installed rack with a new one from the hydraulic booster. Remove the pole of screws and complete the assembly procedure of the device. Connect the hoses and fill the expansion tank with working fluid; to pump it, turn the steering wheel to the extreme right and left positions with the engine off and running.
The part marked in red will need to be sawed off
The need for power steering
VAZ 2112 cars coming off the factory assembly line do not contain power steering. This fact may indicate that the machine simply does not need such a device. However, you can find power steering on sale and install it yourself. Before buying anything, spending time and effort, it would be wise to weigh all the facts.
Arguments in favor of hydraulic booster
Aspects that indicate the need to install this device are as follows:
- Facilitation of parking;
- Reduced effort on long turns;
- Increased ease of control on the road.
As you can see from the list, there are few arguments. But for some drivers they are very important.
Ease of parking
The main purpose of the VAZ 2112 power steering is to reduce the effort when turning the wheels. In winter, when the surface is slippery, turning the wheel of a stationary car is quite simple. But if you imagine that there is asphalt under the car with small stones sticking out and digging into the tire, then you will have to make a lot of effort to perform the desired maneuver.
At such moments, it is best to start turning the wheels immediately after starting to move, as this helps reduce the load on the steering mechanism. If the parking process causes a lot of inconvenience to the driver, then you should think about installing power steering. This is often typical for female drivers.
Reduced effort in movement
Moving along a straight path and a flat surface, driving the VAZ 2112 does not cause much trouble. But when entering a sharp turn, changing the trajectory of the car requires effort.
This is due to the fact that it is affected by centripetal acceleration, the vector of which is directed perpendicular to the car. At such moments, power steering will be very useful.
Arguments against the amplifier
After analyzing the positive factors, the driver will immediately want to install an amplifier for himself. But besides the positive, there are also negative aspects. These include:
- Repair costs;
- Labor intensive installation process;
- Changes in body design.
The power steering mechanism of the VAZ 2112 has significant shortcomings. The degree of their significance for the driver determines the further decision. The existing aspects should be assessed as objectively as possible.
Repair costs
Over time, any mechanism wears out and needs repair. It is clear that an increase in the number of mechanisms inevitably leads to increased costs for their maintenance and repair.
When installing the amplifier, the following malfunctions may occur:
- Loss of system tightness;
- Broken or loose pump belt;
- Malfunction of the distributor;
- Destruction of rubber parts;
- System clogged.
- Wear and failure of the working cylinder.
Depending on the malfunction, there is a need for certain purchases and associated costs. Not only monetary expenses, but also time will be needed in such situations.
Complexity of the installation process
As the amplifier is introduced, there will be difficulties associated with changing the body, so you need to be prepared for this. The necessary elements are purchased independently. The installation process will be accompanied by the addition of a pump with its mount and belt, a reservoir for working fluid, a distributor, hoses, tubes, and an actuator. All parts must be properly secured. ATF is often used as a working fluid. But there are other options, including those indicated in the instructions accompanying the purchased parts
The desire for additional amenities leads to the complication of the car. And this, in turn, is fraught with a decrease in reliability and costs. In addition, people become weaker physically.
When we want to simplify our life in some way, it turns out that, on the contrary, we make it more difficult. Installing a hydraulic booster on a VAZ 2112 is advisable when there is a genuine need for it; in all other cases it will only be an additional convenience.
Liquid leakage from the system along the way will lead to failure of the amplifier. In winter, due to low temperatures, noise may occur during operation of the device. This brings some discomfort, as the process of driving a car may be disrupted.
Alternator and power steering belt
Generator on a VAZ 2110 car with power steering
What, does the owner of a VAZ 21103 have a hydraulic booster? As you know, if a VAZ 2110 is equipped with power steering, which, it is worth noting, completely eliminates vibrations typical of front-wheel drive cars, replacing the alternator belt is carried out completely differently than is customary. As a rule, the alternator belt is replaced after 45-60 thousand kilometers, and cracks on it are a direct sign of replacement. A normal replacement of this part takes no more than 10 minutes, but on cars with power steering it takes more time, and the belt cannot be found in its usual place. In this place, if power steering is installed, the pump described above is placed. The generator itself is located higher.
The difficulty of replacement in this case is characterized by the fact that the belt rotates around the left motor support, which forces you to unscrew the support, lift the engine and only then remove the belt. Specificity is also observed in the case of alternator belt tension. In particular, the angle of the alternator pulley belt in the case of power steering is quite small and the usually accepted tension of 1 cm up and down does not work here. The belt begins to slip. This means that the power steering belt tension must be stronger.
As you can see, power steering also means unnecessary troubles associated with repairs. But if you learn to do everything yourself, problems can be avoided. In addition, you can save a lot on repairs, the price of which increases every time at the service station. The instructions presented above are an introductory version for owners of a VAZ 2110 with power steering. A complete step-by-step manual for replacing the power steering, repairing it, etc. can be found in other articles, through video or photo materials.
We install EUR and power steering on a VAZ 2110 on our own
Based on the year of manufacture, the “ten” can be equipped with a hydraulic booster (power steering), also called an electric power steering (EPS). They are appreciated by women; the second option is preferable, because it is easier and more comfortable to drive a car with a child. If your power steering has worn out differently and you just want to change it, then it is recommended to choose the power steering for the VAZ 2110 as a candidate.
This material contains two annotations:
- Installation of power steering.
- Installing electric power steering on a VAZ 2110 instead of the standard power steering.
Well before installation, you need to understand the structure of these units and also find out how they are different.
How to install power steering on a VAZ 2110
AvtoVAZ installed two steering systems on LADA cars of the tenth family: electric power steering (EPS) or hydraulic booster (GUR). However, the majority of cars did not have power steering, but if desired, the car can be modified by installing power steering on the VAZ 2110 with your own hands.
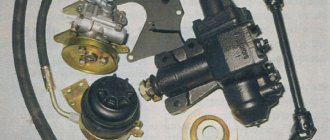
Required . buy a power steering kit (in online stores the price is more than 20 thousand rubles), which consists of a pump and its mount, hoses, a reservoir, a steering rack, a generator mount (you can modify the mount for a c/o air conditioner), a tension roller and its bracket, power steering belt (6PK1115). It is also worth choosing power steering fluid.
Installing the tension roller:
- Remove the timing case, install the bracket with 3 bolts, screwing them into the existing holes. Install a pin under the roller on the bracket.
- Make a hole in the timing case for the pulley stud.
- Install the roller onto the stud.
- Remove the generator and both mountings (report).
- Remove the steering column.
- Shorten the steering shaft by about 3.5 cm using a grinder and welding.
We are finalizing the power steering pump mount:
- We saw off the excess, as shown in the photo.
- We attach the pump to the bracket and the pillow to it. We install everything assembled on the engine, where the lower mount of the generator used to be.
Install the power steering belt and reservoir:
- Unscrew the engine mount bolt and lift the engine (report).
- We insert the belt into the resulting hole. We install it on the tension roller.
- We install the power steering reservoir mounts under the adsorber mount.
Bleeding the brakes of a VAZ 2112. How to do it correctly
In the list of diagnostic measures, bleeding the brakes of the VAZ 2112 is one of the first places. It’s good when car enthusiasts understand this and take it quite seriously. It’s not for nothing that they say: “Why do you need a gas pedal if the brakes don’t work?” Bleeding the VAZ 2112 brakes is primarily necessary to remove air layers from the communications and equipment of the brake system, which lead to malfunctions of the entire well-functioning automotive mechanism. The most critical consequence of the presence of air in the system is its complete failure, when when you press the brake pedal, it falls to the floor without effort and remains in that position. Why and when is bleeding performed? The process, which drivers call “bleeding,” is based on the purpose of removing from the cylinder and underwater hoses of the braking system the layers of air that have penetrated into it. One can object by pointing out that the system is hermetically sealed and only thanks to this technological feature it functions. However, under the influence of constant mechanical loads, as well as material fatigue, the tightness may be broken. Carrying out a daily visual inspection of the car before driving on the road in rare cases may reveal signs of hidden depressurization, which is a consequence of:
- Loose fluid supply hoses;
- Microcracks in tubes, fittings or in the cylinder.
Bleeding must be carried out as one of the stages of work when replacing any equipment included in the functionality of the system. With rare exceptions, when the pads are replaced, however, even such a simple process can also be completed by preventative blowing of the hoses. Stages of work To carry out this type of restoration work, a set of the following tools, materials and auxiliary equipment is required:
- Capacity, preferably a clean bottle of at least 1.5 liters;
- Rubber tube from a medical IV or from a blood transfusion set;
- Clean rags;
- Wrench for 8 and 10, open-end or “bleeder”, which has a special slot;
- Steel brush for cleaning metal surfaces;
- A can of WD-40 to remove traces of dirt and rust;
- New fluid for the system.
Also, to carry out the work conveniently and quickly, you need an assistant who will bleed the brake pedal from the passenger compartment - from this manipulation the whole procedure got its name. At the first stage, air is removed from the discharge cylinder. To do this, the pedal builds up pressure and, alternately unscrewing the fittings on the cylinder, air bubbles are released from them. Prefaces these manipulations by adding fluid to the tank to the maximum possible level. Only after this do they begin to work with the wheel fittings. Bleeding the wheels on VAZ cars is carried out in the following sequence:
- Rear right;
- Front left;
- Rear left;
- Front right;
- *The sequence of processing wheels on VAZ models is determined by their distance from the cylinder, and therefore by the length of the connecting hoses.
However, in the case of the VAZ 2112, this is not critical, since on this model the system is multi-circuit and the sequential wheels do not matter in this matter. The procedure is similar to that done with the central cylinder, only there is only one fitting on the wheel. Even if no repair work has been carried out on the system, the VAZ 2112 brakes should be bled either once every 3 years, or every 4,000-5,000 thousand kilometers. Bleeding is required if the liquid becomes dark, which indicates a loss of its performance characteristics. AutoFlit.ru
- Why do you need an absorber for a VAZ 2114?
- What is the VAZ 2110 gravity valve for?
- Why do you need an adsorber for VAZ 2112?
- VAZ 2110 starter repair kit
- VAZ 2114 how to find out the color of a car by VIN code
- RDT VAZ 2114 signs of malfunction
- VAZ 2110 signs of malfunction
- DMRV VAZ 2114 signs of malfunction
- Dpkv vaz 2114 signs of malfunction
- Signs of a malfunction of the DPD on a VAZ 2112
- VAZ 2114 signs of injector malfunction
DIY steering rack repair video
To understand the process in more detail, it is recommended to watch the video:
I often heard noises, a friend said that it was a problem with the steering rack. Under the guidance of the video, they corrected it.
Steering mechanism of a VAZ 2112 car
An important part for controlling the movement of a car is the steering mechanism. Its main unit, the steering rack, transmits the force that the driver applies to the steering wheel through tips and rods to the steering levers, connected through axles to the steered wheels.
How safe the vehicle will be on the roads depends on the good condition of all its elements. Therefore, it is very important to timely repair the VAZ steering rack. This article suggests that you familiarize yourself with the causes of malfunctions and how to fix them yourself.
conclusions
The desire for additional amenities leads to the complication of the car. And this, in turn, is fraught with a decrease in reliability and costs. In addition, people become weaker physically.
When we want to simplify our life in some way, it turns out that, on the contrary, we make it more difficult. Installing a hydraulic booster on a VAZ 2112 is advisable when there is a genuine need for it; in all other cases it will only be an additional convenience.
Liquid leakage from the system along the way will lead to failure of the amplifier. In winter, due to low temperatures, noise may occur during operation of the device. This brings some discomfort, as the process of driving a car may be disrupted.
Disassembling the steering rack
- Remove the support and protective cap from both sides of the mechanism.
- Release the protective covers.
- Remove the stop nut using a special wrench.
Remove the stop nut
Removing the drive gear with bearing
Remove the support sleeve
Next, you need to replace all the elements that are included in the steering rack repair kit, check the product for play and conduct a visual inspection.
After disassembling the rack, special attention should be paid to the worm gear mechanism and the support sleeve. Also, if the anthers are damaged, then corrosion of some parts of the mechanism may occur.
Everything here needs to be cleaned and rinsed, and also generously lubricated.
It is necessary to change the retaining ring and the rack stop. These parts are subject to the most wear and tear.
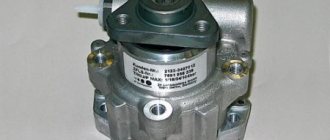
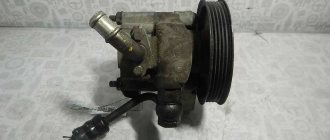
Power steering pump
The pump of this mechanism deserves a separate discussion. It costs about 3 thousand Russian rubles and is often repaired rather than replaced. But if repairs don’t help, you’ll have to spend money. As for high-quality repairs, you can again do it yourself, thereby saving your money.
Typically, a ZF brand pump is installed on the VAZ 2110 power steering, which is also used on the Audi A6, Volkswagen and other cars. But this pump model is not dismountable and there are no retaining rings or covers on it. This does not mean that it is impossible to restore the operation of such a pump. Below are instructions for removing and disassembling the power steering pump:
- Remove the clamp;
- Disconnect the return hose (do it carefully so as not to spill oil);
- Disconnect the connector;
- Remove the DJ (sensor) from the fitting bolt.
- We disconnect the discharge tube, first removing the union bolt;
- Remove the power steering drive belt;
- Now it's time to start removing the pump itself;
- Loosen the first bolt securing the pump;
- We completely unscrew the second bolt securing the pump;
- Remove the pump assembly.
We clean the pump from dirt and visually inspect it. If a development is found on the inner wall of the housing, resembling steps, then they need to be removed using a special nozzle and a drill.