Almost all car enthusiasts get very upset when something breaks in their car. First of all, the upcoming costs for the services of service station specialists are upsetting. Which very often are not of the highest quality. Therefore, it makes sense to learn how to do some work yourself. For example, replacing the crankshaft oil seal on a VAZ 2106 can be done independently in the most ordinary garage conditions.
Oil seals are designed to seal moving elements. The role of oil seals in the functioning of the power unit can hardly be overestimated, and the slightest malfunction in their operation will certainly lead to very serious breakdowns. If the front or rear seal moves even slightly out of place, a lubricant leak will occur.
Car VAZ 2106
Important nuances
Now there are three important points to note, without which this article would be incomplete:
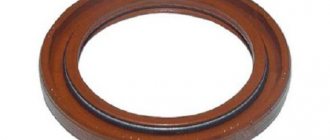
- seal sizes. When buying an oil seal at a spare parts store, you should definitely tell the seller which oil seal you need: front or rear. Despite the external similarity, the sizes of these oil seals are different. The dimensions of the front oil seal are 55*41*8 mm (these are the outer and inner diameters and thickness of the product), and the rear oil seal is 88*69*10 mm;
- Relatively recently, oil seals manufactured by Corteco appeared on sale. They are in high demand among owners of “sixes”. The fact is that the material for their manufacture is fluorine rubber. Oil seals made from it are more reliable and wear-resistant. So, if possible, it is better to purchase this particular part, despite the high price, which starts at 500 rubles;
Corteco oil seals are made of fluorine rubber and are highly wear resistant
- The groove in which the oil seal will be installed must not only be thoroughly cleaned and wiped, but also degreased. This is best done using regular technical acetone. This simple operation is the best guarantee of high seal tightness.
It is best to degrease the oil seal installation area using technical acetone.
A novice driver can easily change the front crankshaft oil seal on his own. You will have to tinker with the rear oil seal a little longer, but this task is quite capable. You just need to take your time and follow the above recommendations exactly.
Signs and reasons for the need to replace the oil seal
There can only be one sign of this problem - contamination of the engine compartment. When the tightness of the unit is broken, lubricant leaks through the damaged oil seal and the oil, falling on the rotating parts, is sprayed throughout the engine compartment. In particular, replacing the front crankshaft oil seal on a VAZ 2106, or rather, its prerequisite may be the fact that when oil leaks, it gets onto the pulley and splashes on the sides in the front of the engine. If there is a leak from the rear oil seal, oil sprays onto the flywheel in the clutch housing. If there is a large leak, the driven disc linings may become oily, and as a result, the clutch will slip. The reason for the need to replace the oil seal may be the following:
- Natural wear of the oil seal has occurred.
- The oil seal was installed skewed and, as a result of static stress, a crack appeared on its body.
- The oil seal could have suffered basic mechanical damage.
- The integrity of the oil seal working surface was damaged as a result of engine overheating.
- A poorly made oil seal, in other words, a fake.
Many car owners believe that replacing the front crankshaft oil seal on a VAZ 2106 should be done with their own hands. This will not only save money, but also gain much needed experience in the automotive business. Argue with this. However, there are certain nuances in this work. We will look at them below.
What are seals used for?
In short, the oil seal is a seal that prevents oil from leaking out of the engine. On early models of “sixes” the seals looked like small rubber rings with a diameter of about 40 cm. And after a few years they became reinforced, since pure rubber is not durable and cracks quickly. Oil seals are installed at the ends of the crankshaft, front and rear.
Modern crankshaft oil seals on the “six” have a reinforced design
Even a slight displacement of the oil seal in the groove leads to serious oil leakage. And the leak, in turn, leads to the fact that the rubbing parts in the engine cease to be lubricated. The coefficient of friction of these parts increases sharply and they begin to overheat, which can ultimately lead to the motor jamming. A jammed motor can only be restored after a lengthy and expensive overhaul (and even such repairs do not always help). So the seals on the crankshaft are extremely important parts, so the driver should carefully monitor their condition.
About the service life of oil seals
The VAZ 2106 operating instructions say that the service life of crankshaft oil seals is at least three years. The problem is that this is not always the case. For three years, oil seals can operate in conditions close to ideal. But there are simply no such conditions on domestic roads. If the driver drives mainly on unpaved or poorly paved roads, and his driving style is very aggressive, then the seals will leak earlier—in a year and a half or two .
Signs and causes of oil seal wear
In fact, there is only one sign of wear on the crankshaft seals: a dirty engine. It's simple: if oil begins to leak through a worn oil seal, it inevitably ends up on the external rotating parts of the engine and scatters throughout the engine compartment. If the front oil seal of the “six” is worn out, then the leaking oil pours directly onto the crankshaft pulley, and the pulley sprays this lubricant over the radiator and everything that is near the radiator.
The reason for the appearance of oil on the “six” crankcase is a leaking rear crankshaft oil seal.
When the rear oil seal leaks, the clutch housing becomes dirty. Or rather, the clutch flywheel, which will be covered in engine oil. If the leak is very large, then the problem will not be limited to the flywheel. Oil will also get onto the clutch driven disc. As a result, the clutch will begin to “slip” noticeably.
All of the above phenomena can occur for the following reasons:
- The oil seal has exhausted its service life. As mentioned above, oil seals on “sixes” rarely last more than two years;
- The tightness of the oil seal was broken due to mechanical damage. This happens too. Sometimes sand gets on the crankshaft protruding from the engine. Then it can get into the oil seal. After this, the sand begins to work as an abrasive material, rotating with the crankshaft and destroying the rubber from the inside;
- The seal was initially installed incorrectly. A misalignment of just a couple of millimeters can lead to a leak in the seal. So when installing this part into the groove you need to be very careful;
- The oil seal was cracked due to engine overheating. Most often this happens in the summer, in forty-degree heat. In such weather, the seal surface may become so hot that it begins to smoke. And when it cools down, it will definitely be covered with a network of small cracks;
- long idle time of the machine. If the car is not used for a long time, the oil seals on it harden, then crack and begin to leak oil. This phenomenon is especially often observed in the cold season;
- poor quality seal. It's no secret that auto parts are often counterfeited. Oil seals also did not escape this fate. The main supplier of counterfeit oil seals to the domestic auto parts market is China. Fortunately, it’s easy to spot a fake: it costs half the price. And its service life is half as long.
Important nuances
Now there are three important points to note, without which this article would be incomplete:
- seal sizes. When buying an oil seal at a spare parts store, you should definitely tell the seller which oil seal you need: front or rear. Despite the external similarity, the sizes of these oil seals are different. The dimensions of the front oil seal are 55*41*8 mm (these are the outer and inner diameters and thickness of the product), and the rear oil seal is 88*69*10 mm;
- Relatively recently, oil seals manufactured by Corteco appeared on sale. They are in high demand among owners of “sixes”. The fact is that the material for their manufacture is fluorine rubber. Oil seals made from it are more reliable and wear-resistant. So, if possible, it is better to purchase this particular part, despite the high price, which starts at 500 rubles;
A novice driver can easily change the front crankshaft oil seal on his own. You will have to tinker with the rear oil seal a little longer, but this task is quite capable. You just need to take your time and follow the above recommendations exactly.
How to replace the rear crankshaft oil seal
The procedure for replacing the crankshaft rear oil seal requires the dismantling of many components. You will have to dismantle the gearbox while carefully inspecting all components. To perform this operation, place the machine on a lift or inspection pit. Secure the wheel using the stops and then get to work.
Advice. It is advisable to have someone help you when dismantling the box, as this is a difficult and time-consuming procedure. When working, immediately begin sorting the bolts so that subsequent assembly does not turn into a complete torture. Place bolts and small parts from each unit in a separate box or on a separate blank sheet. Make a corresponding signature on each of them.
2.10. Replacing the front crankshaft oil seal
| GENERAL INFORMATION |
DIESEL ENGINE Crankshaft oil seal
| I – oil seal with spring; II – oil seal made of PTFE material; 1 – working edge; 2 – oil seal |
Installing crankshaft oil seals
| 1 – front oil seal; 2 – front cover of the cylinder block; 3 – cylinder block; 4 – flywheel; 5 – flywheel mounting bolt; | 6 – clutch housing shield; 7 – rear oil seal holder mounting bolt; 8 – rear oil seal holder with oil seal assembly |
| EXECUTION ORDER |
| 1. Remove the right front fender lock. |
| 2. Remove the camshaft drive belt (see subsection 2.4.1). |
| 3. Unscrew bolt 1 securing the crankshaft pulley, while holding the crankshaft from turning. At service stations, devices T 30004 or MP 1-310 are used for this (2 – device; 3 – crankshaft pulley). |
| 4. Remove crankshaft pulley 3. |
| 5. Using an MP 1-226 sealing ring puller, remove the old oil seal. |
| 6. Wipe the crankshaft with a clean cloth. |
| 7. Place the new oil seal on the crankshaft with the working edge inside the cylinder block using a suitable mandrel, for example T 10053/1. |
| 8. Press in the oil seal until it stops using mandrel 1. At service stations, for this purpose, use mandrel T 10053 with bolt T 10053/2 (1 – mandrel T 10053; 2 – bolt T 10053/2). |
items 1–4
| EXECUTION ORDER |
| 1. Remove the engine crankcase (see subsection 3.1). |
| 2. Unscrew the fastening bolts 7 and remove the front cover 2. The cover is installed on silicone sealant D176404 A2 without a gasket; it can be torn off from the block by knocking it down with gentle blows of a rubber hammer. |
| 3. Remove front oil seal 1 from cover 2. |
| 4. Thoroughly clean the oil seal seat in the cover and the mating surfaces of the cover and cylinder block from oil and old sealant residues. |
| 5. Using a suitable mandrel, press the new oil seal into the cover until it stops. |
| 6. Apply silicone sealant to the lid (the place where the sealant is applied is shown by the arrow). At the same time, do not apply too thick a layer of sealant; the layer thickness should be 2–3 mm. |
| 7. Place the guide mandrel on the crankshaft to avoid damaging the seal lip and install the cover in place. Tighten the cover fastening bolts evenly crosswise to a torque of 15 Nm. |
| 8. Reinstall all removed parts in reverse order. Please note that the sealant dries within 30 minutes, so you can fill the engine crankcase with oil no earlier than 30 minutes after installing the crankcase. |
PETROL ENGINES 1.0 l, 37 kW AND 1.4 l, 50 kW
| EXECUTION ORDER |
| 1. Remove the right front fender mudguard. |
| 2. Remove the generator drive belt (see subsection 2.3). |
| 3. While holding the crankshaft from turning, unscrew bolt 18 (see Fig. Cylinder block of 1.0 l, 37 kW and 1.4 l, 50 kW engines) securing the pulley. |
| 4. Remove pulley 17 of the generator drive. |
| 5. Remove the oil seal 16 from the cover 15 using an o-ring remover or by picking it up with a screwdriver. If the oil seal cannot be removed, you can remove the timing gear cover 15, but in this case you need to replace the cover gasket 20. |
| 6. Press in the new oil seal as far as it will go, with the working edge facing inward. |
| 7. Install all removed parts in reverse order. |
Step-by-step instruction
Due to the limited space between the front of the engine and the radiator, it is difficult to press in a new oil seal without distortion. For this reason, experts recommend replacing the sealing element with the front engine cover removed. Of course, doing this on a mechanic’s workbench is much more convenient, but there are also pitfalls here. As practice shows, after such dismantling it is difficult to restore the tightness along the junction line of the oil pan, and in addition, there is a danger of breaking the internal threads in a rather delicate duralumin cover.
For this reason, we recommend using the more common and less labor-intensive method, in which the damaged oil seal is replaced directly on the engine. This work will require your attention and accuracy. It is more convenient to perform all manipulations on a lift, overpass or inspection pit.
- Put the car on the handbrake and set the gear lever to fourth speed.
- Disconnect the power terminals and remove the battery from the vehicle.
- Using a 17mm socket and a long wrench, loosen the self-locking nut securing the generator to the adjusting bar.
- Having installed a pry bar or the same wrench between the generator and the right subframe (spar), use it as a lever to move the generator towards the cylinder block. This will allow you to loosen the serpentine drive belt of the mounted mechanisms and remove it from the engine.
- Moving under the car, remove the mudguard and oil pan protection.
- Unscrew the ratchet nut using a special 38 socket wrench. In some cases, the fasteners grab so tightly that even the foot brake cannot be used to block the wheels. In this case, mechanics recommend removing the starter and using a strong wrench to block the flywheel. To remove a stuck nut, the wrench is extended with a suitable pipe. Please note that the crankshaft shank has a right-hand thread, so turn the ratchet counterclockwise.
- Remove the crankshaft pulley. For these purposes, use a mounting spatula, prying the part from different sides and using the tool as a lever. However, do not overdo it, as if you press too hard, you will break the front engine cover.
To play it safe, make sure you have a puller in your arsenal. With its help, you can easily and safely dismantle even those parts that are installed with a noticeable interference. - Clean the front part of the cover, the oil seal and its seat, otherwise dirt will get inside the engine when removing the sealing element.
- Using a strong, wide-bladed screwdriver, use a strong, wide-bladed screwdriver to pry up the seal with support from the oil seal socket. Tapping the handle of the tool, remove the damaged part.
- Before installing a new oil seal, wipe its seat until it shines - this will make installation easier in the future. If the damaged oil seal is removed too easily, this indicates wear of the socket in the camshaft drive cover. To ensure sealing in the future, apply a layer of automotive sealant to the side surface of the new seal.
- Carefully install the oil seal into place. Make sure that it does not warp and fits evenly into the socket.
- Using a suitable mandrel (you can even take a wrench to remove the ratchet if it is the right thickness), carefully press the oil seal into place with a hammer.
- Carefully inspect the crankshaft pulley. If there is significant wear on its working part, then replacing the oil seal will not eliminate the problem of oil leakage. In this case, replace the part.
- Before installing the pulley, lubricate the inner and outer surfaces of the pulley hub with engine oil. Lubrication will make it easier to install the part on the crankshaft, and most importantly, it will prevent premature wear of the working edge of the oil seal in the first minutes of engine operation.
- While turning the pulley, align the groove with the key installed in the groove of the crankshaft. By shaking and simultaneously pressing on the part, ensure that the hub fits inside the oil seal.
- Screw the ratchet nut all the way in by hand and tighten with a wrench. According to the manufacturer's recommendation, the tightening torque does not exceed 101.3-125.64 N×m (10.34-12.8 kgf×m).
- Reinstall and tension the poly-V-belt of the accessory drive. Remember that excessive tension will cause accelerated wear on the alternator and coolant pump bearings. The deflection of the belt between the pump and the crankshaft with a pressure force of about 10 kgf x m is 12 - 17 mm.
- Tighten the generator mounting nut.
- Install the battery and connect it to the vehicle's on-board network. At this point the repair is considered complete.
How to change the crankshaft oil seal on a VAZ 2106
Almost all car enthusiasts get very upset when something breaks in their car. First of all, the upcoming costs for the services of service station specialists are upsetting. Which very often are not of the highest quality. Therefore, it makes sense to learn how to do some work yourself. For example, replacing the crankshaft oil seal on a VAZ 2106 can be done independently in the most ordinary garage conditions.
Oil seals are designed to seal moving elements. The role of oil seals in the functioning of the power unit can hardly be overestimated, and the slightest malfunction in their operation will certainly lead to very serious breakdowns. If the front or rear seal moves even slightly out of place, a lubricant leak will occur.
Car VAZ 2106
The role of oil seals in engine operation
Oil seals are one of the types of cuffs that serve as a seal for moving parts in various mechanisms. It would be correct to call it a reinforced cuff or a radial cuff. The role of the oil seal in the operation of the engine is quite significant and any failures in its stable functioning lead to very undesirable consequences. Even if the oil seal moves slightly from its standard position, oil leakage will certainly occur. It is believed that the probability of its replacement is once every three years. However, such a replacement may be necessary earlier, depending on operating conditions and various side problems.
Crankshaft loose
The crankshaft driller may make a mistake and loosen the crankshaft, then the engine will not have good oil pressure, and also because of this the engine may knock quickly.
Photo. This way you can turn the crankshaft on a VAZ engine with a key.
You can check for weakness in the crankshaft like this. Tighten the cushion and spin the crankshaft; if it spins very easily, it doesn’t hurt to check whether the crankshaft is loose or not.
Usually, after a good boring, the crankshaft does not clamp and turns easily. Remove the cushion, take out the liner and place chocolate foil under the liner, tighten the liner, if the crankshaft gets tight or starts to turn noticeably more difficult, it means that this crankshaft journal is bored perfectly, pull out the foil from under the liner and check the next pillow.
Photo. It is shown how to place foil under the liner, and be sure to cut off the excess foil with the tip of a knife; it is shown here that the foil is cut off on one side and not on the other.
If, after placing foil under the liner, the crankshaft does not turn more difficult, it means that this crankshaft journal is weakened, place more foil under this cushion between the liner until the crankshaft begins to turn more difficult. After all the pillows have been checked and found to be loose, and if more than one foil had to be placed under the liner, then you will have to completely remove the crankshaft and under those journals that had to be placed more than one foil, you will need to divide the foil strips into two and place half of the foil under the liner in the block. Install the crankshaft, tighten it, that's it, you have perfectly adjusted the liners, and the crankshaft will work perfectly in the engine.
Be sure to put a nail in the foil under the liner and make a hole through the holes in the liner for the oil to pass through.
Installing thrust rings on the rear support
Markings on the main bearing caps (supports are counted from the front of the engine) and the conventional number of the cylinder block
Place the crankshaft in the main bearings and insert two thrust half-rings into the sockets of the rear support, selected in thickness according to the instructions in the chapter “Crankshaft and flywheel of the VAZ 2107”. Install the main bearing caps according to the marks.
WARNING Install the main bearing caps in the same block. For this purpose, the cylinder block and the covers belonging to it are marked with the same reference number. Install the thrust half-rings with the recesses to the thrust surfaces of the crankshaft, and place a steel-aluminum half-ring on the front side of the rear support, and a metal-ceramic half-ring (yellow) on the rear side.
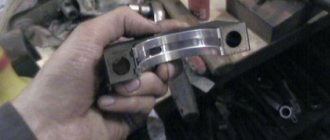
Rear crankshaft oil seal holder. The arrows indicate projections for centering the holder relative to the crankshaft flange
Place the oil seal holder gasket on the crankshaft flange, and insert the bolts securing the front clutch housing cover into the holder sockets. Place the holder with the oil seal on the mandrel 41.7853.4011 and, moving it from the mandrel to the crankshaft flange, attach it to the cylinder block.
Removing the flywheel: 1 - key; 2 - flywheel; 3 — flywheel mounting bolt; 4 — washer; 5 — clamp A.60330/R to keep the flywheel from turning; 6 — front cover of the clutch housing
Install the front cover 6 of the clutch housing using two centering bushings. Install the flywheel on the crankshaft so that the mark (cone-shaped hole) near the rim is opposite the axis of the connecting rod journal of the fourth cylinder VAZ 2104, VAZ 2105, VAZ 2107, lock the flywheel with lock A.60330/R and bolt it to the crankshaft flange.
Installing the piston with piston rings into the cylinder using the mounting sleeve from set A.60604. The arrows indicate bushings for centering the head on the cylinder block
Using the bushing from set A.60604, insert the pistons with connecting rods of the Lada Classic into the cylinders. The set contains bushings of nominal and repair sizes of pistons.
WARNING The pin hole on the piston is offset by 2 mm, so when installing the pistons into the cylinders, the “P” mark on the pistons must face the front of the engine.
Therefore, you should select a sleeve suitable for the given size of the piston being installed. You can also use an adjustable bushing 67.7854.9517. Install the bushings into the connecting rods and connecting rod caps. Connect the connecting rods to the crankshaft journals, install the caps and tighten the connecting rod bolts.
Install the sprocket on the crankshaft. Install the VAZ 2104 oil pump drive shaft and secure with a thrust flange.
- Cylinder head bolt tightening order
- Install the cylinder head of a VAZ 2104, VAZ 2105, VAZ 2107 with a gasket, with an exhaust manifold and an intake pipe using two centering bushings on the block. Tighten the fastening bolts in a certain sequence in two steps:
- - preliminary torque 33.3–41.16 Nm (3.4–4.2 kgf m) bolts 1–10; final torque 95.94–118.38 Nm (9.79–12, 08 kgf m) bolts 1–10 and a torque of 30.67–39.1 N m (3.13–3.99 kgf m) bolt 11.
Checking the alignment mark on the crankshaft sprocket with the mark on the cylinder block
Turn the flywheel so that the mark on the crankshaft sprocket of the VAZ 2105 coincides with the mark on the cylinder block.
Procedure for tightening the camshaft bearing housing nuts
Checking the alignment of the installation mark on the camshaft sprocket with the mark on the bearing housing: 1 — mark on the sprocket; 2 - mark on the bearing housing
Install the sprocket on the camshaft assembled with the bearing housing and rotate the shaft so that the mark on the sprocket is opposite the mark on the bearing housing. Remove the sprocket and, without changing the position of the shaft, install the bearing housing on the cylinder head of the VAZ 2107 and secure it by tightening the nuts in a certain sequence.
Install the chain guide on the cylinder head. Install the camshaft drive chain in the following order:
Video “One of the replacement methods”
This video presents one of the methods for replacing crankshaft oil seals on a VAZ 2106.
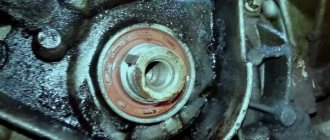
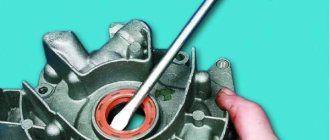
A sign that the front crankshaft oil seal needs to be replaced is oil leaking through its lip. In this case, oil is sprayed out by the rotating crankshaft pulley, as a result of which the entire front part of the engine and engine compartment becomes oily. HELPFUL ADVICE Before replacing the crankshaft front oil seal if a leak occurs, check the cleanliness of the engine crankcase ventilation system (see “Cleaning the crankcase ventilation system”), since if it is clogged, the increased gas pressure in the crankcase causes a leak even with a working seal. To replace the front crankshaft oil seal on a VAZ 2106 car, you will need: “10”, “36” wrenches (or a special wrench for the crankshaft pulley mounting nut), a screwdriver, a mounting blade, a hammer, and a bit. 1. Remove the camshaft drive chain cover (see “Replacing the Camshaft Drive Chain”) and its gasket. NOTE If you have certain skills, the crankshaft oil seal can be replaced without removing the camshaft drive chain cover directly on a VAZ 2106. However, given the small space between the radiator and the engine and the high probability of the oil seal being pressed in with a distortion due to inconvenient working conditions, we recommend a chain cover remove the camshaft drive from the vehicle to avoid having to replace the oil seal again.
2. Using light blows from the inside of the cover, remove the crankshaft oil seal.
3. Lubricate the new oil seal with engine oil and install it on the cover from the outside, oriented with the working edge towards the centering protrusions a . NOTE
The working edge of the oil seal is distinguished by the presence of a spring.
4. Lightly tap the crankshaft oil seal through the mandrel until it stops. 5. Replace a severely compressed or torn cover gasket. HELPFUL TIP To ensure that the gasket does not leak, apply a thin layer of silicone sealant to both sides of the gasket. Then, for ease of use, glue the gasket to the lid. 6. Install the cover together with the gasket on the cylinder block and tighten all the bolts and nuts securing it without tightening them. 7. Install a special mandrel on the crankshaft, centering the cover relative to the shaft (as a last resort, use the crankshaft pulley, centering the cover on the oil seal, for which install the pulley and lightly tighten the nut securing it). 8. Lightly tighten the bolts and nuts securing the cover to the cylinder block. 9. Finally, crosswise tighten the bolts and nuts securing the cover to the cylinder block. 10. Finally tighten the oil pan mounting bolts. 11. Install the remaining components and parts on the VAZ 2106 car in the reverse order of removal.
This article is intended for car enthusiasts who prefer to independently resolve technical issues that arise during the operation of the car. In this article, based on a VAZ 2106 car, replacing the front crankshaft oil seal and rear oil seal will be outlined step by step and illustrated with photos. Many car owners are very sensitive to any breakdown of their car. And what upsets them is not so much the cost of repairs, but their own incompetence sometimes in dealing with basic technical problems. In this case, replacing the crankshaft oil seal on a VAZ 2106 or on some other car model is a standard procedure that will ensure further correct operation of the engine.
Consequences
Now, let’s take a look at the consequences that can arise when oil regularly leaks from under the crankshaft oil seal. Located next to the front oil seal: if engine fluid gets on it, the belt may break faster during operation.
Installation of the front SCV
The clutch mechanism is located next to the rear oil seal, and if consumables get on it, the system will lose its friction characteristics. One way or another, in both the first and second cases, fluid leaks and engine contamination are inevitable,
There was a leak from under the front oil seal
It should be noted that a leak from under the oil pump gasket can also be confused with a leaking oil seal. These elements are located next to each other and the motor fluid in both cases will flow from one side. It is also worth adding that in this case the crankcase will be dirty, since any dirt that remains there will stick to the lubricant.
A broken timing belt is the worst outcome if the crankshaft oil seal leaks. Moreover, on many engine models, cases where engine valves were bent were recorded. In this case, the motorist will need:
- replace the timing belt;
- replace the cylinder head gasket;
- replace the valves, and grind them in;
- grind the engine cylinder head, since in 98% of cases it will be uneven and, accordingly, will not fit tightly to the engine, which will negatively affect the reliability of the power unit.
In addition, if the vehicle is regularly used, the pistons may be damaged by a leaking oil seal, since these are the elements that rub against the valves and can be damaged by them. Experienced car enthusiasts know that minor defects and irregularities on the piston surfaces will not in any way affect the operation of the power unit as a whole.
Installation of a new SCV
But in practice, there have been cases when the piston was simply pierced by the valve itself: in this case, the car owner will have to fork out for expensive repairs, almost a major one. After all, you will have to replace:
- directly failed piston;
- broken shaft valve;
- all liners around the circle will also need to be replaced;
- and change the crankcase gasket.
So, let’s summarize the total costs that a driver may experience in the event of a leak of engine fluid from under the oil seal:
- replacing the timing belt;
- changing valves, grinding them in;
- grinding the surface of the cylinder head;
- replacing the head gasket;
- adding lubricant to the engine, as well as antifreeze to the cooling system;
- It is also advisable to replace the cylinder head mounting screws;
- replacing the piston (if it fails);
- it may also be necessary to replace the piston rings;
- replacing the pan gasket.
This is what a new front SCV looks like.
A motorist who operates his vehicle with a leaking oil seal may face such consequences.
Rear oil seal leaking
Now let’s look at the consequences that the owner of a car with a leaking rear oil seal may face. As in the case of the front oil seal, the car owner will not have such catastrophic problems, but a leak in itself is already a significant problem. To solve it you will have to:
- dismantle the gearbox;
- remove the clutch mechanism along with the disc;
- remove the flywheel.
All this is needed in order to simply get to the oil seal. As for the consequences, if the rear element leaks, motor fluid can flood the clutch mechanism, as a result of which the device will lose its frictional characteristics. In this case, the vehicle:
- will significantly lose power;
- fuel consumption will increase (the driver gives gas, and the car also drives, respectively, gasoline consumption increases);
- you will have to add a lot of lubricant to the engine (all of it, of course, will not leak out, but you will have to add enough).
Fluid leak through rear SCV
What are the dangers of squeezing out oil?
The main consequence is engine oil starvation. Lack of lubrication will lead to harsher friction of internal components and their rapid wear. The lack of working fluid can completely damage the unit.
How much oil can leak?
The volume of oil released from under the crankshaft oil seal depends on how badly the part is worn (from a few drops to liters per 1 thousand kilometers). If you do not add fluid to the power unit, all the lubricant may come out.
Front oil seal
The main consequence of untimely replacement will be oil leakage and contamination of the power unit crankcase. This is due to the fact that the lubricant will attract wear products. This problem can cause the timing belt to break and damage the valves.
In this case you will need:
- change the torn timing belt;
- change the cylinder head gasket;
- replace the valves and grind them in;
- dismantle and grind the cylinder head of the internal combustion engine, since after replacing the gasket it will not be smooth and will not be able to come into contact with the engine.
It must be taken into account that regular use of a vehicle with damaged oil seals will cause damage to the pistons. Minor defects will not lead to serious problems, but the piston may be punctured by the valve, which will require major repairs.
When carrying out a capital inspection, the car enthusiast will have to replace:
- damaged or defective piston;
- failed crankshaft valve;
- all liners arranged in a circle;
- engine crankcase gasket;
- bolts securing the cylinder head (they must be tightened in accordance with the specific order and force specified in the service manual);
- pan gasket.
You will also need to add oil to the engine and antifreeze to the cooling system.
Rear oil seal
If the rear crankshaft oil seal wears out or fails, you will have to:
- remove the transmission unit;
- dismantle the clutch mechanism assembled with the drive;
- dismantle the flywheel mechanism (dismantling of these units is required in order to gain access to the oil seal).
Regular operation of a car with a damaged part will lead to the fact that engine oil can flood the clutch system, as a result, all the friction characteristics of the device will be impaired.
This will lead to the following problems:
- serious reduction in engine power;
- increased fuel consumption (when you press the gas pedal, the car will drive at the same speed, but gasoline consumption will be higher);
- the driver will have to regularly add lubricant to the engine.
Is it possible to drive with a leak?
Good to know
It is recommended to stop operating a car with a leaking crankshaft oil seal or at least limit it until the problem is completely eliminated.
Short-term use of the vehicle is possible by regularly checking the level and adding oil to the engine. The need to limit the operation of the car is due to the fact that the engine will gradually become clogged and will need to be flushed. In addition, oil can get on the contacts of electrical circuits and equipment, which can lead to malfunction.
Why might oil leak?
First, let's try to understand how to determine the time to replace the oil seal. If you believe the manufacturers, a high-quality cuff should last more than 60-70 thousand kilometers. But is this really so? Of course not. Under conditions of constant load, bad roads, dirt falling on parts, and poor quality oil, the oil seal cannot withstand and needs to be replaced quickly. A visual inspection of the rear axle will help identify the need for replacement. It is clear that for a better inspection it is recommended to put the car in a pit. It is often possible to eliminate a leak from the gearbox by tightening loose fastening bolts or replacing the washers with softer options. In this case, copper washers are considered ideal. Often, instead of a washer, a sealant in the form of a thread or ordinary gel is used on threaded connections.
Sealant for threaded connections
In addition, the cause of an oil leak may be an insufficiently tightened drain or fill plug. Careful attention should also be paid to this. If everything is in order with the plugs, then it would be a good idea to pay attention to the connection of the gearbox to the crankcase.
Connection of the gearbox to the crankcase
If the tightness of this connection is broken, then oil leakage cannot be avoided. In this case, replacing the oil seal on the VAZ 2106 bridge or replacing the axle shaft seal will help. As a rule, any leaking oil seal needs urgent replacement. No other type of repair will help here. Oil seals are inexpensive and it is better to replace them periodically so that no problems arise in the future. It also happens that the cause of the leak is the breather. It is located on the upper side of the car crankcase, on the right side.