Fuel systems of automobile engines are a rather complex device, the approach to which is contraindicated without knowledge of some basic concepts. Knowledge of the equipment and minimal experience are the main components that will help eliminate any malfunction. Even the wheel cannot be taken apart without special ceremony. We need preparation. And the power supply system is a complex set of devices that seem elementary only at first glance.
The photo shows a car fuel system, which should only be repaired by a specialist.
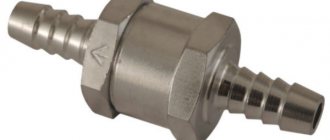
Even the conventional fuel system of the old VAZ 2101 can throw up a trick that modern high-tech engines have never even dreamed of, not to mention diesel engines of the last few years of production, where two electronic fuel sensors are installed for every centimeter of the line. Something as insignificant as a check valve may raise eyebrows among an experienced mechanic, but if the average car enthusiast is talking about a check valve, then it's worth going into more detail.
Checking the fuel pressure in the engine supply structure
The basic indicators for determining the suitability of the engine power supply design are the fuel pressure in the fuel rail of the Lada Kalina 2 car
. If the pressure is unsatisfactory, the following failures are possible:
• Unstable engine operation
• Stopping the engine at idle
• Unstable crankshaft speed at zero load
• The motor does not work at full power
• Jerks and dips during engine operation
First, we advise you to make sure that the electrical contacts in the harness blocks of the injection units, which are responsible for the supply of gasoline, are reliable.
The fuel pressure in the power supply structure is checked using a pressure gauge with a breather for connection to the fuel rail.
Note
The fuel pressure was checked using the example of a VAZ-21116 engine. On viburnums with other engines, check in the same way.
1. When you turn on the ignition, you will hear the sound of an electric fuel pump running. If you don't hear anything, check the pump's electrical circuit.
Note
If you turn on the ignition several times without starting the engine and do not hear any operating sounds, this does not indicate a defect. It will turn on when you start the car.
2. Unscrew the protective cap of the fitting for monitoring the fuel pressure at the end of the ramp. Please note that the sealing ring is fixed in the cap. If you notice flaws on the ring, replace it or the cap.
Note
On VAZ-21126 and VAZ-21127 engines, the pressure measuring valve in the fuel rail is located slightly differently.
3. Reduce the pressure in the supply structure.
4. Take the iron protective cap and unscrew the spool
Note
If the breather used during the pressure check has a tip similar in design to the tire pump breather tip, do not unscrew the valve stem.
5. Unscrew the spool valve from the pipe.
Note
Gasoline may leak while unscrewing the spool valve. Remove drips with a cloth.
6. Connect the fitting and breather to the pressure gauge. Secure the breather to the fitting using a tie. Start the car and check the pressure on the pressure gauge. Acceptable pressure should be 360-400 kPa.
7. Stop the motor, reduce the pressure in the power structure.
8. Disconnect the pressure gauge and pressure regulation fitting. Screw the spool valve into the fitting and secure the protective cap to the fitting.
Removing and disassembling the fuel module
We are carrying out work to replace the fuel level indicator sensor, fuel pressure regulator, strainer and fuel pump.
Relieve the pressure in the power system (see “Replacing the fuel filter”). Disconnect the wire terminal from the negative terminal of the battery. Inside the car, lift the rear seat cushion (see “Removing the rear seat”) and bend the sound insulation valve that closes the hatch cover in the floor of the body under the rear seat. Use a Phillips screwdriver to unscrew the two screws securing the hatch cover...
...and remove the cover. Lifting the wire harness block clamp...
...disconnect the block from the fuel module cover connector.
By pressing the spring clamp, disconnect the tip 1 of the tee from the fitting of the fuel module cover. By squeezing the clamps (in the direction of the arrows) of tip 2 of the fuel supply tube, disconnect the tip from the fitting of the fuel module cover.
Using a 10mm socket with an extension, unscrew the 8 nuts securing the pressure plate of the fuel module. Remove the spring washers and the ground wire from the tank neck studs.
Remove the pressure plate.
Carefully, trying not to damage the fuel level indicator sensor float, remove the fuel module from the tank. We drain the remaining fuel in the module into a previously prepared container.
If replacement is necessary, remove the ring plastic spacer.
Please note: when installing the spacer subsequently, its cut must coincide with the protrusion on the fuel module cover.
Remove the rubber sealing gasket. We close the hole in the fuel tank to prevent foreign objects from getting into it. We disassemble the fuel module on a workbench. If it is necessary to replace the o-rings of the fuel pressure regulator or the regulator itself...
...disconnect the tip of the ground wire from the terminal on the regulator body.
Using a screwdriver, remove the fuel pressure regulator mounting bracket.
Using pliers, remove the regulator from the module cover socket.
Remove the two rubber sealing rings of the regulator. Install the fuel pressure regulator in reverse order. We replace the regulator O-rings with new ones. Before installing the regulator O-rings, apply a thin layer of engine oil to the O-rings. To replace the fuel gauge sensor or fuel pump, the fuel pressure regulator does not need to be removed. From the inside of the module cover...
...use a screwdriver to press out the fixing plate of the common wire block...
...and disconnect the wire block from the cover connector. By pressing the latch...
...disconnect the wire block from the fuel pump. To remove the fuel level sensor...
...we release the two sensor latches...
...and move the sensor along the grooves of the housing towards the cover.
Remove the fuel level indicator sensor with wire blocks. Install the fuel level indicator sensor in the reverse order. When replacing the fuel pump, it is better to remove the fuel level sensor to avoid damaging it.
Use a screwdriver to pry up the drain tube... ...and disconnect it from the module body.
There is a retaining ring located in the groove of one of the guide posts of the module cover. We remove it by prying it with the blade of a slotted screwdriver.
By pressing the four latches of the pump holder...
...remove the fuel module cover assembly with the holder and the fuel pump.
Remove the spring from the guide post of the cover.
...remove the strainer.
Remove the lock washer from the slot in the strainer housing.
Using a screwdriver, press out the plastic latch of the holder...
...and use your finger to push the fuel pump out of the holder. We heat the plastic corrugated tube on the pump nozzle over a container of boiling water...
...and remove the tube from the pump connection. The car is equipped with a BOSCH fuel pump 0580454035.
A valve is installed in the fuel module housing to prevent fuel from leaking out of the housing. We assemble and install the fuel module in the reverse order. When installing the strainer, pay attention to the condition of the lock washer; if it is dented, it must be straightened or replaced. When installing the fuel module into the tank...
...arrow 1 on the fuel module cover should be directed backwards (towards the trunk). Arrows 2 on the fittings of the fuel module cover indicate the direction of fuel movement. We put the tips of the tee and the fuel pipe onto the fittings of the module cover until the latches click. Before closing the hatch cover in the floor of the body under the rear seat, it is necessary to check the tightness of the fuel module connections. To do this, connect the wire terminal to the “negative” terminal of the battery and turn on the ignition.
Welcome! Gas pump - without it, the car wouldn’t drive, and the engine wouldn’t even start at all, the whole point is that with the help of this unit, the fuel that is in the gas tank comes from it into the car’s engine and in connection with this, the car’s engine starts working, but over time, this pump begins to pump fuel from the gas tank into the car engine worse and worse, and therefore the car begins to slow down, because gasoline is not supplied in the quantities required.
Note! Many people basically go to a car store and buy a new fuel pump for a car, but you don’t have to do this, since by replacing a couple of parts in it you can bring it back to life for less money, but in order to repair this pump, you will need to stock up on some tools, namely: Take a screwdriver and pliers with you, and we also recommend that you make the replacement in a garage or in a guarded parking lot, because when you remove the fuel pump from the car, it will no longer start, so you will need leave the car in a secure place and close it because only by removing the pump itself can you understand what’s going on, and when you close the car, go (If there is one nearby) or drive another car to a car store and buy all the faulty parts that will be identified in during its dismantling!
Reduced pressure in the fuel rail - the fuel pump dies
For those blog readers who follow my YouTube channel, the information will not be new, but for the rest I will describe everything here. So over the past few days my Kalina has started having problems. And they were as follows:
- After a long period of inactivity, the engine began to start poorly, often even on the second try.
- the car became very “dull”, and it felt like the loss of power was about 20%
- fuel consumption increased by 10% when the engine was idling, and when driving too
In general, based on all the signs described above, it looked like a dying gas pump. Of course, I checked the mass air flow sensor first, since its operating voltage is also already close to critical. But when it was turned off, nothing changed for the better.
As a result, I began to deal with the fuel system. I’ll say right away so that there are no unnecessary questions:
Video review of a dying fuel pump on Kalina
If you don’t want to read everything written above, then you can watch this video, in which everything was clearly demonstrated.
If you have any questions, ask them below in the comments or discuss them on the channel under the video.
Stable engine operation is ensured by a number of systems and mechanisms. One of such systems, including for the Lada Kalina, is the power supply system. Among the components of this system, the key role is played by the fuel pump, which ensures an uninterrupted supply of fuel to the gasoline injection parts - special nozzles.
What should be the pressure in the fuel rail of the Lada Kalina?
So, having bought a fuel pressure gauge, which, by the way, cost me as much as 1,500 rubles, I decided to measure the pressure, which as a result was around 3.4-3.5 kg/cm². From the data obtained we can conclude that this was not enough for normal engine operation.
Moreover, when the speed increased to certain values, the pressure in the ramp dropped to 3 kg/cm², which also should not happen in a working fuel system.
The normal pressure in the system is from 3.8 to 4 kg/cm². Of course, if you are a fan of the “retirement” driving style up to 2000 rpm, then you may not feel any difference in power loss. But when the speed increases to at least 3000, you immediately feel a failure, and overtaking is difficult with such a “stupid” ride.
see also
Comments 21
It’s inexplicable, but it’s a fact, thank you very much for the information! This is exactly how the car was 'repaired'! I’m shocked, but everything starts up clearly after a loose screw, I suffered for three weeks, it started up only once since the 20th.
Tell me, the Priora suddenly stopped starting, when you turn on the ignition, the relay clicks on the starter, but on the BN there is silence, the fuses are all intact, I changed the relay and the starter does not turn
Scribe...I'm in ah wow...I also tried everything and nothing worked...and so I loosened this bolt and f.b.a.n.u.t.y.s.ya. EARNED
Hello guys! If anyone has encountered this, the problem is the following: the fuel pump does not pump when you turn on the ignition, the relay does not click, I set it to work, nothing changes, the fuse is intact, I reset the battery terminal, it pumps three times, but the car does not start, it tries, as if it’s seizing , but no, I installed a jumper instead of the fuel pump relay, it buzzes, but does not start
Same problem.
Tell me, what if it’s a simple standard key?
In fact, the bolt loosened and stopped glitching.)) I was at fault with the immobilizer, but I didn’t understand what was going on)) I turned the key 10-15 times back and forth to start, sometimes it would start the second time, the relay would turn off and that’s it. And thank heavens
Result after replacing the fuel pump
So, after replacing the fuel pump, a pressure gauge was immediately connected and when starting the engine, excellent readings of 4 kg/cm² could be observed, and when the speed was set to almost maximum, the pressure did not decrease.
Here you can see information on replacing the fuel pump, which was done in this case. As for the result specifically in terms of the operation of the motor and its power characteristics, everything is excellent here too. Now the car drives very quickly, there are no dips or slowdowns when pressing the gas pedal. As surprising as it may sound, fuel consumption also returned to normal both at idle and when driving.
Diagnostics of a mechanical fuel pump
A mechanical type fuel pump is found in a car with a carburetor engine. To check a mechanical fuel pump, you need to:
- Disconnect the fuel hose from the carburetor inlet fitting.
- We lower the disconnected hose into a transparent bottle or jar. We pump up the fuel with the lever and see what the fuel flow is like. There should be no air bubbles.
If the stream does not appear immediately, this does not indicate a malfunction of the fuel pump. Diaphragms usually rupture.
You also need to look at the strainer, inlet and outlet valve.
On foreign cars, mechanical fuel pumps are usually not dismountable. Therefore, they only have to be changed.
In general, we look for the cause of problems in the operation of the fuel pump by checking the voltage supply to the device. If it is a mechanical pump, then most likely the diaphragm is worn out.
0
Author of the publication
offline 1 month
Signs and malfunctions of the fuel pressure regulator
Welcome to the DIY car repair website. A reliable car is not one that looks beautiful, but one that rarely breaks down. Unfortunately, VAZ cars do not always please their owners, forcing them to pay a lot of attention to repairs or restoration work.
Fuel pressure control
So, one of the weakest links is the fuel pressure regulator. Due to the low quality of gasoline, it often fails, forcing you to check the VAZ fuel pressure regulator and replace it. All that remains is to find out how to diagnose the malfunction and check the functionality of the device.
Features of fuel filters for the Lada Priora car
VAZ 2170 fuel filters have their own characteristics.
- The coarse filter (FGO) is a fine mesh made of petrol-resistant plastic and capable of trapping solid impurities and dirt larger than 80 microns. It is made in the form of a flattened bag with a pipe in the middle, attached to the fuel pump using a clamp on the fitting.
Fine mesh filters gasoline before it enters the pump - A fine filter (FFO) consists of porous paper assembled into an “accordion” in a cylindrical body made of metal or polyamide. It traps impurity particles 50 microns in size and smaller. For connection to the fuel system, the filter housing has an inlet and outlet fitting with protrusions for clamps.
Fine filter traps small particles of impurities
It is noteworthy that these consumables are suitable for almost all injection VAZ models, from the “ten” to the “Kalina”. Only the latter use plastic clamps to secure the hoses (must be included in the kit), but for the Priora they are not needed.
It is quite difficult to make a mistake when purchasing a coarse filter - it is unified for the entire family of front-wheel drive VAZ models. The original product costs about 50 rubles.
You should not purchase mesh from dubious retail outlets. A fake can quickly fail, clogging the fine filter.
There are a number of things to consider when purchasing FTO.
- you need to make sure that the size of the filter matches the size of the housing and pipes - some foreign cars use very similar filters;
- the fittings must have protrusions for fixing the fuel hoses;
- preference should be given to familiar brands, avoiding Chinese manufacturers.
The size of the fine filter housing is unified for all injection VAZ vehicles
The cylindrical body of the part is held in place by a standard clamp designed for a diameter of 56 mm. The dimensions of the nozzles where the hoses with wire clamps are put on are 8 mm.
The FTO body can be made of metal or black plastic. The manufacturer installs both types of filters on VAZ cars - it doesn’t matter much.
The following fuel filter manufacturers have proven themselves well in the post-Soviet space:
- FILTRON (Poland);
- BOSCH (Germany);
- SCT Germany;
- "Salyut", Samara, Russia;
- UFI (Italy).
The filter housing can be made of metal or black plastic
Among the inexpensive products manufactured in the Russian Federation, we can highlight.
Table: price of fine filters for VAZ 2170
| Company name - |
manufacturer
FTO prices are current as of September 2022.
Video: review of fuel filters for VAZ
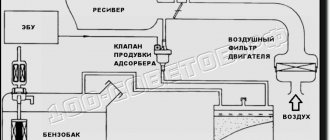
The purpose of this small device
The car's system is designed in such a way that fuel flows through the injectors to the intake manifold. It is very important that the pressure does not change. In turn, the regulator makes an accurate calculation of the volume of gasoline supplied.
As a result, the device controls the pressure parameter inside two elements - the intake manifold and the fuel rail. In this case, the regulator’s task is to maintain the pressure difference at the same level. In addition, the regulator controls the pressure parameters at the injector and in the intake manifold.
A decrease in power, malfunctions of the power unit, an increase in consumption - all these are signs of a malfunction of the fuel pressure regulator (we’ll talk about this in more detail below). At the same time, the task of the car owner is to diagnose the problem in time and accurately determine whether the fuel pressure regulator is faulty or the problem lies elsewhere.
Replacing a faulty valve
The regulator to be replaced is located in the fuel block, which includes other elements: an electric fuel pump, a coarse filter and a Kalina fuel level sensor.
You will need to remove the entire unit from the tank and then change the regulator. To do this, relieve the pressure, as described above, and then remove the rear seat. The module is located under a hatch covered with a mat and sound insulation, which moves to the side. You need to unscrew the screws and remove the hatch, then disconnect the wires and fuel hoses.
The pressure ring holding the assembly is twisted to the left. You can move it from its place with light blows of a hammer on the protrusion through the adapter. Then the fuel module along with the float is carefully removed from the opening.
You need to remove the wire from the regulator installed in it and pull out the spring retainer with a Phillips screwdriver. After this, the valve can be easily removed and replaced with a new one. Before reinstalling, the O-rings of the new part must be lubricated with fresh engine oil.
When assembling the unit, it is important to monitor the condition of the gaskets and replace them if worn. When installing the fuel module into the opening, you must ensure its orientation; the arrow on the cover should point towards the trunk. At the end, it doesn’t hurt to check the pressure again, and only then you can screw in the spool and start the engine.
To be sure, the Lada Kalina should be tested in motion, making sure that the dynamic properties of the car are restored.
Signs and malfunctions of the fuel pressure regulator
The main sign of a problem is the appearance of malfunctions in the car. So, the following symptoms of a malfunctioning fuel pressure regulator can be identified:
- Problems starting the engine. The starter rotates, but the engine does not “support” its efforts;
- power has decreased significantly. As a rule, this is immediately noticeable when accelerating a vehicle or when driving downhill;
- The engine is unstable at idle speed. At the same time, it may stall from time to time (for example, at an intersection);
- fuel consumption increases.
There may be two reasons:
- Valve failure;
- the valve just doesn't hold.
The regulator valve has failed. In this case, excess fuel is not poured into the tank, but an increased pressure of 2.5 kg/cm2 or more is created. This problem invariably affects the amount of fuel injected into the combustion chamber. As a result, fuel consumption increases, and the gasoline itself does not burn completely.
The valve doesn't hold. In this case, there is a constant “staggering” of fuel throughout the system. As a result, the pressure decreases, and with an increase in engine speed, a clear fuel shortage occurs.
In such a situation, the power and throttle response of the power unit drops significantly. In addition, during starting, you need to turn the starter for a long time to create the necessary pressure.
see also
Comments 21
It’s inexplicable, but it’s a fact, thank you very much for the information! This is exactly how the car was 'repaired'! I’m shocked, but everything starts up clearly after a loose screw, I suffered for three weeks, it started up only once since the 20th.
Tell me, the Priora suddenly stopped starting, when you turn on the ignition, the relay clicks on the starter, but on the BN there is silence, the fuses are all intact, I changed the relay and the starter does not turn
Scribe...I'm in ah wow...I also tried everything and nothing worked...and so I loosened this bolt and f.b.a.n.u.t.y.s.ya. EARNED
Hello guys! If anyone has encountered this, the problem is the following: the fuel pump does not pump when you turn on the ignition, the relay does not click, I set it to work, nothing changes, the fuse is intact, I reset the battery terminal, it pumps three times, but the car does not start, it tries, as if it’s seizing , but no, I installed a jumper instead of the fuel pump relay, it buzzes, but does not start
Same problem.
Tell me, what if it’s a simple standard key?
In fact, the bolt loosened and stopped glitching.)) I was at fault with the immobilizer, but I didn’t understand what was going on)) I turned the key 10-15 times back and forth to start, sometimes it would start the second time, the relay would turn off and that’s it. And thank heavens
Features of checking the fuel regulator
To solve the problem, it is important to know how to check the fuel regulator. This can be done using a regular pressure gauge. Everything is simple here. The device is mounted in the space between the fitting and the fuel pipe. To take measurements, the vacuum hose must be disconnected.
In this case, measurements should be made in four different modes:
- When the ignition is turned on. The nominal parameter is “three” atmospheres;
- when measured at idle – 2.5 atmospheres;
- in case of squeezing of the return flow hose - 7 atmospheres;
- with the hose removed from the pressure regulator - 3.3 atmospheres.
If the measured parameter does not correspond to the specified data or does not increase at all, then the device is faulty. In such a situation, it is enough to figure out how to change the fuel pressure regulator and perform the replacement.
Be attentive to your car, promptly respond to problems that arise, carry out diagnostics and make repairs. This is the only way to extend the life of your VAZ car and protect yourself from high costs in the future. Good luck on the roads and of course no breakdowns.
How to repair a fuel pump, also known as a fuel pump on a VAZ 2170-VAZ 2172?
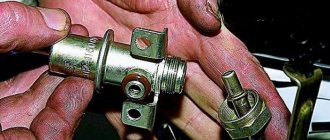
Note! Before we begin, let’s take a look at the fuel pump itself and figure out what it consists of, so that later, when disassembling it, we can understand which part has most likely become unusable, so this pump consists, firstly, of the body itself, as can be seen in the photo below, so inside this housing there is a fuel pressure regulator (it is indicated by a red arrow), as well as the fuel pump itself, and on the outside of this housing there is the same sensor that measures the fuel level in the gas tank of your car, this sensor consists of a lever, a float (Float indicated by a blue arrow) and of course from the wires that go to the dashboard from this sensor, so when the float is deformed or its lever is deformed or something happens to the wiring, the dashboard begins to give incorrect results about the remaining fuel level or In general, the arrow will lie and not move!
Now we move on, when the fuel pump itself, which is located inside this housing and which is shown in the photo below for clarity, fails, the car begins to behave incorrectly, namely, as was said earlier, it begins to twitch when you press the gas pedal, stalls idling and does not develop full power, the same story will happen with the pressure regulator, which is indicated in the photo above with a red arrow and with the same mesh that was mentioned earlier in the article! (In fact, the fuel pump itself consists of many more parts, but the most important ones have been described here, so knowing them you can already understand what most likely you will need to change in your car)
Disassembly: 1) At the very beginning of the operation, you will need to remove the fuel pump itself from the car; read about how to do this in the article entitled: “Replacing the fuel pump on a VAZ.”
Note! In the article linked above, there will be a “Note!” item. so read it carefully and if you need to, check the pressure in the power system in order to be 100% sure that it is the fuel pump that is faulty!
2) Then, when the fuel pump is removed, find the drain pipe on the module body and then use a screwdriver to remove it from the pump body.
3) Next, grab the top cover with your hand, and pulling it up, slightly lift the fuel pump housing, but only when lifting do not damage the guides, and also using a screwdriver as shown in the small picture below, remove the retaining ring from one of the guides, but do not lose it, as it is very small and will be difficult to find later.
VAZ fuel pressure regulator: causes of malfunctions and ways to solve them
An important element of the fuel system of any car is the fuel pressure regulator. The performance of the fuel system depends on how stable the fuel pressure regulator is.
The fuel pressure regulator in VAZ cars is a valve-membrane against which the regulator spring rests on the intake manifold side, and the fuel pressure on the other. After stopping the engine, it is the RTD that maintains pressure in the fuel system. If the pressure regulator is worn out, restarting the engine will require some time and manipulation of the ignition key.
The RTD is located either in the fuel tank itself, or, if the fuel system has a recirculation system (increasingly popular), then it moves to the fuel rail. The main task of the RTD is to maintain the difference between the pressure in the tank and the combustion chamber, the injector and the intake manifold. It is thanks to the operation of the fuel pressure regulator that control over the operation of the fuel injectors, the level of pressure in the fuel system is ensured, and excess volumes of fuel are returned to the tank through the return system.
Messages 12
1 Topic by Ser_vas_xxx 2014-03-13 18:28:45
- Ser_vas_xxx
- New member
- Inactive
- Registration: 2014-03-07
- Messages: 30 Thanks : 1
- Auto: 21124
Topic: Where is the check valve in the fuel pump
After diagnostics, the control valve in the fuel pump was said to be clogged
The pressure is already 4.5 they told me to clean it, where and how to clean it?! Machine 21124 1.6
2 Reply from chev-viktor 2014-03-13 20:04:39
- chev-victor
- New member
- Inactive
- From: Rostov-on-Don
- Registration: 2014-02-17
- Messages: 96 Thanks : 7
- Car: VAZ2112
Re: Where is the check valve in the fuel pump
The check valve is not cleaned in the fuel pump but in the fuel system
3 Reply from kapelkaK 2014-03-13 21:09:12 (2014-03-13 21:10:03 edited by kapelkaK)
- kapelkaK
- Experienced
- Inactive
- From: Ramenskoye, Moscow.
- Registration: 2013-12-16
- Messages: 313 Thanks : 94
- Car: VAZ 2111, 2001, 1.5; 8V; January 5.1; BK ShtatKh4m.
Re: Where is the check valve in the fuel pump
In what place exactly?
4 Reply from sergo9531 2014-03-13 21:15:38
- sergo9531
- Local
- Inactive
- From: Domodedovo
- Registration: 2014-01-12
- Messages: 578 Thanks : 208
- Auto: 21114
Re: Where is the check valve in the fuel pump
5 Reply from kapelkaK 2014-03-13 21:34:23
- kapelkaK
- Experienced
- Inactive
- From: Ramenskoye, Moscow.
- Registration: 2013-12-16
- Messages: 313 Thanks : 94
- Car: VAZ 2111, 2001, 1.5; 8V; January 5.1; BK ShtatKh4m.
Re: Where is the check valve in the fuel pump
Added: 2014-03-13 22:34:23
6 Reply from sergo9531 2014-03-13 21:36:14
- sergo9531
- Local
- Inactive
- From: Domodedovo
- Registration: 2014-01-12
- Messages: 578 Thanks : 208
- Auto: 21114
Re: Where is the check valve in the fuel pump
kapelkaK , it is the opposite. through it, excess fuel is drained into the tank. This way the pressure is regulated))
7 Reply from kapelkaK 2014-03-13 21:39:10 (2014-03-13 21:39:45 edited by kapelkaK)
- kapelkaK
- Experienced
- Inactive
- From: Ramenskoye, Moscow.
- Registration: 2013-12-16
- Messages: 313 Thanks : 94
- Car: VAZ 2111, 2001, 1.5; 8V; January 5.1; BK ShtatKh4m.
Re: Where is the check valve in the fuel pump
sergo9531 , this is not a check valve, but a return valve (so to speak). The operating principle is different.
8 Reply from sergo9531 2014-03-13 21:52:53 (2014-03-13 21:55:40 edited by sergo9531)
- sergo9531
- Local
- Inactive
- From: Domodedovo
- Registration: 2014-01-12
- Messages: 578 Thanks : 208
- Auto: 21114
Re: Where is the check valve in the fuel pump
kapelkaK , yes, you are right))) let's approach this issue from the other side) Ser_vas_xxx , the pressure in the system is 4.5 atm. pressure is regulated by a pressure regulator (right obvious
) . therefore, it is faulty))) as far as I know, the pump has a check valve (so that gasoline does not escape), but if it were faulty, the car would not start (stuck in the closed position), perhaps the opposite is true - it does not close, but in a running car it not needed
The first sign of RTD malfunction
The first sign of a faulty fuel pressure regulator is increased fuel consumption. The reason for this is simple - due to problems with the RTD, excess gasoline or diesel fuel from the internal combustion chamber does not return to the tank. This leads to an increase in pressure throughout the entire fuel system; Moreover, this increase can be significant - twice or even three times higher than the norm. If the norm is 2 kilograms per square centimeter, then with a faulty RTD this figure can reach 5 and 6 kilograms per square centimeter. This situation cannot take place for a long time, since all the “weak points” of the fuel system are very quickly discovered, and one or another breakdown occurs. In turn, a malfunction in the fuel system is fraught, firstly, with breakdowns, which, in turn, will require major repairs or even a complete replacement of the engine, and, secondly, with serious situations on the road, which are no longer fraught with costs, but with a threat to health and the lives of you and your loved ones.
It should be noted that malfunctions of the VAZ 2110 RTD after five years of operation are a regularity. It is necessary to begin monitoring the condition of the regulator after three to four years of active operation. If your car is already of advanced age, and at about the same age, the fuel pressure regulator should be monitored especially carefully for signs of malfunction.
If the power decreases and the dynamics of the engine deteriorate, the turbocharger may have stopped working altogether. This means that the fuel is not supplied to the internal combustion chamber under pressure, but gets there naturally, so to speak, by gravity. In this case, the engine at high speeds cannot cope with the fuel shortage, which can lead to rapid breakdowns.
Procedure for servicing the fuel pump, possible malfunctions
You should not always resort to immediate replacement of the Kalina fuel pump, because first you can repair it. But for this you need to select the right tool in advance.
For this device, two parameters are usually monitored: operating pressure and operating performance. After removing the device, you can check the current consumption at rated and full load. But for such measurements you will need a specialized stand.
The initial point of control will be the voltage of the connector that supplies the fuel pump from the vehicle’s on-board power system. Not only should it be equal to 12 V or even slightly exceed this value, but also when the machine is operating, the noise of the operating device should be clearly audible.
The disadvantage of this control method is the inability to detect unreliable contact in the electrical circuit on the way to the connector. Any loose connection in the fuse box, fuel pump relay, will result in the 12 V received at the terminals upstream of the pump showing the same 12 V. But a working pump will receive only a few volts and will not be able to work normally.
Also, a malfunction in such a situation may be a breakdown of the fuel pump relay. This malfunction is easy to diagnose, since special symbols are displayed on the instrument panel, which allows the driver to see an error in the operation of this part.
All control relays are located inside the car and, when malfunctioning, distinguish themselves with characteristic clicks. Replacing the fuel pump relay yourself is not difficult; it is enough to recognize the location of its installation by the special printed symbols.
Fuel pump parts disassembled
Problems and their causes
- Fuel consumption has increased. The cause may be excess pressure in the fuel system due to a faulty fuel pressure regulator.
- The engine power has decreased, the dynamic performance of the car has deteriorated and continues to deteriorate. The reason is often that the RTD has stopped holding pressure (for example, due to a high level of spring wear).
- Problems with starting the engine: in order to start the engine, you have to repeatedly “torment” the starter. The reason is difficulty in the movement of fuel in the fuel system due to a faulty (for example, jammed) fuel pressure regulator.
- The car periodically stalls, and unexpected and unmotivated jerks are possible while driving. The reason is the jamming (permanent or periodic) of the fuel pressure regulator. It is to pressure surges in the network that you owe all of the above “joys”. Such manifestations are extremely dangerous, especially when driving around the city, with a minimum distance between vehicles.
Fuel filter location
In the fuel supply system of the Lada Priora, access to filters may be difficult.
The fine filter on the Lada Priora car is located behind the gas tank
Any car enthusiast should know where the following components are located:
- The fuel tank is integrated into the underbody recess under the rear seats.
- A coarse mesh filter is installed on the suction pipe of the electric fuel pump inside the fuel tank.
FGO is installed on the suction pipe of the electric fuel pump in the gas tank
The fine filter is attached with a clamp to a bracket on the bottom of the car behind the gas tank.
The FTO on the Lada Priora car is located between the recess for the spare wheel and the gas tank
| FILTRON | BOSCH | FRAM | MANN | SCT | UFI | "Firework" | |
| Product cost, rub. | 330 | 395 | 345 | 400 | 235 | 285 | 210 |
- The distribution rail with injectors is located under the hood and bolted to the engine. At its end there is a diagnostic fitting with a valve.
The fitting with the valve is located at the end of the fuel rail
The location of the filters and fuel system rail is the same for all modifications of the VAZ 2170, regardless of the body type (sedan, hatchback or station wagon).
How to check the fuel pressure regulator
If you have any suspicions about the RDT, its performance should be checked as soon as possible. It’s quite easy to do this even at home, just follow a few simple instructions.
We unscrew the fitting responsible for the fuel pressure and inspect the o-ring. Its condition is of great importance, so if this element is old or damaged, you will have to purchase a new ring. The next step is to unscrew the spool valve from the fitting.
At this point you will need a pressure gauge to measure the pressure while the engine is running. And if the pressure is less than what is specified by the manufacturer for the VAZ model you own and the installed engine, the fuel pressure regulator needs to be changed. Moreover, it is inexpensive, the operation itself is very simple, and you can evaluate the result on your first trip.
- karemat
- buy toys for boys
- sewing store
- engine oil liqui moly
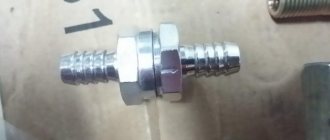
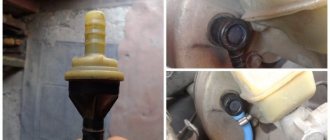
Gasoline is no joke, ch2, change the check valve and what’s inside it.
In the first part, I discovered a significant fuel leak in the engine compartment and changed almost all the gasoline hoses to imported Gates ones, but part of the return line remained unchanged, since the diameter of the hose is just over 8 mm, and the diameter of the check valve fittings 2108 is 7 mm.
After eliminating the leak, consumption by the way returned to normal, about 10 l\100. In addition to the fact that the diameter of the fitting on the valve is 7mm, and the diameter of the fitting on the carburetor is 8mm (someone pressed this in) and the diameter of the metal line is also 8mm, I decided that I needed to switch to an 8mm hose, which means the valve should also have a fitting diameter of 8mm. I rummaged around on Ali and ordered this one
, there were others, but they have notches on the fittings, it’s somehow not right to install this one, then if you remove the hose, you’ll just pull out the horseradish and cut the hose, but I looked and found it with smooth fittings. The valve can be easily purged with the mouth, so there will be no problems with circulation at low gasoline pressure, I didn’t even expect it, I thought with such a small size I would have to apply more pressure, although as it turned out, the working part of the 2108 valve is similar, it’s just that its body is so healthy. Well, in general it was/has become
Two valves in comparison
Source
Summer 2022: Solex carburetor return
Hello! I’m sitting here, drinking tea and port... And I decided to tell you this story...
For so many years now this car has had a carburetor carburetor cheburetor ugh (well, you understand what I mean) from 2108-1107010 What should I tell you? Impressions from him are, in principle, half-to-half. Initially, if you go deeper into history, the unit was designed for other engines. but this fucking ancient tendency of Soviet minds to install other spare parts on your car, even if they are similar, continues to live and develop, like mold in a basement. And it will never be eradicated. Nothing. It's forever
So here it is. Solex is in Osennka
.
Its global advantage
is its consumption on the highway. on the highway it consumes only 6.5 liters, at a speed of 80-90, if you don’t push the trigger too hard and don’t pretend to be a racer at traffic lights in the NP. Everyone made fun of me and said: “This is impossible! How? This is an ordinary Zhygul, he eats like a locomotive and stinks like a tank!” Maybe. The engine is 1.2, original, weak, chiseled for the first repair. In the carburetor, the accelerator pump was not bent into the primary chamber, but was only adjusted to accurately inject fuel into the manifold. Everything was done on the second test carb. (although during the search in 2014, I experimented with this, and bent both noses into the primary chamber as Zhenya Travnikov advised, but Osennka began to eat up, therefore, after listening to Uncle Nail Poroshin, everything came back, albeit with the adjustment of the noses to the primary and secondary chambers at the factory, and precise hit of the jet into the collector). I’ll add the jet parameters in a page, I’ve already forgotten (there’s a photo). A global overhaul and washing of the carburetor was done in 2014, since then “Osennka” has driven only 12,000 thousand. Funny.
But the disadvantages are obvious: - The car is stupid
. on the 1.2 engine it’s sooo stupid. Of course, it has no failures, because a pseudo-cable is installed, the noses are adjusted, the pump is absolutely normal, although it is an ordinary DAAZ mushroom. That is, if you got stuck in the wrong lane, in order to leave the traffic light abruptly and change lanes, you need to work hard with the trigger and gears. Grandfather Red was not lying around with her native Weber. But the Weber eats like a steamship Leonid Sobinov. Should I install other jets? The car will become faster, but again it will start to eat up, which is not necessary. Change the engine to 2103? Gearbox? A box from 2103, or better yet a 5-mortar from a VAZ 2107? F**k Not for this project anymore...
— No return
. That is, the return line in the VAZ 2101 was not designed by the factory, and the return line itself on this car was made as follows: return hose - check valve from 2108 - tee in front of the fuel pump - filter and to the carburetor, and in a circle. What do we have with this system? In the fierce heat of +40, in a jam or a traffic jam, the gasoline circulating in a circle heats up, then boils, evaporates, and the car stalls. Cold gasoline supplied from the tank is mixed with already hot gasoline, the volume of which is much larger. And so on for 12 years.
Grandfather was tired of this, especially stalling in traffic jams in the heat.
It was decided to make the correct Orthodox return line
I decided to make the inlet hole for the line from the trunk side next to the main fuel line. The tube was installed through a dense core from the wire and a gasket.
Source
Design and operation of RTD
The RTD is a valve with a diaphragm that is installed in the fuel line. When the engine is running, a certain pressure is formed in the system, which must be maintained in the required range, but since the gas pump pumps fuel continuously, the pressure increases. When the pressure increases, the RTD opens the check valve and releases excess pressure into the return system, which communicates with the fuel tank.