Once the engine has been repaired, it needs to be installed on the car. The engine is installed on a half-assembled engine, it does not have a head. To install the engine without a lift, due to its weight, you will need only two people, but three are better; the task of two is to release the engine, and the third will direct it to the box shaft. In order not to suffer, trying to get the engine onto the gearbox shaft, it will need to be fixed, the box will need to be lifted with a jack.
In this position, the box will be fixed, as a result it will be easy for the engine to get onto the box shaft. The engine must be lowered slowly, since it is not very easy to direct it onto the input shaft; only after the shaft is in the basket is the engine lowered completely onto the box.
When installing, you need to carefully ensure that the engine fits smoothly into the box, there should be no distortions, only then the shaft fits evenly into the crankshaft bearing and clutch disc.
If everything is done correctly, installation takes about 2-3 minutes. Now we gradually lower the jack and make sure that the engine mounts rest on the cushions. We screw the box to the engine, the generator, the starter, and connect the stove pipe to the pump. Now all that remains is to install the block head.
Lada 2101 Tazi Rulet › Logbook › how to properly carry out major repairs of the VAZ 2101 Engine
Overhaul is a major overhaul of the engine, i.e.
complete restoration and restoration of the engine, bringing the gaps between parts to like new ones. After a major overhaul, an engine has a new life of 80%-100%. An alternative to overhaul is installing a contract engine or a used one from disassembly, but there are pros and cons. Pros: it is possible to have a low-mileage engine with original parts, it is possible to supply a larger volume, more modern one (from carburetor to injection), from the minuses: there is a risk that the engine does not last the expected life, there may be inconsistencies with the technical passport and data. Overhaul allows you to qualitatively repair the engine, you can immediately tune the engine, increase power, bring details to mind, install a tuning camshaft, crankshaft, increase engine displacement, which is more economically feasible to do precisely at the time of repair, when the engine is disassembled. Let's consider the main stages of overhaul of an internal combustion engine. Engine removal, washing, disassembly and troubleshooting. A major overhaul can only be a major overhaul if the main engine part, the cylinder block, is being repaired. The dimensions and planes of the cylinder block are checked. If necessary, the block is bored to size and honed. honing machine honing flat top angle of honing grooves The angle of the cavity of the main roughness of the hone is also important, because at a larger angle, the oil falls into the cavity, and at a small angle it protrudes above the surface, thus improving the operating conditions of the piston rings. Ideally, of course, before boring and honing, install a false head and false gearbox on the cylinder block, because According to some data, after installing the cylinder head and gearbox, the geometry of the cylinders changes, which affects the service life in a certain way, but this applies more to sports engines with maximum power and engines with high liter power, such as turbocharged ones with more than 100 hp. with 1 l.
Opening the graphite grains of a cast iron cylinder block
In cast iron cylinders there is the concept of opening the graphite grains, visually the cylinders are matte gray, but if the grains are covered, as if by scales, the color is more shiny, which negatively affects the engine life, reducing it several times! If honing is carried out with diamond stones, then there is a problem such as carving (the introduction of abrasive particles into the surface) when using silicon carbide or aluminum oxide stones with an abundant supply of coolant. After restoration, the cylinders must be washed with either a hot soda solution or soapy water, because gasoline does not wash away abrasive dust after honing. After grinding the crankshaft, it is necessary to clean the oil supply channels; to do this, the plugs are unscrewed or drilled and the channels are cleaned with drills of a suitable diameter, washed, blown with compressed air and the crankshaft is assembled, the plugs are put in place, if necessary, new ones . This is usually done during an engine overhaul.
The cost of restoring a cylinder block (boring, honing) ranges from 350 UAH. For. VAZ, ZAZ and up to 750 UAH. from more expensive contractors on expensive equipment. Grinding the crankshaft (4 connecting rod journals and 5 main journals) – 250-500 UAH, Balancing the crankshaft assembly with flywheel and clutch basket – 600 UAH. Weight distribution of connecting rods, pistons with an accuracy of 1 gr. - 200 UAH Lightening of connecting rods - 300 UAH. Grooving cylinder head channels, combining manifolds - from 500 UAH. Boring of the block and grinding of the crankshaft is carried out by contractors, for example, the Navy company. and etc.
The second large part that requires attention is the cylinder head. A lot of things depend on the condition of the cylinder head.
Cylinder head Checks require the plane of contact with the cylinder block and subsequent grinding, especially if the engine has overheated. The camshaft, camshaft bearings, valve guides, valves, valve seals, camshaft seals, valve seats are checked for wear and replaced or restored if necessary.
The cost of disassembling and reassembling the 400 eight-valve cylinder head is 800 UAH. 16-valve cylinder head, restoration of guide bushing + valve seats 350-800 UAH. Disassembly, washing, troubleshooting and assembly of the engine from 1900 UAH, Removal and installation of the engine or replacement 900 UAH. Valve adjustment 150-450 UAH. Grinding the cylinder head plane - 200 UAH. signs There are times when the client gets the impression that an engine overhaul needs to be done, although in fact the cylinder head gasket has broken, for example, compression has dropped, oil leaks and the reason is in the cylinder head gasket, then a VAZ cylinder head gasket replacement is necessary. It happens that the cause of gasket failure is improper tightening of the cylinder head bolts, an uneven cylinder head contact plane, or stretched cylinder head bolts. There may also be a VAZ cylinder head gasket that does not match the cylinder diameter, for example, the cylinder diameter is 79 mm, but the gasket is 76 mm, or the cylinder is 77.5 mm, and the gasket is 72 mm on the Memz engine.
Because When buying a new part, it happens that you need it anyway. The cost of engine overhaul used to be from $300, today it is less because... We still live in Ukraine. Overhaul of vases is not expensive, and engines are especially susceptible to tuning, the classics are already on their way out, replaced by front-wheel drive vases and 16 valves. When disassembling, the studs of the exhaust manifold, exhaust pipe (pants) are often rolled up, in this case, drilling, straightening the threads, for example, M8x1.25, if the stud is not screwed in tightly, then you need to cut the thread to M10x1.5. The stud is broken. Tighten the yokes (main bearings) of the crankshaft and connecting rod bearings only with a torque wrench, according to the technical documentation.
How to repair a VAZ 2101 engine
VAZ 2101 cars are equipped with a carburetor 4-cylinder engine with an overhead camshaft and an in-line vertical arrangement of cylinders. Its working volume is 1.2 liters. Repair work is carried out depending on the nature of the damage. Let's look at the main stages of how to repair a VAZ 2101 engine yourself.
Removing and installing the engine
- To repair the VAZ 2101 engine, the car is first placed above an inspection ditch or on a lift.
- The hood is removed, the wires from the battery and engine electrical equipment are disconnected. The battery and engine compartment lamp are removed. To avoid damaging the radiator during dismantling, when turning the drain plug, you must hold the plug fitting with a second key. To prevent the edges from being torn off, the plug is unscrewed with a spanner or socket wrench.
- It is necessary to drain the fluid from the heater, radiator and cylinder block. To do this, unscrew the cylinder block plugs on the lower radiator tank from the expansion tank. The heater valve also opens.
- The fan casing is removed. The coolant hoses are disconnected from the engine and the radiator is removed along with the thermostat.
- Before removing the air filter, you must first disconnect the hoses, cover and filter element. The carburetor must be closed with a technological plug.
- Unscrew the nuts securing the muffler pipe to the exhaust manifold.
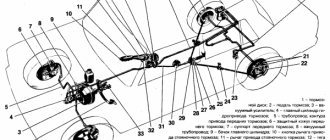
- Remove the gearbox.
- From the VAZ 2101 engine, disconnect the choke control cable and the throttle drive rod at the carburetor.
- Disconnect the fuel and heater supply hoses from the engine.
- Hang the traverse on the hoist and sling the engine behind the bracket on the right side. Sling on the left side behind the hole in the clutch housing fastening. Lightly tighten the hoist chain and unscrew the nuts securing the front suspension cushions to the front suspension cross member. Remove the VAZ 2101 engine from the engine compartment for subsequent repairs.
- Remove the hot air intake and starter insulation shield. Remove the 2 side brackets from the cylinder block along with the front engine mount cushions.
- Remove the clutch.
- When the engine repair is completed, it is installed in the reverse order. It is necessary to correctly connect the gearbox to the engine: the input shaft must fit into the splines of the clutch disc without distortion.
Recommendations for engine repair
When starting to repair a VAZ 2101 engine, prepare tools, equipment and components in advance. When carrying out repairs, do not press on the wrench while tightening or unscrewing bolts and nuts. It is better to use torque wrenches - they limit the torque. It is necessary to fit the keys tightly into the keyways of the shafts. Play of keys in shaft grooves is not allowed! During assembly, it is recommended to lubricate the rubbing surfaces of parts and threaded connections.
When replacing bearings, their pressing force should not be transmitted through rollers and balls. When pressing, the tool must rest only on the ring being pressed. To avoid misalignment of the rings, the pressing force must be in relation to the bearing axis. A correctly installed bearing rests tightly with the ends of the rings on the shoulders of the housing or shaft. It should turn without effort.
Ignition installation
After the valve adjustment is completed, we begin to set the ignition. Oil may leak out from under the distributor; to prevent this from happening, sealant must be applied under the distributor. The ignition is set to the fourth cylinder, the crankshaft pulley must be placed on the first mark of the cover, the mark of the camshaft sprocket should be at the very top, in the fourth cylinder this is the compression stroke, insert the distributor into the engine so that the slider faces the fourth cylinder towards the wire exit. Now we turn the distributor clockwise, as soon as the contact opens, the distributor can be tightened, all ignition is set. Now all that remains is to connect the sensors, install the valve covers, as well as the choke cable, throttle levers, and fill in antifreeze.
VAZ-2101 engine repair
The prototype for the production of the VAZ-2101 was the Italian FIAT-124 - “car of the year” in 1965. But the VAZ-2101 is significantly different from the Italian, unfortunately not for the better. A different engine with an overhead camshaft and an increased center-to-center distance was installed on the VAZ, which made it possible to increase the engine displacement.
With a volume of 1198 cm3. the cylinder diameter increased by 3 mm from 0.73 cm to 0.76 cm, and the piston stroke, on the contrary, decreased from 0.715 cm to 0.66 cm, that is, the engine is theoretically more responsive than the Italian one, but this does not mean that better. 800 - this is exactly the number of changes that engineers made to the FIAT-124 and called the car VAZ-2101.
When repairing the VAZ-2101 engine, do not press too hard on the key when unscrewing or tightening the nuts and bolts. If convenient, try to pull the key towards you. But if you still push the key, do it with an open palm, otherwise, when the key slips, you can damage your finger joints. Look for a position that will prevent the key from falling.
Adjustment of valves
You need to start adjusting the valves from the fourth cylinder, the mark on the camshaft sprocket should be opposite the camshaft mark, so we will adjust the 8th and 6th valves, then turn the crankshaft 180 degrees, then we can adjust the 4th and 7th valves, turn the crankshaft another 180 degrees 1 and 3, to adjust 5 and 4, turn another 180 degrees.
You can buy a feeler gauge designed for adjusting valves, this feeler gauge needs to be inserted between the camshaft and the rocker, loosen the nut by seventeen, and with a wrench of 13 you need to move the rocker so that it slightly clamps the feeler gauge. Now we slightly tighten the nut to seventeen, and with a wrench to 13 we loosen the rocker until the feeler gauge moves not hard but not easily, and now we tighten the nut to seventeen, if the feeler gauge tightens, the adjustment must be repeated. In my opinion, you don’t need to adjust the valves well right away, the point is that when you start the engine, it will run for a couple of minutes, the valves will clearly sit in their places, and you will have to adjust them again.
Ways to repair a hole with damaged threads:
- Larger thread cutting.
- Damaged holes can first be welded, and then a hole of the required diameter can be drilled and threaded.
- Restore using repair. kit - thread restoration (FAT). A thread former is a tool for repairing bad threads in various systems: fuel supply, lubrication, cooling, transmissions, cylinder head cover.
- Using screws.
- Using spiral threaded inserts.
The most rational way to restore a hole with damaged threads is to use threaded inserts. The insert looks like a spring spiral made of wire with a rhombic cross-section, on one side of which a technological lead is bent, with the help of which the insert is wrapped into the hole.
Repair using a spiral insert by drilling out the defective hole to the required size, then cutting a thread to the size of the spiral insert, then screwing in the spiral insert and breaking off the driver along the notch. A special kit with spiral inserts is sold, which includes: inserts, drills, taps, tools for screwing in the inserts.
Cold method of pressing a finger into a VAZ connecting rod. Video
The crankshaft has been installed, now we need to knock out the old pistons and install new repair pistons on the connecting rods. It is good to knock out the piston pins on a stump; drill a hole in the stump in advance, or knock it out with a chisel; the piston pin will be knocked out into this hole. It is advisable to knock out the finger with a special beard, or a round piece preferably with a diameter of 21 mm, and a heavy hammer. The piston pins are knocked out when cold; there is no need to heat them up.
Photo. Preparing pistons for installation on connecting rods.
Now we need to install new pistons on the connecting rods, you can install the pistons as is without modification, but I advise you not to be lazy and modify the pistons. First, chamfer the skirt using a sharpener or a file as shown in the photo, second, drill a hole in the piston skirt on both sides as shown in the photo.
Engines with modified pistons are much faster and more economical, since oil flows through the hole between the piston and cylinder skirt and reduces friction. Also, modified pistons do not suffer much if the engine accidentally overheats. The hole in the piston skirt used to be drilled 6mm, now it’s 14mm, so with a 14mm hole the engine turns out even faster.
Engine repair tips
When repairing the engine, you must use the tips given below.
In situations specified in the manual, you must use torque wrenches that limit torque.
The keys must be pressed tightly into the shaft keyways using a hammer or similar. We do not allow any play in the keys in the shaft grooves.
If there are a large number of nuts on an engine element, then they are tightened in the prescribed manner and one after another so that damage to the element does not occur. If the nuts have a circular arrangement, they should be tightened crosswise. If the nuts are rectangular, they should be tightened from the center of the engine element to the edges.
To begin with, the bolts and nuts are tightened by hand. After each of these elements is tightened one full turn, and so on from one element to another, crosswise or diagonally. Then, after tightening each element one full turn, starting from the first element and so on from element to element, tighten it half a turn.
And at the end we tighten the elements a quarter turn until the required tightening torque is achieved. All nuts and bolts of the same connection must be tightened with equal torque. If you allow an engine part to be overtightened, this can lead to deterioration of its strength and failure. If you allow it to be under-tightened, this may lead to self-unscrewing of the connection.
Repairing a VAZ 2101 engine is not possible without fasteners such as bolts and studs, which have the necessary tightening torques, which are specified in the technical requirements; first of all, the tightening torque depends on the material from which they are made and their diameter.
When tightening the castle nut to insert a cotter pin, tighten the nut to the specified torque value, then tighten it further to the other hole for the cotter pin. Do not under any circumstances unscrew the nut to align the hole for the cotter pin unless instructed in the instructions.
When checking or re-tightening a bolt to the correct torque setting, back the nut or bolt a quarter turn and then tighten it to the correct torque.
What kind of motor can be installed on a “penny” instead of the standard one?
One of the main types of car tuning is improving the car engine. VAZ 2101 engines are an unplowed field in this sense. Some craftsmen install turbines on them in order to increase power and traction characteristics, others change the crankshaft and bore the cylinders, and still others simply change the engine to a more powerful one.
But here it is important not to overdo it, because the car body is designed for certain loads, exceeding which can seriously harm the entire car.
Among the popular options for replacement, it is worth considering only power units that are similar in design and performance. For a penny, without any problems, you can install a 1.6 or 2.0 liter gasoline engine from the same Fiat Argenta or Polonaise.
You can try the same engine from Renault Logan or Mitsubishi Galant, if you install them together with a gearbox. But the best option is a power unit from subsequent modifications of VAZs. These could be VAZ 2106, 2107, 2112 and even 2170. The engines from these cars are suitable both in size and in mounting to the gearbox.