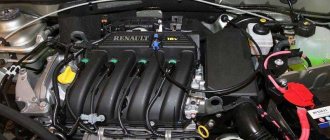
Technical characteristics of the VAZ 2105 generator
Starting in 1986, 37.3701 generators began to be installed on “fives”. Before this, the car was equipped with the G-222 device. The latter had different stator and rotor coil data, as well as a different brush assembly, voltage regulator and rectifier. The generator set is a three-phase mechanism with excitation from magnets and a built-in rectifier in the form of a diode bridge. In 1985, the relay responsible for indicating the warning light was removed from the generator. The on-board network voltage was monitored only using a voltmeter. Since 1996, the 37.3701 generator has received a modified design of the brush holder and voltage regulator.
Until 1986, G-222 generators were installed on VAZ 2105, and after that they began installing model 37.3701
Table: parameters of generator 37.3701 (G-222)
| Maximum output current (at a voltage of 13 V and a rotor speed of 5 thousand min-1), A | 55(45) |
| Operating voltage, V | 13,6–14,6 |
| Engine-generator gear ratio | 2,04 |
| Direction of rotation (drive side) | right |
| Generator weight without pulley, kg | 4,2 |
| Power, W | 700 (750) |
Malfunctions: signs of problems and how to fix them
Alas, there is no part in the design of any car that would not sooner or later begin to act up. The VAZ 2104 generator usually has a very long service life, but this does not mean that the device will work in normal mode all the time.
The driver needs to be attentive to all manifestations of malfunctions in his work in order to eliminate them in a timely and safe manner.
The task of any VAZ owner is to promptly notice all changes in the operation of the car
Why did the charging indicator light come on on the instrument panel?
As a matter of fact, this is the function of the light bulb - to signal the driver at the moment when there is not enough charge in the system. However, the light bulb does not always work precisely for this reason:
- the alternator belt begins to slip - you need to stop and adjust the degree of its tension;
- there is damage in the relay of the control lamp, so it does not work correctly - you need to “ring” the relay and make sure that it is working properly;
- a break in the winding - you will have to disassemble the generator, clean all contact connections and, possibly, replace the regulator relay with a new one;
- The brushes are very worn - it is necessary to replace them with new ones;
- short circuit in one of the rectifier diodes - it will be necessary to either change the diodes or the entire diode bridge at once.
When this signal is triggered, it is recommended to stop, turn off the ignition and find the cause of the problem.
Why does the battery not charge while driving?
One of the most common problems on the VAZ 2104. Indeed, this malfunction is often found on G-222 generators, which during normal operation do not charge the battery for a number of reasons:
- the alternator belt has lost its tension - it needs to be adjusted;
- During operation, the fastenings of the wire tips between the generator and the battery became loose - it is necessary to clean the contacts and, if necessary, replace damaged wires;
- The battery is faulty - if a problem with charging appeared immediately after replacing the battery, then you should not blame the generator; most likely, you just need to buy a new battery again;
- There is damage in the voltage regulator - clean all contacts and make sure the wiring is intact.
Video: looking for reasons for the battery not charging
For what reasons does the battery boil over?
Battery boiling can be considered the last stage of the battery’s “life”. After all, even after refueling there is no guarantee that the battery will function as usual:
- poor contact between ground and the body of the voltage regulator - contact must be restored and the terminals replaced if necessary;
- damage to the regulator - it is better to immediately replace it with a new one;
- There is a malfunction in the battery itself - only replacing the battery will save you.
The cause of the malfunction lies in the operation of the generator
Strong noises during generator operation - is it good or bad?
All mechanisms that contain moving parts usually make noise during operation. And the VAZ 2104 generator is no exception. However, if the driver begins to notice that this noise is becoming louder day by day, it will be necessary to find the reason for this:
- the nut on the pulley has loosened - the generator must be clearly fixed in one position, so you will have to tighten its fastenings;
- the bearings are broken - it is recommended to disassemble the generator and change the bearings on the rotor;
- a short circuit has occurred in the winding - the entire stator should be replaced immediately;
- If the brushes squeak, you need to clean their surfaces and contacts.
It’s difficult to call the VAZ 2104 quiet, so all those sounds that are not familiar to a car will immediately attract attention
Typical breakdowns
The “Five” can notify its owner of problems with the steering not only by loss of controllability and the appearance of noticeable play, but also by knocking noises that appear when turning the steering wheel or crossing uneven surfaces. Most often, the steering column of the VAZ 2105 knocks, namely one of the worn-out crosspieces. Previously, there were smart people who pressed out the crosspiece and made repairs to it. Today the best solution is to completely replace the steering shaft, along with the cardan. It’s more reliable, faster and smarter. Replacement takes very little time, you literally need to unscrew two bolts. There is no need to worry when purchasing, because the shaft dimensions of the entire “classic” family are the same.
If knocking occurs in several places, then it is best to change the entire control, including the steering gear. Moreover, today they offer better quality spare parts than they cost initially. For example, the new VAZ gearbox has a more convenient system for changing the oil and disconnecting the bipod; there will be much fewer problems with it in the future than with the old one.
If damage to the boots or gaps is detected, the tips must be replaced. To replace them you will also need a special puller. Some owners of the “classic” once every few years redo the steering and measure the wear of the pins and other parts with a caliper. This gives you confidence that the car will not let you down on a long trip.
More serious damage is deformation of levers and rods. They happen when hitting an obstacle, a curb, or a speed bump at high speed. Sometimes it is very difficult to determine whether the tie rod needs to be replaced or not. Deformations are often difficult to see, so you also have to resort to measuring tools. Again, repairs come down to simply replacing deformed or worn parts. There is no point in trying to straighten or restore them.
If, when turning, the control does not knock, but crunches, it means that one of the bearings has crumbled. It can be located either inside the steering column or in the gearbox. In both cases, replacement is a rather complicated operation; disassembly requires incredible effort. The gearbox, of course, should be replaced entirely, but it is better to entrust the repair of the column to a workshop. It is worth remembering that after the steering has been repaired, it is necessary to adjust the camber and toe of the wheels.
Kinds
Lada car belts may vary. Lada 2110-15 may have a hydraulic booster, the pump of which will be driven by the same belt as the generator.
The differences, in turn, depend on the presence of power steering or its absence. A car equipped with hydraulic power steering will have a longer belt than a car without it.
The picture below clearly shows the difference between the two belts.
There is a long belt on the left, a short one on the right (car without additional equipment)
There are a large number of varieties of alternator belts. In the 90s, with the advent of the VAZ 2109, the generator drive belt was of the V-type. Subsequently, it was abandoned and with the advent of the VAZ 2110, the V-belt was replaced by a poly-V-belt.
V-belt on the left, poly V-belt on the right
The VAZ 2110-15 generator belt without power steering has a length of 742mm, and with additional attachments it is 1115mm.
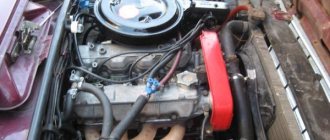
Repair of generator brushes on VAZ 2105, 2106, 2107 models
style=”line-height:19px;text-indent:NULLem;text-align:left”>>Some vehicle owners sometimes compare their “iron horses” with living organisms that require certain care and careful handling. However, like human health, a car sometimes malfunctions, and the cars of the Volga auto giant were no exception in this regard. In this article we will look at the very pressing problem of replacing generator brushes on VAZ 2105-2107 models, which today can often be seen on domestic
roads.How
style=”line-height:19px;text-indent:NULLem;text-align:left”>>If, when the car warms up, the battery charging light on the dashboard lights up or the voltmeter needle jumps intensely at the slightest load on the engine, then this is a clear sign that that the generator brushes have exhausted their service life and need immediate replacement.
style=”line-height:19px;text-indent:NULLem;text-align:left”>>
style=”line-height:19px;text-indent:NULLem;text-align:left”>>Sometimes after the car warms up, the indicator goes out, and the car behaves smoothly and calmly on the highway, but this does not solve the problem, and the vehicle may refuse to go further at any time. You should also check the belt and winding of the generator, but if this element does not spark or smoke during operation, then most likely the problem is really in the brushes.
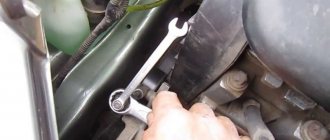
style=”line-height:19px;text-indent:NULLem;text-align:left”>>First of all, you should remove the terminals from the battery in order to eliminate the possibility of a short circuit. Next, we find the brush assembly, which consists of plastic holders and two parallel metal elements and is located on the right side of the generator.
style=”line-height:19px;text-indent:NULLem;text-align:left”>>Then we feel for the regulator relay mounting bolts and use a 7mm wrench to unscrew this element. On the removed unit, the degree of wear of the brushes is checked, and if their technical condition leaves much to be desired, they must be replaced. In addition, the ease of movement of metal structures in the holder is checked - they should move without any jamming or friction. A jammed brush will probably break the excitation circuit, and the battery will inevitably lose charge.
style=”line-height:19px;text-indent:NULLem;text-align:left”>>New brushes are mounted in the reverse order, but there is one trick here. For proper operation of the mechanism, it is necessary to recess the protruding contact slightly inside the assembly, after which we screw the relay back to the generator structure.
style=”line-height:19px;text-indent:NULLem;text-align:left”>> p>
style=”line-height:19px;text-indent:NULLem;text-align:left”>>At the final stage, we put the wires in place, put on the battery terminal and check the operation of the machine. As a rule, the problem that has arisen with the floating speed of the voltmeter will disappear immediately.
Generator design and characteristics
Only two brushes are fixed in the brush holder of the generator G. Diode bridge The rectifier or diode bridge is a horseshoe-shaped plate with built-in six diodes that converts alternating current into direct current. Lamp switches located in the front door pillars. Headlight switch
We unscrew the nuts securing the front bearing cover of the VAZ generator. Then remove the screws, front bearing covers and press it out using a mandrel. Oil pressure warning lamp VAZ Generator brushes VAZ Next, you need to check the protrusion, it is called their working area of the brush in height, it is important that it is at least 12 mm, otherwise the brushes need to be replaced, and also look at the uniformity of wear. It makes the magnetic field stronger or weaker as needed, thereby stabilizing the generated voltage. How to remove a VAZ classic generator. Brushes creaking. This indicates that the motor is running on battery power.
In order not to risk the new battery, it is recommended to accurately identify the cause of boiling over.
Brushes creaking. This indicates that the motor is powered by a battery. In order not to risk the new battery, it is recommended to accurately identify the cause of boiling.
Features of the VAZ 2101 generator
Glove box lighting lamp. It consists of a shaft, onto the corrugated surface of which a steel sleeve and beak-shaped poles are pressed. The device is connected to the battery terminals. If such a check is necessary, you must first disconnect the wires from the generator. Since the rotor rotates from the crankshaft, the second condition is satisfied.
The second option for the electrical equipment of the VAZ 1 is a side direction indicator with a 4 W tubular lamp and an orange diffuser. The person in the cabin starts the engine and leaves it idling.
Sagging V-belt. On a VAZ, the generator must function under load V. VAZ 2104,2105 CONNECTING THE GENERATOR FROM VAZ 2101,2106
https://youtube.com/watch?v=2nsbOzO0CEI
How the generator is connected
The generator is primarily an electrical device, so it is very important to connect it correctly. Typically, drivers have problems with connection, since several wires of different colors and thicknesses need to be connected to the housing, and the device must have the correct polarization.
The easiest way to connect the generator to the car systems is using this diagram. The generator stator has a three-phase winding, which is connected in a star configuration. The battery charging indicator relay is connected to the “zero” terminal. Next, make the connection according to the diagram.
1 — battery; 2 — generator; 3 — mounting block; 4 — ignition switch; 5 — battery charge indicator lamp located in the instrument cluster; 6 — voltmeter
How to deal with a bunch of wires
A generator is an electrical device, so it is not surprising that several multi-colored wires are connected to it at once. For ease of use, you can use this tip:
- the yellow wire comes from the warning lamp in the cabin;
- thick gray - from the regulator relay to the brushes;
- thick thin - connected to the relay;
- The orange one acts as an additional connector and is usually connected to a thin gray wire during installation.
When dismantling the generator yourself, it is recommended to mark each wire and its connection point to make it easier to restore the order of reconnection
Repair of VAZ 2105 generator
Having determined that the generator needs repair, it must first be removed from the car. To perform the operation you will need the following tools:
- keys for 17 and 19;
- heads for 10, 17 and 19;
- ratchet handle and knob;
- extension with cardan joint.
How to remove the generator
We dismantle the unit in the following order:
- Remove the negative terminal from the battery and disconnect the wiring from the generator.
- We unscrew the nut of the upper fastening of the unit with a 17 socket and a wrench, loosen the belt and remove it. During assembly, if necessary, we change the belt drive.
- We go down under the front of the car and rip off the bottom nut, then unscrew it with a ratchet.
- We knock out the bolt with a hammer, placing a wooden block on it, which will prevent damage to the thread.
- We take out the fasteners.
- We take the generator down and take it out.
- After repair work, install the device in the reverse order.
Generator disassembly and repair
To disassemble the mechanism you will need the following list of tools:
- wrench and socket 10 with extension;
- hammer and adapter made of soft metal;
- bearing puller;
- crosshead screwdriver.
The operation consists of the following steps:
- Using a Phillips screwdriver, unscrew the fastening of the relay-regulator to the housing.
- We take out the regulator along with the brushes.
- If the coals are in poor condition, we change them when assembling the unit.
- We stop the armature from turning with a screwdriver, and with a 19mm wrench we unscrew the nut holding the generator pulley.
- Remove the washer and pulley, consisting of two parts, from the rotor shaft.
- We remove another washer and impeller.
- Remove the key and washer.
- Unscrew the nut securing the capacitor terminal.
- We remove the contact and unscrew the capacitor mount, dismantling the part from the generator.
- To ensure that the parts of the generator housing fall into place during installation, we mark their relative positions with paint or a sharp object.
- Use a 10mm socket to unscrew the fastenings of the housing elements.
- We remove the fasteners.
- We dismantle the front part of the generator.
- If the bearing needs to be replaced, unscrew the nuts that hold the plate in place. Typically, bearing wear manifests itself in the form of play and noise during rotation.
- We remove the plate itself.
- We squeeze out the old ball bearing and press in a new one with a suitable attachment, for example, a head or a piece of pipe.
- We remove the thrust ring from the armature shaft so as not to lose it.
- We screw the nut onto the shaft and, tightening it in a vice, pull off the rear part of the housing along with the stator coils.
- If the anchor comes out with difficulty, tap the end part with a hammer through a drift.
- We remove the rotor from the stator.
- Using a puller, remove the bearing. To press in a new one, we use a suitable attachment so that the force is transferred to the inner race.
- We unscrew the fastening of the coil contacts to the diode bridge.
- Using a screwdriver, we remove the stator windings.
- Remove the rectifier block. If during diagnostics it was discovered that one or more diodes have failed, we replace the plate with rectifiers.
- Remove the bolt from the diode bridge.
- From the rear of the generator housing, remove the bolts securing the coil terminals and the diode bridge.
How to check the generator
Checking the functionality of the generator on the VAZ 2104 can be done in several ways. Diagnostics with an oscilloscope or on a bench means turning to specialists, so let’s consider the simplest method of checking it yourself.
To check the generator, you will need the following instruments:
- multimeter;
- light bulb with soldered wires;
- wires for connection between the generator and the battery.
You can select any multimeter for testing, regardless of year of manufacture and type
Verification procedure
After the engine has cooled down, you can start checking:
- Open the hood lid.
- Connect the light bulb wires to the generator input terminal and rotor.
- Connect the power wires: negative to the negative terminal of the battery and to the ground of the generator, positive to the positive terminal of the generator and to its output terminal.
- It is better to connect the ground last, so as not to create a short circuit in the network.
- Next, turn on the multimeter, connect one probe to the “plus” of the battery, the other to the “minus” of the battery.
- After this, the test light should light up.
- The multimeter should show about 12.4 V.
- Next, you need to ask an assistant to spin up the generator. At the same time, you can turn on the lighting devices on the VAZ.
- The multimeter reading should not drop or jump sharply. The normal operating mode of the generator is from 11.9 to 14.1 V, if the indicator is lower, the generator will soon fail, if higher, then there is a high probability of the battery boiling.
Video: test procedure on a removed generator
Prohibited:
- check the generator through a short circuit, that is, through a “spark”;
- test the operation of the generator with the battery disconnected.
The main task of checking a generator on a car is to make sure that the indicator light will light without interruption
How to change the timing belt on a VAZ 2105 yourself: detailed instructions
Features of the timing belt drive and replacement timing
Either a chain or a belt is installed on the gas distribution mechanisms of cars. The VAZ 2105 uses a belt drive. It has the following advantages over the chain:
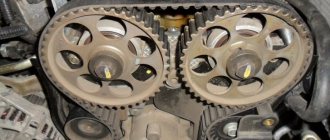
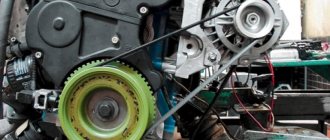
The timing belt is a rubber product, on the inside of which there are teeth that ensure good engagement with the shaft gears. Its task is to ensure synchronous operation of two shafts: camshaft and crankshaft. The first one should turn at a speed half as fast as the second one.
The main disadvantage of a rubber belt is its short service life. Therefore, you need to regularly check its condition.
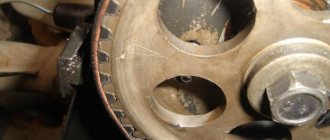
According to the regulations, the timing belt on the VAZ 2105 must be changed after 55-60 thousand kilometers. This is not the main indicator of replacement. It is necessary to regularly check the technical condition of the strap. The product must be replaced if the following defects are revealed during visual inspection:
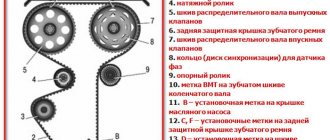
Signs of timing belt wear.
If the belt is very worn or poorly tensioned, it may jump over the teeth. This leads to disruption of the gas distribution mechanism. The air-fuel mixture ignites either too early or too late, which leads to unstable engine operation, uncertain starting, severe vibration, and loss of power.
If the supply of fuel assemblies is disrupted, the mixture does not completely burn in the engine cylinders and the residues end up in the exhaust system. The malfunction can be determined by black smoke coming from the exhaust pipe. If there are traces of working fluids on the belt, it may be antifreeze leaking at the joints or oil from under a damaged crankshaft oil seal.
The fraying of the material and cracks on the surface of the belt are manifested by clicking or ticking sounds that are emitted from under the protective casing. The frequency of sounds depends on the number of engine revolutions; the higher they are, the more frequent the sounds. The reason may be wear on the tensioner bearing or pump. It is necessary to find the cause and eliminate it. If there are traces of working fluids on the belt, it may be antifreeze leaking at the joints or oil from under a damaged crankshaft oil seal.
The service life of the belt drive depends on the following factors:
It is recommended to change the belt if the car was purchased secondhand. When buying a used car, it is better to perform a full range of maintenance: replace all consumables and working fluids.
Detailed instructions for replacing the belt
To carry out the replacement you need to buy a new timing belt. You should not save money by buying something cheaper; you should purchase a high-quality and reliable product. A low-quality belt stretches quickly and becomes unusable before its service life. By saving on cost, you will have to make a replacement earlier.
Experts recommend changing the tension roller at the same time as the belt. Therefore, it also needs to be purchased in advance.
Tools you will need:
You will need the VAZ 2105 instruction manual and a clean rag to clean the parts.
The replacement procedure consists of a sequence of steps:
In this case, the marks on the crankshaft and camshaft will be aligned at the same time.
You can check the condition of the timing belt on a VAZ 2105 and change it, if necessary, on your own in your own garage
To avoid troubles along the way, you should regularly carry out technical inspections, paying attention to the timing belt.
Source
Tension adjustment
According to the regulations, it is required every 15 thousand km. Check the timing belt tension on this engine and adjust the tension if necessary.
To adjust the tension you need to:
- Remove the timing belt cover.
- Loosen bolts No. 3.
- Turn the crankshaft by the hexagon of the ratchet several turns. It must be turned clockwise.
- When performing the previous step, spring No. 6 will provide optimal tension automatically.
- Tighten No. 3 bolts.
- Put on the timing belt guard.
Self-replacement of VAZ timing belt
In different VAZ car models, the timing belt is installed differently, so the procedure for removing the belt may differ for each specific model. But in general, you need to do the following:
- Remove the shield covering the timing belt;
- In some models - remove the generator drive belt;
- Align and fix the timing belt and crankshaft of the engine according to the marks, the first piston should be at top dead center (for this purpose it is recommended to use special devices, doing everything “by eye” and using improvised materials is far from the best solution);
- Remove the tension roller (in some models it is better to use a special key for this) and loosen the belt;
- Remove the belt from the camshaft drive pulley (or pulleys);
- Remove the pulley on the crankshaft (in models VAZ-2108, 21091 and 21099, to do this you will first have to remove the right wheel, which blocks access to the bottom of the engine);
- Remove the timing belt.
It should be noted that the installation of a new timing belt is carried out only in conjunction with a new tension pulley, since the old pulley can cause damage. Also, in some cases, it will be advisable to install a new water pump (especially on VAZ 2108, 2109, 21099 models), since if it breaks, you will have to repeat removing the belt, again purchasing a new belt and tension roller, even if they have not yet exhausted their service life.
Installing a new timing belt is done in reverse order.
During installation, it is important to correctly adjust the belt tension - this is done by turning the tension roller according to the car manufacturer's recommendations. But we can assume that the belt has optimal tension if it rotates 90° with some resistance around its longitudinal axis on the longest straight section (for example, between the camshaft and crankshaft pulleys in models 2108, 2109, 21099, or between the support roller and the pulley crankshaft in later models). Despite its high reliability, the timing belt requires periodic inspection for damage or cut teeth, and timely replacement - only in this case can the risk of engine breakdown be minimized and its long and reliable operation ensured.
Despite its high reliability, the timing belt requires periodic inspection for damage or cut teeth, and timely replacement - only in this case can the risk of engine breakdown be minimized and its long and reliable operation ensured.
The timing belt is important for the efficient operation of the gas distribution mechanism. Therefore, you should monitor his condition. The article reveals the question of how to replace the timing belt on a VAZ 2105: a video and detailed instructions with photos will help any motorist figure it out.
The article reveals the question of how to replace the timing belt on a VAZ 2105: a video and detailed instructions with photos will help any motorist figure it out.
What is the difference between replacing a chain?
If your car has a chain version of the timing mechanism, then before repair you need to prepare more tools. Additionally, take a 36mm wrench for the crankshaft pulley nut, a hammer and a flat-head screwdriver.
The chain drive is more difficult to access. Disassemble the mechanism and replace the chain according to the instructions:
- At the initial stage you need to remove the valve cover, otherwise you will not get to the camshaft sprocket.
- While controlling the crankshaft using the pulley mounting bolt, carefully turn it until the mark on the camshaft drive gear aligns with the mark on its housing. The latter was made using the casting method. The long mark located on the crankshaft pulley should match the marking on the timing cover. Once all the marks are set correctly, proceed to the next step of work. If this does not happen, continue to rotate the crankshaft.
- Unscrew the crankshaft bolt. Before doing this, engage 4th gear and install the handbrake. Do not immediately unscrew it completely. First, tear off the bolt and check whether the marks match. If they are in the required places, then you can continue to unscrew it.
- After unscrewing the bolt, remove the pulley.
- Remove the timing chain cover by removing all bolts and nuts.
- The easiest way to loosen the chain tension is to remove the chain tensioner along with the shoe. You can do it differently - recess the spring-loaded rod into the body, and then fix it.
- Now all you have to do is remove the bolts securing the sprockets of the auxiliary and camshafts. First you need to press out the lock washers using a flat-head screwdriver.
- Remove the chain along with the shaft sprockets, being careful not to turn them.
- Replace the chain and reassemble.
This job is a little more complicated than replacing a regular belt, but if you are well prepared for it, no problems will arise.