03/04/2022 1,848 VAZ 2109
Author: Ivan Baranov
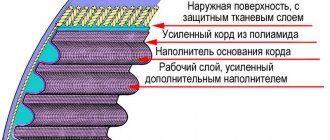
The gas distribution mechanism of car engines is often equipped with a low-noise belt drive, which is subject to wear and is a consumable item. You can replace the timing belt on a VAZ 2109 yourself, without going to a service station.
[Hide]
We independently change the timing belt on a VAZ 2109 - 21099
The gas distribution mechanism (GRM) of an internal combustion engine coordinates the operation of valves and pistons and is driven by a special belt or chain. Replacing the VAZ 2109 and VAZ 21099 timing belt is done every 30-40 thousand km, which will minimize the likelihood of it breaking during operation. Many owners turn to specialized service stations, but due to the maintainability and simplicity of the design of these models, the replacement can be done independently.
When does a timing belt need to be replaced?
The manufacturer has determined the frequency of replacing the camshaft drive belt on the VAZ 2109 every 75 thousand km. However, car owners prefer not to bring the mileage to the specified value, performing repairs after 50-60 thousand km. This is due to the operation of equipment under conditions of temperature changes, as well as due to the unstable quality of components.
To be on the safe side, it is recommended to regularly inspect the condition of the belt. The procedure is carried out annually or after 10-12 thousand kilometers. To carry out inspection, it is necessary to remove the plastic drive cover.
The belt must be replaced in the following cases:
- when abrasions are detected;
- in the presence of tears and delaminations;
- when oiling occurs (it is additionally required to detect and eliminate the source of the engine oil leak).
Preparatory work
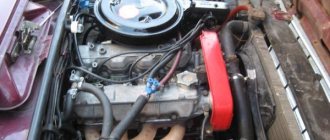
Replacing the timing belt requires some prep work to get to it. To do this, lift the hood and remove the air filter pipe by unscrewing the fastenings of the retaining clamp with a wrench. Next, the belt protective cover is removed, for which you need to unscrew the three bolts that hold it in place. This is done with a regular open-end wrench. In the opened space, the timing belt will be visible, which needs to be replaced.
The front right wheel and the protection under it are first removed to get to the crankshaft pulley, which drives the gas distribution mechanism via a belt. In the cab, put the lever in the fourth gear position and ask the assistant to press the brake pedal. We install the head 19 on a long wrench so that it is convenient to get to the crankshaft pulley, which we unscrew, which will require some effort. After the bolt is broken, you can put the gear in neutral and not hold the brake pedal.
Important feature! To replace the timing belt on a VAZ 2109 8-valve injection engine or a similar VAZ 21099 model, when removing the crankshaft pulley, you need to hold the flywheel, which is best done with a screwdriver. Otherwise, it will rotate along with the pulley. In carburetor engines this problem does not exist; the pulley is held independently.
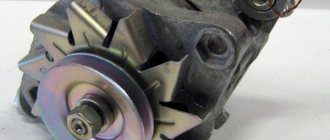
From the top of the open hood, the nut that holds the tension of the generator belt is loosened; this is best done using a special cardan on which to place the head of the key. The generator pulley is moved so that the belt can be removed without interference. After this, remove the crankshaft pulley so that the gear is visible.
Engine characteristics
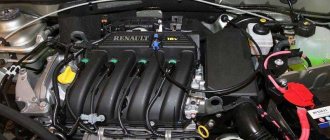
Throughout the entire production period, these models were equipped with V8 power units of various modifications. They differed in their working volume, which varied by installing pistons of different diameters and a crankshaft with a reduced piston stroke. Later they began to install VAZ-2111-80 and VAZ-11183-20 engines with an injector in the power system. The first of them had a working volume of 1500 cm3, and the second was already 1600 cm3.
Replacing the timing belt on the 2108 engine, performed efficiently and in a timely manner, ensures a long period of operation of the engine. The engines are equipped with pistons with a working diameter of 76 mm; for engines with a volume of 1.5 or 1.6 liters, their diameter is increased to 82 mm, which have a recess for the valve heads. The piston stroke in the engine is 71 mm; for engines with a displacement of 1100 cm3 it was reduced to 66 mm. Replacing the timing belt on a VAZ 2108 can be done earlier than the factory recommendations if the operating rules of the power unit are not followed.
Owners of VAZ 2108, 2109 should be aware that untimely replacement of the timing belt can lead to its breakage, and this causes damage to the valves in the cylinder head of the power unit.
VAZ 21083 or VAZ 21093 engines do not have this drawback. In the event that the timing belt on these engines breaks, the valves do not meet the pistons, since the pistons have special recesses. To replace the timing belt, simply align the marks and install a new product.
Aligning marks
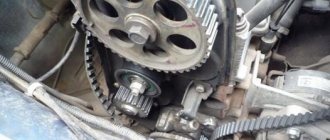
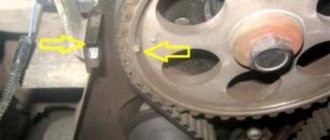
In order for the engine to work after replacement, it is necessary to set the timing marks. If the belt tensioner roller is noisy, it is better to replace it. Although it is better to do this in any case, so that no problems arise during the life of the belt. But if this is not possible, use a 17 wrench to loosen the nut holding it in order to loosen the tension for subsequent removal of the belt. We find a mark on the main camshaft sprocket and align it with the mark on the cover. To align the marks, unscrew the bolt holding the camshaft sprocket, align the timing belt marks, and then tighten it again.
After this, we align the marks on the crankshaft. To do this, we find a groove on the housing in the area of the oil pump and a point on the crankshaft gear. We put the pulley on the gear and turn it by hand until the marks match. This is easy to do; just hand strength is enough to turn the pulley.
Sometimes the marks on the crankshaft are not visible, then after aligning the marks on the camshaft, you need to make sure that the mark on the flywheel and the notch on the casing match. To do this, you first need to remove a special plug, after which these marks will be visible. If they do not match, after replacing the timing belt the engine will not start, and if it starts, it will run unstably and intermittently. Therefore, this stage is important for successful repair and subsequent operation of the car.
What are the signs of a broken belt?
You can determine that the timing belt has broken by the following “symptoms”:
- Abrupt stopping of the engine and inability to start it. Attempts to start the power unit only worsen the situation, since the piston causes new damage to the failed valve.
- After a belt breaks, engine operation may be accompanied by a metallic knock and ease of rotation of the crankshaft by the starter. This is due to the lack of compression in the engine cylinders, as a result of which nothing holds the pistons.
Video: how to determine if the timing belt has broken
The video from the Renault Repair channel describes in detail how to independently determine whether the timing belt is damaged or broken.
Belt installation
If the marks on the camshaft and crankshaft coincide, you need to install a new timing belt. If there are markings or inscriptions on the belt, they must be oriented clockwise, and the arrows must also be oriented if they are on the belt. Before this, the old belt is removed; if it is intact, by examining it, you can make sure that it is cracked and its operation is dangerous.
First, the belt is installed on the crankshaft gear, and then, with light force, on the camshaft sprocket. When installed, it should go around the drive sprocket and tension roller, making a zigzag.
Checking the timing belt tension is done by adjusting the tension roller, which is best replaced when installing a new belt. This is done with a special key; if you don’t have one, bolts or pins 40-50 mm long that fit the diameter are inserted into the holes. A screwdriver is inserted between them and, turning the roller, the belt is tightened. It should be quite tight, but with the average effort of the hand to turn 90°, if it is overtightened, it will quickly wear out. After this, the tension roller nut is securely tightened.
Replacement (main stage)
In order to dismantle the timing belt on a VAZ 2109, unscrew the roller mounting nut with a 17-size wrench. The belt tension will become less when the nut is loosened. The belt is dismantled first from the camshaft pulley, and only then from the crankshaft. Next, the new belt is installed. Now we can talk about how to set timing marks on a VAZ-2109.
It is recommended to inspect the camshaft pulley. You can find a groove (recess) at the outer diameter at the end; it must be aligned with the bar on the engine block (on the left, on the cab side). In order for the timing marks to align, the camshaft must be rotated in a clockwise direction.
Next, you need to pay attention to the crankshaft roller. It also has a groove that needs to be aligned with the mark on the engine block. The most convenient way is when the crankshaft timing marks are mated on the flywheel. To do this, it is necessary to observe the process through the hole in the transmission housing (clutch).
The oblong mark (on the flywheel) is aligned with the indentation on the plate. Such installation of VAZ 2109 timing marks will ensure effective synchronization of both shafts. After all the described procedures have been completed, you can assemble the engine and perform a test run.
Now you know how to change the timing belt and how to set timing marks on a VAZ-2109. However, despite the fact that the “nine” is relatively easy to maintain and repair, the lack of the necessary skills and experience in carrying out this work can result in unpredictable consequences and, possibly, expensive repairs.
Reassembly
Then everything is assembled in reverse order. First, install the crankshaft pulley. To tighten the bolt, set the fourth speed again and depress the brake pedal, after which the bolt is tightened with a head with great force using a collar. The generator belt is installed in place, the pulleys are moved apart using a pipe, a collar or a small pry bar. This is necessary for good tension of the generator belt, after which the nut is tightened using a wrench with a universal joint. The pulling procedure is repeated several times. This belt should be stretched very tightly and practically not bend under the force of your hand.
Why does the timing belt break on a VAZ 2109?
Many people wonder why the timing belt breaks only after it has happened. You will be lucky if such a breakdown occurs, for example, somewhere in the yards while the engine is warming up, and not on the highway between cities. Therefore, so that you do not find yourself in such situations, you need to know why this happens. There are several reasons for belt breaks:
- Natural wear of the part.
- Buying a defective belt.
- Contact with technical fluids on the belt.
- Malfunction of timing drive parts.
Let's discuss each point in more detail.
Natural wear of the part.
During operation, the belt not only wears out, but also bends, resulting in microcracks that subsequently grow and lead to belt breakage.
Each node has its own service life. The timing belt of the eight-valve VAZ engine operates for 60 thousand kilometers.
Buying a defective belt.
Don't skimp on critical spare parts. By saving 100-200 rubles you can be stuck on the road for a long time.
Contact with technical fluids on the belt.
Oil or coolant can easily get on the timing belt. Oil gets in due to wear on the camshaft and crankshaft seals, and antifreeze can leak out when the pump wears out.
Malfunction of timing drive parts.
Timing drive parts include:
- Camshaft and crankshaft gears.
- Tension roller
- Pump drive gear
Over many thousands of kilometers, the timing gears wear out and the possibility of the belt jumping over a gear tooth increases.
Due to a poor-quality belt tension roller or due to its long use, it may jam. Also, do not overtighten the belt. A belt that is too tight begins to whistle and can break very quickly.
During operation, the pump bearings wear out and play appears at the pump shaft, as a result of which the pump drive gear is crooked and the timing belt begins to slip and rub against the protective casing or the block.
Main malfunctions of the timing belt of the VAZ 2109 engine
These include the following:
- the thermal clearance of the valves is broken;
- camshaft bearings or cams are worn;
- broken valve springs;
- valves stuck;
- the strap is stretched or weakened (slips or slips, perhaps skips if the teeth are worn);
- the camshaft timing pulley is damaged;
- oil seals (valve stems or guides) are worn out;
- carbon deposits on the valve plate.
There are several factors that are also typical for malfunctions of the crank mechanism:
- general wear and tear of the power unit elements caused by the exhaustion of the main resource determined by the manufacturer;
- the engine operating rules have been violated (this may include the use of low-grade fuel, low-quality oil, prolonged operation at high speeds).
One of the most serious problems that can happen is the so-called stuck valves. Such a breakdown leads to complete engine failure and expensive repairs. There may be two reasons.
Factors that caused the malfunction
The first is operation on low-grade fuel, as a result of which resin is deposited on the valve stems. The second factor is resonance caused by broken springs. In this case, when the piston reaches TDC, the valve does not have time to fully seat itself. This kind of problem is extremely rare, but it doesn’t hurt to know about it.
A common malfunction with a violation of the thermal clearance occurs due to wear of the bearings or camshaft cams. Also possibly the camshaft pulley. Often the cause is incorrect adjustment of the gap or incorrect selection of the washer.
In fact, it is quite difficult to correctly diagnose timing belt faults, since signs may indicate other engine components and assemblies not related to the timing belt.
https://youtube.com/watch?v=hqf2QA3WHcw
Therefore, diagnosing breakdowns of the gas distribution mechanism often involves removing the cylinder head cover for a visual inspection of the condition of the elements. A timing malfunction in any case leads to a violation of the valve timing, as a result of which unstable engine operation is observed, the inability to gain power, etc.
Signs of trouble
You can carry out diagnostics yourself if you pay attention to phenomena that clearly or indirectly indicate problems with gas distribution:
- at low and medium speeds a knock is heard in the cylinder head;
- the power of the power plant has been reduced;
- a metallic knock when starting the engine, which goes away as it warms up;
- The camshaft drive is noisy;
- there are strong pops in the exhaust system;
- exhaust gases have a blue tint;
- increased oil consumption is observed;
- engine detonation when revving up;
- the motor overheats;
- failures during engine operation.
For an accurate diagnosis, the best option would be to contact a specialized center. You should not delay with such malfunctions, as the consequences can be serious.
How to remove the timing belt on a VAZ 2109.
First of all, we engage fifth gear (this is done to make it easier to crank the engine when we align the marks), loosen the nuts on the front left wheel and jack it up. Open the hood, remove the protective cover and look at the position of the mark on the gear.
If you change the belt on a VAZ before it breaks.
Rotate the wheel until the marks on the gear and on the plate match.
After the marks coincide in this place, open the inspection hole plug in the clutch housing and check whether the slot on the housing coincides with the mark on the flywheel.
If there are no marks on the flywheel, then rotate the wheel so that the camshaft gear makes one more revolution. If this time no risk appears near the mark in the clutch housing, read how to change the timing belt on a VAZ 2109 if the belt breaks. If the mark coincides with the mark, unscrew the crankshaft bolt and go to the section “Lower timing mark of VAZ 2109”
If the timing belt on the VAZ 2109 is broken and you are planning to change it.
We remove the wheel, remove the plastic fender liner, if you have one. Unscrew the crankshaft pulley bolt.
Replacing the pump and removing the belt
Along with the timing belt, the fluid pump should also be replaced. The service life of both units is approximately the same - about 60 thousand kilometers.
True, the pump can go 75, but not every instance. Therefore, it is better to be on the safe side once again to avoid any troubles in the future.
First you need to get rid of the belt. To do this, you need to remove the generator belt drive pulley from the crankshaft.
Use a 17 key to loosen the tension roller. When the belt is loose, it can be removed. There is no need to stand on ceremony with it; you can even cut it off so as not to waste a lot of time on this activity.
Now that we have come to the pump, we must not forget about the most important thing - the coolant in the system. To drain it, there are two holes:
- in the crankcase - a bronze bolt with a wrench head 13;
- at the bottom of the radiator - can be easily unscrewed by hand.
Don't forget to open the heater tap and unscrew the cap from the expansion tank. If there is coolant left in the heater radiator, it will pour out when the pump is dismantled. This results in significant fluid losses.
The cooling system on the VAZ-2109 is sealed, so pressure from above is necessary for the antifreeze to come out.
The pump is secured with three bolts to the engine block. Use a 10mm wrench to unscrew them, and use a hammer and thin chisel to knock them out of their seat.
Clean the surface on the block thoroughly. The main thing is that there are no old gaskets or small particles of dirt left on it. The pump is installed in the reverse order of removal.
Also read - Where is the VAZ 2109 starter, carburetor, injector.
Installing a timing belt on a VAZ 2109 injector.
Before installing the belt, check all marks again. When installing the belt, there should be no slack in the belt between the camshaft and crankshaft gears, otherwise the marks will go away. It is best for the belt to be slightly tensioned in this place. It is allowed that the marks differ by approximately half a gear tooth. We install the tension roller. Before him, a washer is put on the bolt, and only then the roller itself.
How to properly tension the timing belt on a VAZ 2109.
The belt can be tensioned either with or without a special key. A special key can replace a screwdriver and 2 nails or self-tapping screws. We insert the nails into the holes of the roller, insert a screwdriver between them and twist counterclockwise. A good tension is considered to be the moment when the belt between the camshaft and crankshaft gears can be twisted 90 degrees with little effort. With the engine running, in this place the belt should run straight like a string, without beating. It should also make noises such as creaks and whistles.
After tensioning the belt, turn the crankshaft 2 turns and see if the marks on the gears match. If everything matches, then we collect the rest in reverse order.
I hope in the article “How to change the timing belt on a VAZ 2109” you found answers to all your questions. If something is unclear, leave your question in the comments.
Source
How to align the crankshaft and camshaft marks on a 402 engine
you can make 4t from 50cc into 4t 85cc here:
Dmitry (Nnenia) Those who rode Chinese 4-stroke “fifty dollars” felt that the capabilities of their engines left much to be desired. Horsepower can be added by installing a tuning kit that increases the displacement to 72 cubic meters. Using the GX Ranger scooter as an example. The technology described is applicable to many 4-stroke scooter engines. Remove the side parts of the plastic lining and the seat tank - this is already enough to disassemble the cylinder-piston group. For convenience, we also disconnected the engine-transmission unit from the frame. Disconnect all hoses and throttle cable from the carburetor and remove the carburetor. Remove the muffler by first unscrewing its mounting bolts - they are located near the oil filler neck and on the exhaust pipe. Remove the cooling shroud halves by unscrewing the screws that connect them. That's it, the motor is ready for disassembly. Here are the marks (highlighted with a red oval): on the generator rotor, crankcase. and the camshaft sprocket.