An oil leak from the axle gearbox through the drive gear oil seal is like a person with a runny nose. It seems that you are working as always, but this constant dampness under your nose is annoying. The only difference is that a person does not need the fluid flowing from the nose, but at the same time it is constantly produced by the body with a cold. And the bridge desperately needs the oil flowing out of the bridge, but it will not be able to replenish the supply without your help. It’s good that replacing the rear axle gearbox seal on a VAZ 2107 and other models of this series is possible with your own hands.
How to replace the rear axle gearbox seal of a VAZ-2107
The VAZ-2107 rear axle gearbox seal prevents lubricant leakage, so if it is displaced or worn out (rubber is not elastic), it is necessary to fix the problem as soon as possible.
Replacing the oil seal suitable for the rear axle is a serious procedure, but if you want, you can learn everything. Sometimes it is even difficult to find an oil seal of the required size for a VAZ-2107, then to replace it you should take a regular oil seal from a similar engine. For example, if the new oil seal is larger than the old one, it will not be possible to put it on, so it is better to buy a smaller sample.
Make sure that the oil seal has an oblique cutting format, and a boot is also required. A traditional new oil seal is enough for 40,000 - 50,000 km. The boot prevents dirt and moisture from getting inside the part, which is especially valuable on Russian highways. The side thread, playing the role of a pump, prevents the oil from leaking and throws the solution back into the crankcase.
Tell me, doctor, is there any way to do without surgery?
First of all, you need to drain the oil from the bridge. To do this, we turn out both plugs - both the drain and the filler. Next, disconnect the driveshaft from the bridge. When separating the axle and cardan flanges, be careful - sometimes oil accumulates in the cavity between the flanges. If this happens, then check the axial play of the flange by rocking it along the axis with your hand. There shouldn't be any play. If there is noticeable movement (in fact, play of more than 0.05 mm is already very harmful for the bridge), it is worth once again carefully inspecting the traces of oil on the crankcase. Perhaps the oil leaked not through the cuff, but through the gaps in the splines of the loose flange? In this case, it is worth trying to eliminate the play and observe the bridge in operation. If the leak stops, then that was the reason.
Axial play of the flange is eliminated by tightening the nut. When handling a flange nut, you should always remember that it does more than just hold the flange. This is the most important element in adjusting the drive gear bearings, and improper tightening can have serious consequences, ranging from noise to axle jamming. Having inserted two bolts into the holes of the flange, we insert the mounting between them so that, holding it, we prevent the rotation of the flange when the nut rotates. Pull the nut just enough to select the gap. The thread pitch is 1.25 mm, which means that when you turn the nut one turn, it will move along the axis by the same 1.25 mm. If the flange play is minimal - 0.05 mm, then it is enough to turn the nut 1/25 of a turn, that is, only 15 degrees.
Overtightening the nut loads the drive gear bearings with a large axial force, as a result they overheat and may fail. To be sure that we did everything correctly, we need to measure the moment of resistance to rotation of the drive gear. To do this, you need to remove the rear wheels and brake drums, unscrew the axle shaft mounting bolts and pull off the axle shafts, disengaging them from the differential gears. Then we tightly wind the thread onto the flange shaft and pull its free end with a steelyard, measuring the force at which the flange rotates evenly without jerking or acceleration. A less accurate result is obtained by another method, when the steelyard is hooked to a hole in the flange and also pulled evenly. In this case, care must be taken to ensure that the force is directed perpendicular to the radius of the flange circumference. You can also use a torque wrench, evenly rotating the drive gear shaft by the nut, but with such a movement it is difficult to follow its readings. We multiply the measured force value by the radius value, thereby obtaining the moment of resistance to rotation. The torque value should be in the range of 6–9 kgf.cm.
You can try to do without removing the axle shafts and measuring the torque on the flange. Experienced mechanics can do this. To do this, tighten the nut exactly until the play is eliminated and a little more. After this, we put the driveshaft in place and make a test drive in a mode sufficient for the bridge to warm up to operating temperatures (several tens of kilometers along a country road). After this, we check by hand the heating of the axle housing in the area of the drive gear bearings. If the hand tolerates heat, then we assume that everything is in order. If the bearings have become so hot that a drop of water on the crankcase hisses, then we have overdone it and now we definitely cannot do without a good adjustment. You cannot reduce the moment of resistance to rotation of the drive gear simply by loosening the nut. The fact is that a deformable spacer sleeve is installed between the bearings, which, when the nut is tightened, gives the structure the necessary rigidity. By tightening the nut, we compressed the bushing more than necessary, and it will no longer be able to lengthen back. When we loosen the nut, the bushing will no longer be a “spacer”, so it must be replaced
You should also pay attention to the bearings. If a blue color appears on the rolling surfaces, it means they are overheated and also require replacement.
Replacing the rear axle oil seal of a VAZ-2107
The VAZ-2107 is a rear-wheel drive car, the chassis of which is located on the rear component. If the car is used every day, the oil seal has the main function of moving the vehicle. That is why the condition of the oil seal located on the rear axle of the VAZ-2107 must be regularly monitored and, if possible, replaced.
To make replacing the VAZ-2107 rear axle gearbox seal quick, prepare the following set of tools:
- puller equipped with 2 types of removal;
- torque wrench.
Another nuance is that an oil leak indicates a malfunction of the oil seal, but if an oil film has formed on the gearbox housing, this does not indicate a oil seal failure.
When starting work with your own hands, treat it with full responsibility, otherwise you will have to disassemble the gearbox, and this can only be done by highly qualified specialists using special equipment.
Difficulties will not arise if you use these step-by-step instructions:
- First you need to remove the old oil seal. If you know how to remove the old unit on a VAZ-2107, installing a new one is done in the reverse order, the steps do not change. To begin, lift the car onto an overpass or place it on a viewing hole.
- Drain the old oil that is filled in the rear axle of the VAZ-2107 into a container.
- To unscrew the driveshaft from the drive gear, hang the wheel located on the rear of the machine.
- Using a size 13 wrench, remove the 4 nuts securing the heat shield, the latter is located directly above the catalytic converter.
- Now you can remove the electrical shield.
- Mark the cardan where the hinge fork is located, based on the position of the main drive drive gear flange.
- Using a 13mm wrench, unscrew 4 nuts. At this time, support the universal joint with a mounting device to prevent rotation.
- In case of corrosion processes that have affected the bolt threads, experts recommend treating the threads with a lubricating compound, which can be purchased at a car dealership. After the composition softens the metal, you should take a 13-mm open-end wrench equipped with wide jaws, a flat-tip screwdriver, and then unscrew the bolts.
- Next, move the cardan shaft forward; if you cannot do this yourself, use a hammer - hit the cardan shaft fork a couple of times with the tool.
- Hang the cardan from the rear axle.
- Apply the handbrake.
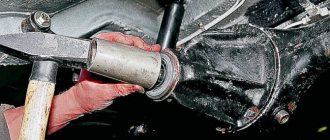
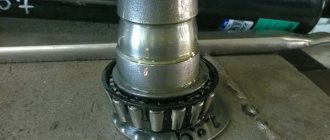
- Armed with a 24mm wrench, unscrew the nut that firmly secures the shank flange.
- Press the flange off the pins using a two-jaw puller.
- Remove the washer and dirt deflector from the shank.
- Feel for the gearbox seal of the VAZ-2107 rear axle. Using a screwdriver, remove it from the gearbox housing.
A little anatomy
In the last years of its life on the AvtoVAZ assembly line, the classic Zhiguli remained perhaps the only passenger car in the world with a rigid drive axle. This design is simple and technologically advanced in production, but has serious disadvantages in operation:
- large unsprung mass of the bridge, which negatively affects the smoothness of the vehicle;
- tendency to steer when one of the wheels hits an obstacle - at this time, due to the misalignment of the bridge, both wheels tilt from the vertical and tend to roll in the direction of the tilt;
- reduction in the useful volume of the trunk, because there must be free space between the axle and the car body for the axle to move during the compression of the suspension.
The advantage of a rigid axle, in addition to manufacturability, is its better adaptability to bad roads: the ground clearance under the axle practically does not change depending on the load, and the wheel drive is reliably protected from external influences by the axle housing.
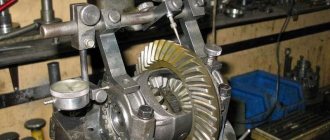
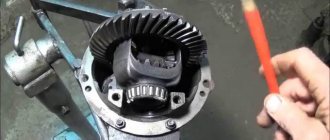
The Zhiguli bridge consists of a stamped-welded bridge beam (such beams are called “Banjo” for their characteristic shape), a main gearbox with a differential, and axle shafts. The gearbox is made in a separate open housing, the flange of which is bolted to the crankcase. A drive gear with a driveshaft mounting flange and a differential with a driven wheel are mounted in the housing on bevel bearings. The main gears are hypoid, that is, their axes are located at an angle of 90 degrees to each other, but do not intersect (they are crossed). The amount by which the axis of the drive gear is offset relative to the axis of the driven gear is called hypoid offset. Such a transmission, if it is precisely manufactured and well adjusted, operates smoothly and with the least noise, but due to the intense sliding of the curved teeth, it is very sensitive to the quality and quantity of oil in the bridge.
The design of the bridge is relatively simple and technologically advanced, although it is not without its drawbacks
Rules for installing a new cuff on the rear axle
Before installing a new oil seal, make sure that the flange surface is in good condition:
- matches the seal format;
- no corrosion; if there is one, go over the surface with polishing material;
- no deep grooves. If grooves are present, the cuff is pressed to move it so that it slightly extends beyond the neck of the gearbox.
When installing a new reverse gear cuff on a VAZ-2107, remember the following rules:
- First, apply a small layer of grease to the surface of the cuff.
- Then press the part into place with light hammer blows on the steel seal ring. Avoid distortions.
- Reinstall the dismantled mechanism components onto the shank.
- Replace the fastening nut located on the shank flange.
- Hang up the rear part of the VAZ-2107.
- Disengage the axle shafts from the differential gears.
- Using a 120 Nm torque wrench, tighten the shank nut, remembering to support the shank flange by the fasteners the entire time.
- Now turn the flange by hand. The part should not jam, and rotations should be carried out without much effort.
- Check to see if there is any end play. If there is one, increase the nut tightening torque by 20-30 Nm and check the operation again.
- Adhere to the total tightening torque limit of 225 Nm. If the indicator exceeds this value, there is a risk of damage to the special spacer type sleeve.
- If tightening the flange does not allow the backlash to be eliminated, then only service station specialists can handle this step.
- If the spacer is seated, the torque of the locked nut does not increase even if additional tightening is performed. Therefore, the indicator is equal to a value slightly short of the required size. It is impossible to do without disassembling the gearbox, which, again, is carried out only in a car repair shop.
Step-by-step video instructions on what it looks like to replace the gearbox seal of a VAZ-2107 rear axle with your own hands can be seen below:
Let's go to the store
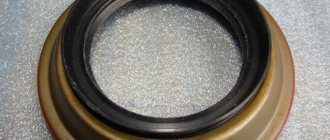
So we did everything we could, but the leak didn't stop. This means it's time to change the seal. Actually, according to GOST, these products are called “Reinforced rubber cuffs for shafts.” Or simply - cuffs. If a store offers you a part with that name, don’t be surprised. Factory part designation: 2101–2402052. Further, its variations can be written through a dash: -01, -02 and so on. All of these products are interchangeable and differ in the nuances of their design and manufacturer. Perhaps the most important thing when choosing an oil seal is the manufacturer. Choose products from well-known factories. No name details, in principle, should not attract your attention, because not only according to ours, but also according to Western standards, the cuff must be marked with the manufacturer’s trademark, cuff size, and type of material. Domestic GOST also provides for marking the year of manufacture. As a rule, these are two digits of the year when the mold was made, and next to them are dots, each of which indicates one year of operation of this equipment. You count the points, add their number with the numbers and find out in what year your part was manufactured. The year of manufacture is important because over time, any rubber compound “ages”, losing its shape and elasticity .
The type of mixture from which the oil seal is made is also important. The most expensive and most durable is fluorine rubber. It works well in aggressive environments and at high temperatures. It is usually marked with the Latin letters FBR. Nitrile butadiene rubber (NBR) is considered optimal in terms of price and quality for automobile transmissions. ACM acrylate polymer seals are also available, but they are usually used in components that should not be directly exposed to water. Chemists are constantly improving their products, so the fundamental differences between mixtures are becoming less and less, due to additives introduced into them that improve the weaknesses of certain recipes. Read reviews on the Internet, listen to the seller’s recommendations and make a decision based on your financial capabilities.
When examining externally, first of all pay attention to the quality of the working edge: it should be even and smooth around the entire circumference. You can use a magnifying glass. It will be a big plus for the gearbox seal to have an external boot - like a second edge, but without a spring and with a hole of a slightly larger diameter. The boot, as the name suggests, protects the work area from dust and dirt. The presence of an inclined notch on the boot or near the working edge indicates that the oil seal is designed for shafts rotating in the same direction.
Purpose of the rear axle gearbox
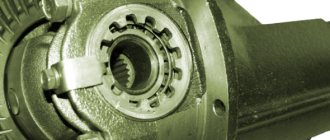
Rear axle gearbox
It is impossible to directly apply torque from the engine to the drive wheels: they will rotate too quickly and it will be impossible to control the car. Some kind of intermediate link is needed between the engine and the wheels. Such an intermediate link is the rear axle gearbox. Its task is to receive torque from the engine and apply it to the drive wheels, having previously distributed it depending on the distance traveled by the wheels.
Device
In order for the car to move, it is necessary to transfer the rotation of the engine to the wheels. But the engine speed is too high, and in order to correctly distribute the torque, a mechanism is needed that changes the gear ratio. Due to the gearbox and different engine speeds, the speed of movement changes, and the main pair of the rear axle takes over the rotation and transmits it to the wheels through gears.
- flange, it is fixed on the drive gear (shank) of the RZM, and is an intermediate link between the driveshaft and this gear;
- the shank of the main pair, at one end of which there are splines for pressing the flange, at the other end there is a bevel gear with a small number of teeth;
- driven gear (planet gear), it is in mesh with the drive gear, and it is with it that it forms the main gear;
- center differential, allowing the rear wheels to spin at different angular speeds.
The differential design is very simple - the mechanism consists of two axle gears, two satellites and a satellite pin. From the gearbox, the movement is transmitted to the axle shafts, on which the wheels are mounted.
Reasons for replacing the oil seal and symptoms of malfunction
The seals in the gearbox are changed for one reason: they begin to leak. The oil seal may become old, tear, or be of poor quality from the very beginning, which will inevitably affect its service life. In addition, the tightness of the gearbox may be compromised due to improper installation, as a result of which the seals are compressed too much. The malfunction can be identified by the following signs:
- Small drops of oil appeared on the rear axle, near the gearbox.
- After leaving the parking lot, an oil stain remains on the asphalt.
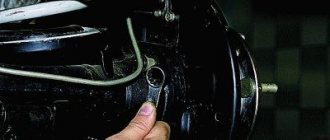
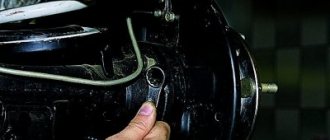
- A small radial play appeared on the gearbox shank. It is easy to determine: just move the shank up and down with your hands. As a rule, such play indicates not only torn oil seals, but also worn bearings.
It is there that you can detect the backlash
Important nuances
- The dynamometer readings were mentioned above, and this is no coincidence. Tightening the flange is a very responsible process, and it can only be done using a torque wrench. This allows you to avoid excessive squeezing of the oil seal, which leads to a violation of the tightness of the entire gearbox. This is done like this: if at the first measurement the force on the dynamometer was 2.8 - 3 kg, then the force on the torque wrench when tightening should not exceed 6.3 kg. If the dynamometer showed 4.3 kg, then when tightening the key there should be no more than 9 kg, etc. If the dynamometer showed 2.7 kg, and the key when tightened shows 9 kg or more, it means that the gearbox adjusting sleeve is completely worn out and needs for urgent replacement.
- After removal, the flange should be carefully inspected for severe abrasions and cracks. If there are any, the flange must be replaced. If this is not done, the new oil seal will very quickly become unusable.
- Before driving the oil seal with a tube, it is recommended to lubricate it with lithol. This makes it much easier to fit the new oil seal into its original place.
- When striking a pipe with a hammer, there is no need to be too zealous: with a strong blow, the pipe easily cuts the seal.
As you can see, replacing the oil seal itself does not take too much effort, and getting to it is not so difficult: just put the car in an inspection hole with good lighting. But tightening the flange so that it does not crush the new oil seal is a more difficult task. That is why the car owner needs a dynamometer and a special key, without which it is strictly not recommended to open the rear axle gearbox.
Assembly procedure
VAZ 2107: changing the oil in the gearbox
After the repair has been completed and all the damaged elements have been replaced, it is necessary to reassemble the rear axle and make sure that the gearbox no longer makes noise when driving.
The process looks like this:
- the new node is fixed in the place intended for it;
- return the axle shafts to the bridge;
- the gear flange is attached to the cardan;
- install wheels and brake drives.
It is necessary to test the car both at low speeds and at high speeds. First of all, leaving the car in neutral gear, press the gas. Then accelerate smoothly, and then turn off the engine. In a situation where the noise is still heard, an unambiguous conclusion should be drawn: you made some mistake or the reason was not in the gearbox.
When the car moves without any extraneous sounds, you can safely operate it as usual.