Print this article Font size 16
The crankshaft oil seal is far from the most reliable design in any car. Therefore, its replacement with an 8-valve VAZ 2114 is carried out quite often.
Camshaft drive diagram
In this case, the procedure differs depending on which oil seal we are talking about - front or rear. We will talk about each of them separately.
Reasons for replacing the crankshaft oil seal
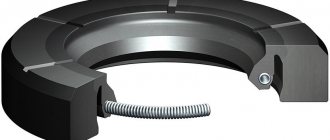
The internal combustion engine design has 2 sealing rings on both sides of the crankshaft. They prevent oil leakage from the crankcase while the engine is running. Cars of the VAZ-2114 and 2115 family have the same VAZ-2111 engine. The seals themselves are located under the timing belt protective cover and in the clutch housing on the gearbox side.
Crankshaft oil seal location
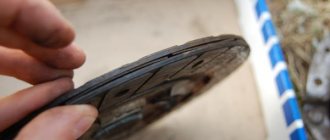
The cause of leakage may be a malfunction of the crankcase ventilation system. This often happens due to clogged hoses. In this case, excess pressure causes engine oil to leak through the seal, especially if it is already old.
Oil leakage through the oil seal
Common causes of wear are:
- low quality o-ring material;
- incorrect installation of the oil seal in the seat;
- damage to the rubbing surface due to mechanical scuffing of the shaft;
- natural aging and loss of elasticity due to long service life.
A strong leak from the rear oil seal is noticeable by the clutch slipping when starting to move and when changing gears.
Replacement process
If you have some auto mechanic skills, you can replace the front oil seal yourself.
- remove the protective crankcase and timing covers;
- align the ignition marks so as not to disrupt the operation of the gas distribution mechanism;
- remove the timing belt;
- dismantle the pulley and remove the generator belt;
- remove the crankshaft pulley (you will need a puller, do not forget to purchase it);
- remove the oil pump (drain the oil first);
- assess the condition of the oil seal (it may be “oaky” from time to time or, conversely, softened by oil);
- Press in a new oil seal with a socket of the appropriate size.
Pressing in the front crankshaft oil seal
Replacing the rear oil seal is an extremely labor-intensive process, which is accompanied by checking the condition of important vehicle components - the crankshaft and clutch parts.
We strongly recommend changing the rear crankshaft oil seal on a VAZ 2114 at a normal car service center.
The process for replacing the crankshaft rear oil seal is as follows:
- separate the engine and gearbox;
- remove the clutch and flywheel;
- pull out the old oil seal and press in a new one.
At the same time, we check the shaft for play, examine the condition of the clutch, and after assembling the engine, you should also make sure that the breather is open.
After replacement, observe the car at idle and make sure there are no leaks. For a while, try not to over-spin the engine. It takes time for the seals to “get used” to the temperature conditions. Due to high oil pressure in the system, they can be squeezed out again.
Replacing the front crankshaft oil seal.
Dirt has appeared on the timing mechanism. Clear signs of oil seal leakage.
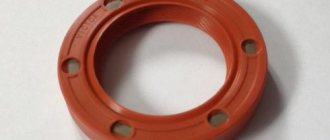
I bought a front oil seal 2108-1005034 110 rubles. Dimensions: 28.0 x 42.0 x 7.0 mm.
Necessary tools for work
The VAZ-2114 crankshaft oil seal is replaced in a garage or car service center. You can change it yourself if you have minimal plumbing skills and the necessary tools:
- jack and reliable support for lifting the car and hanging the internal combustion engine;
- wheel anti-roll bars;
- set of socket heads from 10 to 27;
- open-end and ring wrenches;
- slotted screwdriver;
- hammer;
- container for draining used oil from the engine sump;
- special graphite lubricant;
- automotive sealant;
- rags or wipes.
Repairs are best done by changing the engine oil and cleaning the crankcase. In this case, you will need a can of fresh oil, an engine sump gasket, an oil pump cover gasket, and a new front oil seal.
Important! Carry out the work on a lift or in an inspection pit. If they are absent, it is enough to raise the front part of the car as high as possible and install it on reliable supports, for example, cuttings of sleepers or cinder blocks. It is strictly prohibited to stand under a machine mounted on a jack.
Where is?
To prevent lubricant from getting onto components outside the oil pan, there is an oil seal at the outlet holes through which the crankshaft is connected to other engine components. One of them is front, the other is rear. Their purpose is to ensure the tightness of the housing.
Crankshaft seals
The front one is located behind the crankshaft pulley on the oil pump. To replace the rear one, it is necessary to dismantle the gearbox, clutch and flywheel, then the rear cuff will be accessible. You can see this clearly in the video posted at the end of the article.
Step-by-step dismantling
Let's look at how to change the engine oil seal of a VAZ 2114 with an 8-valve engine.
The work order is as follows:
- Place the car on a level surface, support the rear wheel with stops. Set the gearshift lever to the neutral position, remove the front right wheel and engine protection. You can remove part of the fender liner for easy access to the front engine cover.
- Under the hood, unscrew the bolts securing the timing belt protective cover. Loosen the generator and remove the generator drive belt.
Removing the protective cover
- Set the valve timing marks on the camshaft and crankshaft. To do this, rotate the crankshaft with a socket wrench until the arrows on the pulleys align with the special ebbs on the body. This corresponds to the position of the first piston at TDC.
We set the valve timing marks
- Before removing the timing belt, loosen the tension roller and unscrew the bolts securing the upper and lower sprocket. Inspect the belt for damage and traces of oil. Change if necessary.
Loosen the tension roller and remove the timing belt
- Drain the oil from the engine and unscrew the pan. It is secured with 16 10mm wrench bolts. Remove the clogged oil receiver and clean thoroughly.
Unscrew the bolts securing the pallet
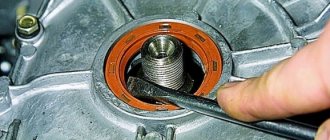
- Using a 24mm socket, unscrew the pulley mounting nut, to do this, secure the crankshaft itself. Under the pulley there is an oil pump, into the cover of which the front engine oil seal is pressed. It is secured with six 10mm bolts.
Securing the oil pump cover
- Remove the oil seal from the seat using a flat screwdriver or carefully press it out with a socket of a suitable size.
Dismantling the old oil seal
Sequence of actions on a VAZ-2114 with 8 valves
- The car is installed on the inspection hole. Wheel chocks are installed under the rear wheels. The right front wheel is jacked up and removed using a socket wrench. The engine protection is also removed.
- The hood of the car is opened and the timing belt cover is removed. Now you have access to the crankshaft and camshaft pulleys and to the belt itself.
The timing cover is removed, the crankshaft and camshaft pulleys are visible
Aligning the pulley to the marks for bringing 1 cylinder to TDC
The pan has been removed from the engine and the oil has been drained.
The bolts on the oil pump are unscrewed, it can be removed
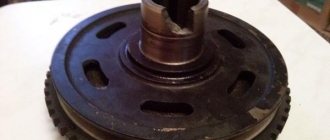
The crankshaft oil seal is installed in its original place
Fines for crossing the stop line and speeding will no longer bother you!
Video: expert advice on replacement on the 14th model
Reasons for gasket failure
When all the processes have been sorted out and the choice of valve cover gasket has been decided, it is necessary to consider the reasons for the failure of this element:
- Wear. Perhaps the most common reason is that during use this element tends to crack because it is constantly exposed to hot oil.
- Stretching. Constantly high temperature negatively affects the rubber product, which loses its physical properties and stretches, which entails a loose connection and the passage of lubricant.
- Oil streams. Occurs due to gasket breakdown. This usually happens after the engine overheats severely.
- Pressure. Excessively high pressure can squeeze the gasket out of its seat, which will cause oil to flow like a river.
Causes of leakage. Determining the location of the leak
The reason for the leak is that the oil seal is skewed
An oil seal can leak for several reasons:
- Natural wear and tear. No matter how carefully the elements of the crank mechanism (CCM) are adjusted to each other, the crankshaft still vibrates during rotation, which leads to wear on the inner surface of the oil seal. Because of this, it no longer fits tightly to the shaft and lubricant leaks out through the gap;
- Loss of elasticity. This happens due to the rubber drying out, it becomes “tanned” and the tightness of the seal decreases;
- Installation is skewed. Incorrect installation leads to the appearance of leaks through which lubricant under pressure leaks;
- Low quality rubber element installed when replacing a leaking oil seal. There are many fake spare parts on the market and the likelihood of purchasing a defective product is high.
Since the oil seal is located in a place where inspection is not very convenient, the problem is judged by traces of oil under the car and severe contamination of the lower part of the engine. But it is worth noting that lubricant can also leak in other places - from under the pan gasket, oil filter. Therefore, before eliminating a leak, it is necessary to carefully inspect the lower part of the power unit in order to accurately determine the location of the leak.
This can be done on an overpass or inspection hole, after first dismantling the crankcase protection (if there is one). In the case where it is impossible to determine the location of the leak due to severe contamination, the bottom of the engine is cleaned, and then, after a short trip, everything is inspected again. Dust will stick to the leak site, which is used to determine the location of the leak. Having established that the oil is leaking due to a damaged or worn oil seal, you can begin replacing it. Note that although the front crankshaft oil seal leaks more often than the rear, it is much easier to replace it.
The technology for replacing this rubber element is the same for any engine, but the complexity of the work depends on the design features of the engine itself.
Location of rubber elements on the crankshaft
In the design of power plants, two oil seals are used on the crankshafts - front and rear. They both prevent lubricant from leaking out of the engine. The rear oil seal is installed on the end of the shaft to which the flywheel is screwed. Due to the fact that this end switch is presented in the form of a flange, the dimensions of the oil seal are quite large, with a significant layer of rubber. This ensures a considerable service life of the rubber element.
The front oil seal is located on the end of the shaft, which is used as a drive for systems and mechanisms of the power plant or auxiliary equipment. The rubber element is located behind the drive gear, which is mounted on the shaft end and secured with a key connection. The dimensions of this oil seal are smaller than the rear one. And this affects the resource of the element.
Due to the leak, oil gets onto the outer surface of the engine, causing it to become dirty. This also increases the consumption of lubricant, which must be replenished periodically. Leakage is especially dangerous for engines in which the timing belt is driven by a belt. Oil-based liquids have a negative effect on rubber elements. If oil gets in, the belt can delaminate and break, which is especially dangerous if the engine is “plug-in” (if the belt breaks, the pistons collide with the valves).
Analogues (manufacturers)
Of course, the manufacturer and many automotive experts recommend installing the original valve cover gasket, but, as practice shows, substitutes are often of higher quality and have a much longer service life.
So, let's look at which analogues of the original part are recommended for installation on a car:
| Manufacturer's name | Catalog number | Cost in rubles |
| Glaser | X08964-00 | 300 |
| Goetze | 50-025881-00 | 750 |
| Ajusa | 56021200 | 1000 |
| Trialli | GZ 101 7022 | 1500 |
As you can see, the cost of alternative gaskets is quite high, but as practice has shown, the service life of the parts is twice as long as the original.
Level overflow
As a rule, the distance between Min and Max on the dipstick is 1 liter of engine oil, and 1 cm is 300 ml. The last or even higher value is unlikely to be dangerous for the motor.
Yes, the pressure will increase slightly, but it is not critical, because when developing engines, a safety margin is always built into them. And some people specifically fill the oil above the maximum level when driving on roads with steep ascents and descents, so that the oil receiver does not catch air.
But if a significant overflow was allowed, for example, two or more times, then the upper oil level will reach the crankshaft, foaming will occur, the pressure will increase and the oil seal will squeeze out.
A similar thing can happen if the cylinder head gasket is punctured and coolant enters the lubrication system. The oil becomes gray-brown in color, its level in the crankcase rises, and then you already know what can happen.