Modern car security systems are innovative, convenient and advanced technologies that make the life of a motorist easier and more comfortable. Such systems are equipped with key fobs that operate remotely. Unfortunately, such controls can fail or be lost altogether. This situation is not fatal, but it can cause a lot of problems. Every motorist should know what to do if the alarm key fob is broken or lost. This is exactly what we will talk about today.
Frequent breakdowns of car alarm key fobs
My battery is almost done
In 90% of cases when the remote control does not work, the reason for this is a dead power source . An indirect sign of a dead battery will be a dimmed screen. This incident can hardly be called a breakdown.
In such cases, it is better to always have a spare battery on hand. Key fobs are mainly equipped with batteries of the following formats: A27 (short little finger), A23, AAA (little finger) and CR2032 (tablet).
If it is not possible to replace the battery with a new one, but you need to open it and drive the car urgently, you can try to gently heat the old battery and tap it on something hard. These actions will resume the electrochemical processes inside it. This way you can get energy to signal the doors to open and disarm. To be completely sure, bring the key fob as close as possible to the central alarm unit and only then give the command by pressing the button.
Moisture ingress
If water gets inside the housing, there is a high risk of a short circuit. Water is a good electrical conductor. And therefore, creating unwanted connections between elements can lead to their failure. Water, in principle, harms any electrical appliance.
Ingress of sand and small debris
Sand is no longer so dangerous for the pager. However, it can jam the buttons if it gets inside them. In this case, it will be necessary to disassemble the case and clean them. You can try cleaning the keys with alcohol.
Keychain falling from height
Physical damage to the remote control can lead to many consequences. In the most harmless case, you will scratch the keychain, ruining its appearance. But the following breakdowns are much more serious:
Crack in the body
It not only worsens the appearance, but also increases the risk of water getting inside through it. It can also lead to permanent damage to the case.
Broken screen
A crack may simply appear on it, interfering with the perception of information, or due to an impact the display will completely lose its functionality. In this case, only replacing the screen or the entire key fob will help. It is not at all difficult to replace it yourself and can be found in stores for all popular device models.
Internal damage
Due to the energy of the impact on the surface inside the case, one or another radio element may leave its seat (for example, the screen cable has moved away from its connection point). If you do not observe any external damage, but the key fob shows no signs of life, we advise you to start looking for the problem there.
Before disassembling the remote control, check the battery. Often, when struck, it “jumps out” of the contacts and stops powering the system. If, after returning the battery to its place, the key fob turns on and begins to function normally, consider yourself lucky!
Having found an element inside the pager that lies separately or does not fit well to the board, we can conclude that it is precisely this element that is to blame for the inoperability of the system.
Important! To protect the keychain from water, sand and physical influences, we recommend using protective covers. They are made of leather or silicone and can have a bright, beautiful color.
Leakage of electrolyte from the battery
If you use low-quality cells, electrolyte may leak out of them over time. Even a small amount of this liquid, if it gets on the contact pads of the battery, will cause them to quickly oxidize and rust. If this happens, you need to immediately remove the battery, wash off the leak with alcohol and dry the key fob.
Wear and tear, aging
Like any device, a key fob cannot work forever. Over time, the key fob body wears out, the button pads wear through to holes, and their mechanical part wears out and becomes unusable. But, as a rule, if any of the above happened, there is little point in repairing the key fob, because all its other elements are most likely close to the end of their life. It will only make sense when it is impossible to find a replacement key fob, and replacing the entire alarm system with a new one is not practical for you.
Stopped working after lying in the heat
Prolonged exposure to sunlight in hot weather can damage the plastic elements and screen. The case and buttons may lose shape and begin to melt, and the screen will burn out. We do not recommend leaving the keychain in the scorching sun for a long time.
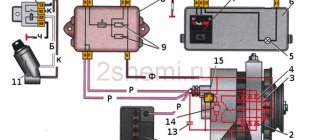
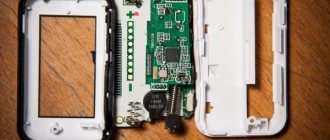
Design and principle of operation
As always, before moving on to practice, it will be useful to learn a little theory; believe me, in practice it often helps out. So, the standard alarm device looks something like this:
- Main unit;
- Transceiver antenna;
- Keychain;
- Shock sensor;
- Led indicator;
- Service button.
Previously, such systems worked on the principle of a static code, that is, there was one constant code that the key fob exchanged with the transmitter antenna. Naturally, it was too vulnerable, so after a while, experts introduced dynamic code. Of course, you can hack it, but it is much more difficult to do.
Do-it-yourself car alarm control panel repair
If you have the necessary skills and tools, you can try to fix the key fob yourself.
Tool for disassembly, assembly and repair
To disassemble and then reassemble the remote control, for example, a simple set for repairing mobile phones will suit you. To work, you need a small screwdriver, tweezers, and a special plastic spatula is also useful, which will help you pry and remove certain elements without scratching or damaging them.
Carefully remember where you unscrewed each of the parts. Carefully place the screws in a place where you won't lose them (for example, in a small bowl). If lost, finding a replacement screw will not be easy.
A multimeter will help you find the problem. For the repair itself, you will most likely need a soldering kit. It includes: a soldering iron with a thin tip, solder, flux. You will also need a device for removing excess solder and alcohol for cleaning the board after soldering with flux. A “third hand” can simplify the work. It consists of a stand with clamps and a magnifying glass. By fixing the key fob board on it, it will be much easier for you to orient and solder the radio component.
Provide yourself with a comfortable workplace. There should be enough space and it should be well lit. Without good light it is not only inconvenient to work, but also harmful to vision. Especially if you are working with miniature elements.
Instructions on how to open and disassemble the key fob
Analysis of the key fob of each model contains its own characteristics. But, in general, the algorithm looks like this:
- start the procedure by removing the battery compartment cover;
- remove the battery;
- in the compartment, find and unscrew the screw connecting the two halves of the case;
- separate the halves.
Inside you will find a block consisting, as a rule, of three modules:
- antenna module;
- board with buttons installed on it;
- screen module.
Typically, these modules can be separated without the use of special tools.
Next, carry out the repair work and reassemble the pager in the reverse order.
What should you do with the keychain if it falls into the water?
If you drown your car alarm pager, you should immediately remove the battery from it. This is necessary to de-energize it. Then simply place the remote control in a warm, dry place for at least 8-10 hours. We do not recommend drying it with a hairdryer or placing it on a radiator. Exposure to elevated temperatures, although it will dry out the moisture much faster, can also damage the plastic case or display.
But if a short circuit occurs before you have time to remove the battery, the consequences of getting wet can be irreversible. And then you will have to look for and repair the element that has “burnt out” due to a short circuit.
It can be detected visually. The damaged element will turn black and the circuit board around it may be slightly charred. If you cannot identify the fault this way, use a multimeter. “Ring” each of the elements on the board one by one and you will find a breakdown.
Key fob cleaning process
For cleaning you will need the following things:
- cotton swab;
- a toothbrush with soft hair;
- alcohol solution.
To perform this task, you must first disassemble the key fob. If the contamination is significant, then start cleaning the elements with a brush, after moistening it a little with an alcohol solution. When cleaning the board, use the brush very carefully so as not to damage the radio elements and the connections between them.
To clean the case from heavy dirt, you can use household detergents. The main thing is to thoroughly dry the parts after such a wash. The buttons can be completely soaked in an alcohol solution.
Perform final cleaning of the elements with a cotton swab dipped in alcohol. If it gets dirty, take a new one. Cleaning with a dirty stick may further stain the parts.
After finishing cleaning, allow all elements to dry. The alcohol evaporates quite quickly, so 30-40 minutes will be enough. After making sure that the parts are dry, assemble the keychain.
If there is a second set of keys left
First of all (not forgetting to submit an ad in the style of “on such and such a date a bunch of keys were lost in the area of supermarket N”), you need to re-register the remaining key fob in the alarm memory. During this operation, the alarm memory will be pre-cleared, that is, it will stop responding to commands from the lost one. Of course, this will not make it much more difficult for a potential thief to gain access to the cabin, but someone who accidentally finds the keys will lose the opportunity to find the car by the sound of the alarm: well, it’s difficult to predict what might come to the mind of an unknown person who has full access to the car.
For at least several days, it makes sense to be careful about where you park, especially at night - choose a lighted place under surveillance cameras or a paid parking lot.
On cars where there is a standard immobilizer, and the chip is mounted in the head of the key and is removed from it, when installing autostart, it is usually removed from the spare key. In fact, in our time this can already be considered a gross mistake - both keyless immobilizer bypassers and alarms that support imitation of a standard key without an external bypasser have been developed long ago. But in order to retain the ability to use the car, you will have to tinker with finding where exactly the crawler unit is hidden in the car - and if the alarm was installed by a professional, then you will have to search for a long time.
Cars with a key card usually have a mechanism for emergency door opening when the battery is dead. For example, at Renault you can remove a mechanical key from the key card, which is inserted into an inconspicuous cylinder on the driver's door. Therefore, when buying a car with an already installed auto start, you need to make sure that the emergency key from the card installed in the immobilizer bypass is removed, giving it for installation yourself - remove it yourself and keep it at home. Otherwise, if the second key card is lost, the task of opening the car will become much more difficult - not all electromechanical locks of such cars can be opened using the classic method with a ruler or hook.
Video: What happens if you lose your car keys.
The next step for a car with an immobilizer is a visit to an authorized dealer. There are two things to do here:
- First, order a new key.
- Secondly, ask for a second training of the immobilizer using the saved key, if this car (and this is almost all models) requires a diagnostic scanner for this.
The essence here is the same as when re-registering a key fob - the code of the lost chip will be erased from the immobilizer memory, and the missing set of keys will become practically useless.
Of course, there is a cheaper way - now many companies offer a key cloning service, grinding out a copy of the standard one from a blank and installing a copy of the remaining chip into it. But you need to remember that a lost key will retain full functionality, and saving money can result in subsequent searches for the car.
On machines that have a key card instead of a key, the algorithm of actions will be absolutely the same.
How to repair buttons?
To replace the buttons, first disassemble the remote control in the same way. Most often, the button consists of two parts: an external cover (which is pressed) and the button itself, soldered to the board and closing individual contacts, thereby letting the board know that you pressed it. Replacing a plastic or rubber pad on a button is not difficult. As a rule, it is simply sandwiched between the board and the case. Once you remove the board, you can easily change it. The only problem is that this overlay is almost impossible to find in the open market. You can only buy it complete with the housing.
If it is necessary to replace a button, then the old one will first need to be unsoldered from the board. This procedure requires certain skills due to the small size of the contact legs of the button. If you do not have them, it is better to contact an electronics repair service. By mindlessly applying a soldering iron to a board, you risk damaging it.
As for repairing the button, it is only advisable to soak it in alcohol if it is stuck. Otherwise, it’s easier to buy another one to replace it.
How to check the functionality of the key fob after repair?
After successful completion of the repair, a question appears about checking the key fob in operation. To begin, insert the battery into its slot. If the key fob turns on, that is, it makes a sound signal and turns on the display, then this is the first step.
Then you need to check it in operation. But before you go to the car, take an extra key fob with you. If the repaired key fob starts to work inadequately or send commands on its own, you can resume car security with a second working key fob.
Approach the car and start sending alarm commands with the key fob. Start by opening and closing the car, then check all other functions. Check the distance from which the key fob signals are perceived by the car.
If all commands are executed, the range of action is at the factory values - then congratulations, the repair was completed successfully! If none of the functions work or not all of them work, you need to understand the problem deeper.
Reference! Sometimes, the cost of a new keychain is equal to or lower than the cost of restoring the old one, keep this in mind!
If you cannot figure out on your own why a particular function does not work, contact a specialized service center.
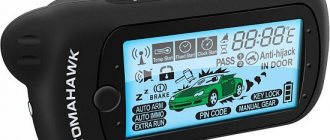
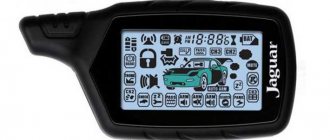
Functionality of the Starline A91 key fob
The presence of many functions allows you to make maximum use of control panels to influence the StarLine A91 alarm system on a car. The instructions highlight:
- The car alarm remote control reminds you of missed alarms by flashing the indicator;
- Accidental pressing of buttons is blocked by setting;
- The main car alarm console is identified in several stages;
- The StarLine A91 car alarm is protected from interception of remote control signals;
- Commands are viewed visually on the screen;
- One button turns on and off security modes;
- In silent mode, the remote control vibrates;
- The LCD remote control has time options.
The screen of the vehicle's car alarm key fob displays its status, the review is initiated by an icon, and the StarLine operating modes are noted:
- Autostart based on time parameters, temperature;
- Code programming data;
- Responsible for service maintenance;
- The turbo timer and the StarLine A91 alarm immobilizer are initiated or turned off.
The car alarm status indication is highlighted on the display:
- The “Key” icon means the ignition is on.
- Position of the hood and trunk doors.
- Security with or without sound.
- Position of parking and foot brakes.
- Connection to the StarLine A91 alarm system GSM modules M20, M30.
- Status of shock sensors.
- Car engine operation.
This overview shows only the main part of the display of information icons on the screen. Other modes of the StarLine remote control are described in the operating instructions.
The cost of a new StarLine key fob ranges from 1,400 rubles. in the regions and up to 3,500 rubles. in Moscow, but it still needs to be registered in the car alarm memory. Below we will tell you how to register the Starline A91 alarm key fob yourself.
How to polish the glass of a Starline alarm key fob yourself?
Over time, sand and constant friction in your trouser pocket can cause the glass covering the key fob screen to become cloudy from scratches. And become cloudy to such an extent that the information on the display will be completely unreadable. In this case, the car owner wonders whether it is possible to return the glass to its former transparency?
One option would be to replace the glass with a new one. Especially if the old one has deep scratches. It is impossible to remove them by polishing.
But if there are no strong scratches on the glass, you can easily polish it to restore transparency. For polishing you need polishing paste. The simplest and cheapest for this is GOI paste. But instead, you can use regular toothpaste or tooth powder, which are easy to find. You will also need a cloth, preferably microfiber.
Before starting work, the glass can be removed from the key fob. It is attached with glue or double-sided tape. Apply a small amount of paste to the glass and begin to rub it with a rag. On average, you need to rub for about 20 minutes. But if you don’t have the patience, use a special attachment on a screwdriver or simply wrap a rag tightly around the drill.
If the final result does not satisfy you, repeat polishing again. And so on until the moment of your own satisfaction. To increase efficiency, experienced craftsmen recommend soaking a rag in a mild solvent or WD-40.