symptoms
The most common symptoms of a bad crankshaft position sensor on a Nissan are that the car hesitates to start or the car stalls after starting. In some cases, you may need to crank the car for a long time to start it.
- Engine starts but won't start
- The engine hesitates to start
- P0335 Crankshaft position sensor
- Engine may start normally when cold, refuses to start when warmed up
- Check engine light
- Engine stalls when warmed up
- Intermittent startup problem
- The difficulty of the beginning
Below you will find instructions for replacing the crankshaft position sensor on a Nissan 3.5L V6 engine.
This is interesting: The car will not start. The check light is on, the diagnostics does not see any errors
Replacing DPKV
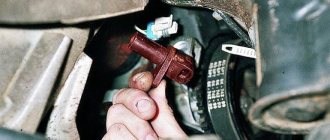
We remove the QG18DE engine protection from below. Knowing the approximate location from the manual, we try to take the most convenient position for work. You will need a 10 mm socket, a ratchet, a screwdriver, and WD-40 penetrating lubricant. The replacement goes like this:
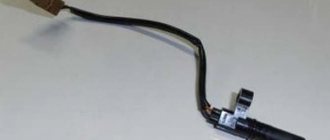
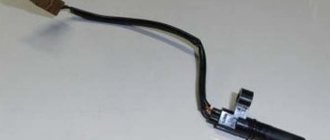
Remove the power clip from the sensor. Attention! Do not pull the cable, grab the clip, press the latch and pull it towards you.
We try to start the engine, idle speed should improve. Try checking the operation while driving at speed. An improvement in the vehicle's acceleration dynamics will indicate that the problem has been corrected. In this case, the chec engine will disappear.
Main reasons for failure
The main reasons for failure of the crankshaft sensor include:
- Natural wear and tear. The sensor is installed on the engine in the flywheel area. During the operation of a car, it is exposed to high temperature changes, as a result of which its structure can receive microcracks into which liquids and oils enter, which leads to corrosion.
- Contamination of the working surface with metal shavings. This process significantly reduces the sensitivity of the sensor and can lead to signal loss. As a rule, this reason occurs on “older” cars. In most cases, cleaning the working surface of the sensor is not successful.
- Mechanical damage. Such a malfunction is most likely the result of incorrect installation, replacement with a sensor from another engine modification, or a traffic accident.
- Broken electrical wiring or destruction (corrosion) of the sensor connector.
The true reason for the failure of most crankshaft sensors is the destruction of the electromagnetic sensor. It represents an inductor wound around a core of magnetic material. The winding is made of a very thin copper conductor in varnish insulation.
As a result of repeated heating and cooling of the sensor, the thinnest conductor can receive a micro-rupture. As the sensor heats up, the coil breaks, the sensor stops working, the car stalls, then cools down, the coils close again and the engine can start again. In such a situation, experienced car enthusiasts place a rag soaked in cold water on the sensor.
Signs of a failed DPKV
Crankshaft position sensor
Here are some of the common symptoms that will help determine if the QG18DE engine crankshaft sensor is damaged:
The check engine indicator lights up. The check engine light comes on for many reasons, including a malfunction of the DPKV. When the motor is running for a long time, the sensors stop working due to increased heat levels, causing the indicator to light up. Perform diagnostics to determine the cause of the check engine light.
Loss in acceleration. If you notice a loss of acceleration at high speed, this is due to a malfunction of the DPKV. The control unit does not receive the correct information due to a faulty sensor, which causes problems when synchronizing the systems. The fuel injection adjustment is disrupted, which leads to loss of acceleration.
Engine vibration. If the DPKV fails, the position of the crankshaft is not determined. This leads to strong engine vibration, reduced power and increased fuel consumption.
Increased gasoline consumption. Ignition timing and fuel injection are not performed efficiently, which leads to engine malfunction and increased gasoline consumption.
Difficulty starting the car. Difficulties in starting arise due to incorrect timing and adjustment of fuel injection; the engine will not start. However, the problem may be an electrical fault.
QG18DE engine misfires. The on-board computer does not receive information about the position of the piston, which leads to the cylinder misfiring. This is caused by a faulty DPCV or a damaged spark plug.
The engine stalls. In addition to problems with acceleration at high speed, if you notice that the engine stalls at low speed, then the problem is related to the crankshaft sensor, since the ignition timing is disrupted.
The purpose of the throttle position sensor and how it works
Injection engines required the installation of a large number of automatic devices that regulate and control the operation of all power plant systems. The control principle of one of the main mechanisms regulating the fuel supply to the engine has been changed. throttle valve. The drive became electric, electronically controlled. Its difference from mechanical is as follows:
- there is no mechanical connection between the gas pedal and the throttle valve itself;
- Idle speed is controlled by the movement of this very damper.
Because the rigid connection between the pedal and the damper is not all controlled due to the operation of the electronic systems. In this scheme, along with the control unit, the throttle sensor plays an important role.
The tool itself is mounted on the same axis as the throttle. It works like a potentiometer:
- at one sensor output. The electrical signal voltage is 5 V, the opposite is connected to ground. On the third channel, an electrical signal is sent from the moving contact to the controller. When the gate is turned, the voltage from the current collector slide changes to output;
- When the ignition is turned off, the voltage supplied to the DPDZ can be measured using a measuring device. To do this, place the probe needles on the input contact and on the ground. If the throttle is closed, then the tester should show no more than 0.7 V and no less than 0.5 V. When the engine starts, when the dampers open, the voltage should increase and in the maximum open position show 4 V (0.3);
- when the throttle opening angle changes, the voltage going to the controller from the DPDZ slider changes and regulates the fuel supply;
- DPDZ is related to the operation of the idle air control device (RXX). At startup, if the damper is in the closed position, then when the controller receives such a signal from the sensor, it connects the RCX and additional air enters the engine, bypassing the closed damper.
Location of TPS on VAZ 2114
Monitor DPDZ performance by measuring resistance with an ohmmeter. For this purpose, the device is connected to the input and output terminals of the sensor. When the accelerator pedal is pressed, a smooth change in resistance should occur; if the device shows zero or the resistance goes to infinity, this indicates a DPZ malfunction on the VAZ 2114.
Experienced motorists recommend buying DZDZ VAZ 2114 from manufacturers. Omega, Moscow, JSC "Srimash", "Kursk" and JSC "Avtoelektrika", Kaluga ("AvtoElektrika". contactless TPS).
FAQ
Where is the crankshaft position sensor located on a Nissan?
Nissan crankshaft position sensor location.
Location of the crankshaft position sensor on the Nissan 3.5L V6 engine Photo: YOUCANIC
How to check the serviceability of the Nissan crankshaft position sensor?
One of the most common ways to check the health of the crankshaft position sensor on a Nissan is to read fault codes from the ECU. This is a very simple procedure and requires reading the OBD2 code.
- Connect the scanner to the OBD2 port under the dashboard.
- Turn the ignition.
- Read codes from the ECU.
- Check for a code related to the crankshaft position sensor circuit.
Where to buy a cheap Nissan crankshaft position sensor?
Nissan crankshaft position sensors vary depending on the year of manufacture. To find a cheap Nissan crankshaft position sensor, check prices here and here. Filter results by year and model to find the right crankshaft position sensor for your Nissan.
Nissan Crankshaft Position Sensor Part Numbers
- 2.5L 4 Cylinder Engine Part Number: 235-91203
- Applications: 2002-2006 Nissan Frontier, Altima, Sentra
- Part Number: CKP2085 PC165 714958 SS1013911B1 SS10139 J5T10271 5S1782 2373135U11 2373135U10 2373135U00 2132395 1800319
- Part Number: 23731-31U11 PC89 2373131U10 23731-31U10 373131U11 S10113 SU4315
- Part Number: 12799167
- Part Number: 23731-AL60A 23731AL60C/23731 AL60C PC499 23731 SU6482 23731-AL60C, 1236545
- Part Number: 23731EA20C 23731-EA20A 23731-EA20C 23731AE20C 23731EA20A 23731EA20C 23731EA220 23731EA221 3322082Z30 SU7825 5S6314 PC715
Nissan Crankshaft Position Sensor
This is interesting: Replacing the trunk lid lock Nissan Note 2004 - 2012
Where is the QG18DE DPKV located?
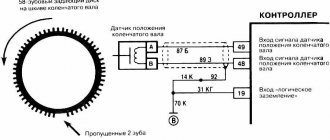
Obviously this should be close to HF. Note that the DPKV is often confused with the camshaft rotation sensor. They are similar in appearance, but not interchangeable (they have different firmware). The first has the article number 237314M500, and the DPRV has the article number 0815662033. Here is how they are located in the diagram.
DPKV location
The diagram shows that the DPVR is located on the cylinder block under the valve cover. The DPVC is located on the cylinder block at the bottom, on the driver's side, near the mounting bracket. It is impossible to see it from above without a mirror. If you disassemble the air duct along with the air filter cover, then you can see it through the mirror, feel it with your hand and, with some skill, even replace it. But the best way is to do it from below, using an inspection hole, a lift or an overpass.
InjectorService.com.ua
Car diagnostics using USB Autoscope
- Unanswered topics
- Active topics
- Search
Nissan Primera 2003 P12 1.6 - synchronization of DPKV and DPRV
Nissan Primera 2003 P12 1.6 - synchronization of DPKV and DPRV
Post by Jura » 03 Mar 2015, 20:58
Re: Synchronization Nissan Primera P12
Post by Alexander » 03 Mar 2015, 21:37
Re: Synchronization Nissan Primera P12
Post by Jura » 03 Mar 2015, 23:34
Re: Nissan Primera 2003 P12 1.6 - synchronization of DPKV and DPRV
Post by Jura » 08 Mar 2015, 11:11
Re: Nissan Primera 2003 P12 1.6 - synchronization of DPKV and DPRV
Post by zmey » 08 Mar 2015, 18:40
Re: Nissan Primera 2003 P12 1.6 - synchronization of DPKV and DPRV
Post by Jura » 09 Mar 2015, 10:00
Re: Nissan Primera 2003 P12 1.6 - synchronization of DPKV and DPRV
Post by zmey » 09 Mar 2015, 19:58
Re: Nissan Primera 2003 P12 1.6 - synchronization of DPKV and DPRV
Post by Jura » Mar 10, 2015 02:47 pm
Re: Nissan Primera 2003 P12 1.6 - synchronization of DPKV and DPRV
Post by zmey » Mar 11, 2015, 11:20 am
Re: Nissan Primera 2003 P12 1.6 - synchronization of DPKV and DPRV
Post by Jura » Mar 11, 2015 04:26 pm
Re: Nissan Primera 2003 P12 1.6 - synchronization of DPKV and DPRV
Post by Vijar » March 11, 2015, 5:20 pm
Re: Nissan Primera 2003 P12 1.6 - synchronization of DPKV and DPRV
Post by zmey » Mar 11, 2015, 05:56 pm
So I asked which DC I replaced from VAZ? We are talking about the reference voltage for the new ones - 3.5 V, for the old ones - 0.45 V - that's all, no dispute. Jura yes, as I understand it, is supplied at the new 3.5 volts, but the system still works within the range from 0.1 to 0.9 volts. for example, on VW Sharan ADY engines, 1.5 or 2.5 volts are supplied, if I’m not mistaken, but the system still works from 0.1 to 0.9 volts, and many early Opels from 1997-2000 generally have 4.5 volts saw served . what to argue? I wanted to know which sensor I could install on a Nissan example in 2003 - is the “native” one more expensive anyway?
Yes, I described myself a little in the picture. Sorry
Part numbers
The article number of the original DPKV is 23731-6N21A; 237316N20C
Manufacturer numbers of non-original spare parts
| ASHUKI | N440-15O, N440-15, N390-05 |
| BLUE PRINT | ADN17215C |
| ERA | 550539 |
| FAE | 79380 |
| FISPA | 83.512 |
| HERTH+BUSS JAKOPARTS | J5661008 |
| HOFFER | 7517610 |
| HÜCO | 138104, 2508104 |
| LUCAS ELECTRICAL | SEB1858 |
| MAGNETI MARELLI | 064847152010 |
| MEAT & DORIA | 87610 |
| MOTAQUIP | LVCP202 |
| OPTIMAL | 07-S025 |
| QUATTRO FRENI | QF00T00476 |
| QUINTON HAZELL | XREV311 |
| SIDAT | 83.512 |
| STANDARD | LCS441, CS1615, 19215, EPS405 |
| VEMO | V38-72-0127 |
| WAI | CAM464 |
| WILMINK GROUP | WG1013660 |
One morning my tricky one stopped starting, they were able to start it only when they lit a cigarette from another car. After about 20 minutes I turned off the car and tried to start it again - no result. I arrived at the service center and it turned out to be a crankshaft sensor.
Video
Recommendation
Since the crankshaft sensor is one of the main sensors in the Chevrolet Cruze engine control system, some car enthusiasts purchase this sensor for future use, especially if they travel long distances to sparsely populated areas.
Damage to the crankshaft sensor is a critical problem in the Chevrolet Cruze. The sensor has a limited resource. You start having problems with it after 7 - 10 years of using the car.
The sensor is one of the main sensors of a set of engine management accounting programs. Designed for general synchronization of the operation of a complex of accounting programs for vehicle ignition and fuel injection. The main task of the sensor is to monitor the angular position of the vehicle's crankshaft. In most cars, like the Chevrolet Cruz, this task is solved with the help of special teeth (teeth) attached to the flywheel. At one time the teeth of the crankshaft rotate, the flywheel rotates synchronously with it. Passing in the area of the electrical sensor, they induce electronic impulses.
Removing and installing the coolant temperature sensor
The sensor is screwed into the hole in the front water jacket pipe of the cylinder head.
You will need a key "19".
1. Use a screwdriver or finger to press out the plastic latch securing the wiring harness block and disconnect the block from the sensor.
2. Loosen the sensor and...
3. ... unscrew it from the pipe hole along with the sealing ring.
4. Check the sensor resistance. At 20°C, a working sensor should have a resistance of 2.2–2.4 kOhm.
The sensor resistance varies with temperature over a wide range.
At high temperatures, the sensor resistance is low (70 ohms at 130 °C), and at low temperatures it is high (100.7 kOhms at –40 °C).
5. Install the sensor in the reverse order of removal.
Methods for checking the camshaft sensor
Before testing the sensor using a multimeter or other electronic tools, you must check its mechanical integrity. In particular, it is installed in a housing with an O-ring, ensuring its secure fastening. We need to check its condition. It would also be useful to check the integrity of the sensor body, whether there are cracks or other damage on it. It is advisable to check the drive disk to see if the teeth are damaged or if there are metal shavings on the sensor body or nearby.
On the Internet you can find information that supposedly the DPRV can be determined to work by simply checking its magnetic properties. In particular, bring a small metal part to its end (the working sensitive part), which should “stick” to the sensor. In fact, this is not the case, and a non-working DPRV may or may not have magnetic properties. Accordingly, verification must be performed using other methods.
There are two main ways to test the camshaft position sensor - using an electronic multimeter and using an oscilloscope. The first method is simpler and faster, but the second is more accurate and provides more diagnostic information.
Checking the camshaft sensor with a multimeter
To check the DPRV, dismantling is necessary. This is not difficult to do; you just need to disconnect the contact group of wires from it and unscrew the fastening bolt. You will also need a small metal object (ferrous metal so that it is magnetic) to test.
Connection diagram for checking phase sensor 21110-3706040
Connection diagram for checking phase sensor 21120-3706040
The algorithm for checking the sensor with a multimeter is as follows:
- Take a multimeter and switch it to the DC voltage measurement mode in the range up to 20 V (depending on the specific multimeter model).
- Disconnect the “chip” from the sensor by unclipping the latch.
- Remove the sensor from its mounting location.
- On the “chip” of the sensor 21110-3706040 of a VAZ car (and on many others), contact “A” corresponds to ground, contact “C” is the positive wire, comes from the control relay, contact “B” is the signal wire (middle). For sensor chip 21120-3706040, contact “A” corresponds to ground, contact “B” is the positive wire from the control relay, contact “C” is the signal wire.
- Check the presence of power on the chips. To do this, you need to turn on the ignition on the car (but do not start the engine) and do this with a multimeter. If there is no power to the chips, then you need to look for the reason. This could be faulty wiring (insulation damage, broken wires), failure of the control relay, or a glitch in the electronic control system (ECU).
- Next, you need to connect the sensors for testing according to the diagrams shown in the figure.
- Apply a voltage of 13.5±0.5V to the sensor (although less is allowed, for example, 12...12.5 Volts from the battery).
- If, when power is applied to the sensor, the voltmeter detects a lack of voltage on the sensor, then this indicates either a breakdown of the sensor itself, the test can be completed and you can prepare to replace the sensor with a new one.
- Measure the voltage between the positive and signal contacts. It must be equal to at least 90% of the supply voltage (that is, if the supply voltage is 12 Volts, then the voltage at the signal contact must be at least 10.8 Volts).
- Bring a metal object prepared in advance to the end of the sensor (its signal part). Re-measure the voltage at the signal contact. It should be no more than 0.4 Volts. Remove the plate - the voltage value should be restored to 90.100% of the supply. If there are any deviations during the verification process, it means that the sensor has failed and must be replaced.
Checking the DPRV using an oscilloscope
An electronic oscilloscope helps to understand how the camshaft position sensor works and whether it produces pulses at all. Usually they use a so-called electronic oscilloscope, that is, simply a simulator program installed on a laptop or other similar device. You need to connect to the camshaft sensor and take an oscillogram from it. Ideally, there should be a smooth comb diagram with one drop-out peak that corresponds to the rapper passing through the sensor. If the oscillogram has a different shape, additional verification is needed.
When diagnosing the camshaft sensor of Nissan cars (in particular, Nissan Almera) with an oscilloscope, the shape of the oscillogram will be different. It will not be smooth, but in the form of 3 impulses, then a space, then 4 impulses - a space, 2 impulses - a space and one impulse - a space. For engines from this automaker, this feature is the norm.
Self-replacement of the sensor on Nissan Primera P12
To replace the Primera P12 crankshaft position sensor, you must follow the step-by-step algorithm presented in the instructions below.
- Disconnect the on-board power supply by disconnecting the negative terminal of the battery.
- Gain access from the underbody of the Primera P12.
- Remove the power unit protection
- Remove the subframe cross member.
- Disconnect the terminal block from the crankshaft position sensor connector.
- Unscrew the bolt that secures the DPKV.
- Slightly wobble and remove the crankshaft position sensor from its seat.
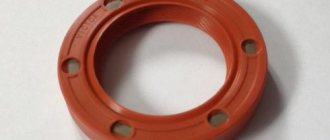
- Check the O-ring. When replacing the old sensor, it may be hardened. In this case, the ring will need to be replaced. It is also worth considering that many analogues come without a seal. You need to install the ring on them yourself.
- Reinstall the crankshaft position sensor.
- Fix the DPKV and connect the connector.
- Reassemble everything in reverse order.
- Check engine operation by starting the power plant.
Required Tools
To replace the crankshaft position sensor on a Nissan Primera P12, you need the list of tools from the table below.
Table - Tools required to replace the crankshaft sensor
| Name | Note |
| Socket wrench | Set |
| Head | "on 10" |
| Vorotok | With ratchet, universal joint and extension |
| Penetrating lubricant | To combat rusted threaded connections |
| Wire brush and rags | To clear your workspace |
Replacing the crankshaft position sensor is possible both through the bottom and through the top of the engine compartment. The first method is more preferable. Access from the bottom will require an inspection hole, overpass or lift.
Location of the crankshaft sensor on Nissan Primera P12
The crankshaft position sensor is installed at the rear of the cylinder block. To see where the DPKV is located, you need to crawl under the car and remove the engine protection. You can also look at the sensor from the top. To do this, you will need to remove a number of components in the engine compartment.
Sensor cost
The Primera P12 uses the original Nissan crankshaft position sensor 237318H810. Its price is 3000-5000 rubles. Analogues of the branded meter are available for sale. The table below presents a list of the best alternative options for the original DPKV on the Primera P12.
Table - Good analogues of the original crankshaft sensor Nissan Primera P12
| Manufacturer | vendor code | Approximate cost, ruble |
| Lucas | SEB1723 | 1400-2000 |
| TRW | SEB1723 | 2000-3000 |
| ERA | 550851 | 2100-2900 |
| FAE | 79160 | 1400-2000 |
| Facet | 9041 | 1200-1800 |