The pendulum lever (also known as the “ pendulum”) on the VAZ 2107 is designed for one simple function - synchronous rotation of the front wheels through the steering mechanism. It is thanks to him that the left and right wheels turn in the direction desired by the driver simultaneously, without delay, when turning the steering wheel. This ensures vehicle stability when cornering.
A malfunction of the VAZ 2107 pendulum worsens the vehicle’s performance when maneuvering and can lead to an accident. Therefore, at the first sign of its malfunction, it is necessary to repair or replace the unit.
Replacement of the pendulum lever of VAZ 2107, VAZ 2104.
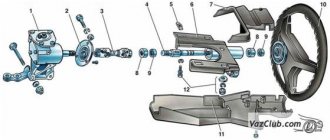
Pendulum design for VAZ 2104 - VAZ 2107
1 - bipod; 2 — bracket body; 3 — washer; 4 — adjusting nut; 5 - cotter pin; 6 — upper washer; 7 - seal; 8 — bushing; 9 – axis; 10 - lower washer; 11 - lock nut.
Many owners of VAZ 2104 - VAZ2107 cars buy, make repairs and change the pendulum themselves.
To do this you need:
This must be done carefully so as not to strip the threads or flatten the castle nut, so it is better to screw on another nut.
- remove by unscrewing two nuts, while on the other side you need to put on an adjustable wrench that will keep the bolt from turning;
- unscrew the top nut;
- remove the axle from the bracket. During assembly, add lubricant to the pendulum arm bracket.
- The bushings should fit tightly in the bracket, and the axle should have no radial play. When the bushings are worn out, replace them with new ones.
- check the turning torque of the axle - by tightening or loosening the nut, observe while turning the bipod. When turning, the bipod should “walk” easily and without effort. The lighter this force, the less it will be transmitted to the steering wheel.
Designs on bearings cope better with this task.
- check the play on both sides;
- tighten the top nut;
- install the bracket in place.
Repairing the pendulum on a VAZ 2104 - VAZ2107 car is not difficult and will not take much time, but to be sure of the result, it is better to contact a professional.
Replacing steering rods on a classic
Hello everyone!
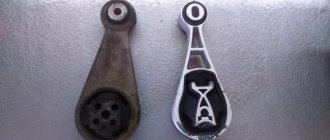
The other day I was literally shopping and bought external tie rod assemblies, without a middle. The middle has either been replaced or is in very good condition, in any case the anthers are intact and I did not change it. For one thing, the old owner left the BZAK pendulum on bearings. And I replaced the remaining silent blocks on the lower arms, because without removing the rods, the puller cannot be installed on the silent blocks! Old pendulum with rubber bands
The most annoying thing is that to replace the rods I bought a puller that didn’t fit. As a result, I used a crowbar and a hammer to remove everything, breaking two fingers. I wasted 360 rubles in vain!
New
I changed the silent blocks quickly, it’s good that I had a puller. I did half the repairs in the dark and started late, around 3 p.m.
I exposed the alignment by eye. The steering wheel turns much easier, but I haven’t figured it out yet. Tomorrow I'll go for a wheel alignment and we'll see.
Basic engine malfunctions
VAZ 2107 cars are equipped with three main types of power units with a displacement of 1.5, 1.6 and 1.7 liters. The second engine is equipped with a distributed injection system, which differs significantly from carburetor engines. During long-term operation, parts and components of the unit are subject to wear, which can cause the following malfunctions:
- Failure of the power supply system: fuel pump, low or high pressure pipelines.
- Clogging of the main fuel or air jet, damage to the starter membranes or other mechanisms.
- Failure of the ignition system: high-voltage wires, spark plugs, distributor or other mechanisms.
- Oil pump failure, filter clogged.
- Extreme wear of parts of the cylinder-piston group, crankshaft or camshaft liners, timing belt.
Diagnosis of injector or ECU malfunctions is carried out using a special tester, which is available at specialized service stations. Repair and restoration work on the engine is classified as complex and requires high qualifications and special skills.
PROCEDURE FOR PERFORMANCE OF REPAIR WORK
Replacement of a faulty part of the steering mechanism is carried out in the following sequence:
- We clean the assembly from dirt using a brush, and apply a penetrating compound to the threaded connections.
- Using pliers, remove the fixing cotter pins and, using a spanner wrench or a “22” socket, unscrew the nut on the pin.
- The steering rods are detached from the steering knuckle using a special puller. The device is put on the assembly from above and using a bolt, the finger is squeezed out of the eye.
Helpful advice: if you first tap the joint using a copper or bronze drift, the dismantling process will be significantly accelerated.
The manufacturer of the VAZ 2107 recommends replacing worn steering rods as a set. The service life of these structural units from one batch installed on a vehicle is usually the same. Replacing only one of them does not fundamentally solve the problem; a little time will pass and the repair process will have to be repeated for the remaining elements of the system.
Disassembly and assembly of the pendulum lever VAZ 2106-2103
As a rule, the pendulum arm is disassembled if the resulting play cannot be eliminated by simply tightening the nut. In this situation, the entire bushing will need to be replaced. For repairs, prepare pliers, a screwdriver, a 19mm wrench and a torque wrench.
Disassembling the pendulum mechanism
Clamp the lever together with the bracket in a vice and, unscrewing the nut, unscrew it. Remove the nut and the top washer on the lever axle together with the washer by prying it off with a screwdriver.
Next, release the bushing with the seal from the lever axis and remove the bracket. Do the same for the next bushing with its seal.
Disassembly of the lever is now complete. You will need to conduct a thorough inspection of all removed parts. For example, the axle should not show any noticeable defects caused by wear of the part or corrosion deformation. There should be no signs of wear on the bushings. If any of the above defects occur, then these parts should be replaced with new ones.
Assembly of the pendulum mechanism
Assembly must be done in the reverse order of disassembly. Don't forget to lubricate the hole in the bracket for the axle, as well as the axle itself. After the pendulum arm is completely assembled, the nut should be tightened with a torque wrench with a certain pressure force (1.5-2 kgf). After this, be sure to tighten the nut.
Aquagel - CAR GLASS PROTECTOR.
Aquagel - is not washed off by rain, snow and water.
rem-vaz.ru
Article: 2101-3003080, additional articles: 095943
Order code: 014452
- Buy with this product
- show more
Buy analogues
Passenger cars / VAZ / VAZ-21021 drawing
» href=»/catalog/vaz-3/legkovye_avtomobili-30/vaz_2102-4/privod_rulevoiy-164/#part8095″>Lever with bracket Front axle / Steering drive
- Passenger cars / VAZ / VAZ-21041 drawing
- » href=»/catalog/vaz-3/legkovye_avtomobili-30/vaz_2104-5/privod_rulevoiy-129/#part14931″>Lever with bracket Front axle / Steering drive
- Passenger cars / VAZ / VAZ-21061 drawing
- » href=»/catalog/vaz-3/legkovye_avtomobili-30/vaz_2106-7/privod_rulevoiy-141/#part21305″>Lever with bracket Front axle / Steering drive
- Passenger cars / VAZ / VAZ-21011 drawing
- » href=»/catalog/vaz-3/legkovye_avtomobili-30/vaz_2101-3/privod_rulevoiy-164/#part3611″>Lever with bracket Front axle / Steering drive
- Passenger cars / VAZ / VAZ-21031 drawing
- » href=»/catalog/vaz-3/legkovye_avtomobili-30/vaz_2103-106/privod_rulevoiy-130/#part11672″>Lever with bracket Front axle / Steering drive
- Passenger cars / VAZ / VAZ-21051 drawing
- » href=»/catalog/vaz-3/legkovye_avtomobili-30/vaz_2105-6/privod_rulevoiy-129/#part18037″>Lever with bracket Front axle / Steering drive
- Passenger cars / VAZ / VAZ-21072 drawings
- » href=»/catalog/vaz-3/legkovye_avtomobili-30/vaz_2107-8/privod_rulevoiy-178/#part25500″>Lever with bracket Front axle / Steering drive
- » href=»/catalog/vaz-3/legkovye_avtomobili-30/vaz_2107-8/privod_rulevoiy-179/#part25530″>Lever with bracket Front axle / Steering drive
There are no reviews for this product yet.
Today, the next article in the series “Crystal VAZs or typical breakdowns of domestic cars” is dedicated to the “classics”: VAZ-2101, 2103, 2104, 2104, 2105, 2106 and 2107. These cars have been driving along our roads for decades and, despite Despite all the shortcomings that we will talk about, their popularity is still high.
How to identify a faulty pendulum
The easiest way to determine if the lever is faulty is to listen for knocking noises while driving on rough roads. You shouldn’t deliberately drive into a hole or run over a bump, so you can pull over to the side of the road and experiment
But this is not the only way to determine the malfunction of such an important part as the pendulum
The second way to determine whether the VAZ 2107 pendulum arm is faulty is the presence of large play in the steering wheel. This can be determined quite simply by turning the steering wheel in one direction and the other. But the most common case of pendulum failure is the presence of load when turning the steering wheel. But these factors do not always indicate that the pendulum lever is the culprit. Malfunctions with such symptoms may include loosening of the bolts or overtightening of the adjusting nut. Therefore, before you start replacing the device, you should definitely make sure that it is broken. This can be done after dismantling it. The first sign of a part malfunction is the presence of defects on its component elements, so to determine the failure you will need to disassemble the mechanism.
Replacing the swing arm
If repair is not possible, you can install a new swingarm and secure it. The procedure is the reverse of removing the pendulum from the car body.
Replacing the pendulum on a VAZ 2107 is a fairly simple process. You can make it yourself.
The first signal that needs to be taken into account and the pendulum replaced is a bent bipod of the pendulum arm. It is possible to carry out repairs to replace the pendulum without an overpass. Initially, it is necessary to dismantle the main filter housing so that it does not interfere. Next, you need to unscrew the castle nuts of the tie rods, as well as the ball pin nut. After this, it is necessary to press out the ball pins of both steering rods. To do this, a long steel rod is used, which is struck with a hammer.
PURPOSE AND OPERATION SCHEME OF TRAPEZE
The rod system serves as an intermediary between the steering shaft and the steering knuckles of the front hubs. The task of the mechanism is to synchronously turn the wheels in one direction or another, obeying the rotation of the steering wheel. The trapezoid is located under the engine at the level of the bottom of the car, attached to the body stiffening elements - the lower side members.
The part of the steering mechanism in question consists of 3 main parts:
- the middle link is screwed to two bipods - a pendulum lever and a worm steering gear;
- the right link is attached to the swing arm of the pendulum and the steering knuckle of the front right wheel (in the direction of travel of the car);
- The left rod is connected to the gearbox bipod and the left front hub knuckle.
Trapezium levers mechanically connect the steering wheel with the front wheel mechanisms
The method of connecting the swivel brackets to the trapezoid parts is a conical pin, inserted into the counter hole of the bipod and secured with a nut. The pendulum arm and gearbox are rigidly attached to the side members with long bolts.
The middle link is a hollow metal rod with two hinges. Two side rods are prefabricated elements consisting of 2 tips - long and short. The parts are connected to each other by a threaded clamp, tightened with two bolts.
The middle section is designed for rigid connection of the gearbox bipod and the pendulum
How does a trapezoid work:
- The driver turns the steering wheel, rotating the shaft and shank of the gearbox. The worm mechanism transmits fewer revolutions to the bipod, but increases torque (force).
- The bipod begins to turn in the right direction, dragging the left and middle rods with it. The latter transmits force to the right rod through the pendulum bracket.
- All 3 elements move to one side, causing the front wheels to turn synchronously.
- The pendulum arm, mounted on the second spar, acts as an additional hinged suspension for the system. In older versions of pendulums, the bipod rotates on a bushing, in new elements - on a rolling bearing.
- Ball pins at the ends of all rods allow the trapezoid to move in one horizontal plane, regardless of the compression of the front suspension springs.
The side lever consists of two tips fastened with a clamp
Increasing torque with a worm gear makes it possible to do without hydraulic and electric power steering. On the other hand, the driver physically feels problems with the chassis - as soon as the ball joint or rod end becomes sour, it becomes much more difficult to rotate the steering wheel.
Trouble-shooting
As the vehicle is used, individual components of the steering mechanism gradually wear out. For comfortable and safe driving, as well as to prevent uneven tire wear, any defects in the steering mechanism must be corrected in a timely manner.
Steering gearbox
To identify problems with the steering column, the unit will need to be removed from the car. To do this, you need to prepare the following list of tools:
- a set of keys;
- knob;
- heads;
- steering rod puller.
Dismantling is carried out in the following sequence:
- We drive the car onto an overpass or lift.
- We unscrew the fastening of the cardan to the column shaft.
- We unscrew the nuts that secure the tie rod pins to the bipod, and then use a puller to squeeze out the pins.
Let's disassemble the mechanism for troubleshooting parts:
- Using a 30mm wrench, unscrew the nut holding the bipod.
Inspect the roller and worm for wear or damage. The gap between the bushings and the bipod axle should be no more than 0.1 mm. The rotation of the bearings should be easy and without jamming. Any defects on the internal parts of the bearing are considered unacceptable, as are cracks on the mechanism body. Damaged parts are replaced with serviceable ones. Before assembling the mechanism, lubricate all elements of the gearbox with transmission oil and perform the assembly:
- We hammer the bearing ring into its seat.
INSTALLATION OF PARTS AND ADJUSTMENT
Installation of steering rods on a car of the classic VAZ 2107 model is not particularly difficult and is performed as follows:
- We measure the length of the old assembly using a steel ruler as accurately as possible.
- We adjust the new unit using a threaded connection to the desired size and lock it with locknuts.
- Installing the part in place is carried out by inserting a finger into the seat and screwing the nut with a certain torque.
Timely replacement of faulty components of the VAZ 2107 steering mechanism will allow you to avoid serious troubles and emergency situations on the road.
Repair of the pendulum arm (Pendulum) on VAZ 2101-VAZ 2107
Welcome! Pendulum lever - over time, like any other part, the pendulum lever, or as it is also called simply “Pendulum”, becomes unusable, and the cost of this lever for some will seem too small, and there will be those people for whom the cost of the pendulum lever will seem too big.
Therefore, in order not to spend money and buy it new right away, you can first try to repair it at minimal cost, but with the loss of some time, which, compared to money, will seem like a more acceptable option.
Note! To repair the pendulum, you will need: A set of basic wrenches, a vice, as well as a screwdriver, pliers, and it is also recommended to stock up on a dynamometer thanks to which you can determine with greater accuracy under what action the bipod of the lever rotates (More details will be discussed in the article, a little below)!
Where is the swing arm located? It is located at the very bottom of the car, and this is easy to understand, because as such the pendulum is part of the main part of the car’s chassis. (But still, you can see a more detailed location of the pendulum in the article entitled: “Replacing the pendulum arm on a VAZ”)
Why do you need to repair the pendulum arm? In most cases, the pendulum is disassembled, thereby repairing it in order to replace the main bushings in it, due to which play appears in the pendulum, which in turn cannot be removed by tightening the pendulum nuts.
Steering problems
The steering mechanism, like any other vehicle component, wears out and requires repair over time. To simplify the troubleshooting, there are certain signs that allow you to find out the nature of the breakdown and fix it in a short time.
Oil leak
On a classic, the problem of a “wet” steering gear is quite common. There can be many reasons for this:
- oil seal wear;
- leakage from under the gasket;
- loosening of the fasteners that secure the mechanism cover;
- Corrosion of the input shaft.
If the oil seal and gaskets can be replaced and the bolts tightened, then if the shaft is damaged, the part will have to be ground.
Tight steering wheel
Sometimes it happens that to turn the steering wheel it is necessary to apply noticeably more effort than usual. Several reasons can lead to this malfunction:
- incorrect wheel alignment;
- failure of one of the elements in the steering mechanism;
- the gap between the worm and the roller is broken;
- The pendulum axis fasteners are too tight.
Steering play
One of the reasons for free play in the steering mechanism is wear on the shaft crosspieces. In addition to them, play appears in the gearbox itself. If the unit has a high mileage, then it is advisable to disassemble it, inspect the condition of all the elements, replace parts with high wear, and then carry out adjustments.
Knock and vibration
If you feel feedback on the steering wheel while driving, there can be many reasons for this phenomenon. Driving a vehicle in such a technical condition leads to rapid fatigue and reduces the level of safety. Therefore, the steering mechanism needs diagnostics.
Table: causes of vibrations and knocking on the steering wheel and ways to eliminate them
| Cause of steering failure | Troubleshooting method |
| Increased clearance in front wheel hub bearings | Adjust the front wheel hub clearance |
| Loosening the tie rod ball pin nuts | Tighten the tie rod ball stud nuts |
| Increased clearance between the pendulum arm axis and the bushings | Replace the swingarm bushings or bracket assembly |
| The adjusting nut of the pendulum arm axis is loose | Adjust the tightness of the swingarm nut |
| The clearance in the engagement of the roller with the worm or in the worm bearings is broken | Adjust the gap |
| Increased clearance in steering rod ball joints | Replace tie rod ends or tie rods |
| Loosening the bolts securing the steering gear housing or the pendulum arm bracket | Tighten the bolt nuts |
| Loosening the swing arm nuts | Tighten the nuts |
TROUBLESHOOTING
As the car moves, the ball pins rotate in different planes and gradually wear out the crackers, which causes backlash. The following signs indicate critical wear of a tip (or several):
- a distinct dull tapping sound when driving over any uneven surfaces;
- vibration from the play of the ball pins is transmitted to the steering wheel;
- on a flat section of the road the car spontaneously leaves the straight path;
- The rotation of the steering wheel is difficult, and a creaking sound is heard from below.
When a lot of force is required to turn the steering wheel, the worn tip must be replaced immediately. The symptom indicates that the ball pin is jammed inside the housing. If measures are not taken in time, the hinge may jump out of its socket and the car will become uncontrollable.
A similar story happened to my relative. When there was literally half a kilometer left to drive to the garage, the right steering tip on the “seven” broke off. The driver showed ingenuity: he tied the end of the dropped rod to the suspension arm, leveled the wheel with his hands and slowly continued driving. When it was necessary to turn, he stopped, got out of the car and manually adjusted the wheel in the right direction. The 500 m long path was covered in 40 minutes (including the entrance to the garage).
Most often, hinges become unusable due to a torn protective cover.
Steering rods of Zhiguli cars become unusable for a number of reasons:
- Natural wear and tear. Play and knocking appear at 20-30 thousand km, depending on conditions and driving style.
- Operation with torn hinge boots. Water flows into the unit through the holes, dust and sand penetrate. Corrosion and abrasive effects quickly destroy the ball pin.
- Lack of lubrication leads to increased friction and accelerated wear. The presence of lubricant must be checked before installing the part on the car.
- Bending of the rod due to impact with a stone or other obstacle. If the outcome is successful, the element can be removed and leveled by heating it with a burner.
When the production of all tips reaches a critical limit, the front wheels have large free play in the horizontal plane. To drive straight, the driver has to “catch” the car along the entire road. How to diagnose wear on steering rods and not confuse them with suspension faults:
- Place the car on a viewing ditch or overpass and apply the handbrake.
- Go down into the hole and carefully inspect the trapezoid, especially after hitting the bottom.
- Grab the shaft near the tip with your hand and rock it up and down.
If you feel free movement, replace the worn element. Repeat the operation on all hinges. To check, the lever must be swung in a vertical plane, grasping it near the hinge
The method of developing traction during diagnosis is of great importance. There is no point in turning the lever around its own axis - this is its normal operating stroke. If the test shows a small tight play, the hinge is considered to be in good condition - the internal spring is triggered.
There is no point in putting pressure on the hinge from below - you will only feel the resistance of the spring
VIDEO: HOW TO CHECK THE STEERING LINKAGE OF A ZHIGULI
Steering VAZ 2107
The steering mechanism of the VAZ “Seven” consists of several units connected together by means of fasteners. These components and their constituent elements, like any other part of the car, wear out over time and become unusable. The purpose, design, repair and maintenance of the VAZ 2107 steering system should be discussed in more detail.
Purpose
The main function assigned to the steering mechanism is to ensure the vehicle moves in the direction specified by the driver. On most passenger cars, the trajectory of movement is carried out by turning the wheels of the front axle. The steering mechanism of the “seven” is quite complex, but at the same time it provides trouble-free control in different situations on the road. The car is equipped with a safety steering column with a driveshaft that folds upon impact. The steering wheel of the mechanism in question has a diameter of 40 cm and to completely turn the wheels you need to make only 3.5 turns, which allows you to perform maneuvers without much difficulty.
What does it consist of?
The front wheel control mechanism on the VAZ 2107 is made of the following basic elements:
- steering wheel;
- shaft;
- gearbox;
- bipod;
- trapezoid;
- pendulum;
- steering knuckles.
Steering shaft
Through the shaft, rotation from the steering wheel is transmitted to the steering column. The shaft is secured with a bracket to the car body. Structurally, the element is made in the form of a cardan with crosspieces and an upper shaft. In the event of a collision, the mechanism folds, thereby ensuring the safety of the driver.
Gearbox
The VAZ 2107 is equipped with a worm steering column, which converts the rotational movement of the steering wheel into the translational movement of the steering rods. The operating principle of the steering mechanism is as follows:
- The driver turns the steering wheel.
- By means of cardan joints, the worm shaft is driven, thereby reducing the number of revolutions of the steering wheel.
- The worm element rotates, moving the double-ridge roller.
- The secondary shaft rotates, on which the bipod is fixed, driving the steering rods.
- The trapezoid moves the steering knuckles, turning the wheels in the desired direction.
Steering linkage
The radius of the vehicle's trajectory when turning depends on the angle of rotation of the wheels. Since the outer wheel has a larger radius than the inner one, in order to avoid the latter slipping and deteriorating traction with the road surface, the front wheels must deviate at different angles.
This is what the steering linkage is used for. During the maneuver, the transverse thrust of the mechanism shifts under the influence of the bipod. Thanks to the pendulum arm, it pushes and pulls the side rods. Since misalignment occurs, the impact on the tie rod ends is different, which leads to the wheels turning at different angles. The tips of the trapezoid with the rods are connected through adjusting couplings, which allow you to change the angles of rotation of the wheels. The parts of the trapezoid are connected to each other by identical ball joints. This design contributes to the normal operation of the unit even when driving on bad roads.
Pendulum arm
The steering pendulum of the “seven” is necessary for synchronous rotation of the wheels of the front axle without lag. Thus, the car is able to corner safely. If malfunctions occur with the pendulum, the vehicle’s performance during maneuvers deteriorates, which can lead to an emergency.
Types of pendulums for VAZ 2104–2107
In the manufacture of pendulum levers, bushings are used, and the bearings on which the lever axis rests. They are designed to provide longer service life for moving parts. Manufacturers believe that bushings are more durable because, unlike fragile bearings, they are not subject to influences other than abrasion. However, both materials are subject to wear. If the elements are worn out, the driver will feel more tension in the steering wheel than usual, and it becomes difficult to control the car due to increased play. When hitting a hole or bump, extraneous knocks begin to be heard from the side of the pendulum, and the steering wheel travel increases. And if the mechanism itself is damaged, the bolts are loosened, or the adjusting nut is overtightened, then the wheel will rotate more tightly.
The designers tried to make the pendulum airtight and isolated the internal cavity of the body with two rubber rings, but usually after traveling 45–90 thousand km it has to be completely changed. When a car drives onto country roads, all the dirt is pulled inside.
Functions and purpose
The steering gearbox is installed on the driver's side, and the steering pendulum mechanism is connected to the bipod on the passenger's side. They are connected to each other by a steering rod and serve as support points. The driver controls them by acting on the steering rod.
The pendulum body is made of cast iron or aluminum and has the shape of a cylinder with holes for attaching it to the spar or to the frame. In the center, an axle is inserted through a hole, which is threaded through the body and makes the handle more movable, and also serves as a support for the steering rod. The other end of the bipod moves like a pendulum and therefore has this name.
The steering gearbox is installed on the driver's side, and the steering pendulum mechanism is connected to the bipod on the passenger's side. They are connected to each other by a steering rod and serve as support points. The driver controls them by acting on the steering rod.
The steering gearbox is installed on the driver's side, and the steering pendulum mechanism is connected to the bipod on the passenger's side. They are connected to each other by a steering rod and serve as support points. The driver controls them by acting on the steering rod. The pendulum body is made of cast iron or aluminum and has the shape of a cylinder with holes for attaching it to the spar or to the frame.
Replacing the pendulum arm (Pendulum) on a VAZ 2101-VAZ 2107
Welcome! Pendulum arm – popularly this unit is simply called “Pendulum”. You need this unit to turn both wheels at the right moment in time. Essentially, due to the “Pendulum Lever”, it creates synchronism when turning the wheels, that is, thanks to it, both wheels turn at the same moment and without delay, respectively.
Note! To replace the pendulum, be sure to stock up on: Two 17" wrenches!
Where is the swing arm located? It is located under the bottom of the car, you can see it by opening the hood of the car and looking at the very bottom of the engine compartment, and the easiest way to look at it is from the bottom of the car, to do this, climb under the car and find the lever there that comes from the pendulum itself, and for clarity, this lever is indicated by an arrow.
Note! In fact, it is incorrect to use the word lever in the pendulum (this was done only for convenience), in fact, no lever comes from the pendulum, but only a bipod, which is indicated by the arrow, comes from it!
When should the swing arm be replaced?
- Basically, after the pendulum arm fails, knocking noises begin to be heard from the lower part where it is located, which will be especially audible when hitting a bump.
- In addition to knocking, the free play of the steering wheel, popularly called play, can also be increased.
- Also, the steering wheel itself may be difficult to turn due to the failure of the pendulum arm.
Note! All these signs relate to a malfunction of the pendulum, but they can also occur when the pendulum bolts are loose or the adjusting nut is too tight, so before replacing the pendulum arm with a new one, check the tightness of the bolts and either loosen or tighten them as necessary!
How to replace the pendulum arm, also known as the pendulum, on a VAZ 2101-VAZ 2107?
Removal: 1) First, disconnect both tie rod ball joints that are connected to it from the pendulum. (How to disconnect the hinges, see the article: “Replacing steering rods on a VAZ”)
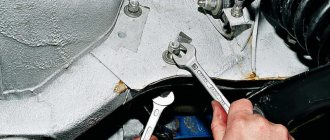
2) Then take two wrenches in your hands and with one of them at this time hook onto the bolt that secures the pendulum, so that the bolt does not turn when the nut is unscrewed. After you grab the bolt, use a second wrench to unscrew the nut of the bolt you are holding.
Note! There should be washers under both nuts, so if you have them, then remove them, and if there is more than one on one bolt, then before removing the washers, remember which bolt had what number of washers and when reinstalling it, place the required number of washers under the nuts !
3) Now remove the two bolts that secure the pendulum and, as a result, remove the pendulum arm from the car.
Note! Before installing a new pendulum on a car, make sure that it has been assembled correctly; to do this, clamp the pendulum in a vice so that its bipod is directed strictly horizontally. In this position, under the weight of its own weight, the bipod will have to stand in one place, not moving anywhere. It will only have to move under the influence of a force of “1-2 kg” applied to the part on which the right tie rod joint will be installed, in other words, to the tip of the bipod as shown in the figure:
Additional video clip: For more detailed instructions on how to replace the pendulum arm, you can see the video clip located just below:
vaz-russia.com
COMPLETE DISASSEMBLY OF TRAPEZE
Removing all rods is practiced in two cases - when replacing assembled levers or a complete set of anthers on hinges. The technology for carrying out the work is similar to dismantling the outer tip, but is done in a different order:
- Complete the preparatory stage - place the car in the pit, clean the hinges, apply lubricant and remove the cotter pins. There is no need to turn or remove the wheels.
- Using a 22 mm spanner, unscrew the nuts securing the two side link ball pins; do not touch the clamp bolts.
The inner nuts securing the rods can only be reached with a curved spanner. - Using a puller, squeeze both fingers out of the steering knuckle axle and the pendulum bipod. Relieve the cravings.
- Remove the remaining 2 levers in the same way.
- Having loosened the clamps of the new rods, clearly adjust their length to the size of the removed elements. Secure the ties with nuts.
The length of the pull is adjustable by screwing in/unscrewing the short end - Install the new trapezoid parts, tighten the nuts and secure them with cotter pins.
Don't forget to position the middle section correctly - bending forward. After replacement, it is worth driving out onto a flat section of the road and observing the behavior of the car. If the car pulls to the side, go to a service station to straighten the camber angles of the front wheels.
VIDEO: REPLACING STEERING RODS VAZ 2107
The operation of replacing tips or rod assemblies cannot be called complicated. With a puller and some experience, you can change the parts of the VAZ 2107 trapezoid in 2–3 hours. The main thing is not to confuse the right lever with the left one and install the middle section correctly. There is a reliable way to protect yourself from mistakes: before disassembling, take a photo of the position of the rods with your smartphone camera.
How to identify a faulty pendulum
The easiest way to determine if the lever is faulty is to listen for knocking noises while driving on rough roads. You shouldn’t deliberately drive into a hole or run over a bump, so you can pull over to the side of the road and experiment
But this is not the only way to determine the malfunction of such an important part as the pendulum
The second way to determine whether the VAZ 2107 pendulum arm is faulty is the presence of large play in the steering wheel. This can be determined quite simply by turning the steering wheel in one direction and the other. But the most common case of pendulum failure is the presence of load when turning the steering wheel. But these factors do not always indicate that the pendulum lever is the culprit. Malfunctions with such symptoms may include loosening of the bolts or overtightening of the adjusting nut. Therefore, before you start replacing the device, you should definitely make sure that it is broken. This can be done after dismantling it. The first sign of a part malfunction is the presence of defects on its component elements, so to determine the failure you will need to disassemble the mechanism.
Location of the pendulum on the VAZ 2107
This product is located on a VAZ 2107 car from below the engine compartment. You can see the pendulum when you open the hood and look at the bottom of the car on the passenger side. It is most convenient to dismantle or examine the device from below from an inspection hole or on an overpass.
A bipod extends from the pendulum, which controls the rotation of the front wheels of the VAZ 2107. The photo below shows a view of the pendulum arm on the VAZ 2107.
Removal and repair of the pendulum
To carry out the work, you will need to stock up on a standard set of tools and a steering rod puller, and then begin the work process:
After removing the product, it is replaced or repaired. Installation of a new pendulum arm is carried out in the reverse order of removal. It is advisable to replace the pendulum arm only if it cannot be repaired. In frequent cases, the product can be repaired, which many motorists do on their own.
Repair of the mechanism is carried out using the following procedures:
The product is assembled in the reverse order of removal, but initially all parts should be lubricated with Litol-24
This completes the replacement of such an important device on the VAZ 2107. After assembly, you should check the steering wheel play
Currently, pendulum arms with rolling bearings are also sold on the market. There are different reviews about the reliability of this option. Everyone is inclined to believe that the pendulum on bearings facilitates the rotation of the steering wheel and lasts several times longer than the factory one, but it is not repairable. In the end, the choice is yours.
Source
Electrical equipment main causes of malfunctions
The on-board network of the VAZ 2107 is powered from the battery, and after starting the engine from the generator. The most common causes of electrical equipment failures:
- Failure of the voltage regulator, significant wear of the brush assembly and slip rings, and the generator drive belt.
- Undercharging a battery for a long time causes sulfation and destruction of the plates, which leads to a decrease in its capacity.
- A breakdown of the solenoid relay or damage to the stator or rotor winding makes it difficult to start the engine.
Any malfunctions of the VAZ 2107 car are diagnosed by employees of service stations or independently. The method of restoring the functionality of systems and mechanisms usually involves replacing failed parts. Experienced car enthusiasts can fix most breakdowns on their own using illustrated repair manuals.
SELECTION OF NEW TRAPEZE PARTS
Since the VAZ 2107 car has been discontinued, finding original spare parts is becoming increasingly difficult. On the roads of the CIS countries, steering rods fall into disrepair quite often, so the supply of “original” parts has long been exhausted. In recent years, trapezoid kits have been supplied to the market by several well-known manufacturers:
- "Belmag";
- "Cedar";
- "Track";
- Fenox;
- Delphi;
- "VIS".
A special feature of repairing a steering linkage is that worn tips can be replaced one by one. Few Zhiguli owners install complete sets because of one broken ball pin. As a result, the “seven” trapezoid is often assembled from spare parts from different manufacturers.
Complete kit includes rods, clamps and castle nuts with cotter pins
The quality of steering rods from these manufacturers is approximately the same, as evidenced by reviews from car enthusiasts on the forums. Therefore, choosing a new spare part comes down to following 3 rules:
- Beware of fakes and do not buy parts from dubious outlets.
- Avoid tie rods from unknown brands sold at bargain prices.
- Do not confuse the left long tip with the right one if you are changing part of the trapezoid.
