Installing a short-throw rocker on a VAZ 2114 and a classic
The car is packed very tightly, and it is very difficult to find free space in the engine compartment. Therefore, the control parts of some components are sometimes located at a significant distance from the mechanism itself. Everything said completely refers to the checkpoint (Checkpoint - a point designed to control passage (visit) and entry into the territory of any facility)
, in which the box itself and the gear shift lever (RPL) are connected by a special part called the backstage. One of the shortcomings of VAZ, both on front-wheel drive 2110, 2112, 2115, 2114, and on classics, is the inconvenience of changing gears. This shortcoming is eliminated by a short-stroke rocker.
The photo shows how it looks on a square.
What kind of gearbox can be installed on a VAZ 2107
Initially, the “Seven” was produced with a “four-speed”, so you can install any VAZ gearbox from rear-wheel drive “Zhiguli” on it. You should know what functions the car will perform. If you use it as a workhorse, carry loads, pull a trailer, then a four-speed gearbox will do. It is more durable and resistant to variable loads. If high-speed driving on highways is necessary, then a five-speed gearbox is suitable.
It is possible to install boxes from foreign cars.
The best option is a box from an Italian Fiat model, since this is a prototype of our VAZ.
You can also install it from an early model BMW, but for installation you will have to redo the fastenings.
Pros and cons of a short-throw rocker
Before we look at how to create a short-stroke slide with our own hands, let’s summarize what was said earlier and decide what pros and cons it gives. Most often, a similar substitution is carried out on all VAZ cars (for example, 2110, 2112, 2115, 2114 and 2107, 2106, 2108, 2109), the following is considered a positive effect:
- reduction of moves (distances for moving the checkpoint) when switching a checkpoint (Checkpoint - a point designed to control passage (visit) and access to the territory of any facility)
; - the most accurate fixation of gears (due to an increase in their engagement force);
- elimination of free play and rattling of the RPP.
But not everything is so great; some experts believe that installing a short-stroke rocker causes synchronizer failure due to excessive shifting force.
Do-it-yourself short-throw scaffold
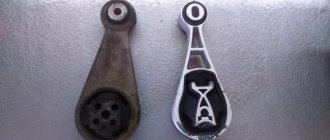
Short-stroke link for classics
For production in this case you will need:
- a piece of pipe fifteen mm in diameter;
- nut from a traditional ball nut;
- RPP from 2108;
- backstage repair kit 2108 (axle and two bushings);
- cardan from the control mechanism 2104, 2105 or 2107.
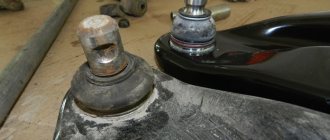
The work is carried out as follows:
- The ball from the bottom is cut off from the RPP;
- The lower part is sawed off so that a pipe can be inserted into it, and scalded;
- The nut is welded to the pipe from below;
- The ball is located in a comfortable place;
- The cardan is attached to the checkpoint lever (Checkpoint is a point designed to control passage (visit) and access to the territory of any facility)
.
The described process is explained by the following photos:
Short-stroke rocker VAZ 2109
One of the main parts will be a cardan from Kalina, which allows you to avoid free movement of the lever.
Next you need to make modifications, as shown in the photo:
Then two pieces of alloy are welded
After finishing the work, you need to clean all the seams and paint them in a suitable color.
The short-throw rocker, which you install yourself on almost all models of VAZ cars, has its pros and cons, but it allows you to reduce gear shift time and simplifies the control of the car. Whether to create it or not is everyone’s personal choice, but it cannot be denied that such modification is perceived by almost everyone as suitable and necessary. ”alt=””>
Source: znanieavto.ru
Gearbox VAZ 2106 and their design
This car was equipped with two types of gearboxes, one of them was a manual 4-speed transmission. The second is an improved version of the previous one, designed for 5 speeds, also of a mechanical type. At the same time, the five-speed gearbox, due to its modernization, was more expensive and more demanding to maintain. In addition, both of these gearboxes (5-speed and 4-speed) can be interchangeable.
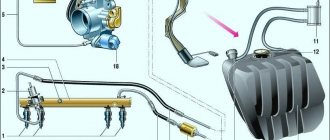
The VAZ 2106 gear shift diagram is shown in the photo.
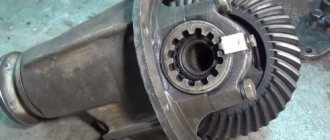
The device of any of them is a simple structure consisting of several shafts (primary, secondary, intermediate), a crankcase and a gear shift mechanism with synchronizers. On the input shaft there is a firmly seated gear, which is in constant mesh with all other gears. The shaft rotates due to two bearings located at the front and rear; the front one is also located in the crankshaft socket at the end. The rear one is located inside the crankcase and is sealed with an oil seal. The presence of the latter is explained by the fact that there is transmission oil in the crankcase.
Short-throw gear shift lever VAZ 2101-2107 TURBOTEMA
- We guarantee prompt processing of your order during business hours (we work from 11-00 to 20-00, Saturday and Sunday are days off).
- We guarantee reliable packaging of your order (when sending it by Russian Post or transport company).
- We guarantee very prompt dispatch of the paid order (within 2-4 working days after receipt of payment).
- We guarantee a refund or exchange for another product (with recalculation) within 14 days from the date of receipt of the order (the product must be in good condition, without traces of installation, delivery costs are not refundable).
- We guarantee a free exchange of the product (transportation costs at our expense) if the purchased product turns out to be defective.
Payment methods
Delivery options
Pickup options
Product added to bookmarks!
- Description
- Reviews
APPLICABILITY: VAZ 2101, 2102, 2103, 2104, 2105, 2106, 2107 with installation of the VAZ 2123 gear selection mechanism (Niva-Chevrolet).
SIZE: height 370 mm.
MATERIAL: steel, powder-coated, caproloctan.
INSTALLATION: short-stroke rocker on VAZ 2101-2107 “Classic”
made on the basis of a conventional ball joint (installed on the “tunnel” of the car). When installing, you need to drill holes in the seat mounting bracket (bushings are included in the kit).
Without modifications, it is installed on a 5-speed gearbox (Checkpoint - a point designed to control passage (visit) and access to the territory of any facility) with a gear selection mechanism from a VAZ 2123 (Niva-Chevrolet).
When installing on a 4-speed gearbox (Checkpoint is a point designed to control passage (visit) and access to the territory of any facility), the gear selection mechanism needs to be modified.
Repair of VAZ 2107 5-mortar gearbox
The above procedure involves complete disassembly of the unit as a preventative measure. However, it happens that the manual transmission unit knocks out or slips during driver manipulations. Moreover, the VAZ five-speed transmission suffers from such things all the time. The reason for the repair may be one of the following factors:
the rocker lever gets stuck; extraneous noise when driving; one of the gears falls out; positions are difficult to switch on.
For a more accurate understanding of the process, you can watch video master classes of the process from experienced specialists.
4th gear slips out
On a five-speed VAZ 2107 gearbox, fifth speed overshoot can provoke wear of the gear, synchronizer, and related parts.
During the repair, the 3/4 clutch, the damaged element and a complete set of seals that are subject to separation during disassembly are replaced.
Note! Some mechanics claim that in 40% of cases, replacing the driveshaft mount and clutch fork saves the day.
5th gear slips out
The five-speed gearbox of the “seven” periodically gives out vagaries to the user due to insufficient gear lubrication. It is recommended that in case of knockout or tight engagement of a position, completely change the synchronizers, gear, fork and bushings - this will ensure stable operation of the unit.
Note! Before purchasing spare parts, it is necessary to troubleshoot them. Some stores sell "crooked" parts.
Repair of gearbox lever (backstage) VAZ 2107
If the gearbox linkage (handle) becomes loose, repairs can be carried out even without removing the unit from the car. However, some experts recommend using “garage” repair parts. For the convenience of the reader and a clearer explanation of the process, it is better to complete the description in pictures.
- Dismantle the cover and remove the locking bar from the rocker bushing.
After release, the lever axis is removed; for convenience, you can push the insert with a screwdriver or a pusher.
Usually the bushing itself wears out; you can replace it with a new insert or a standard M10 bolt.
Next, fasten everything in the reverse order and tighten the structure.
Old-style VAZ 2107 gearbox repair
Before repairing an old-type VAZ gearbox, it is advisable to study the user manual or technical documentation. The main nuance is the absence of 5th gear - the classic system has only 4 positions. Therefore, the reverse gear is located separately. This should be taken into account during repairs.
Repair of VAZ 2107 transmission without removing the box
In case of emergency, you can repair the VAZ 5th transmission without removing the housing from the car. When performing the procedure, the car is driven onto an overpass or inspection hole. All manipulations are performed upside down, which complicates the process. Therefore, experienced auto mechanics prefer to first dismantle the unit from the car.
Device placement and properties
Checkpoint lever (Checkpoint - a point designed to control passage (visit) and access to the territory of any facility)
The VAZ 2107 is located directly in the car’s interior. It is used to be able to change gears while moving. The gearbox lever fails only in the rarest cases, and the prerequisite for this is a careless attitude towards the product. If the product fails, it must be replaced. But before making a replacement, you need to remove the product in question. We’ll find out in more detail how to remove it and also carry out a replacement on the “seven”.
On the “seven” the gear shift knob has a common problem - rattling and chattering. If you remove such a malfunction using the means at hand, then replacing the device will not be necessary. Before starting to replace the device, you will need to find out the clear reasons for the malfunction. After all, sometimes not only the part in question, but also the checkpoint (checkpoint - a point designed to control passage (visit) and access to the territory of any facility)
or clutch.
If you are convinced that the checkpoint lever is faulty (Checkpoint is a point designed to control passage (visit) and access to the territory of any facility)
, then only then you need to start replacing it.
Substitution personality
Before you start replacing, you need to stock up on tools such as wrenches and a screwdriver. Let's start with the following steps:
- Set the lever to neutral position.
- After this, you need to move the upper cover upward. There is no need to remove the cover at all.
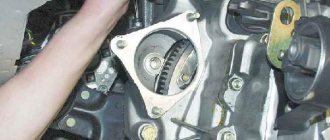
- The next step is to move the cover, which is located below, to the highest part. This cover is also called a thermal protection valve. In the photo below it is shown with a reddish arrow.
- Now you need to press on the device, drowning it in the lower part. After this, you need to insert a screwdriver into the lower part of the product, where the plastic sleeve is located. The bushing is located at the very bottom of the device, as shown in the photo below.
- You need to move the locking sleeve to the lower part, then remove the product from the box.
- If the device emits powerful vibrations, it needs to be replaced with a new one. With all this, you can change the part to a product of the shortest length, as on foreign cars. A small device is much more comfortable to operate than a conventional product.
Almost all motorists replace the standard gear shift levers with the most modern ones, which allows them to uniquely customize the interior of the “Seven”.
After the standard product is dismantled, we install a new handle in its space. Let's take a look at what the installation is.
Installing the device on a VAZ 2107
After the standard mechanism has been removed, you will need to remove the rubber bushing from it, if it remains inside. To remove the bushing, you must use a screwdriver or a hook. By prying the sleeve, we remove it from the device, as shown in the photo above.
If you plan to install a standard product in a space, then it is better to change the bushing by purchasing a repair kit in advance. When choosing a repair kit, preference should be given to products manufactured by VAZ. The installation process is similar to removing the device. First, a rubber bushing is installed, recessing it inside the device. Following the bushing, you need to install a rubber band in the form of a washer, which softens the control of the mechanism. Next, you need to install a plastic lock inside the mechanism, due to which the device is fixed on the “scene” of the checkpoint (Checkpoint - a point designed to control passage (visit) and access to the territory of any facility)
.
The assembly is completed by installing the locking sleeve, which had to be moved down at the initial step in order to dismantle the gearbox lever (Checkpoint - a point designed to control passage (visit) and access to the territory of any facility)
.
Once the product is ready for installation, you will need to insert it into the drawstring. To do this, you should first lubricate the slide, and then tap the mechanism handle with your hand until you feel that the lever has settled into space. This is how the installation of both the newest and the old mechanism, which was dismantled to replace the component parts, is carried out.
Self-tuning handles
Some drivers are not satisfied with the properties of repair kits for installation, and they came up with a typical tuning of the gearshift knob itself (Checkpoint - a point designed to control passage (visit) and access to the territory of any facility)
: to reduce rattling and vibration going to the shift knob, instead of the usual plastic bushings and rubber bands, they insert a piece of hose suitable for the outer and inner diameters. This upgrade also makes future handle installation easier.
How to dismantle the gearbox lever of a VAZ 2107
If you had problems with play in the bushings, then you need to purchase a repair kit for the VAZ 2107 gearbox handle in advance and after dismantling it.
Before starting work, prepare a screwdriver.
- Set the box to neutral.
- Slide the cover.
- Push the damper locking sleeve down with a screwdriver.
- Remove the rod with the knob.
- Remove the remaining bushings from it.
- Replace them in reverse order as shown in the picture.
Before reinstalling, fully assemble the rod and bushings, slide it onto the lever, and push down sharply to seat it in place.
If you need to completely replace the rocker, then add a 10mm wrench to the screwdriver (preferably a socket or socket):
- remove the decorative panel;
- unscrew the boot;
- use a 10mm key to unscrew the mechanism;
- remove it from the box.
After repair or replacement, assembly is performed in the reverse order.
The quality of bushing repair kits leaves much to be desired and the backlash of the rod remains quite large, so some, instead of plastic and rubber bushings, simply select a simple hose according to size and attach it to it.
Do-it-yourself short-throw rocker for a VAZ 2109 (manufacture and installation)
The short-throw rocker is popular among VAZ owners who love tuning and their own car. But despite all this, they can’t stand the gear shift lever (GSL), which simply “wanders” throughout the cabin in search of a suitable gear.
The short-throw shifter came “to us” from motorsport experts, well, you see, what kind of sport can it be if it takes so much time to engage the gear. What does this curtain give? Thanks to it, switching becomes much more pleasant, the lever stroke is halved, the result of the installation is simply indescribable. Good people grabbed the “topic” and launched it into the “masses.” As a result, you can now purchase a short-throw rocker for a VAZ 2109 in almost any auto store. The cost, however, is significantly inflated, but this does not stop most motorists. This is logical, because it is worth it. I, like everyone else, was ready to buy a short-throw rocker for a VAZ 2109, but after I saw how it works and what its purpose is, I changed my mind about paying for something that you can create with your own hands in just half an hour. See for yourself what came of it. And for now, a few words about how it all works...
To watch online, click on the video ⤵
Zhulka - Transfer of the backstage or short-stroke backstage. More details
Do-it-yourself free short-throw VAZ gearbox shifter? Easily! More details
Transferring the scenes of the “house” VAZ 2101-07 classic AkAn motor tech Review/Installation Read more
SHORT STROKE STROKE FOR ZHIGULI | WITH YOUR OWN HANDS Read more
Short-throw rocker for VAZ 2105 More details
TRANSFER OF THE SCENES ON THE CLASSIC | HALF SHAFT STUDS | REAR SPACER WITH YOUR OWN HANDS More details
Short-stroke gearbox 2107 More details
TECHNIQUE. Installed hydraulic handbrake. Short-stroke action - like a sequential action?! ZDT power! More details
Clubturbo short-throw rocker for VAZ 2107 More details
Short-throw rocker for VAZ 2107 Read more
MOVING THE GEARBOX LEVER TO A VAZ 2107 ✖ NEW SHOCK ABSORBERS INSTALLED ON THE ZHIGU ✖ MOVING THE STAGE LEVER TO THE CLASSIC Read more
Transfer of the gearbox lever VAZ 21214 More details
Tuning Beard VAZ More details
DIY HYDRAULIC HANDLE for 1000. Detailed installation. More details
silent locks VAZ 2107 (part 1) More details
BASICS OF IMPROVEMENTS - LIST FROM THE RED RING Read more
DIY | A twist on the classics. Installing clubturbo levers on a VAZ Read more
2 din radio and interior tuning 2107 Read more
How does a short-throw rocker work?
The above diagram allows you to understand the mechanism of operation of the short-stroke rocker. Points “O” and “F” are your stock gearbox, which is installed in the neutral position. To engage the gear you need to move the rod that connects to the lever at point “B” - to point “A”. In this case, the gear shift knob will move to point “E”. As you remember, the task is to reduce the switching distance and the handle stroke. To do this, you need to lengthen the lever to point “H”, this will allow you to advance the rod the same distance (“D” and “C” = “B” and “A”). As a result, the gear shift knob will have to travel the shortest distance, and you won’t have to reach or “search around the cabin” for your gear knob, or the gear itself.
Now I propose to move from words to action!
To make and install a short-stroke rocker you will need:
- A grinder with a cutting wheel or an alloy hacksaw.
- Two iron pieces.
- Welding.
- Cardan from Lada Kalina.
Signs of breakdown
In fact, it is not difficult to determine that the backstage is the culprit of all the troubles. After all, there are a number of characteristic signs that indicate this.
You can prepare to work on adjusting or replacing the rocker if:
- The first gear does not want to stubbornly engage or disengage, or move to another position;
- When you engage first gear, initially the gearshift knob behaves normally, but then the box spontaneously jumps into reverse gear;
- You cannot engage first and/or fifth gear, while changing to other speeds is no problem.
At the first sign of a problem, you should go to a service station or your own garage to have the problem repaired.
Sign of breakdown
Explanation
There is play on the gear lever
Most likely the linkage is worn out. In this situation, the problem can only be solved by replacing the worn element
It occurs most often when there are problems with the gearbox on a VAZ 2110. The ringing can be caused by defects in factory production, or by poor-quality repairs
It’s hard to engage the gearbox, it gets knocked out
In such a situation, you can try two methods - adjustment and replacement. If the adjustment does not help, change the element
Instead of first gear, reverse gear is engaged
Everything is fine with the lever, but the rocker let you down. Make a replacement. Although repairs using a repair kit can also help
Lever vibrates excessively
Check the condition of your transmission handle joints. Most likely, there was a serious backlash in them
Step-by-step photo report on how to make and install a short-throw rocker on a VAZ 2109
This is the “Kalinovsky” cardan that we will install.
The photo shows the places where you need to create a cut.
We cut it off and now we have:
We find two fragments of suitable size and diameter.
We weld and get a finished short-stroke link.
That's how it happened. Now we can say - DONE!
Before installing the short-stroke rocker on the VAZ 2109, you can go through the welding with a grinding wheel and later paint it dark or any other color. That’s all for me, I wish you luck, don’t forget to explain and share the article with your friends on social networks.
I also recommend:
Source: vaz-remont.ru
Sports
We noted that for the VAZ 2114 you can install a sports short-throw rocker. Outwardly they are quite similar, but the difference in work is felt immediately. On a sports unit, gears shift faster and smoother. It's all about the design of the backstage itself. Unfortunately, it is precisely because of this that the process of independent replacement becomes almost impossible.
If you decide to install a short-throw rocker on your VAZ 2114, contact trusted car services, or even better, a studio that specializes in tuning. Such events are classified as technical improvement, which is why no one understands this better than tuning specialists. Even official AvtoVAZ car services.
Do-it-yourself short-throw rocker for a VAZ 2109 (manufacture and installation)
The short-throw rocker is popular among VAZ owners who love tuning and their own car. But despite all this, they can’t stand the gear shift lever (GSL), which simply “wanders” throughout the cabin in search of a suitable gear.
The short-throw shifter came “to us” from motorsport experts, well, you see, what kind of sport can it be if it takes so much time to engage the gear. What does this curtain give? Thanks to it, switching becomes much more pleasant, the lever stroke is halved, the result of the installation is simply indescribable. Good people grabbed the “topic” and launched it into the “masses.” As a result, you can now purchase a short-throw rocker for a VAZ 2109 in almost any auto store. The cost, however, is significantly inflated, but this does not stop most motorists. This is logical, because it is worth it. I, like everyone else, was ready to buy a short-throw rocker for a VAZ 2109, but after I saw how it works and what its purpose is, I changed my mind about paying for something that you can create with your own hands in just half an hour. See for yourself what came of it. And for now, a few words about how it all works...
Gearbox oil for VAZ 2101
The oil in the “penny” gearbox, like in any other vehicle unit, needs to be replaced periodically. But before you perform this procedure, you need to know when and how to replace it and what lubricant to use.
What kind of oil to pour into the box of a VAZ 2101
Today there is a wide selection of transmission oils for cars. The difference between them lies in the additives used, or, more precisely, in their classes. There are the following classes of markings: from GL 1 to GL 5. For the VAZ 2101 gearbox, the best option is considered to be GL 5 class oil with a viscosity grade of 85W90 or 80W90. This lubricant is intended for hypoid gears and provides good lubrication of rubbing elements even under high loads. In addition, GL 5 oil can be used not only for the gearbox, but also for the rear axle. Of the manufacturers, preference should be given to those who are suitable in terms of price.
The VAZ 2101 gearbox must be filled with GL5 class gear oil with a viscosity of 85W90 or 80W90
Checking the oil level
For the gearbox to function properly, the oil level in the crankcase must always be optimal. It needs to be checked periodically. If the grease level in the box is normal, it should be level with the bottom edge of the filling hole. The oil volume in the VAZ 2101 gearbox crankcase is 1.35 liters.
How often to change the oil in a VAZ 2101 gearbox
Although transmission oil is rarely changed, you still need to know when this procedure is necessary. As a rule, on a “classic” it is done every 40–60 thousand km. mileage or 3 years from the date of filling.
How to drain the oil
To drain the oil from a VAZ 2101 gearbox, you will need a hex wrench and a container of suitable volume, for example, a cut-off plastic bottle. Using a hexagon, unscrew the drain plug, which is located in the lower cover of the crankcase, and drain the oil.
To drain the oil from a VAZ 2101 gearbox, unscrew the drain plug in the bottom cover of the box using a hexagon.
The drain plug is wiped clean of dirt and screwed back into place.
In addition, you need to pay attention to the drained oil and, if there is metal dust in it, you will need to repair the box as soon as possible
How to fill oil
To fill the gearbox with lubricant, you need to unscrew the filler plug with a 17mm wrench and clean it of dirt. The oil is poured in the required volume using a special syringe. Many people do not measure the required volume of lubricant, but simply fill it in until it begins to flow back out. After filling, immediately screw the plug into place. Instead of a syringe, you can use homemade devices if you have the desire and time to make them.
Oil is poured into the gearbox using a special syringe through the oil filler hole.
How does a short-throw rocker work?
The above diagram allows you to understand the mechanism of operation of the short-stroke rocker. Points “O” and “F” are your stock gearbox, which is installed in the neutral position. To engage the gear you need to move the rod that connects to the lever at point “B” - to point “A”. In this case, the gear shift knob will move to point “E”. As you remember, the task is to reduce the switching distance and the handle stroke. To do this, you need to lengthen the lever to point “H”, this will allow you to advance the rod the same distance (“D” and “C” = “B” and “A”). As a result, the gear shift knob will have to travel the shortest distance, and you won’t have to reach or “search around the cabin” for your gear knob, or the gear itself.
Now I propose to move from words to action!
To make and install a short-stroke rocker you will need:
- A grinder with a cutting wheel or an alloy hacksaw.
- Two iron pieces.
- Welding.
- Cardan from Lada Kalina.
How to remove the gearbox
The fork fixing bolt and nut must be unscrewed after the input shaft stopper has been removed. The same thing will have to be done if it is necessary to replace the short-throw gearshift link.
The spline must be removed from the secondary shaft. The box assembly diagram assumes the reverse procedure.
Removing the gear shift mechanism drive may be necessary when replacing faulty parts (for example, to replace a torn drive rod boot, damaged drive rod). The sequence and number of operations indicated below can be changed depending on the purpose of the work.
To complete the work, you will need an assistant, as well as an inspection ditch or overpass.
Removal and disassembly
1. We prepare the car for work.
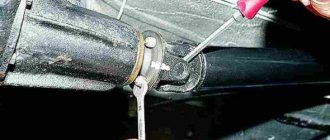
2. Clean the threads of the clamp bolt with a wire brush. We treat the junction of the rod with the hinge and the bolt with penetrating lubricant.
3. Using a 13 mm wrench, loosen the tightening of the clamp bolt nut.
4. Unclench the clamp with a screwdriver and move it along the rod. Unclench the rod with a screwdriver.
5. After wiping the connection between the rod and the hinge with a rag, we mark the relative position of the drive rod and the hinge.
6. Disconnect the rod from the hinge.
7. Disconnect the torque rod from the base of the ball joint of the gear shift lever.
8. Inside the car, use a thin slotted screwdriver to remove the plug from the gear shift lever handle.
9. Using a 13 mm socket wrench, unscrew the nut securing the handle bolt and remove the handle from the gear shift lever.
10. Using a screwdriver, remove the cover from the floor tunnel lining and turn the cover inside out.
11. Disconnect the wiring block from the reverse lock solenoid switch.
Loosen or cut the plastic clamp.
12. Remove the switch from the gear shift lever.
13. Remove the floor tunnel lining.
If necessary, you can unscrew the four bolts securing the gearshift lever support to the body (see below) and remove the drive assembly.
14. Using a 13 mm wrench, unscrew the nut of the bolt securing the linkage to the lever, holding the bolt from turning with a second wrench of the same size.
15. Remove the bolt from the lever. We remove the lever from the traction fork. We remove the metal and plastic washers, take out the metal spacer sleeve.
16. To compress the drive rod, lubricate it with a soap solution and remove it from the hole in the cover.
17. Using a 13 mm socket, unscrew the three bolts securing the bracket to the body.
We unscrew the fourth bolt securing the bracket with a spanner of the same size (access to it from above is blocked by the air duct).
18. Remove the bracket and drive rod cover. We replace the torn cover.
19. Remove the gear shift lever support from the hole in the floor tunnel.
20. Use a puller to compress the retaining ring of the ball joint of the lever and remove it from the base of the support.
21. Remove the lever from the base of the support.
22. Using a screwdriver, remove the upper sealing ring.
23. Remove the support from the lever.
Assembly and installation
We assemble and install the drive in the reverse order. Before tightening the gearshift mechanism drive rod clamp, adjust the drive (see below).
Adjustment
1. Loosen the tightening of the drive rod clamp of the gear shift mechanism (see paragraphs 2-4 above).
2. Lift the lower part of the gear shift lever cover (see point 10 above).
3. Move the gear shift lever so that its lower part is perpendicular to the floor surface, and the lever handle is located from the right seat cushion at a distance approximately equal to 1/3 of the distance between the front seats and hold it in this position. In this case, the assistant, moving the clamp 2-3 mm from the end of the rod, tightens the clamp nut.
4. We install the cover in place and, by trying to engage the gears, make sure that the gear shift mechanism drive is working.