The VAZ 2101 is equipped with a gearbox that differs in operating time. Thanks to it, effective control of the machine is noted. The VAZ 2101 gearbox provides dynamic acceleration.
It should be noted that the VAZ 2106 is equipped with a transmission as standard: 4-speed or 5-mortar. It should be noted that in addition to manual transmission, vehicles may have automatic transmission.
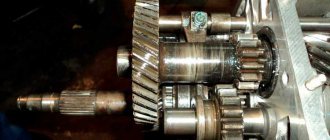
The Zhiguli gearbox is distinguished by its small dimensions. Among the main elements of the device, it is worth highlighting three shafts (primary, secondary, intermediate).
The gearbox input shaft oil seal is distinguished by its compact dimensions. Moreover, it is designed for a long service life. The variable gear ratios of the VAZ 2101 gearbox allow the car to effectively move along the road at different speeds.
Box gears have straight and oblique teeth. There are synchronizer rings, thanks to which the machine is easy to control and speeds can be changed quickly. The box on the VAZ 2101 is connected to the power plant through the clutch.
The transmission includes a linkage that provides connection between the gear shift lever and the rod-shaped rod. The average service life of this spare part is 100,000 km.
The combinations of gear ratios of the VAZ gearbox provide the vehicle with the proper traction at 1 stage and maximum acceleration at 4.
Troubleshooting speed box 2101
Despite the long service life of the high-speed gearbox, this unit requires periodic maintenance and care. Among the causes of device breakdowns when it is necessary to disassemble it, it should be noted - poor gear engagement. In this case, you need to inspect the cylinder and seals. Also, the car owner should check the level of the existing working fluid in the tank. In addition, synchronizers are subject to diagnostics. When they are deformed while the engine is running, changing speed modes occurs with difficulty. The best option is to replace worn parts.
It is advisable to repair the gearbox on a VAZ 2101 if the gear is knocked out. As a rule, this manifestation is due to the fact that the teeth of the gearbox gears have become unusable, the springs and bearings have worn out. Premature deformation of these mechanisms is due to the fact that trips were often made in difficult conditions.
Manifestations such as noise at the 2101 gearbox are a consequence of insufficient oil in the system or the driver uses low quality fuel. Because of this, all components related to the gearbox suffer. Failure of the synchronizer and wear of the clutch basket also contribute to the appearance of noise from the gearbox, and a characteristic crunch may be noted when changing gears.
If any of the above occurs, driving is dangerous. That is why it is worth repairing the VAZ gearbox.
Instructions for removing, disassembling and assembling the VAZ 2114 gearbox
Removing the gearbox is required when troubleshooting parts and the mechanism of the gearbox itself; when replacing the clutch.
Repair work may require one business day, so the instructions below must be started in the morning. Hiring a partner with experience in this type of repair will reduce time costs and improve the quality of repairs.
Preparation
The preparation process consists of the following steps:
- to warm up the oil to be drained, we drive a vehicle for a distance of 5 km;
- we install the vehicle on an inspection ditch (pit) or drive it onto an overpass;
- We put the car on the handbrake;
- raise the hood;
- fix the raised hood;
- we install the hoist, or use improvised means, or a special device, which is a crossbar to support the engine in a suspended position.
Removing and disassembling the gearbox. Procedure for cleaning gearbox parts
We perform the following steps sequentially:
- We remove the terminals.
- We remove the battery.
- We remove the battery to the side.
- We unscrew the three bolts that secure the crankcase protection.
- We remove the protection.
- If the model is before 2003, then remove the oil level dipstick.
- Using a 17 key, unscrew the plug (plug) of the drain hole.
- Place a five-liter container under the drain hole.
- Drain the existing oil from the gearbox into a container.
- We are waiting for the oil to be completely removed from the gearbox.
- We unscrew the two locking nuts of the starter protective jacket, located below in relation to the pit, and one locking nut on top of the starter.
- Remove the protective jacket of the engine starter.
- Disconnect the power wires to the engine starter.
- We remove the engine starter from below, that is, by descending into the pit.
- Remove the clutch cable.
- Compress the spring holding the block.
- From below, disconnect the block with the wires of the speed sensor under the hood.
- Disconnect the reverse sensor wire connector.
- We unscrew the bolts under the hood connecting the ignition module bracket to the gearbox housing.
- Disconnect the torque rod bracket.
- Loosen the gear shift rod clamps.
- We remove it by pulling the torque rod from the hinge intended for changing gears.
- We take out the gear shift rod.
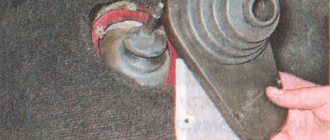
- Unscrew the fastening bolts to the steering knuckle of the left ball joint.
- We carry out dismantling by disconnecting the lower mounting of the gearbox to the engine (sometimes it is enough to loosen the tightening).
- Unscrew the bots.
- Removing the transmission housing
- We unscrew the bot from the lower left part of the gearbox.
- Using a board, we hang the motor.
- We remove the fixation of the left and rear (attachment to the body) engine mount by unscrewing the corresponding nuts.
- We unscrew the pair of bots that secure the rear engine mount to the transmission, holding the nuts against spinning with a second wrench.
- We dismantle the support.
- We insert a screwdriver into the hole between the engine cylinder block and the clutch housing.
- Using an inserted screwdriver, we move the box along the guides so that the rear part of its body passes over the backlight extension, and the input shaft is disconnected from the clutch.
- We remove the gearbox unit from under the car.
- We clean the gearbox parts, removing deposits with a brush.
- We clean the holes and slots from dirt.
- We wash and blow off the parts and bearings with a stream of compressed air.
- We examine the details of the gearbox.
- If necessary, we replace worn or damaged parts.
- We carry out the assembly, focusing on the procedure indicated above.
How to remove the gearbox?
Before you begin removing the gearbox (2101) from its original location, it is worth preparing in advance the appropriate tool required for this work. In particular, this is a set of socket wrenches, sockets with extensions of different sizes, screwdrivers, and pliers. Additional materials include rags.
The VAZ gearbox can be removed as follows:
- Vehicles must be placed in a viewing hole.
- The negative terminal from the battery needs to be removed and the rear exhaust system mount needs to be disconnected.
- Using a screwdriver, remove the gearshift lever.
- The clamp and the transmission exhaust pipe must be dismantled (fixed with nuts).
- The fasteners of the crankcase and clutch are unscrewed, the spring is removed from the fork, and the cotter pin of the pusher axle is removed.
- The driveshaft safety bracket, the speedometer cable from the drive, and the elastic coupling must be dismantled.
- To remove the coupling, it is advisable to use a special clamp.
- It is necessary to unscrew the starter mount to the clutch housing.
- Carefully remove the clutch housing cover and the gearbox cross member.
Finally, the box is dismantled along with the clutch. Next, the device must be disassembled. This allows you to determine which components have been worn to the limit and need to be replaced. Corrosion, chips and cracks are unacceptable. For self-repair, a diagram of the box is required. Installation of a 5-speed gearbox on a VAZ should be done in the reverse order.
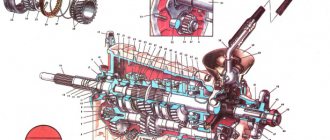
Gearbox device
In general, the five-speed transmission has the same functions as its predecessors: it varies the direction and magnitude of torque from the engine. The differences are that the five-speed has 6 speeds, including 1 reverse speed.
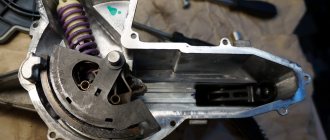
Inside the gearbox housing there are:
- two types of shafts with different numbers of gears - primary and secondary;
- levers responsible for changing gears.
If any malfunctions are detected, it is recommended to remove the box based on the manufacturer's instructions.
Installing the car on a lift (you can use an overpass or a pit) is preceded by disconnecting the battery and removing the radio panel:
- Remove and disassemble the gearbox rod.
- Remove the cover from the gap where the lever attaches and remove the foam filling.
- Remove the exhaust pipe from the exhaust system.
- Move the starter, disconnect the speedometer wire.
- Unscrew the bolts holding the cardan and remove it.
- The clutch cylinder is removed using the same method.
- After this, the gearbox is removed from the car. To do this, it is best to invite assistants who will support the mechanism while you unscrew the mounting bolts. At this stage, it is also advisable to drain the transmission oil.
After all these steps have been completed, we repair the VAZ 2107 gearbox.
In general, the concept of “remaking” the box is not entirely correct, since the design of the VAZ-2105 gearbox with 4 speeds was practically no different from the same gearbox 2101. The 2105 gearbox is of a three-shaft design, with constant meshing of gears and manual control.
| 1 | Bottom cover; | 40 | Needle bearing of the front end of the secondary shaft; |
| 2 | Filler and inspection plug; | 41 | Synchronizer spring thrust washer; |
| 3 | Intermediate shaft second gear gear; | 42 | Fourth gear synchronizer ring gear; |
| 4 | Intermediate shaft third gear gear; | 43 | Sliding clutch for synchronizer of third and fourth gears; |
| 5 | Intermediate shaft; | 44 | Third and fourth gear synchronizer sliding clutch hub; |
| 6 | Front intermediate shaft bearing; | 45 | Synchronizer retaining ring; |
| 7 | Clamp washer bolt; | 46 | Synchronizer locking ring; |
| 8 | Intermediate shaft front bearing clamp washer; | 47 | Synchronizer spring; |
| 9 | Intermediate shaft constant mesh gear; | 48 | Third gear synchronizer gear and ring gear; |
| 10 | Constant mesh gear of the input shaft; | 49 | Second gear synchronizer gear and ring gear; |
| 11 | Spring washer; | 50 | Secondary shaft; |
| 12 | Retaining ring; | 51 | First gear synchronizer gear and ring gear; |
| 13 | Rear input shaft bearing; | 52 | First gear gear bushing; |
| 14 | Input shaft oil seal; | 53 | Secondary shaft intermediate bearing; |
| 15 | Transmission front cover; | 54 | Intermediate bearing lock plate; |
| 16 | Bearing mounting ring; | 55 | Secondary shaft reverse gear; |
| 17 | Clutch housing; | 56 | Elastic cushion for gear shift lever damper; |
| 18 | Gearbox input shaft; | 57 | Damper rubber bushing; |
| 19 | Reversing light switch; | 58 | Damper spacer; |
| 20 | Intermediate shaft reverse gear; | 59 | Damper locking sleeve; |
| 21 | Reverse intermediate gear; | 60 | Inner gear shift lever cover; |
| 22 | Reverse fork; | 61 | Secondary shaft rear bearing oil seal; |
| 23 | Gear shift lever release spring; | 62 | Flange of the elastic coupling of the propeller shaft; |
| 24 | Tension spring bolt; | 63 | Screw; |
| 25 | Gear shift lever guide cup; | 64 | Centering ring seal; |
| 26 | Ball joint of the lever; | 65 | Centering ring retaining ring; |
| 27 | Spherical washer; | 66 | Centering ring; |
| 28 | Spring; | 67 | Rear secondary shaft bearing; |
| 29 | Gear shift lever; | 68 | Drain plug; |
| 30 | First and second gear shift fork; | 69 | Mud deflector; |
| 31 | Third and fourth gear shift fork; | 70 | Speedometer drive gear; |
| 32 | Fork rod for first and second gears; | 71 | Speedometer drive; |
| 33 | 3rd and 4th gear fork rod; | 72 | Rear gearbox cover; |
| 34 | Locking blocks; | 73 | Reverse idler gear axis; |
| 35 | Reverse fork rod; | 74 | Rear intermediate shaft bearing; |
| 36 | Rod lock ball; | 75 | Intermediate shaft first gear; |
| 37 | Retainer spring; | 76 | Gearbox housing; |
| 38 | Retainer cover; | 77 | Sliding clutch for synchronizer of first and second gears. |
| 39 | Breather; |
DETAILS: Do-it-yourself power steering pump repair How to tear apart, identify defects and repair a power steering pump
Since the box from the VAZ-2105 is structurally similar to the 2101, the kinematic diagram of the gearbox is the same. But the gear ratios are different; on 2105 gearboxes they are:
- 1st – 3.67;
- 2nd – 2.10;
- 3rd – 1.36;
- 4th – 1.00;
- Rear – 3.53;
As for the differences in the design between gearboxes 2105 and 2101, they mainly come down to different numbers of teeth on different gears. So, on the intermediate shaft of the gearbox, a 1st speed gear with 14 teeth is used (15 for 2101), and their inclination angle is greater.
The constant mesh gear of this shaft has 28 teeth (29 for 2101). The input shaft uses an 18-tooth gear (19 for 2101). Because of these features, the shafts with gear blocks of these two gearboxes are not interchangeable if you try to install them separately.
But in the case of a complex replacement - the input shaft along with the intermediate shaft and all gear blocks, then installation is quite possible. As for the secondary shaft, modification 2105 differs from shaft 2101 in the first gear gear (its teeth have a different angle, although their number is the same, and its diameter is also slightly larger).
In fact, dismantling the gearbox from a VAZ-2105 is not a very difficult operation and it is quite possible to do it yourself, having only a basic tool:
- Sets of wrenches (open-end, socket), heads with knobs, extensions;
- Screwdrivers;
- Rags;
- WD-40 product;
- Wooden block;
- Jack;
Removal of the box must be carried out on an inspection hole or overpass - there is no other way to dismantle it. It is noteworthy that the removal technology is identical for all modifications of this car - with a 5-speed gearbox or 4-speed, carburetor version or VAZ-2105 injector.
The sequence of actions is as follows:
- We place the car in the pit, immobilize it with wheel chocks, set the gearbox to neutral, disconnect the ground from the battery;
- The first part of the work is carried out in the salon. First, remove the radio panel and decorative casing and everything else that is located near the gearshift lever. Then pull up the lever to provide access to the clamping clamp. Holding it in this position, use a screwdriver to pry up the latch and remove the lever;
- We dismantle the spacer bushing, for which we use screwdrivers to open its fixing petals and tighten them;
- We remove the plastic cover with the lever boot, for which we unscrew the screws along its perimeter;
- We climb under the car. First of all, we dismantle the exhaust system of the car. To do this, we tighten all its fasteners and disconnect the muffler from the exhaust manifold pipes;
- Unscrew the cardan shaft from the elastic coupling. To make work easier, jack up the rear of the car a little, which will allow you to rotate the shaft when unscrewing the fasteners, providing easy access to the bolts. Afterwards we lower the shaft down;
- Remove the starter;
- We remove the clutch drive from the crankcase. In this case, it is not necessary to completely remove the working cylinder; it is enough to disconnect it from the crankcase and move it to the side;
- Disconnect the speedometer drive cable and the reversing light wires from the box;
- We install a wooden beam under the box, which will support it, so you should choose the right length;
- Unscrew the bolts securing the clutch housing inspection cover
- Unscrew the nuts securing the rear cross member of the gearbox;
- We check the reliability of the support installation. After this, we unscrew the fastening elements of the clutch housing to the power unit;
- Holding the box with your hand, using a flat screwdriver and a pry bar we pull off its mounting pins, but this is not enough, you still need to completely remove the input shaft from the clutch driven disc. To do this, already holding the gearbox with both hands, move it as far back as possible, and then lower it.
DETAILS: Golf 3 automatic transmission repair. Removing a manual transmission and repairing a clutch drive on a Volkswagen Golf 3 ADZ
And then the unit is replaced, modernized or repaired. In the last two cases, the VAZ-2105 gearbox is disassembled, worn elements are replaced, a 5th gear gear block is added, etc.
To put the gearbox in place, perform the described steps in reverse order. In this case, before seating the box, it is recommended to lubricate the splines of the input shaft with a thin layer of Litol to make it easier to fit into the driven disk.
When installing it back, if the gearbox does not go into place, you need to push it back, turn the shaft and try to seat it again. You may have to do this several times to get the shaft splines to line up with the splines in the disc.
Article on the topic - Repair of the gearbox of a VAZ-2105 car
| Video - VAZ gearbox repair | Leisure - tuning the five |
Selecting fuel for the transmission system
The manual transmission of the VAZ 2106 is not demanding on fuel. The need to replace the fuel and lubricant arises after the second year of operation. As a rule, oil marked 80W-90 is used. You can change the fuel yourself. To do this, you should arm yourself with a wrench and a hexagon.
It is recommended to check the oil level of gearbox 2101 every 15,000 km. The fuel volume in the crankcase does not exceed 1.4 liters. The fuel needs to be replaced after 40,000 km.
To drain the oil from the gearbox, you need to prepare an empty container, rags, and a hex key in advance. The work is done on a warm engine. The drain plug is unscrewed using a key. Taking this into account, it is necessary to substitute an empty container in advance for draining the transmission. As soon as the liquid has flowed out, the drain plug is screwed in (previously cleaned of settled contaminants). Next, you can begin refueling the gearbox with new fuel. This procedure is carried out using a special syringe or funnel to which an elastic hose is connected.
Possible malfunctions of the machine
Foreign-made cars most often suffer from breakdowns, and it is not always worth starting to repair them yourself. This can lead to numerous problems in the event of further contact with car service centers of this manufacturer, so you will have to answer this question yourself, taking into account your skills and capabilities.
With an automatic machine, most often:
- The electronic control unit fails, which causes problems with the process of switching not only “upper” but also “lower” gears. Often they may stop switching speeds from 1 to 4.
- Troubles can begin due to violation of the rules of car operation: if you braked sharply, tried to quickly change gears, or put the car in reverse when the car was not completely stopped.
- Cars with automatic transmission are extremely demanding on the quality and quantity of oil that you pour into it. If there is constant overfilling or underfilling, malfunctions may occur and the gearbox will need to be repaired.
All car owners know that manual transmissions are much easier to repair than automatic ones. Before you start repairing the machine, you should think several times and listen to the opinion of the experts at the service center. Many parts are expensive, not only new ones, but also used ones. And the center’s technicians may refuse to complete the repair work if they see that someone has been “digging” in the car before them. Therefore, the decision is up to you.
From 4-speed to 5-speed
Finally, let’s consider such an issue as converting the gearbox from 4 to 5 stages of the VAZ-2105. Such a modification is quite possible, since when the five-speed gearbox was created, the basis for it was the 4-speed version. But in this case, you will have to replace some of the components taken from the 5-speed gearbox, namely:
- Back cover;
- Intermediate shaft (with a hole for mounting the 5th gear gear block);
- Secondary shaft (in the 5-speed version it is slightly shorter);
- 5th speed gear block;
- Reverse idler gear axis;
- A set of rods together with a fork for 5th and reverse gears;
- Gear shift mechanism (slide);
- Reverse light sensor;
- Power unit mounting bracket;
Next, it is enough to completely disassemble the 4-speed gearbox and assemble it as a 5-speed gearbox using the specified components.