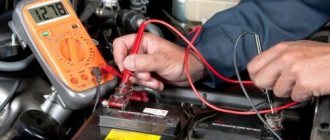
Any modern car needs diagnostics and repairs. The condition of the suspension, vehicle load and some other factors have a significant impact on the direction and inclination of the light flux. The VAZ 2114 headlight hydrocorrector will help correct the negative consequences associated with headlight illumination.
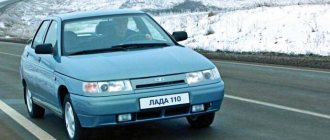
Hydrocorrector of headlights VAZ 2114
This is especially important on the highway, because incorrectly adjusted headlights can shine not on the road, but directly into the eyes of oncoming drivers, which can lead to an accident. In order to prevent such a scenario from happening, you should monitor the technical condition of the lighting devices and carry out all the necessary preventive procedures in a timely manner.
The importance of proper headlight installation
Proper installation and adjustment of lighting devices is no less important. For example, it is better to lower the headlights of a loaded car slightly lower than usual. In a similar way, you can direct the light flux not to the sky, but to the road. This method will avoid dazzling oncoming vehicles and ensure proper illumination of the road.
If the car is not loaded with anything, then the headlights should be raised slightly. Lighting equipment is quite sensitive and difficult to adjust, so this work is best entrusted to qualified specialists who have extensive experience in adjusting headlights.
Correct headlight settings
Purpose of the Zenit Automatic Headlight Level Corrector
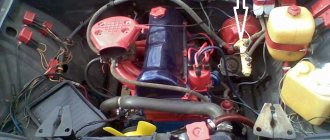
Auto-corrector "Zenith" keeps the headlights in one position, regardless of changes in the load on the vehicle's axles. The tilt of the headlights is adjusted through the standard electric headlight leveler using standard gear motors located in the headlights.
Automatic headlight leveler "Zenit" is intended for installation on vehicles equipped with a manual electric headlight leveler using a single-wire circuit.
In most cases, on a foreign car, its work will be no different from the standard autocorrector, i.e. "Zenith" is a direct replacement for the standard one. Most often, the sensor from the standard autocorrector fits the Zenit and our sensor fits the standard one, the connectors are just different.
The reliability of the Zenit Autocorrector is ensured by the use of a non-contact axis loading sensor based on a Hall sensor and a rotating magnet; there are no variable resistors with sliding contacts inside. In Russian conditions of dirty roads, it is much more durable than ultrasonic sensors.
Who needs the Zenit automatic headlight leveler?
Luxury cars are usually equipped from the assembly line with xenon or LED headlights, auto leveling and headlight washers. No one doubts the advantages of these light sources anymore
It is important that on the conveyor all light parameters comply with technical regulations
Owners of middle-class foreign cars, which also have luxury segment trim levels, always have the option of replacing halogen headlights with xenon ones and installing standard auto-corrector and headlight washers. Another thing is that the prices of official dealers stop many people.
Owners of economy-class foreign cars and all Russian cars in possible factory configurations do not have xenon light. Therefore, it is not possible to use standard solutions.
It is precisely for the last two categories, which solved the issue with xenon headlights and washer, that the Zenith Automatic Headlight Corrector is intended. Automatic headlight corrector "Zenith" is the most affordable solution on the market.
How exactly xenon headlights, washer and auto-leveling headlights are installed on various cars is described in the articles, links to which are given on the left in the menu. At the same time, it is quite possible to register the installation with the traffic police as fully complying with the technical regulations. The photo on the right shows the registration certificate for the 2110 with the changes made.
Automatic headlight leveling system "Zenith" - with one or two axle load sensors?
In most cases, one sensor installed on the rear axle is sufficient. The autocorrector itself has two sensor channels, the second one can be connected later if necessary.
How does a hydraulic corrector work?
What is this device, what is it for and what is its operating principle?
The headlight hydraulic corrector is a one-piece device designed to change the position of the light beam by reducing or increasing the pressure of the liquid located inside the pipes. The headlight range control of the VAZ 2114 has a special design. In this VAZ model, the corrector has a one-piece design, which means that it is almost impossible to repair it. If it breaks, you will have to purchase new elements and adjust the lighting devices to the standard as accurately as possible.
Methods for installing PTF on VAZ 2113, 2114, 2115
Installation of fog lights can be done in several ways. Which one to choose, each car owner decides for himself, based on his capabilities and preferences. Let's look at the most common installation options:
- Buying a front bumper with PTF.
In this case, the headlights are sold already mounted in the front bumper. As a rule, a part can be purchased without any problems at a car tuning studio and immediately installed and connected. The disadvantages of this option include high financial costs. Buying a bumper with PTF installed is the most expensive option for installing fog lights on a car. - Buying a bumper with holes for PTF.
With this installation method, you should purchase a bumper with holes for the lights and the headlights themselves with all the necessary elements (wires, relays, power button, etc.). When purchasing a bumper with holes for fog lights, you will need to purchase the lights themselves and all the necessary components for connection - Self-installation of PTF is the most common installation method, since it requires minimal financial investment.
The car owner only needs to purchase headlights with the necessary installation kit and facing elements. The most common option for installing PTF is to purchase and then install a set of fog lights yourself.
PTF location diagram on a car
Before connecting the fog lights, it is important to install the devices correctly on the front of the car. This is done in accordance with certain rules, which clearly stipulate the location of the light source. On modern cars, the installation locations for fog lights are marked from the factory.
Basically, such lighting elements are installed on more expensive car configurations. If the headlights were not installed from the factory, then the places for their installation are closed with plugs
On modern cars, the installation locations for fog lights are marked from the factory. Basically, such lighting elements are installed on more expensive car configurations. If the headlights were not installed from the factory, then the places for their installation are closed with plugs.
Fog lights on the front of the vehicle must be installed in accordance with established regulations
Is it possible to install xenon in PTF
Many car owners seek to install xenon in fog lights, arguing their actions by increasing lighting efficiency. Is this really true? Let's figure it out. First of all, when installing xenon in standard PTF housings, focusing is disrupted, which is due to a different operating principle in contrast to conventional lamps. Since standard fog lights are designed to operate with certain lamps, they simply cannot cope with xenon. The result of such changes will be too much reflection in the reflector, the rays are refracted, the light becomes blurred. A well-known situation arises - the blinding of drivers of oncoming vehicles, which increases the risk of an accident. Installing xenon in PTF is far from the most successful solution and the effectiveness of such light is questionable, so it should be abandoned.
When installing xenon light in standard fog lights, focusing is disrupted, which leads to dazzling oncoming drivers
Headlight device for VAZ 2114
The design of the hydraulic corrector on this model is as follows:
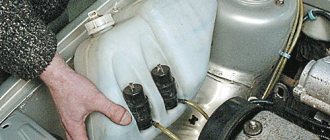
- The master cylinder is located under the instrument panel.
- Small working cylinders are mounted directly under the headlights. It is these devices that are used to raise the headlights on the VAZ 2114.
- The working fluid used in a car is resistant to both high and low temperatures.
- Another element of the hydraulic corrector design is the pipelines. They contain working fluid and are secured with special clamps.
Headlight hydraulic corrector device
Interesting to know . In its normal state, the corrector operates at high pressure. In order to direct the headlights downward, the pressure decreases. After this, the optics are lowered. This operating principle of the device means that during operation it is under extremely high pressure. If temperature changes occur, the working fluid may leak. After this, the headlight range control will also fail.
Maintenance and operation of the product
The design of the headlight hydraulic corrector is non-separable; in the event of a malfunction, it can be replaced entirely. The main thing is to remove it completely, and not cut it off, to make it easier to install a new device.
If the angle of the headlights increases, you can try to adjust the mechanism. What should be done?
- When the car is loaded, the headlights need to be turned down so that the light beam is directed at the roadway.
- If the vehicle load is minimal and the rear part of the frame is in a raised state, the headlights should be projected upward.
If the unit does not resume proper operation, then you need to check the presence of liquid in the cylinders and tubes. To do this, the products are removed and the working stroke of the rods is measured; it should be about 7 mm.
This is how the manufacturers intended that most of the time the hydraulic corrector is under pressure, as a result of which the working cylinder rod is retracted and the optics rotate downward.
Operating principle
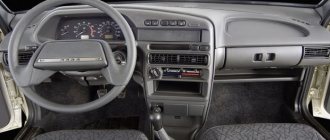
In order to adjust the position of the headlights, the driver should turn a special handle located in the cabin. It is this that allows you to control the pressure in the pipelines of the corrector. To lower the headlights, turn the handle down. It's a simple control system, but even that can break. What to do if the corrector turns out to be faulty?
Control knob for hydraulic headlight adjustment
Features of operation of various installations
| Pneumatic punches of various diameters, “Mole” type |
- Installation of GPU-600. When laying pipes with a diameter from 104 to 630 mm and a length of up to 80 m using the puncture method on soils of groups I-IV (without large solid inclusions), we use the GPU-600 installation. Its operating principle is called “walking jacks”. First, using hydraulic jacks of 1.2 m (rod stroke length), workers push the movable pressure plate with a pipe, turning on the oil station. Having completed the working cycle by moving the jacks in reverse, the released moving cycle is pulled up behind the pipe being laid. These operations are repeated until the first link is inserted into the ground. Then the slide with jacks, the movable stop and the pressure plate take their original position. After this, we install the next section of the pipeline and the process repeats.
- Installation of Glavmosstroy. It is advisable to place pipes with a diameter of 209 to 426 mm in soils of groups I–IV (regardless of humidity) for a length of up to 45 m using the Glavmosstroy installation - it works on the same principle of “walking jacks” as the GPU-600.
- Soil piercers and pneumatic punches of types IP-4605, PR-400 (or SO-134), PR-60 (or SO-144) and IP-4603 are used by us for laying pipes with a diameter of 63 to 400 mm using the closed method. Pneumatic punches of the “Mole” type allow you to create wells of any type (open/closed, inclined/horizontal) with compacted walls up to 40-50 m long. The hammer, located in the body, under the influence of compressed air, carries out reciprocating movements along the body of the pneumatic punch, which is its working body, thus driving it into the ground.
- Hydropuncture. Using the kinetic energy of the water flow, we can pierce pipes using the hydropiercing method. In this case, a stream of water coming out of a special nozzle on the front of the pipe blurs a hole up to 500 mm in diameter. This is where the pipes are laid. Water consumption is calculated taking into account the pressure, flow speed and soil type. This method has its own characteristics: the work is simplified and the speed of well formation increases to 30 m/shift, but deviations from the design axis may occur and the length of penetration cannot exceed 20-30 m. At the same time, the working conditions themselves become more complicated - the working pit becomes dirty .
Repair or replacement of hydraulic corrector VAZ 2114 on your own
If the headlight hydraulic corrector fails, it is necessary to establish the cause of the malfunction as soon as possible. It may be possible to repair the device yourself.
In order to check the functionality of the headlight hydraulic corrector, you should:
- Inspect the condition of the tubes and rubber bands. There shouldn't be even small leaks.
- If no leaks were found, then you should pay attention to the condition of the working cylinders. To do this, you need to measure the stroke of each rod. Under normal conditions, it ranges from 6.5 to 7.5 mm.
- If such diagnostic measures do not help restore the functionality of the headlight hydraulic corrector, then the entire mechanism will have to be replaced. The fact is that the repair of the VAZ 2114 headlight is not provided by the manufacturer, so the easiest way to replace a broken device is with a new one.
Malfunctions and why it breaks
- Loss of tightness in tubes, places where they are attached to the cylinders, leaks in the cuffs of the main or working cylinders;
- Jamming of working pistons
The main problem in the system of hydraulic adjustment of the reflector position is depressurization. Since it uses liquid as a working medium, its leaks lead to the fact that pressure is not transmitted from the master cylinder in the car interior to the workers on the headlights. No matter how much you turn the regulator, the position of the light beam will not change.
The second reason is souring of the pistons of the hydraulic corrector cylinders in certain positions. For example, if the piston is “stuck” in the maximally extended position, then the light will shine upward, while in a recessed position it will shine downward. When rotating the handle of the regulator, a lot of tension will be felt and when it is released, it will return to its original position and will not be fixed as necessary.
This happens because the pressure changes as the regulator rotates and the pistons cannot move. When you release the handle, the system tries to return to its initial state, equalize the pressure, the handle returns to the position from which you started turning it.
The listed types of breakdowns are prone only to the hydraulic drive of the corrector. Let the manufacturer claim that it is not repairable, but this is not so. There are examples of self-repair of a hydraulic corrector, which we will discuss in the following articles. In order not to bother with restoring it or replacing it with a new one, it is recommended to install alternative types of headlight range control units.
Causes of hydraulic corrector malfunction
One of the most likely causes of failure lies in the ingress of liquid, which flows out of the cylinder when a crack appears in the rubber seal. In such a situation, the pistons often jam, and the angle of the headlights changes and it becomes impossible to adjust it using levers. In some cases, the whole point is a malfunction of the adjustment lever itself. In order to get rid of these problems, you will have to replace all broken parts.
Important note! If an electronic corrector is installed on the car, a possible breakdown may be associated with the contact connection. It also happens that a malfunction is associated with the fastening of the device bracket.
Universal adjustment methods
In principle, the methods discussed are suitable for any passenger car and are used to adjust low and high beam headlights. But the PTFs are configured somewhat differently, just like the headlights on a truck.
The proposed setup methods can be used on the following cars:
- on Grant;
- on Gazelle;
- Renault Logan 2nd generation;
- VAZ 2110;
- Skoda Octavia;
- Lada Kalina;
- Suzuki Grand Vitara;
- VAZ 2106;
- Ford Focus;
- Ssang Yong Action New;
- Nissan X-Trail T31;
- Daewoo Lanos;
- Renault Clio;
- Nissan Almera, etc.
The main thing is that we are talking about a passenger car.
To achieve your goal, you will need to meet several important conditions. To begin, prepare a flat vertical wall and an equally flat horizontal surface on which the car will stand.
The recommended sufficient distance for passenger cars is about 7-8 meters.
Also prepare regular white chalk or masking tape. These materials are needed for marking. Since cars have different dimensions, ground clearance and distance from the surface to the center of the headlights, the markings are applied individually. But there are also standard parameters that are often used for most machines.
There are a few more things to take care of in advance:
If there are problems or inaccuracies on these points, be sure to prepare the car, pump up the tires or release excess pressure, and bring the suspension back to normal. After that you can start.
First method
Here you need a flat horizontal area for the car and one empty vertical wall onto which the light will be directed. Having approached the wall, you need to mark the center of the car, as well as the center of the optics axis, with chalk or tape.
For correct marking, take measurements from the floor to the lamp, and directly from the car lamp to the center of the vehicle on the wall. Next, another line is made, which will run 5 mm lower than the previous one. You should move 7.5 m away from the wall, and then draw another horizontally directed line connecting the center points of the two low-beam headlights. Vertical lines are drawn through the resulting central points of the optics. Plus another vertical line runs through the center of the car. The latter should be located 7.62 cm lower than the line connecting the center of the optical instruments.
Next, turn on the low beam and begin adjusting the headlights. Their angle of inclination should coincide with the horizontal markings. In the area where the beam of light begins to go up or rise, there must be a coincidence in the markings.
The adjustment is carried out using special adjustment screws provided by the design. It is necessary to ensure that the light beam passes slightly lower than the center mark of the headlights.
If the car has combined optics, then the far one is adjusted first, and the near one is adjusted automatically.
Second way
Here you also need a flat wall. Only the car will be located 10 meters away from it. Marks of the center of the optics are made on the wall at their height from the floor in conditions corresponding to real ones, that is, with a driver behind the wheel and standard equipment.
The resulting 2 points must be connected with an even horizontal line. 2 more horizontal lines are made relative to it. The first will be 22 centimeters higher, and the second 12 centimeters lower.
Now set the regulator responsible for the width of the lighting to the zero position. The upper boundary-guideline will be the second line. The third executed line will be a reference point in a situation when the upper limit of the PTF is being adjusted.
Before you make decorative eyelashes on your headlights, and also think about using LEDs in car optics, make sure that your headlights work correctly, do not interfere with anyone, and provide you with the required level of visibility of what is happening on the road and side of the road.
That's all for me.
Thank you all for your attention! Don't forget to subscribe, leave comments and ask relevant questions!
Watch this video on YouTube
Installation of a new device
In order to install a new headlight hydrocorrector, there is no need to go to a service station. This is quite simple to do, so you can save time and money if you do the installation yourself. To get started, you will need a flathead screwdriver and an extension cord with a socket head.
Replacing headlight hydraulic corrector
Once these tools have been found, you should proceed to choosing a hydraulic corrector.
Today you can find a wide variety of models on the market:
- hydraulic, operating due to the pressure of the pistons and fluid;
- electrical;
- automatic, capable of independently adjusting the level of headlights.
The cheapest of them are hydrocorrectors. Their only drawback is frequent breakdowns.
So, in order to install a new hydraulic corrector, you need to remove the old one. Anyone can do this if you follow the simplest instructions, which are presented below in the text.
Instructions:
- First you need to find all the clamps securing the pipelines with liquid. They will need to be removed. To do this, you need to unscrew all the bolts.
- After this, you should return to the cabin and carefully remove the rotating handle from its seat. In this case, the rotating handle is located on the main cylinder.
- Now it's time to remove the main cylinder. This can be done using bolts. All bolts (which secure the cylinder) must be unscrewed and removed.
- When there are no more bolts left, you can start removing the cylinders from the headlights. The easiest way to pull them out is directly through the inside of the car. That's all!
Installing a new hydraulic corrector is as easy as removing the old one. To do this, all of the above steps should be carried out in reverse order, but before doing this, the O-ring must be replaced. Once the new device has been successfully installed, the entire system should be checked.
Warning! If the system is not checked for functionality in time, then while driving, light rays may be directed into the eyes of drivers of oncoming cars, and not onto the roadway. This may lead to an accident. In order to prevent such a scenario, you should check the operation of the lighting devices in advance.
Design and principle of operation of the headlight range control
It is worth noting that the operating principle of different types of headlight range control units is approximately the same. At the same time, a distinction is made between automatic and manual settings. In the latter version, the position of the headlights is adjusted using a special regulator installed inside the car, and with the help of its rotation, the driver independently changes the angle of the optics. In the first case, the electronics automatically configure everything itself, depending on the landing of the car.
Manual headlight range control
This headlight range control is installed on many budget cars, so it is familiar to a large number of car enthusiasts. As the name suggests, the corrector is activated directly by the driver. To do this, as a rule, you just need to turn the wheel, or as it is also called, the rotary switch. The electromechanical drive of the headlight range control is most often used, so we will consider it.
The adjustment wheel usually has digital or graphic markings that indicate the position of the headlights. Adjustments are made by the driver as necessary, depending on the vehicle’s load and changes in its tilt in the longitudinal direction relative to the center of gravity.
Simply put, if three people sat in the back seat, and you had to put four bags of potatoes for your mother-in-law in the trunk, then obviously the back of the car will lower and the front will rise, causing the headlights to shine too high and blind oncoming drivers.
To prevent this from happening, you need to turn the wheel so that the beam of light goes down.
Turning the knob gives the corresponding command to the gear motor, which is needed to turn the headlight to a certain angle. In fact, a gear motor is nothing more than a worm gear, which is necessary to convert the rotational movement of the electric motor (located inside the gear motor) into the translational movement of the rod, which directly acts on the headlight, changing its angle.
Structurally, the headlight is hinged at the top, and the rod with a ball end (resting against a spherical latch) holds the lower edge of the headlight. And it is the back and forth movement of the lower part of the headlight, with the upper attachment point remaining unchanged, that gives the necessary change in the angle of inclination.
A manual headlight leveler is very simple, very reliable and, most importantly, a useful device, but it has one very significant drawback: most drivers forget to use it and blind their colleagues, despite the fact that they have the opportunity not to do so.
Automatic headlight leveling system
Automatic headlight leveling is a more advanced technology because it does not require any action from the driver. The cut-off line is adjusted automatically based on sensor readings.
Automatic headlight leveling can be installed on vehicles equipped with either halogen or xenon headlights. For xenon, this is even necessary, since this type of headlight emits light of very high intensity, and in the absence of auto-corrector, it can pose a serious threat to traffic safety.
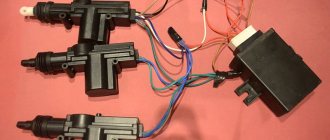
As for the design of the headlight auto-corrector, the following elements can be distinguished:
- Control block;
- sensors that measure the vehicle's ground clearance at various points;
- device that adjusts the headlights (actuator).
Typically, the system uses two or three sensors that measure ground clearance. Either one sensor or a pair can be installed at the front. And one sensor is located at the back.
Early systems used potentiometric sensors, but they were not reliable enough, so they have now been replaced by non-contact angle sensors.
The operating principle of these sensors is based on the Hall effect. The mechanism of operation of the sensor is quite simple.
Structurally, the sensor consists of a rotor (moving part), with permanent magnets built into it, and a stator (fixed part), which, in fact, is a Hall sensor.
The sensor is attached to the bottom and is connected to the suspension using a rod. The change in suspension travel is transmitted through the rod to the rotor, which rotates, causing a change in the magnetic flux, which is detected by the Hall sensor.
The magnitude of the change in the magnetic flux is subsequently recalculated by the control unit into the required angle of rotation of the headlights, and the corresponding signal is sent to the actuator. In its work, the control unit takes into account not only the angle of inclination of the vehicle, but also the speed, as well as the nature of the vehicle’s movement.
Step-by-step instruction
Adjusting the headlights of a VAZ 2114 or 2115 with your own hands is a simple procedure. With proper preparation of the car, you can achieve optimal results that will not differ from adjustments on an optical machine. Before setting the headlights, an auxiliary diagram is drawn. To do this you need:
- Install the VAZ 2114 at a distance of 5 meters from the wall. The measurement is made strictly from the headlight glass.
- The height of the lamp relative to the asphalt is measured with a tape measure.
- The value is marked on the wall with a horizontal line.
- A vertical stripe marks the center of the car.
- From the horizontal mark, an indentation is made downwards by 65 mm and a mark is made where the cut-off strip should be located.
- To identify the center of the beam, the transition points into daws are used.
- The centers of the jackdaws are marked on the wall with vertical lines, the distance between which should be 964 mm.
A schematic sketch is recommended by the manufacturer as the most accurate method for adjusting the optics. Headlight adjustment:
- Turn off the car engine.
- Turn on low beam.
- Set the headlight hydraulic adjustment lever to position 0.
- Open the hood.
- Cover one headlight with cardboard or a thick rag. This improves the visibility of the beam boundary.
- Using the built-in screws, adjust the direction of light first on one headlight, then on the other.
- Rock the car and check that the settings are correct again.
When performing work, the vehicle must be without passengers. You can put a load weighing 50-70 kilograms on the driver's seat, but this is not necessary. Installation on the handbrake often changes the position of the body relative to the road surface, so you should use a wheel support or a regular stick.
By adjusting each headlight separately, you can achieve the most accurate result of the beam position. Correctly configured VAZ optics will not blind oncoming traffic participants and provide high-quality illumination of the road surface.
How to identify problems with optics
It is quite easy to understand that the headlights are not adjusted correctly. The main features are:
- poor visibility of the road surface at night;
- when the low beam is turned on, a bright stripe appears above the hood;
- Oncoming cars honk when the lights are too bright.
Manufacturers install and configure optics in such a way that the lighting maximizes the view of the road. During operation, the installations get a little confused, and the equipment directs the light flux above or below the required level. Such situations happen due to poor road surfaces or after minor accidents when the front part of the car body is deformed.
Before you start adjusting the headlights with your own hands, you need to normalize and check the following car systems:
- Suspension elements (springs and shock absorbers) must be in good condition.
- Tire pressure should advise technical requirements and time of year.
- An incomplete tank of gasoline and no third-party cargo in the trunk so that there is no additional load on the suspension.
DIY adjustment instructions
Before carrying out the procedure, the following conditions must be met:
- tires must be well inflated;
- the tank is at least half full, there should be a spare wheel and tools in the trunk;
- place an assistant in the driver’s seat, and in his absence, place a load equal in weight to the owner of the car;
- rock the car so that the suspension and springs are installed.
This will create operating conditions for the machine. To carry out the adjustment, the car must be placed on a flat horizontal platform at a distance of 5 meters from a strictly vertical wall on which markings must be applied. To configure, you need to turn on the low beam. Then each headlight unit is adjusted one by one using adjustment screws. It is necessary to combine the beam of light emanating from the lights with point E. If you are not confident in your abilities, contact a service station - they will adjust it correctly.
Setting the fog lights
Adjusting the fog lights involves several steps:
- vehicle preparation;
- drawing up a diagram;
- adjustment.
The preparatory steps are no different from the actions performed before adjusting the main headlights. The fog lights should be clean, the tires should be inflated, and the trunk should be empty. When setting up fog lights, you should use a special diagram that you create yourself. This requires:
- Place the car at a distance of 5-10 meters from the wall.
- Measure the height of the center of the headlight and mark it with a line on the diagram.
- Transfer the marks of the center of the car and the fog lamps to the wall.
- Draw a line 10-12 centimeters below the height mark of the fog lights.
To adjust the optics, you need to turn the screw until the beam reaches the level marked on the plan. If the headlight cannot be adjusted, you should clean the bolt head and inspect it for souring. You can use WD-40 aerosol to lubricate the parts. If the bolt rotates but the reflector remains in place, you will need to dismantle the fog lamp and check the integrity of the mechanism.