Replacing injectors on a 16-valve valve
From the manufacturer's factory, VAZ-2112 cars were equipped with injectors from “Bosch” and “Siemens” ( mainly Bosch 0 280 158 996 – approx.) the service life of which before the first cleaning is within 50 thousand kilometers.
Step-by-step work order
- First of all, we remove the air filter housing, the mass air flow sensor (MAF – approx.) and the pipe.
- Then you need to relieve the pressure in the fuel system. In order not to suffer, and to do this work easier, we place a rag under the pipes and unscrew the connections. This will release the pressure quickly, and the remaining gasoline will flow out onto the rag.
Using two wrenches, unscrew the fuel line.
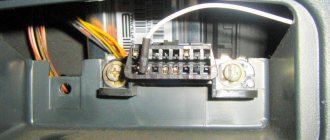
The power supply is disconnected.
Place the loosened bolts in a safe place.
To remove the ramp, you will have to make an effort.
When the fuel rail is removed, we carry out work to dismantle a specific injector:
- We remove the power supply from the injector, first moving the block to the side.
We remove the pads one by one.
Replacement or cleaning?
In order to understand what needs to be done with the nozzle, change it or simply clean it, it is better to diagnose them on a special stand. Under such conditions, you can test it in operation under different pressures, and also visually see how tightly it closes, and whether it is “snotty.”
If any of the injectors needs to be replaced, then you should buy a new one with exactly the same part number as the old one. Also, during installation of cleaned injectors, all O-rings should be replaced (2 pieces on each injector - approx.).
Installation is carried out strictly in the reverse order, similar to the removal procedure.
Video about cleaning injectors
Attention! When working with injectors, observe all fire safety measures, since gasoline vapors are highly flammable and pose a high fire hazard.
Benefits of using rings
Advantages that make O-rings widely popular in injector sealing:
- the symmetry of the design leads to a uniform fit of the seal along the entire circumference;
- ease of manufacture allows you to take into account all the subtleties of injectors of various car brands;
- use of modern materials.
The existing markings make it easy to navigate the interchangeability of seals. This makes it easier to find the ring if it fails. If possible, it is recommended to purchase original rubber bands.
What are injectors?
An injector is a special mechanical sprayer located in the “head” of the engine, through which fuel is supplied to the cylinders under high pressure.
Injector malfunctions
Among the most common causes of injector failure may be the following:
- The injector nozzle is coked - in this case, increased fuel consumption may be observed, vehicle dynamics will decrease, and engine starting will be difficult at subzero ambient temperatures. Otherwise there are no differences.
- The injector valve does not close hermetically (“the injector is snotty” - note) - here there may be increased fuel consumption, “tripleting” and increased detonation (about checking the knock sensor here), unstable idling.
- Valve sticking - engine troubles. In order to diagnose it, with the engine running, turn off the power supply to each injector in turn. With a non-working injector, no changes in engine operation will be observed, but with a working injector, the speed will drop.
If you find a non-working injector on your car, or they need cleaning, you need to know how to properly dismantle them. You could already read more about this above.
Injection vehicles VAZ 2110, 2111, 2112 are equipped with imported injectors. This gives the models increased resistance to low-quality fuel and increases engine life. Owners of cars of the tenth VAZ family can independently repair and change injectors if necessary. The valve replacement steps are not particularly difficult even for beginners.
Symptoms indicating the need to diagnose seals
During operation, cracks of various sizes may appear on the injector sealing ring. The ring loses its elasticity. The appearance and shape change, and deformations appear.
A visual inspection may reveal fuel leaks. Depending on the size of the damage, it can be a drop, a speck, or a trickle. The problem with loss of tightness can lead to serious consequences. If fuel gets on a hot surface it can cause it to ignite and, as a result, a fire in the engine compartment of the car, so it is not recommended to delay replacing the rubber.
Another symptom of damage to the seals is the engine running on a lean mixture. This situation arises due to air leaks through the resulting damage to the ring. This is often due to loss of elasticity as a result of prolonged exposure to temperature, especially after the engine overheats.
In some cases, the need for replacement can be detected by the smell of fuel in the car interior. This is especially noticeable at low temperatures. A visual inspection may not help locate the leak.
In diesel engines, escaping gases enter the oil. This causes coking of the oil. The oil receiver begins to clog. The first time after starting the engine, you can detect white smoke from the exhaust pipe, which has a pungent odor. In the most advanced cases, the lamp flashes periodically, indicating deviations from the norm in oil pressure.
What injectors are installed on VAZ 2110–2112 cars
The main advantage of injectors for VAZ cars of the tenth family is that they are interchangeable. There are only two types of sprayers - produced by Bosch and Siemens. And each of them, regardless of marking and year of manufacture, can be replaced with another.
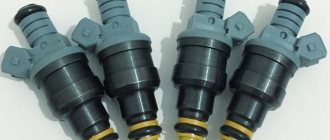
Bosch injectors are traditionally manufactured in black housing
When selecting, there is only one limitation - engine size. 1.5 injectors are not suitable for 1.6 liter engines.
The Siemens injector has a blue tip
Both Bosch and Siemens injectors of any marking can be installed on 8-valve and 16-valve engines.
Table: how to select injectors for VAZ 2110–2112 by marking
| Siemens | Bosch |
| Injector DEKA VAZ 6238 | 0 280 150 996 and 0 280 158 110 |
| Injector DEKA VAZ 6393 | 0 280 158 502 |
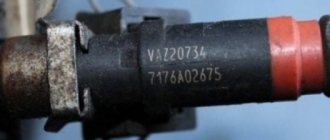
| Injector DEKA VAZ 20734 | 0 280 158 017 |
| Injector DEKA VAZ 20735 | 0 280 158 022 |
| Injector DEKA VAZ short 20734 | 280158017 |
| Injector DEKA VAZ short 20735 | 0 280 158 022 |
Method for replacing injectors on 8- and 16-valve engines
Car owners cannot always diagnose faults in the fuel system. Often, failures in engine operation or unstable idle speed can be explained by completely different reasons, and not just interruptions in the fuel supply.
Symptoms of a problem
If all car systems are operating normally, then the following symptoms will directly indicate injector problems:
- failures in engine operation;
- increased fuel consumption;
- instability of idle speed;
- loss of power;
- black exhaust gas, etc.
Procedure for removing oil injectors
Before you begin removing injectors from any car of the tenth VAZ family, you will need to relieve the pressure in the fuel system. Removing any element that is under pressure in any way can result in personal injury.
How to get rid of excess fuel
To relieve the existing fuel pressure, you need to turn off the fuel pump and exhaust the remaining gasoline:
- Fold down the cushion from the back row of seats.
- Below it is the fuel tank hatch.
- Unscrew the screws securing the hatch.
- Disconnect the wiring harness from the pump housing (the wires supply power).
After this, start the engine and wait until it stalls. It is recommended to turn the ignition on several times to ensure that there is no gasoline left in the system.
Next, you can begin to remove the injectors. It is recommended to prepare the necessary tools in advance:
- open-end wrench 17;
- a flat screwdriver with a narrow blade;
- Phillips screwdriver;
- hex key 6;
- rags.
All elements of the repair kit are usually at hand for any driver
How to remove parts from the engine
- Remove the air filter box (it will interfere with free access to the engine).
- Remove the wiring harnesses from the injectors.
- Then you will need to disconnect the wires from the idle speed control and from the throttle sensor.
- Next, remove the vacuum seal from the pressure regulator (it has a white braid).
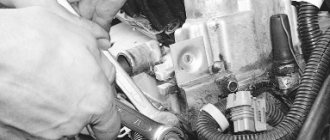
- Using a 17 key, unscrew the bolts that secure the fuel frame to the body. To make it more convenient, you can remove the gas cable.
- It is better to unscrew the fasteners of the plate with which the ramp is pressed using a hexagon.
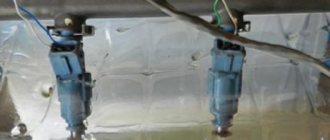
- The fuel rail must be removed very carefully, with the nozzles facing up.
- On a 16-valve engine, dismantling will take longer, since the ramp has a more complex structure and several types of fasteners.
- Next, you can remove the injectors themselves - to do this, disconnect the fastening brackets of the electrical connector with your finger, and then the injector bracket. During removal, gasoline may leak; it is recommended to place a cloth under the ramp.
To install a new injector, the socket is first thoroughly cleaned of dirt and fuel, and only then can the product be screwed in. It is better to drop a few drops of gasoline onto the rubber ring before installation - this will make the nozzle fit into the mounting hole more easily. All work is then carried out in reverse order.
Repair of injectors VAZ 2110–2112
Repairing injectors means cleaning the product and replacing the O-rings. Simple measures to restore the functionality of the injectors can significantly increase the car’s power and make cold starts easier. Injector repair is possible in the following cases:
- there are no visible deformations on the body;
- the nozzle has not yet exhausted its service life;
- the car owner wants to optimize the operation of the power unit.
In all other cases (cracks and deformations, long service life), it is recommended to replace the nozzles with new ones.
How to blow out and clean oil molds
On cars of the tenth family, injector cleaning may be necessary after 40–50 thousand kilometers. In this case, it is best to carry out the procedure yourself, since you can always observe for yourself the true condition of the motor and its elements, and also save a significant amount on service station services.
Many drivers prefer to use the simplest method of cleaning injectors - fuel additives. Special liquids, along with gasoline, are poured into the tank and pass through all elements of the fuel system, cleaning them. This measure is justified for new cars in which the degree of pollution is at a minimum level. But additives will not be able to properly clean injectors and other elements of the system.
Video: a simple way to clean injectors using a repair kit
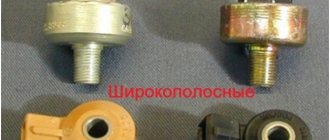
Where and what seals to buy
When purchasing a new nozzle, its kit always includes additional elements: a mesh filter, a set of necessary O-rings, rubber mounting sleeves, and plastic plugs.
Auto parts stores sell rings:
- piece by piece;
- repair kit for one injector (lower and upper);
- repair kit for the engine (the number of cylinders is taken into account).
The color of rubber O-rings can be any color and has nothing to do with size or quality.
Copper washers are sold in sets of several pieces.
Bosch injectors of various modifications are used on domestic and imported cars. Since the 90s, they have been unified, including by seat, and allow everyone to use the same O-ring.
If it is impossible to purchase original rings for rare or old foreign cars, replacements can be selected from seals from domestic engines.
Procedure for cleaning and replacing rubber seals
It is best to remove the injectors from the fuel rail and blow and clean each of them, and at the same time inspect them for wear on the rings. This method has a huge advantage over using an additive, since you can visually check how well the restoration work was carried out.
What tool can you use to make repairs?
To dismantle and replace seals you will need:
- diamond key 8;
- carburetor cleaner;
- a can of compressed air;
- rubber hose (you can use a vacuum cleaner);
- syringe with outlet diameter 10 mm;
- wire approximately 2 meters long;
- standard set of rings for injectors (includes eight products);
- rubber seals for fuel lines.
The repair and cleaning process is as follows:
- Remove the rubber seal from the nozzle.
- Place the rubber hose on the tail part of the nozzle.
- Connect the wire to the battery (you can choose any terminal).
- On the reverse side of the hose, connect an aerosol tube through a syringe to flush the carburetor.
- Holding the entire structure with your hands, spray the cleaner several times until the jets emitted become uniform.
- After cleaning, it is recommended to use the same principle to blow out the injectors with air from a can.
- Next, it is recommended to immediately put new rings on the product, after moistening them with gasoline.
In the photo the nozzle is in critical condition
The injector repair procedure can be considered accessible to beginners and inexperienced drivers. The only difficulty is dismantling the fuel rail, since you will have to first relieve the pressure in the system. Cleaning and replacing the rings on the injectors with your own hands gives the driver the opportunity to carry out the highest quality repairs of these elements and be confident that repeating the procedure will not be necessary for a long time.
Useful video
You can get more information on this topic by watching the video below:
Good day to all! In winter I encountered a problem when gasoline began to drip a little from under the injectors straight onto the exhaust manifold. After this it all evaporates and the smell of gasoline enters the cabin. Yes, and I think when gasoline gets into the hot exhaust it’s not entirely fire safe. I had some free time and decided to replace the O-rings on the injectors, and at the same time wash them with KARP. I found what and how to remove and disassemble on the Internet, but I won’t go into detail, there are a lot of different explanatory videos and video instructions on YouTube.
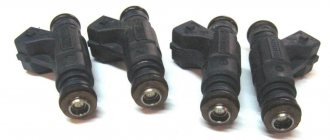
I changed all the O-rings at once, both top and bottom. Only 8 pieces.
My only advice to you: When unscrewing the fuel rail mounting bolts (there are 2 of them), those with a hex head, be very careful) On one, the internal thread was torn off and I had to suffer for a long time to unscrew it from there, you can see in the photo.
I assembled a system of two wires, a syringe (the diameter of which matched the nozzle), a can of KARP and a button on the “+” wire so that when clamped (or reversed) the circuit is closed. Minus directly to the injector, and plus through the button also to the injector.
I rinsed it until it sprayed completely so that all 4 nozzles let liquid through. I washed the fuel rail, assembled everything and put it in place.
Injectors for VAZ 2110–2112 cars
Cars of the “tenth” family are equipped with various injection engines, each of which is designed to work with a specific model of injectors. Despite the fact that they have their own “names,” motorists usually use a “folk” classification based on color and thickness. For example: black thin ones.
This simplification usually works, but does not fully guarantee the compatibility of the injector with the engine. To avoid having to contact the chip tuner once again to correct the firmware of the electronic injection control unit, check the part number before purchasing.
Table: compatibility of injectors and engines of VAZ 2110–2112 cars
| Engine | Volume (l) | Number of valves | Controller (ECU) | Firmware | Injectors | |
| Siemens | Bosch | |||||
| VAZ-2111 | 1,5 | 8 | M1.5.4 | January-5.1 | VAZ6238 (thick gray) | 0 280 150 996 (turquoise thick) |
| VAZ-2111 | 1,5 | 8 | M7.9.7 | January-7.2 | VAZ6393 (beige thick) | 0 280 158 502 (black thin) |
| VAZ-21114 | 1,6 | 8 | M7.9.7 | January-7.2 | VAZ20734 (orange thin) VAZ20734 (yellow thick) | 0 280 158 017 (black thin) |
| VAZ-2112 | 1,5 | 16 | M1.5.4 | January-5.1 | VAZ6238 (thick gray) | 0 280 150 996 (turquoise thick) |
| VAZ-21124 | 1,6 | 16 | M7.9.7 | January-7.2 | VAZ20735 (blue thin) VAZ20735 (pink thick) | 0 280 158 022 (black thin) |
Photo gallery: injectors for VAZ 2110–2112 cars
Differences between injectors for eight and sixteen valve engines
Among some motorists there is an opinion that the injectors for the “ten” differ depending on the number of engine valves. Others believe that the determining factor is the volume of the cylinders.
Clogged injectors can cause the car to jerk when driving. Details: https://vazweb.ru/desyatka/pitanie/dergaetsya-pri-dvizhenii.html
In reality, neither one nor the other is wrong. The parts must match the engine design, model and firmware of the electronic control unit.
When replacing, it is best to install the same ones that were installed previously. Otherwise, there may be difficulties with startup and operation in transient conditions. To eliminate the shortcomings, you will have to adjust the firmware, which is almost impossible in a garage environment.
In-cylinder fuel injection has been known since the very dawn of the automobile industry. In the early 1890s, the German Rudolf Diesel and the Englishman Herbert Ackroyd-Stewart secured the rights to their own designs for an internal combustion engine running on fuel oil.
Vladimir Bekrenev
bvy.su
Why did it happen so?
Perhaps the automatic requests do not belong to you, but to another user accessing the network from the same IP address as you. You need to enter the characters into the form once, after which we will remember you and be able to distinguish you from other users exiting from this IP. In this case, the page with the captcha will not bother you for quite a long time.
You may have add-ons installed in your browser that can make automatic search requests. In this case, we recommend that you disable them.
It is also possible that your computer is infected with a virus program that is using it to collect information. Maybe you should check your system for viruses.
If you have any problems or would like our support team, please use the feedback form.
Note! Photos are for illustrative purposes only and may differ from the actual product in stock. If you are interested in any specific characteristics (color, shape, size, compliance with the product in the warehouse, etc.), please clarify this information with the managers when agreeing on the order
.
You can buy “Injector O-ring (BLUE SILICONE; K-KT of 8 PIECES) dv.406,405,4216; VAZ 2110-15.2170* / 2111-1132188 (BLUE SILICONE) / 24907"
online right now. To do this, simply add the item to your cart or use the “one-click order” option.
At TC “Baza Everything for UAZ” you will always find competitive prices, optimal delivery times and the widest range.
You can ask our manager any questions about the store’s operation and delivery times for out-of-stock goods by phone: 8-800-700-9-554 or through the feedback form.
O-ring for injector (BLUE SILICONE; K-KT of 8 PIECES) dv.406,405,4216; VAZ 2110-15.2170* / 2111-1132188 (BLUE SILICONE) is available in our online store or will be promptly delivered to order. We deliver to Russia. Order or buy injector O-ring (BLUE SILICONE; K-KT of 8 PIECES) dv.406,405,4216; VAZ 2110-15.2170* / 2111-1132188 (BLUE SILICONE) is available right now on our website.
You must be logged in to the site to leave a question about a product.
Source
Repair
Before removing the injectors from the dismantled rack, it is advisable to check their functionality. To check you will need:
- four identical containers,
- tester,
- wires.
Functionality check
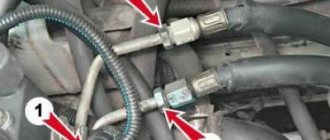
- Connect the gasoline supply and drain hoses and the power connector to the rail with injectors.
- Place the rack over the measuring cups.
Place the rack over the measuring cups
The shape of the cloud should be approximately the same for all nozzles
After the war, Germany received a ban on the development of injectors for aircraft engines. And engineers began adapting direct injection systems for passenger cars, discovering another important advantage compared to carburetors - efficiency.
Vladimir Berestenev